
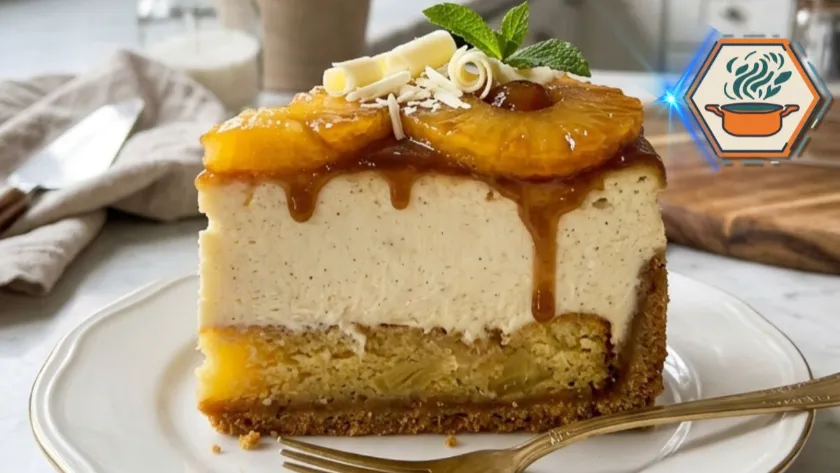
There is something special about desserts that bring together two timeless favorites into one unforgettable creation. The first bite of a Pineapple Right Side Up Cheesecake delivers buttery caramelized pineapple, silky vanilla cheesecake, and a tender cake layer that melts in your mouth. It is the kind of dessert that immediately reminds people of family celebrations, summer cookouts, Easter brunches, and holiday gatherings.
Inspired by the classic pineapple upside-down cake, this bakery-style version keeps the pineapple beautifully displayed on top while adding a rich cheesecake center and a soft golden cake base. The result is a stunning dessert that looks impressive but can easily be made at home with the right techniques.
Whether you’re baking for guests or simply treating your family, this recipe will help you achieve clean layers, rich flavor, and beautiful presentation every time.
JUMP TO
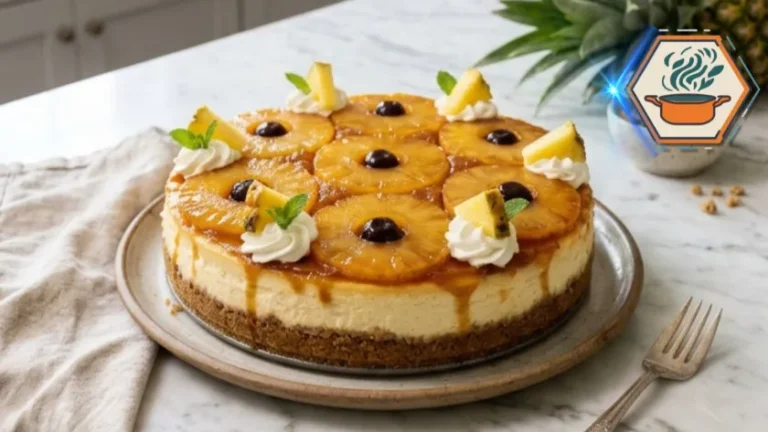
Pineapple Right Side Up Cheesecake
Description: A bakery-style Pineapple Right Side Up Cheesecake made with caramelized pineapple rings, creamy vanilla cheesecake, moist golden cake, and a buttery graham cracker crust. Perfect for holidays, Easter, summer parties, and family desserts.
- Total Time: 3 hours 20 minutes
- Yield: 12 slices
Ingredients
Crust:
– 2 cups graham cracker crumbs
– 1/2 cup unsalted butter, melted
– 2 tablespoons brown sugar
– 1/4 teaspoon salt
Pineapple Layer:
– 1 can pineapple rings, drained and patted dry
– 1/4 cup unsalted butter, melted
– 1/2 cup light brown sugar
Cheesecake Layer:
– 8 ounces full-fat cream cheese, softened
– 1/2 cup granulated sugar
– 1 large egg, room temperature
– 1 teaspoon vanilla extract
– 2 tablespoons sour cream
Cake Layer:
– 1 box yellow cake mix
– 3 large eggs
– 1/2 cup vegetable oil
– 1 cup pineapple juice
Decoration:
– Whipped cream
– Pineapple wedges
– White chocolate curls
Instructions
1. Preheat oven to 350°F / 175°C.
2. Grease a 9-inch springform pan and line the bottom with parchment paper.
3. Wrap the outside of the pan with two layers of foil to prevent leaks.
4. Mix graham cracker crumbs, melted butter, brown sugar, and salt.
5. Press the crust mixture firmly into the bottom of the pan.
6. Bake the crust for 8 minutes, then let it cool.
7. Pour melted butter over the cooled crust.
8. Sprinkle brown sugar evenly over the butter.
9. Pat pineapple rings dry, then arrange them over the sugar.
10. Beat cream cheese until smooth.
11. Add sugar and mix until creamy.
12. Add egg, vanilla, and sour cream. Mix just until smooth.
13. Spread cheesecake mixture carefully over the pineapple layer.
14. In another bowl, mix cake mix, eggs, oil, and pineapple juice until combined.
15. Pour cake batter gently over the cheesecake layer.
16. Bake for 50 to 55 minutes.
17. Cool in the pan for 1 hour at room temperature.
18. Refrigerate for at least 2 hours, preferably overnight.
19. Release the springform ring carefully.
20. Decorate with whipped cream, pineapple wedges, and white chocolate curls.
21. Slice with a warm clean knife and serve chilled.
Notes
Pat the pineapple rings very dry before layering. This helps the brown sugar caramelize and prevents excess liquid.
For clean bakery-style slices, chill the cheesecake overnight and wipe the knife clean between each cut.
Do not skip the crust. It gives the dessert structure and creates the same bakery-style look as the photo.
- Prep Time: 25 minutes
- Cook Time: 55 minutes
- Category: Dessert
- Method: Baking
- Cuisine: American / Southern-Inspired
Why You’ll Love This Recipe
This dessert combines three delicious layers into one showstopping cake.
- Rich vanilla cheesecake
- Caramelized pineapple topping
- Moist yellow cake
- Buttery graham cracker crust
- Perfect for holidays and birthdays
- Beginner-friendly recipe
- Bakery-quality appearance
- Easy to prepare ahead of time
Unlike many recipes online, this version includes a real cheesecake crust, detailed baking instructions, and professional tips that guarantee consistent results.
Ingredients
Graham Cracker Crust
The original recipe skips the crust, but adding one creates the bakery-style appearance shown in the photo while giving every slice more structure.
You’ll need:
- 2 cups graham cracker crumbs
- ½ cup melted unsalted butter
- 2 tablespoons brown sugar
- Pinch of salt
Pineapple Layer
- 1 can pineapple rings, well drained
- ¼ cup melted butter
- ½ cup light brown sugar
Cheesecake Filling
- 8 ounces full-fat cream cheese, softened
- ½ cup granulated sugar
- 1 large egg
- 1 teaspoon vanilla extract
- 2 tablespoons sour cream (recommended for extra creaminess)
Cake Layer
- 1 box yellow cake mix
- 3 large eggs
- ½ cup vegetable oil
- 1 cup pineapple juice
Decoration
- Whipped cream
- Pineapple wedges
- White chocolate curls
Equipment You’ll Need
- 9-inch springform pan
- Mixing bowls
- Electric mixer
- Silicone spatula
- Cooling rack
- Measuring cups and spoons
- Parchment paper
A springform pan is highly recommended because it makes unmolding much easier while preserving the beautiful layers.
Step-by-Step Instructions
Step 1: Prepare the Pan
Preheat your oven to 350°F (175°C).
Grease the springform pan with butter and line the bottom with parchment paper.
Wrap the outside of the pan with two layers of aluminum foil. Although this recipe doesn’t require a water bath, the foil helps prevent melted butter from leaking during baking.
Step 2: Make the Graham Cracker Crust
Mix together the graham cracker crumbs, brown sugar, salt, and melted butter until the mixture resembles wet sand.
Press firmly into the bottom of the prepared pan using the bottom of a measuring cup.
Bake for 8 minutes.
Allow the crust to cool completely before adding the remaining layers.
This simple step creates a firmer base that prevents the cake from breaking when sliced.
Step 3: Prepare the Pineapple Layer
Pat every pineapple ring completely dry using paper towels.
Removing excess moisture is essential. Too much liquid can prevent proper caramelization and make the cheesecake watery.
Pour the melted butter over the cooled crust.
Sprinkle the brown sugar evenly.
Arrange the pineapple rings in a decorative pattern.
Step 4: Make the Cheesecake Filling
Beat the softened cream cheese until completely smooth.
Add the sugar and continue mixing until creamy.
Mix in:
- Egg
- Vanilla extract
- Sour cream
Avoid overmixing after adding the egg. Too much air may cause cracks during baking.
Carefully spread the cheesecake filling over the pineapple layer using an offset spatula.
Step 5: Prepare the Cake Batter
Combine:
- Cake mix
- Eggs
- Vegetable oil
- Pineapple juice
Mix just until combined.
Do not overbeat.
Pour the batter slowly over the cheesecake layer.
Spread gently without disturbing the cheesecake underneath.
Step 6: Bake
Bake for 50 to 55 minutes.
The cake is done when:
- the edges are lightly golden,
- the cake springs back when gently pressed,
- the cheesecake center has a slight jiggle,
- an instant-read thermometer inserted into the cheesecake reads about 150–155°F (65–68°C).
If the top browns too quickly, loosely cover with aluminum foil during the final 15 minutes.
Step 7: Cool Properly
Cooling is just as important as baking.
Allow the cheesecake to cool in the pan for one hour at room temperature.
Transfer it to the refrigerator for at least 2 hours, although overnight chilling produces the cleanest slices.
Never attempt to remove the springform ring while the cheesecake is still warm.
Step 8: Decorate
Before serving, decorate with:
- whipped cream swirls,
- fresh pineapple wedges,
- white chocolate curls.
The decorations add contrast while maintaining the elegant bakery appearance.
Expert Baking Tips
Professional bakers rely on small details that make a huge difference.
Always use room-temperature ingredients
Cold cream cheese creates lumps that are difficult to remove.
Take the cream cheese, eggs, and sour cream out of the refrigerator about 30 to 45 minutes before mixing.
Dry the pineapple thoroughly
This may be the most overlooked step.
Excess moisture prevents caramelization and can create soggy layers.
Press the crust firmly
A loose crust falls apart during slicing.
Using the bottom of a glass or measuring cup creates a compact, even layer.
Chill overnight when possible
Although two hours is enough, overnight refrigeration allows the cheesecake to fully set and develop richer flavor.
Use a warm knife
For bakery-style slices:
- dip the knife into hot water,
- wipe it dry,
- cut,
- repeat after every slice.
The layers will remain neat and beautiful.
Common Mistakes to Avoid
Even experienced bakers make these mistakes.
Using cold cream cheese
This creates lumps throughout the filling.
Skipping the crust
Without the crust, the dessert loses stability and doesn’t resemble the bakery-style version.
Using wet pineapple
Extra juice prevents the brown sugar from caramelizing properly.
Overmixing the cheesecake
Too much air causes cracks during baking.
Cutting too early
Warm cheesecake has not fully set.
Patience makes a noticeable difference.
Storage Instructions
Store leftovers covered in the refrigerator for up to 5 days.
For longer storage, freeze individual slices.
Wrap each slice tightly in plastic wrap followed by aluminum foil.
Freeze for up to 2 months.
Thaw overnight in the refrigerator before serving.
Avoid microwaving the cheesecake, as this softens the crust and affects the texture.
Frequently Asked Questions
Can I use fresh pineapple?
Yes. Slice fresh pineapple into rings and pat them completely dry before using.
Can I make this recipe ahead?
Absolutely.
In fact, the flavor and texture improve after chilling overnight.
Can I use homemade cake batter?
Yes.
A homemade yellow butter cake works wonderfully and gives the dessert an even richer flavor.
Why did my cheesecake crack?
Cracks usually happen because of overmixing, overbaking, or cooling too quickly.
Following the cooling instructions carefully greatly reduces this risk.
Can I freeze the whole cheesecake?
Yes.
Wrap the chilled cheesecake tightly in plastic wrap followed by foil and freeze for up to two months.
Final Thoughts
This Pineapple Right Side Up Cheesecake transforms two beloved desserts into one spectacular centerpiece. The buttery graham cracker crust, caramelized pineapple topping, creamy cheesecake filling, and tender cake layer create a combination of textures and flavors that feels both nostalgic and elegant.
By taking a few extra steps—such as drying the pineapple thoroughly, using room-temperature ingredients, baking the crust first, and allowing enough chilling time—you can achieve beautiful bakery-style layers that slice cleanly and impress every guest. Whether you’re preparing it for Easter, a summer barbecue, a birthday, or a holiday table, this tropical dessert is guaranteed to become a family favorite that everyone requests again and again.