
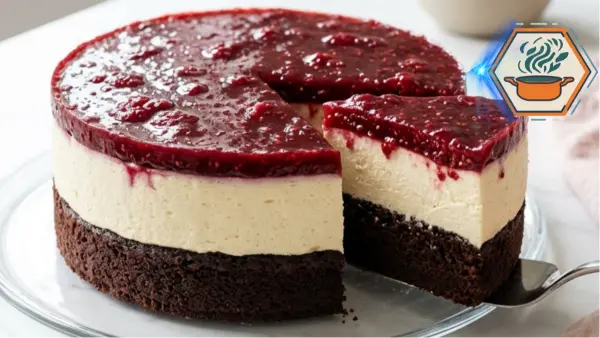
There is something especially satisfying about cutting into a dessert and seeing three beautiful layers appear beneath the knife. This Chocolate Raspberry Cream Layer Cake is exactly that kind of dessert. At first glance, the glossy raspberry topping gets all the attention. Then you cut a slice and discover a thick vanilla cream layer resting over a soft, dark chocolate cake.
It looks impressive enough for a celebration, but there is nothing unnecessarily complicated about the way it comes together.
The chocolate cake provides a rich but not overly heavy foundation. The vanilla cream is cool, smooth, and lightly tangy from cream cheese, while the raspberry topping brings enough brightness to balance everything underneath it.
The key to getting those distinctive layers is not advanced decorating skill. It is patience.
Each component needs enough time to cool or chill before the next one is added. Follow that simple rule and you can create the clean chocolate, cream, and raspberry layers that make this cake so striking.
Affiliate disclosure: As an Amazon Associate I earn from qualifying purchases. This article may contain affiliate links to kitchen tools I find useful for preparing this recipe.
JUMP TO
Chocolate Raspberry Cream Layer Cake
A stunning chilled Chocolate Raspberry Cream Layer Cake with a moist chocolate cake base, a thick and fluffy vanilla cream cheese layer, and a glossy homemade raspberry topping filled with real berry pieces.
- Total Time: 7 hours 45 minutes
- Yield: 12 slices
Ingredients
Chocolate Cake Base
- 1 cup (120 g) all-purpose flour
- 1/3 cup (28 g) unsweetened cocoa powder
- 1 teaspoon baking powder
- 1/4 teaspoon fine salt
- 2 large eggs, room temperature
- 1/2 cup (100 g) granulated sugar
- 1/3 cup (70 g) packed light brown sugar
- 1/2 cup (120 ml) whole milk, room temperature
- 1/3 cup (80 ml) vegetable oil
- 1 teaspoon vanilla extract
Vanilla Cream Layer
- 8 oz (226 g) full-fat block cream cheese, softened
- 1/3 cup (40 g) powdered sugar
- 1 teaspoon vanilla extract
- 1 1/2 cups (360 ml) cold heavy whipping cream
Raspberry Topping
- 3 cups (about 370 g) fresh or frozen raspberries
- 1/2 cup (100 g) granulated sugar
- 1 tablespoon fresh lemon juice
- 2 tablespoons (16 g) cornstarch
- 3 tablespoons (45 ml) cold water
Instructions
1. Prepare the pan.
Preheat the oven to 350°F (175°C). Lightly grease a 9-inch springform pan and line the bottom with parchment paper.
2. Combine the dry ingredients.
In a medium bowl, whisk together the flour, cocoa powder, baking powder, and salt until evenly combined.
3. Mix the wet ingredients.
In a large bowl, whisk the eggs, granulated sugar, and brown sugar for about 1 minute. Add the milk, vegetable oil, and vanilla and whisk until smooth.
4. Finish the batter.
Add the dry ingredients to the wet mixture and fold gently just until no dry flour remains. Do not overmix.
5. Bake.
Pour the batter into the prepared pan and level the surface. Bake for 20–25 minutes, until a toothpick inserted into the center comes out with a few moist crumbs but no wet batter.
6. Cool completely.
Place the pan on a wire rack and allow the chocolate cake to cool completely without removing it from the springform pan. If the cake has a pronounced dome, carefully level it once completely cool.
7. Cook the raspberries.
Place raspberries, sugar, and lemon juice in a saucepan. Cook over medium heat for 4–5 minutes, stirring gently. Allow some berries to break down while leaving plenty of visible pieces.
8. Thicken the topping.
Mix the cornstarch with 3 tablespoons cold water until completely smooth. Stir it into the raspberry mixture and cook for another 1–2 minutes, stirring frequently, until thick and glossy. Transfer to a bowl and cool completely.
9. Prepare the cream.
Beat softened cream cheese, powdered sugar, and vanilla until completely smooth.
10. Whip the cream.
In a separate clean bowl, whip the cold heavy cream until stiff peaks form. Do not overwhip.
11. Combine.
Gently fold the whipped cream into the cream cheese mixture in three additions until fluffy, thick, and uniform.
12. Build the cream layer.
Leave the cooled chocolate cake inside the springform ring. Spread the vanilla cream evenly over the cake, taking it all the way to the edges and smoothing the surface.
13. First chill.
Refrigerate for 30–45 minutes so the cream begins to firm.
14. Add the raspberry layer.
Make absolutely sure the raspberry mixture is completely cold. Spoon it gently over the chilled cream and spread without pressing down heavily. Keep some visible berry texture rather than making the surface perfectly smooth.
15. Final chill.
Cover without touching the topping and refrigerate for at least 6 hours, preferably overnight.
16. Unmold and serve.
Carefully run a thin knife around the edge if necessary, release the springform ring, and slice with a clean sharp knife. For clean layers, warm the knife in hot water, dry it thoroughly, and wipe it clean between every cut.
Notes
- Full-fat block cream cheese provides better structure than spreadable tub cream cheese.
- Heavy whipping cream must be cold before whipping.
- The chocolate cake must be completely cool before adding the cream.
- The raspberry topping must be completely cold before it touches the vanilla layer.
- Do not puree or crush all the raspberries. Visible berry pieces and seeds create the homemade appearance shown in the finished cake.
- Overnight chilling is strongly recommended for clean slices.
- Keep refrigerated and consume within 3–4 days.
- Frozen raspberries can be cooked directly from frozen; allow slightly more cooking time if necessary.
- Results can vary slightly depending on ingredients, pan, oven, and chilling time.
- Prep Time: 35 minutes
- Additional/Chilling Time: 6 hours 45 minutes
- Cook Time: 25 minutes
- Category: Dessert
- Method: Baking and Chilling
- Cuisine: American-Inspired
Why You’ll Love This Chocolate Raspberry Cream Layer Cake
Chocolate and raspberries naturally work well together because they provide contrast. Cocoa brings deep, slightly bitter notes, while raspberries add sweetness and acidity.
The thick vanilla cream between them makes the combination even better. Instead of having raspberry topping directly against chocolate cake, you get a cool and creamy middle layer that softens both flavors.
This cake is also convenient for entertaining because it actually benefits from being made ahead. Once assembled, it needs several hours in the refrigerator to become firm enough for neat slices. Preparing it the night before serving is therefore ideal.
Another advantage is that the decoration happens naturally. You don’t need piping techniques or complicated garnishes. The ruby-red raspberry layer is already the centerpiece.
The Three Layers That Make This Cake Special
Although the finished dessert looks elaborate, it can be understood as three straightforward recipes assembled in one springform pan.
Moist Chocolate Cake Base
The bottom isn’t a cookie crust or brownie crust. It is a genuine chocolate cake layer.
Cocoa powder provides the chocolate flavor, while vegetable oil helps the cake remain tender even after several hours in the refrigerator. That matters because butter-based cakes can become noticeably firmer when chilled.
The cake needs enough structure to carry the substantial cream and fruit layers, so avoid deliberately underbaking it. A toothpick inserted near the center should emerge with a few moist crumbs rather than wet batter.
Thick Vanilla Cream Layer
The middle should be noticeably thick, smooth, and pale.
Cream cheese gives it stability and a slight tang, while whipped heavy cream makes it considerably lighter than cheesecake filling. The result sits somewhere between cheesecake cream and a stabilized whipped filling.
For the best texture, soften the cream cheese before mixing it, but keep the heavy whipping cream very cold.
This difference is important. Soft cream cheese blends smoothly without lumps, while cold heavy cream whips more reliably.
Chunky Raspberry Topping
The top layer shouldn’t look like perfectly smooth raspberry jelly.
One of the best parts of this dessert is seeing the natural berry texture, seeds, and small pieces of raspberry across the surface.
Fresh raspberries are excellent when available, but frozen raspberries also work. There is no need to thaw frozen berries before cooking, although they may require another minute or two to release their liquid.
Cornstarch thickens the fruit mixture enough to remain on top of the cream rather than running down the sides after the springform ring is removed.
Ingredients You’ll Need
For the Chocolate Cake
- 1 cup all-purpose flour
- 1/3 cup unsweetened cocoa powder
- 1 teaspoon baking powder
- 1/4 teaspoon fine salt
- 2 large eggs, at room temperature
- 1/2 cup granulated sugar
- 1/3 cup packed light brown sugar
- 1/2 cup whole milk, at room temperature
- 1/3 cup vegetable oil
- 1 teaspoon vanilla extract
For the Vanilla Cream
- 8 ounces full-fat block cream cheese, softened
- 1/3 cup powdered sugar
- 1 teaspoon vanilla extract
- 1 1/2 cups cold heavy whipping cream
For the Raspberry Topping
- 3 cups fresh or frozen raspberries
- 1/2 cup granulated sugar
- 1 tablespoon fresh lemon juice
- 2 tablespoons cornstarch
- 3 tablespoons cold water
Using full-fat block cream cheese is recommended because it provides a firmer filling. Spreadable cream cheese sold in tubs generally contains more moisture and can leave the cream layer softer than intended.
How to Make Chocolate Raspberry Cream Layer Cake
1. Prepare the Pan and Oven
Preheat the oven to 350°F (175°C).
Use a 9-inch springform pan so the finished chilled cake can be released without turning it upside down. A sturdy springform pan with a tight-fitting removable ring is especially helpful for keeping the cream and raspberry layers neat as the cake chills.
Lightly grease the bottom and sides. Place a circle of parchment paper over the bottom of the pan.
The springform ring will later act as a mold for the cream and raspberry layers, so don’t remove the chocolate cake from it after baking.
2. Mix the Chocolate Cake Batter
In a medium bowl, whisk together the flour, cocoa powder, baking powder, and salt until evenly combined.
In a separate large bowl, whisk the eggs, granulated sugar, and brown sugar for about one minute. Add the milk, vegetable oil, and vanilla and whisk until smooth.
Add the dry ingredients to the wet ingredients.
Fold gently with a spatula just until no obvious pockets of dry flour remain. Avoid prolonged mixing once the flour has been incorporated because excessive mixing can make the cake denser.
3. Bake the Chocolate Layer
Pour the batter into the prepared springform pan and spread it evenly.
Bake for approximately 20 to 25 minutes.
Start checking near the 20-minute mark. A toothpick inserted into the center should come out with a few moist crumbs but no liquid batter.
Set the entire pan on a cooling rack.
Allow the chocolate cake to cool completely inside the springform pan. This is essential. Adding cream to a warm cake could melt the filling and prevent distinct layers from forming.
If the cake has developed a pronounced dome, you can carefully trim just enough from the top to create a relatively level surface once it is completely cool.
Make the Raspberry Topping
While the chocolate cake cools, prepare the fruit layer.
Place the raspberries, granulated sugar, and lemon juice in a medium saucepan.
Cook over medium heat for approximately 4 to 5 minutes, stirring gently. The raspberries should begin releasing plenty of juice, but don’t aggressively crush every berry.
You want visible raspberry pieces in the finished topping.
In a small bowl, stir the cornstarch and cold water together until completely smooth.
Pour the slurry into the simmering raspberry mixture while stirring. Continue cooking for another 1 to 2 minutes, stirring frequently, until the mixture becomes thick and glossy.
Remove it from the heat.
Transfer the raspberry mixture to a clean bowl to help it cool faster. Let it reach room temperature, then refrigerate if necessary until completely cool.
Never spoon warm raspberry topping over the cream layer. Heat can soften the cream and cause the red fruit mixture to bleed deeply into the white layer.
Prepare the Vanilla Cream
Place the softened cream cheese, powdered sugar, and vanilla in a large bowl.
Beat until completely smooth and creamy, scraping the sides and bottom of the bowl when necessary.
In another clean bowl, whip the cold heavy whipping cream until stiff peaks form. Stop once the cream holds its shape firmly. Overwhipping can make it grainy.
Add approximately one-third of the whipped cream to the cream cheese mixture and gently fold it in. Continue with the remaining whipped cream in two additions.
Fold rather than vigorously beating the mixture so you preserve as much air as possible.
The finished filling should be thick, fluffy, and able to hold its shape.
Assemble the Cake
Make sure the chocolate cake is completely cool and still sitting inside the springform ring.
If desired, run a clean strip of food-safe acetate around the inside edge of the pan before adding the cream. This is optional, but it can produce especially clean sides when the cake is unmolded.
Spoon the vanilla cream over the chocolate cake.
Use a small offset spatula or the back of a spoon to spread the cream into an even layer, taking it all the way to the sides. An offset spatula makes it particularly easy to create the smooth, level cream layer that gives this cake its clean three-layer appearance.
Smooth the surface because this becomes the foundation for the raspberry topping.
Refrigerate for approximately 30 to 45 minutes before adding the fruit. This short chilling period helps the cream become slightly firmer.
Check that the raspberry mixture is completely cold.
Spoon it carefully over the chilled vanilla cream and gently spread it toward the edges. Avoid pressing aggressively into the cream beneath it.
The raspberry topping should remain textured and visibly filled with fruit rather than becoming a perfectly smooth red sheet.
Give the Cake Enough Time to Set
This step makes an enormous difference.
Cover the springform pan without allowing plastic wrap to touch the raspberry surface and refrigerate the assembled cake for at least 6 hours.
For the cleanest layers and easiest slicing, refrigerate it overnight.
The chilling period gives the cream time to become firm and allows the raspberry topping to fully set.
Trying to remove the springform ring after only an hour or two can result in softer sides and less defined slices.
How to Remove the Springform Pan Cleanly
When you’re ready to serve the cake, remove it from the refrigerator.
If you didn’t use acetate, carefully run a thin knife around the inside edge of the springform pan. Keep the blade close to the metal so you don’t remove chunks from the cake.
Unlock and slowly lift away the ring.
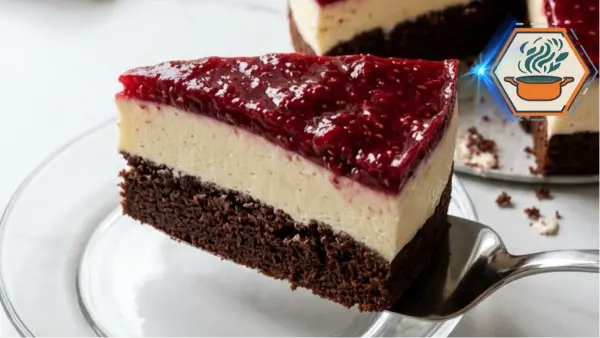
The finished dessert should reveal three clearly recognizable layers: dark chocolate cake on the bottom, a generous pale vanilla cream center, and glossy raspberry topping above it.
How to Get Beautiful Slices
Use a long, thin, sharp knife.
Dip the blade into hot water, wipe it completely dry, and make one clean downward cut.
Wipe the knife after every slice.
Once the slice is separated cleanly, a thin stainless steel cake server makes it easier to lift the tall three-layer portion without crushing the chocolate base or disturbing the soft cream center.
It may sound like a small detail, but it prevents raspberry topping and chocolate crumbs from being dragged through the pale cream layer.
Serve the cake cold rather than allowing it to sit at room temperature for a long period.
Fresh vs. Frozen Raspberries
Both work well.
Fresh raspberries tend to maintain slightly more recognizable berry pieces. Frozen berries often release more liquid as they cook, but the cornstarch handles that additional moisture.
If using frozen berries, cook them directly from frozen and allow a little additional cooking time if necessary.
What matters most is the final consistency.
Before cooling, the topping should look thick and glossy and should coat a spoon rather than behave like raspberry juice.
Common Mistakes to Avoid
Adding Warm Raspberry Topping
This is probably the most important mistake to avoid. Warm fruit can soften the cream underneath and create messy layers.
Cool the raspberry mixture completely.
Using Warm Cream Cheese and Warm Heavy Cream
The ingredients need different treatment.
Cream cheese should be softened enough to beat smoothly. Heavy whipping cream should remain cold so it reaches stiff peaks.
Removing the Cake Too Early
The refrigerator is doing part of the work for you. Give the dessert at least six hours to set and preferably leave it overnight.
Crushing Every Raspberry
Some berries will naturally break down while cooking, but keeping visible fruit pieces gives the topping its appealing homemade texture.
Using Tub-Style Cream Cheese
Choose full-fat block cream cheese whenever possible. Its lower moisture content makes the middle layer more stable.
Make-Ahead and Storage Tips
This Chocolate Raspberry Cream Layer Cake is an excellent make-ahead dessert.
For the easiest schedule, bake the chocolate layer and prepare the raspberry topping earlier in the day. Once both are completely cool, make the vanilla cream and assemble the cake.
Refrigerate it overnight and serve it the following day.
Keep leftovers covered in the refrigerator. Because the cake contains whipped cream and cream cheese, it should not be stored at room temperature.
For the best texture and appearance, enjoy it within 3 to 4 days.
What to Serve With This Cake
This dessert already contains plenty of flavor, so it doesn’t need elaborate accompaniments.
A cup of hot coffee works particularly well with the chocolate and raspberry combination. Unsweetened tea is another good choice if you want something lighter.
You can also serve a few fresh raspberries alongside each slice, but additional decorations aren’t necessary. The naturally glossy berry surface and dramatic three-layer interior already give the cake its finished appearance.
Frequently Asked Questions
Can I make Chocolate Raspberry Cream Layer Cake the day before?
Yes. In fact, making it the day before is recommended. Overnight refrigeration gives the cream and raspberry layers enough time to become properly firm.
Can I use frozen raspberries?
Yes. Fresh or frozen raspberries work. Frozen berries may release more liquid and can take slightly longer to cook.
Why is my raspberry topping runny?
The fruit may not have cooked long enough after adding the cornstarch slurry. Once the slurry is incorporated, allow the mixture to gently cook until visibly thickened and glossy.
Why did the raspberry layer bleed into the cream?
The raspberry topping was likely still warm or the cream hadn’t chilled enough. Cool the fruit completely and refrigerate the cream layer for 30 to 45 minutes before topping it.
Can I use a regular cake pan instead of a springform pan?
A springform pan is strongly recommended. The removable ring allows you to release the tall chilled dessert without flipping it upside down and damaging the raspberry topping.
How long does the cake need to chill?
Allow at least six hours after assembly. Overnight chilling gives the most reliable results and the cleanest slices.
How do I keep the layers neat when cutting?
Use a sharp knife warmed with hot water and wiped completely dry. Clean and warm the blade again between slices.
A Layer Cake Worth the Wait
The beauty of this Chocolate Raspberry Cream Layer Cake comes from contrast: dark chocolate against pale vanilla cream, rich cocoa against tart berries, and soft cake beneath cool, airy filling.
It is also a reminder that an impressive dessert doesn’t necessarily require complicated decorating.
Bake one chocolate layer, prepare a simple raspberry topping, whip a creamy filling, and then give everything enough time in the refrigerator.
When the springform ring finally comes away and that first slice reveals the chocolate, cream, and ruby-red raspberry layers, all that chilling time suddenly feels worthwhile.
For birthdays, family dinners, holidays, Valentine’s Day, Mother’s Day, or simply a weekend dessert worth sharing, this is the kind of cake that looks special before anyone has even taken the first bite.