
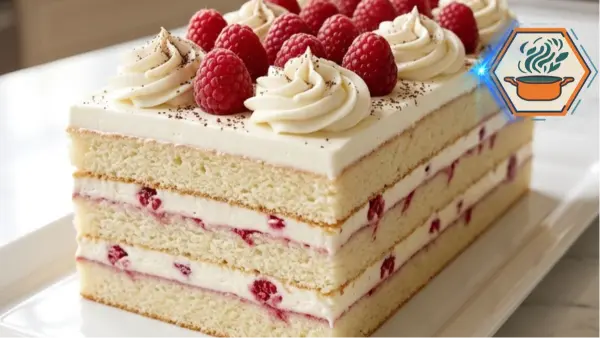
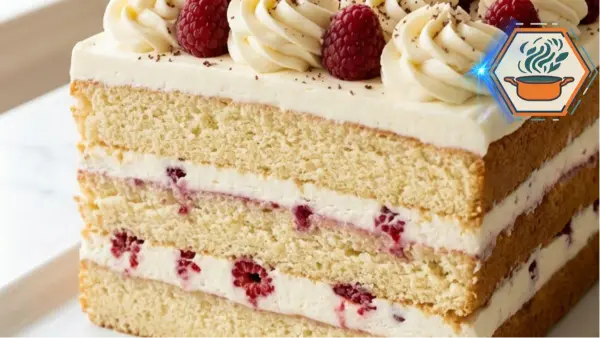
There is something special about cutting into a chilled Raspberry Vanilla Cream Layer Cake. At first, you see a simple white cream topping dotted with bright raspberries. Then the knife reveals the real surprise: three soft vanilla cake layers, pale cream, and delicate raspberry streaks tucked neatly between them.
This recipe is made for the moment when you want a dessert that looks impressive but still tastes fresh and familiar. Vanilla gives the cake its warm bakery flavor. Raspberries add tartness and color. The whipped cream cheese filling keeps each bite light rather than overly sweet. Because the filling contains dairy and fresh fruit, the finished cake should remain refrigerated. The U.S. Food and Drug Administration’s food-storage guidance recommends keeping the refrigerator at or below 40°F (4°C).
The best part is that the cake can be prepared ahead. In fact, chilling is an important part of the recipe rather than an inconvenient waiting period. Four hours in the refrigerator helps the cream firm up and gives the layers time to settle. For serving, remember that cream-filled desserts are perishable. The USDA food-safety basics advise refrigerating perishable foods within two hours, or within one hour when temperatures are above 90°F.
Affiliate disclosure: As an Amazon Associate I earn from qualifying purchases. This article may contain affiliate links to kitchen tools I find useful for preparing this recipe.
JUMP TO
Raspberry Vanilla Cream Layer Cake
A soft three-layer vanilla sponge filled with silky vanilla cream and fresh raspberry swirls, then topped with piped cream, juicy raspberries, and a light dusting of chocolate.
- Total Time: 5 hours 8 minutes
- Yield: 12 servings
Ingredients
Vanilla Sponge
- 2 cups (240 g) all-purpose flour
- 2 teaspoons baking powder
- 1/4 teaspoon fine salt
- 4 large eggs, room temperature
- 3/4 cup (150 g) granulated sugar
- 1/2 cup (120 ml) whole milk, room temperature
- 1/2 cup (113 g) unsalted butter, melted and cooled
- 2 teaspoons pure vanilla extract
Vanilla Cream
- 8 oz (226 g) full-fat cream cheese, softened
- 2 cups (480 ml) cold heavy whipping cream
- 1/2 cup (60 g) powdered sugar
- 1 teaspoon pure vanilla extract
- Pinch of fine salt
Raspberry Filling
- 1 1/2 cups fresh raspberries, divided
- 1/3 cup raspberry preserves
- 1 tablespoon fresh lemon juice
Decoration
- Reserved fresh raspberries
- Reserved vanilla cream, for piping
- 1–2 tablespoons finely grated semisweet or dark chocolate
Instructions
- Prepare the oven and pan. Preheat the oven to 350°F (175°C). Lightly grease a 9 × 13-inch (23 × 33 cm) metal baking pan and line the bottom with parchment paper.
- Combine the dry ingredients. Whisk the flour, baking powder, and salt together. Set aside.
- Beat the eggs and sugar. Beat the eggs and granulated sugar on medium-high speed for 4–5 minutes, until pale, thick, and fluffy.
- Add the liquids. Combine the room-temperature milk, cooled melted butter, and vanilla. Slowly mix them into the egg mixture on low speed.
- Fold in the flour. Add the dry ingredients in 2–3 additions. Fold gently with a spatula just until no dry flour remains. Do not overmix.
- Bake the cake. Spread the batter evenly in the prepared pan. Bake for 22–28 minutes, or until the top is lightly golden, the center springs back gently, and a toothpick comes out clean or with a few soft crumbs.
- Cool completely. Let the cake cool in the pan for 10 minutes. Transfer it to a wire rack and cool completely before cutting or filling.
- Make the raspberry filling. Reserve the best whole raspberries for decorating. Lightly crush about 1/2 cup raspberries with a fork. Mix with the raspberry preserves and lemon juice. Keep the mixture chunky rather than turning it into a puree.
- Make the vanilla cream. Beat the softened cream cheese, powdered sugar, vanilla, and salt until smooth. Slowly pour in the cold heavy cream. Whip on medium-high until the cream forms firm peaks and holds its shape. Do not overwhip.
- Cut three layers. Using a long serrated knife, carefully cut the completely cooled cake horizontally into three even rectangular layers.
- Fill the cake. Place the bottom sponge on a serving plate. Spread with vanilla cream, then add a thin ripple of raspberry mixture, leaving about 1/2 inch around the edges. Add the second sponge and repeat. Keep visible raspberry pieces and streaks rather than mixing the filling completely pink.
- Add the final layer. Place the third sponge on top and press very gently to settle the layers.
- Decorate. Spread a generous layer of vanilla cream over the top while leaving the sides exposed. Pipe large cream rosettes over the surface. Add fresh raspberries and finish with a very light dusting of finely grated chocolate.
- Chill. Refrigerate the assembled cake for at least 4 hours, preferably overnight, before slicing.
- Serve. Cut with a clean, sharp knife. For especially neat layers, warm the blade under hot water, dry it, and wipe it clean between slices.
Notes
- Use a 9 × 13-inch light-colored metal pan for predictable baking and a rectangular presentation close to the reference cake.
- The cake must be completely cool before adding cream.
- Heavy whipping cream must be cold.
- Do not puree the raspberries. Visible berry pieces and red streaks create the intended filling.
- If the crushed raspberries are very watery, drain excess liquid before mixing them with the preserves.
- Keep the raspberry mixture away from the outer edge to prevent the layers from sliding.
- Do not cover the sides with cream. The three sponge layers and two cream layers should remain visible.
- Chill for at least four hours before slicing.
- Keep the finished cake refrigerated at 40°F (4°C) or below. FDA guidance also says foods requiring refrigeration should not remain at room temperature for more than two hours, or one hour when the temperature is above 90°F (32°C).
- Prep Time: 40 minutes
- Chilling Time: 4 hours
- Cook Time: 22–28 minutes
- Category: Dessert
- Method: Baking
- Cuisine: American-inspired
Why This Raspberry Vanilla Cake Works
A good berries-and-cream cake needs balance.
Too much jam makes the layers slide. Too much whipped cream can collapse under the weight of the sponge. A dense cake makes a chilled dessert feel heavy. And if fresh berries release too much liquid into the filling, those beautiful layers can become messy.
This version addresses each problem.
The vanilla sponge uses eggs for structure and lift. Whole milk adds moisture. Melted butter gives the crumb a richer flavor without turning it into a heavy butter cake.
The filling combines cream cheese and heavy whipping cream. Cream cheese gives the whipped filling more body, which matters when the cake is stacked and chilled.
The raspberry component is deliberately kept thin. Fresh berries are lightly crushed and mixed with raspberry preserves and lemon juice. The preserves provide a thicker base, while fresh raspberries give the filling a brighter fruit character.
Most importantly, the berries are not blended completely smooth. Small raspberry pieces and thin red streaks should remain visible. That detail creates the homemade raspberry-speckled cream seen between the pale sponge layers.
If you enjoy working with berries, our guide to what strawberry puree is made of also explains how fruit changes texture once crushed or blended.
Ingredients You Will Need
This recipe makes one rectangular cake, about 10 to 12 servings.
For the Vanilla Sponge
- 2 cups (240 g) all-purpose flour
- 2 teaspoons baking powder
- 1/4 teaspoon fine salt
- 4 large eggs, at room temperature
- 3/4 cup (150 g) granulated sugar
- 1/2 cup (120 ml) whole milk, at room temperature
- 1/2 cup (113 g) unsalted butter, melted and cooled until just warm
- 2 teaspoons pure vanilla extract
For the Vanilla Cream
- 8 oz (226 g) full-fat cream cheese, softened
- 2 cups (480 ml) cold heavy whipping cream
- 1/2 cup (60 g) powdered sugar
- 1 teaspoon pure vanilla extract
- Small pinch of salt
That final pinch of salt is worth adding. It does not make the cream salty. It simply keeps the sweetness from tasting flat.
For the Raspberry Filling
- 1 1/2 cups fresh raspberries, divided
- 1/3 cup raspberry preserves
- 1 tablespoon fresh lemon juice
Reserve enough of the best-looking whole berries for the top before crushing any fruit.
For the Decoration
- Reserved fresh raspberries
- Vanilla cream for piping
- 1 to 2 tablespoons finely grated semisweet or dark chocolate
The chocolate should be a light dusting, not a thick coating. You still want the finished cake to look mainly white, cream, and raspberry red.
Equipment and Pan Size
The original idea can become difficult to reproduce if the pan dimensions are left open-ended.
For a cake close to the rectangular shape pictured, use a 9 x 13-inch (23 x 33 cm) metal cake pan with sides at least 2 inches high. A USA Pan 9 x 13-inch rectangular cake pan is a practical option for this recipe because its dimensions match the pan size used here.
You will also need:
- Parchment paper
- Electric hand mixer or stand mixer
- Large mixing bowls
- Fine-mesh sieve
- Rubber spatula
- Long serrated knife
- Offset spatula
- Piping bag
- Large open-star piping tip
- Wire cooling rack
A metal pan is preferable because it gives predictable heat transfer. If you use glass, the baking behavior can differ.
Step 1: Prepare the Pan and Oven
Preheat the oven to 350°F (175°C).
Lightly grease the pan. Line the bottom with parchment paper, leaving enough parchment on two sides to help lift the cake later.
Grease the parchment very lightly.
Do not skip the paper. This sponge is meant to be cut horizontally, so you want the baked cake to come out with the bottom intact.
Step 2: Mix the Dry Ingredients
Whisk together the flour, baking powder, and salt.
For an especially fine crumb, sift them once after measuring.
Set the bowl aside.
Accurate flour measurement matters here. Too much flour can make the layers dry and difficult to cut. If possible, use a kitchen scale and measure 240 grams.
Step 3: Build Air Into the Eggs
Place the room-temperature eggs and granulated sugar in a large bowl.
Beat with an electric mixer on medium-high speed for about 4 to 5 minutes. A Hamilton Beach 6-Speed Hand Mixer works well for this step and can also be fitted with its whisk attachment later when preparing the vanilla cream.
Do not stop as soon as they are combined.
The mixture should become noticeably paler, thicker, and more voluminous. When you lift the beaters, the mixture should briefly leave a ribbon on the surface.
This aeration helps produce the soft cake structure needed for neat, light layers.
Step 4: Add Milk, Butter, and Vanilla
Combine the milk, cooled melted butter, and vanilla.
Reduce the mixer to low. Slowly add the liquid mixture to the eggs.
Mix only until incorporated.
The butter should be melted but not hot. Hot butter can knock air from the egg mixture and affect the batter.
Step 5: Fold in the Flour
Add the dry ingredients in two or three additions.
Use a rubber spatula to fold them in gently. Scrape from the bottom of the bowl and lift the batter over itself.
Stop as soon as no dry pockets of flour remain.
Overmixing at this stage can give you a tougher sponge rather than the soft layers we want.
Step 6: Bake
Transfer the batter to the prepared pan and smooth the surface.
Bake on the center rack for approximately 22 to 28 minutes.
Start checking at 22 minutes because ovens vary.
The cake is ready when:
- The top looks lightly golden.
- The center springs back after a gentle touch.
- A toothpick inserted near the center comes out clean or with a few soft crumbs.
- The center no longer looks wet.
Avoid baking until the cake becomes deeply browned. A dry sponge will not give the same soft chilled texture.
Let it rest in the pan for about 10 minutes. Carefully remove it and transfer it to a rack.
Then cool it completely.
Never add whipped cream to a warm cake. Even mild residual heat can soften the filling.
Step 7: Make the Raspberry Mixture
Before crushing the berries, select the prettiest raspberries and reserve them for decoration.
Place about 1/2 cup raspberries in a small bowl.
Crush them lightly with a fork. You are not making a smooth puree.
Stir in the raspberry preserves and lemon juice.
The final mixture should be thick enough to spoon rather than run like a sauce.
If your raspberries are especially juicy, let the mixture sit in a fine-mesh sieve for a few minutes before combining it with the preserves. Excess liquid can make the cream layers unstable.
For more fruit-preparation basics, see our guide on how to make puree.
Step 8: Make the Silky Vanilla Cream
The cream needs to be firm enough to hold the layers while still looking soft and fluffy.
Beat the softened cream cheese, powdered sugar, vanilla, and pinch of salt for about 1 to 2 minutes, until completely smooth.
Scrape down the bowl.
With the mixer running on medium-low speed, slowly pour in the cold heavy cream.
Once incorporated, raise the speed to medium-high.
Whip until the mixture forms firm peaks and holds a piped shape.
Stop as soon as it reaches that stage. Overwhipping can make the mixture grainy.
A useful temperature trick is to chill your mixing bowl and beaters for 10 to 15 minutes before whipping. The cream cheese should be softened enough to become smooth, but the heavy cream itself needs to stay cold.
Step 9: Cut the Cake Into Three Layers
This is one of the most important steps for matching the finished appearance.
Once the cake is completely cool, place it on a flat cutting board.
Use a long serrated knife. A 10-inch Mercer Culinary serrated knife gives you enough blade length to use gentle sawing motions across the rectangular sponge without pressing down heavily.
First, make small marks around the sides at roughly one-third and two-thirds of the cake’s height. These marks act as guides.
Hold the knife parallel to the work surface. Use long, gentle sawing motions rather than pushing straight through.
Cut the cake horizontally into three rectangular layers of similar thickness.
If your kitchen is warm or the cake feels very soft, refrigerate it for 20 to 30 minutes before cutting. A slightly chilled sponge is easier to handle.
Step 10: Assemble the First Layer
Place the bottom cake layer on a rectangular serving plate or cake board.
Spread a layer of vanilla cream across the surface.
Do not make it excessively thick. You need enough cream for the second filling, the top, and the piped decoration.
Spoon a small amount of raspberry mixture over the cream.
Gently ripple it through the surface.
Do not spread raspberry filling all the way to the edges. Leave about 1/2 inch around the perimeter. This helps prevent red filling from squeezing out when the next sponge is added.
Step 11: Create the Raspberry-Speckled Center
Add the second cake layer.
Spread it with vanilla cream.
This time, add some raspberry mixture and lightly drag a spatula through the cream once or twice.
You want visible raspberry flecks and soft streaks.
Do not stir until the entire cream becomes pink.
That distinction matters. The visual goal is a mostly pale filling with irregular pieces of raspberry and thin pink-red ripples.
Add the final sponge layer.
Press down very gently with flat hands so the cake settles without forcing the filling out.
Step 12: Finish the Top Like the Reference Cake
Spread a generous layer of vanilla cream over the top.
Keep the sides mostly exposed so the sponge-and-cream layers remain visible.
Smooth the top with an offset spatula.
Transfer some remaining vanilla cream to a piping bag fitted with a large open-star tip.
Pipe generous rosettes across the top, spacing them so fresh raspberries can sit naturally between them.
Add the reserved whole raspberries.
Some berries can stand upright. Others can rest at a slight angle. This gives the top a relaxed bakery-style finish instead of a rigid pattern.
Finally, grate a very small amount of chocolate over the cream.
Stop before the chocolate begins to dominate the white surface.
The Four-Hour Rule That Changes the Cake
Do not cut the cake immediately after assembly.
Cover it without pressing plastic wrap against the decoration and refrigerate it for at least 4 hours.
This chilling time helps the cream become firmer. It also allows the layers to settle together.
For the cleanest slices, chilling overnight works very well.
When you are ready to cut, use a long sharp knife. Wipe the blade clean between every slice.
For an extra-clean result, run the knife under hot water, dry it completely, then make the cut.
Common Mistakes to Avoid
Even a simple cream cake can go wrong when small details are skipped.
- Warm sponge: It melts and weakens the cream.
- Warm heavy cream: It takes longer to whip and may not hold its shape well.
- Too much raspberry filling: The layers can slide.
- Very wet berries: Added moisture can loosen the filling.
- Overmixed batter: The cake may lose its delicate texture.
- Overbaked sponge: Chilling can make an already dry cake seem even firmer.
- Overwhipped cream: The filling may turn grainy.
- Cutting too soon: The layers will be much harder to keep neat.
- Blending all the raspberries: You lose the attractive berry pieces and natural streaks.
How to Store Raspberry Vanilla Cream Layer Cake
Because this cake contains heavy cream, cream cheese, and fresh raspberries, keep it refrigerated.
Store it in a covered cake container at 40°F (4°C) or colder. FDA guidance also recommends keeping refrigerated foods covered.
For best texture and appearance, I recommend serving the cake within 2 days. The sponge will continue absorbing moisture from the filling as it sits, while fresh berries gradually soften.
Take the cake from the refrigerator shortly before serving rather than leaving it on the counter for a long period.
Can You Make It Ahead?
Yes. This is actually a very good make-ahead dessert.
You can bake the vanilla sponge one day before assembly. Once completely cool, wrap it well and refrigerate it.
The raspberry mixture can also be prepared a day ahead and stored covered in the refrigerator.
For the freshest texture, make the vanilla cream when you are ready to assemble.
Then assemble the entire cake the night before serving and chill it overnight.
Add a few of the prettiest fresh raspberries shortly before serving if you want the garnish to look especially fresh.
Easy Variations
The basic method gives you room for small changes.
For a stronger berry flavor, add a little more crushed raspberry to the filling, but avoid adding large amounts of liquid.
For a brighter flavor, finely grate a little lemon zest into the raspberry mixture.
You can also replace raspberries with strawberries. Chop them finely and control the liquid so the filling stays stable.
White chocolate shavings can replace dark chocolate for a sweeter finish.
For the cake shown here, however, I would keep the decoration simple. The contrast between white vanilla cream, red raspberries, pale sponge, and tiny chocolate flecks is what gives it its distinctive appearance.
Frequently Asked Questions
Can I make Raspberry Vanilla Cream Layer Cake the day before?
Yes. In fact, making it the day before can improve slicing. Assemble the cake, cover it, and refrigerate overnight. The chilled cream becomes firmer and the layers settle.
Why is my raspberry cream filling runny?
The heavy cream may have been too warm, the cream may have been underwhipped, or the raspberries may have released too much juice. Start with cold heavy cream and drain very juicy crushed berries before adding them.
Can I use frozen raspberries?
Frozen raspberries work better for a cooked or thickened filling than for the fresh decoration. Once thawed, they usually release more liquid and become softer. For the appearance of this cake, use fresh raspberries on top.
How do I keep the cake layers from sliding?
Use a thick raspberry mixture rather than a runny sauce. Keep the filling away from the edges, avoid overfilling, and chill the assembled cake thoroughly.
Can I use raspberry jam instead of preserves?
Yes. Choose a thick raspberry jam. If it is very firm, stir it with the crushed raspberries and lemon juice until spreadable.
Why does the cake need to chill for four hours?
Chilling firms the dairy-based filling and allows the assembled layers to settle. This makes the cake easier to cut and helps produce cleaner sections.
Can I make this as a round layer cake?
Yes, but the quantities and baking time may need adjustment depending on your pans. The rectangular format is recommended for this version because it produces the same broad, visible layers and presentation shown here.
How do I get clean cake slices?
Start with a thoroughly chilled cake. Use a long, sharp knife and clean it after every cut. For very neat slices, warm the blade with hot water and dry it before cutting.
A Chilled Cake Worth Waiting For
The beauty of this Raspberry Vanilla Cream Layer Cake comes from restraint. It does not need a thick outer coat of frosting or complicated decorations.
Three pale vanilla sponge layers provide the structure. Silky vanilla cream gives it softness. Raspberry pieces and preserves create those natural pink-red streaks through the center. Fresh berries and piped cream rosettes finish the top, while a whisper of grated chocolate adds contrast.
Give the cake enough time to cool before filling it. Keep the raspberry mixture thick. Whip the cream until it can support the layers. Then give the assembled cake its full chilling time.
When the first cold slice comes away cleanly and reveals those distinct vanilla, cream, and raspberry layers, the four-hour wait makes perfect sense.