
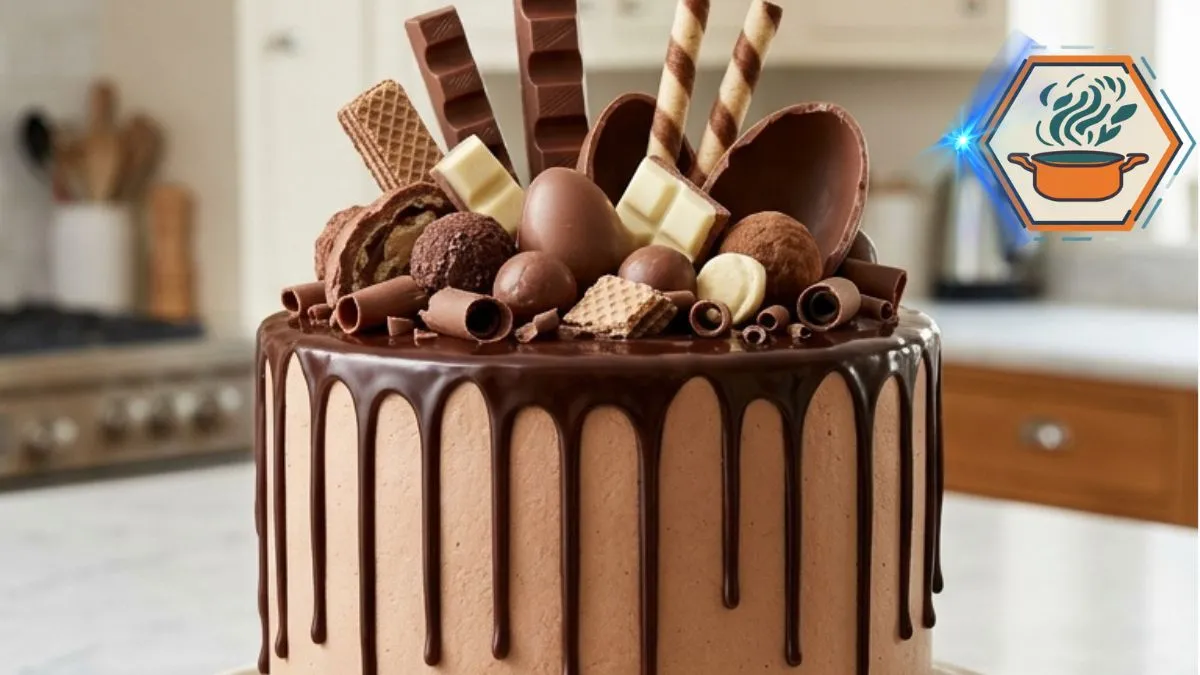
Some cakes quietly wait on the dessert table. This Ultimate Chocolate Candy Drip Cake does the opposite. It becomes the centerpiece before anyone has even tasted it. Tall chocolate layers, smooth milk-chocolate-colored buttercream, glossy dark drips, and a crown of chocolate bars and truffles give it the kind of finish people expect from a bakery display.
The impressive appearance can make a homemade drip cake seem difficult. In reality, most of the work comes down to timing and temperature. A cold frosted cake helps stop ganache from running all the way to the cake board. Testing one drip before decorating the entire cake is also a reliable way to check its consistency, a technique also recommended in this current chocolate drip cake tutorial.
There is another practical detail worth knowing because this cake contains buttercream, heavy cream, and ganache. Keep it properly chilled when storing it. The FDA’s food-storage guidance recommends keeping refrigerators at or below 40°F (4°C) and refrigerating foods that need chilling promptly.
This recipe fills in the small details that often disappear from short social-media recipes. You will know what temperature the ingredients should be, how the batter should look, when the layers are baked, how long to chill the frosting, and what the ganache should look like before the first drip touches the cake.
jump to
Why This Ultimate Chocolate Candy Drip Cake Works
The finished cake has three distinct chocolate experiences.
First comes a dark, soft chocolate sponge. Cocoa gives the layers their deep flavor, while buttermilk and vegetable oil help create a tender crumb. Hot coffee strengthens the cocoa flavor without making the finished cake taste strongly of coffee.
Next comes a lighter chocolate buttercream. It creates the contrast visible when a slice is removed: dark cake followed by creamy chocolate filling, repeated through the tall slice.
Finally, semi-sweet chocolate ganache adds the dark glossy drip. Candy bars, wafer pieces, truffles, chocolate eggs, white chocolate pieces, and chocolate curls bring different shapes and textures to the top.
If chocolate cakes are a regular feature in your kitchen, our strawberry-filled chocolate cake guide offers another way to pair rich chocolate cake with a contrasting filling.
Ingredients You Will Need
For three 8-inch cake layers:
Chocolate cake
- 2½ cups (about 300 g) all-purpose flour
- 2 cups (400 g) granulated sugar
- ¾ cup (about 65–75 g, depending on brand) unsweetened cocoa powder
- 2 teaspoons baking soda
- 1 teaspoon baking powder
- ½ teaspoon fine salt
- 3 large eggs, at room temperature
- 1 cup (240 ml) buttermilk, at room temperature
- ½ cup (120 ml) neutral vegetable oil
- 2 teaspoons vanilla extract
- 1 cup (240 ml) hot freshly brewed coffee
Do not use boiling coffee straight from the kettle. Hot coffee is enough. Very high heat is unnecessary once the dry and wet ingredients have been combined.
Chocolate buttercream
- 1½ cups (340 g) unsalted butter, softened
- 5 cups (about 600 g) powdered sugar, sifted if lumpy
- ¾ cup unsweetened cocoa powder
- ½ cup (120 ml) heavy cream, added gradually
- 2 teaspoons vanilla extract
- Pinch of salt
Chocolate ganache drip
- 8 oz (227 g) semi-sweet chocolate, finely chopped
- ¾ cup (180 ml) heavy cream
Chocolate candy decoration
Use a mixture rather than several pieces of one candy:
- Milk chocolate bars
- Chocolate wafer bars
- Crispy hazelnut-style truffles
- Milk chocolate eggs
- White chocolate pieces
- Chocolate-covered wafer pieces
- Chocolate curls
- Hollow chocolate shells
Choose different heights, shapes, and shades. That variation creates the abundant chocolate-candy appearance shown in the reference cake.
Equipment That Makes the Job Easier
You can make this cake with ordinary baking tools. Still, tall layer cakes expose small inconsistencies. Uneven batter, weak mixing, inaccurate oven temperature, or unstable frosting becomes more noticeable once three layers are stacked.
A heavy-duty stand mixer is particularly useful here because the buttercream needs several minutes of mixing and there is enough frosting for filling, coating, and piping. A premium model such as a KitchenAid Artisan 5-Quart Stand Mixer is also useful for bread dough, cookies, whipped cream, and many other recipes.
For bakers who make cakes frequently, an accurate and stable oven can be a larger upgrade than buying another decorating gadget. A Breville Smart Oven Air Fryer Pro, for example, can also serve many everyday cooking tasks beyond baking.
You will also want three 8-inch round pans, parchment paper, cooling racks, an offset spatula, cake board, bench scraper, piping bag, large star tip, and ideally a rotating cake turntable.
Affiliate disclosure: Some equipment links in this article may be affiliate links. If you purchase through them, RecipesMind may earn a commission at no additional cost to you.
How to Make the Chocolate Cake Layers
Heat the oven to 350°F (175°C). Position a rack near the center.
Grease three 8-inch round cake pans. Place parchment circles on the bottoms, then lightly grease the parchment. This extra step matters with a moist chocolate cake because the layers can otherwise stick when inverted.
Whisk the flour, sugar, cocoa powder, baking soda, baking powder, and salt in a large bowl. Break up every visible cocoa lump.
In another bowl, whisk the eggs, buttermilk, oil, and vanilla.
Pour the wet mixture into the dry ingredients. Mix on low speed only until mostly combined.
Slowly add the hot coffee.
At this point, do not panic if the batter looks thinner than a traditional butter cake batter. That is expected. Avoid adding extra flour just because it looks loose.
Divide the batter evenly between the three pans. A digital scale is useful here. Equal amounts of batter produce layers of similar height, which makes the final cake much easier to stack.
Bake for 24–28 minutes.
Start checking around 24 minutes. The centers should spring back lightly when touched. A toothpick inserted near the center should emerge with a few moist crumbs rather than raw batter.
Do not keep baking until the toothpick is completely dry. That can lead to dry chocolate layers.
Cool the cakes in their pans for about 10–15 minutes. Turn them onto racks and remove the parchment. Let them cool completely before frosting.
Warm cake and buttercream are a bad combination.
Make the Creamy Chocolate Buttercream
Beat the softened butter for about 3–4 minutes until creamy and lighter in texture.
Add the powdered sugar gradually. Mixing it in several additions prevents a sugar cloud and gives you better control over the consistency.
Add the cocoa powder and salt.
Pour in the vanilla. Then add heavy cream gradually rather than adding the entire ½ cup at once. Depending on room temperature and your cocoa powder, you may not need every drop.
Beat for another 2–3 minutes.
The final chocolate buttercream should hold a peak while remaining easy to spread. If it feels stiff, add cream one teaspoon at a time. If it becomes too soft, chill it briefly or mix in a small amount of powdered sugar.
This is one of those recipes where a stand mixer can save real effort rather than simply adding another appliance to the counter.
Level, Fill, and Stack the Cake
If the cakes have large domes, trim them with a serrated knife once completely cool.
Place a small dab of buttercream on the cake board. Set the first layer on top. The buttercream acts like glue and reduces movement during frosting.
Spread a generous, even layer of chocolate buttercream across the cake.
Add the second cake layer and repeat.
Place the final layer upside down. The flat bottom of the cake becomes your top surface and makes a clean upper edge easier to create.
Look at the cake from several angles. Correct leaning now, before the outer frosting is added.
If you enjoy learning the small techniques behind reliable baking, the guide to keeping madeleines moist covers another common problem where texture depends heavily on technique.
Why the Crumb Coat Matters
Spread a very thin layer of buttercream over the entire cake. This is the crumb coat.
Its job is not to look pretty. It traps loose chocolate crumbs so they do not appear in the final smooth coating.
Chill the crumb-coated cake for about 20–30 minutes, or until the frosting feels firm.
Apply a thicker final coat of buttercream. Hold a bench scraper vertically against the side while turning the cake. Fill low spots with more frosting and scrape again.
Chill once more until the outer buttercream is firm.
That cold surface is one of the most important details in the whole recipe.
How to Get Controlled Chocolate Ganache Drips
Finely chop 8 oz of semi-sweet chocolate and place it in a heatproof bowl.
Heat ¾ cup heavy cream until steaming and close to a simmer. Do not aggressively boil it.
Pour the hot cream over the chocolate. Leave it untouched for 2–3 minutes, then stir gently from the center outward until smooth and glossy.
Now wait.
Putting freshly made hot ganache directly on buttercream is one of the fastest ways to ruin an otherwise beautiful cake. The ganache needs to cool and thicken while remaining fluid.
Current drip-cake guidance commonly pairs slightly cooled ganache with a thoroughly chilled buttercream cake. A test drip is useful because chocolate type, cream ratio, cake temperature, and room temperature can change how quickly the ganache moves.
A fast-read thermometer is useful here because it removes much of the guesswork. A premium Thermapen ONE is not limited to cake decorating; it can also be used for bread, caramel, meat, sauces, and other temperature-sensitive cooking.
Test one drip on the back of the chilled cake.
If it races to the bottom, stop. Let the ganache cool and thicken.
If it barely moves, warm the ganache very gently.
If it slowly travels partway down the cake and stops, you are ready.
Make individual drips around the edge first. Vary their lengths slightly for a natural appearance. Then spoon a thin amount of ganache onto the top and gently spread it toward the edges.
Decorate It Like a Chocolate Candy Showpiece
The decoration should look abundant without looking random.
Pipe chocolate buttercream stars or swirls around parts of the upper edge. These provide support for heavier candy pieces.
Start with the tallest chocolate bars. Insert them toward the back and center of the cake. Add medium-height wafer bars beside them.
Next, arrange truffles, chocolate eggs, broken wafers, and white chocolate pieces around the base of the taller decorations.
Leave some broken edges visible. They give the top more texture.
Use white chocolate sparingly. Its pale color provides contrast against all the brown tones.
For a polished result, avoid placing every piece at the same angle. Some should stand vertically. Others can lean. A few smaller chocolates should sit almost flat.
If you make decorated cakes regularly, a strong rotating cake stand or professional turntable is worth considering. It is particularly helpful when smoothing tall buttercream cakes and controlling ganache placement.
Chilling and Slicing the Cake
After decorating, chill the cake briefly so the structure firms up.
For cleaner slices, use a long sharp knife. Dip it in hot water, wipe it completely dry, and make one cut. Clean and warm the knife again before the next cut.
This creates the dramatic cross-section you want: dark chocolate sponge alternating with lighter chocolate buttercream.
For another lesson in working with sugar and heat, see our guide to caramelizing sugar.
Common Mistakes and How to Fix Them
Ganache runs to the bottom: It is probably too warm or too fluid. Wait before continuing and test again.
Ganache sits in thick blobs: It has cooled too much. Warm it very gently.
Cake slides while frosting: The layers may be warm, the buttercream may be too soft, or too much filling may have been added.
Chocolate crumbs appear everywhere: Apply a proper crumb coat and chill it before the final frosting.
Cake leans: Level the layers and check the stack after adding each one.
Buttercream looks rough: The frosting may be too cold or stiff. Adjust its consistency before attempting the final coat.
Cake tastes dry: Measure flour carefully and start checking the cakes before the maximum baking time.
For more baking troubleshooting, our banana bread preparation guide explains how preparation choices can affect the final crumb.
Make-Ahead and Storage Tips
The cake layers can be baked ahead. Once completely cool, wrap each layer well so it does not lose moisture.
You can also assemble and crumb-coat the cake before final decorating. Keeping the final candy decoration until closer to serving can help wafer-based candies retain their texture.
Because the finished cake contains dairy-rich frosting and ganache, refrigerate it for storage. FDA guidance recommends a refrigerator temperature of 40°F (4°C) or below.
For the best eating texture, a chilled butter cake is often more pleasant after it has lost some of its refrigerator firmness. Do not, however, leave perishable food sitting out indefinitely. Follow appropriate food-safety guidance for your conditions.
FAQs About Ultimate Chocolate Candy Drip Cake
Can I make a chocolate drip cake the day before?
Yes. Making the cake ahead can actually make decorating less stressful. Bake and cool the layers, assemble the cake, frost it, and refrigerate it. The candy decoration can be added later, especially if it includes crisp wafers.
Why does my chocolate drip run all the way down the cake?
The two most common causes are warm ganache and a cake that is not cold enough. Chill the frosted cake until the buttercream is firm. Let the ganache cool until it moves slowly, then test one drip before continuing.
What chocolate is best for a drip cake?
Semi-sweet chocolate works well for this recipe because it gives the drip a darker color and balances the sweet buttercream and candy. Finely chopped chocolate also melts more evenly when the hot cream is added.
Can I make this cake without coffee?
Yes. You can replace the coffee with hot water. Coffee is included because it pairs very well with cocoa and gives the chocolate profile more depth. The finished cake should not taste like a cup of coffee.
Why is my chocolate cake batter so thin?
That is normal for this recipe. The cup of hot coffee makes the batter more fluid than many butter-based cake batters. Do not compensate by adding extra flour.
How do I stop a tall layer cake from leaning?
Start with fully cooled, level layers. Keep the buttercream thick enough to hold the cake. Stack each layer centrally and check the sides as you work. Chilling during assembly also helps when your kitchen is warm.
How do I get smooth buttercream sides?
Apply a crumb coat first. Chill it. Add the final frosting layer and use a straight bench scraper while slowly turning the cake. Fill visible gaps and repeat rather than scraping away too much frosting at once.
Print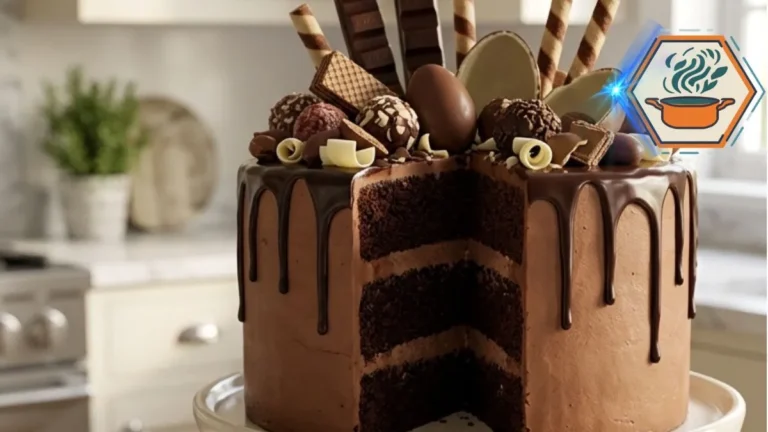
Ultimate Chocolate Candy Drip Cake
A tall and rich chocolate layer cake filled with creamy chocolate buttercream, covered with smooth chocolate frosting and glossy semi-sweet chocolate ganache drips, then topped with chocolate bars, wafer pieces, truffles, chocolate eggs, white chocolate, and chocolate curls.
- Total Time: 1 hour 28 minutes (Tasty default prep + cook)
- Yield: 16 servings
Ingredients
For the Chocolate Cake
- 2 1/2 cups (300 g) all-purpose flour
- 2 cups (400 g) granulated sugar
- 3/4 cup (about 65–75 g) unsweetened cocoa powder
- 2 teaspoons baking soda
- 1 teaspoon baking powder
- 1/2 teaspoon fine salt
- 3 large eggs, room temperature
- 1 cup (240 ml) buttermilk, room temperature
- 1/2 cup (120 ml) neutral vegetable oil
- 2 teaspoons vanilla extract
- 1 cup (240 ml) hot brewed coffee
For the Chocolate Buttercream
- 1 1/2 cups (340 g) unsalted butter, softened
- 5 cups (about 600 g) powdered sugar
- 3/4 cup unsweetened cocoa powder
- Up to 1/2 cup (120 ml) heavy cream
- 2 teaspoons vanilla extract
- Pinch of fine salt
For the Chocolate Ganache
- 8 oz (227 g) semi-sweet chocolate, finely chopped
- 3/4 cup (180 ml) heavy cream
For Decorating
- Milk chocolate bars
- Chocolate wafer bars
- Crispy hazelnut-style chocolate truffles
- Milk chocolate eggs
- White chocolate pieces
- Chocolate-covered wafer pieces
- Chocolate curls
- Hollow chocolate shells
Instructions
For the Chocolate Cake
- 2 1/2 cups (300 g) all-purpose flour
- 2 cups (400 g) granulated sugar
- 3/4 cup (about 65–75 g) unsweetened cocoa powder
- 2 teaspoons baking soda
- 1 teaspoon baking powder
- 1/2 teaspoon fine salt
- 3 large eggs, room temperature
- 1 cup (240 ml) buttermilk, room temperature
- 1/2 cup (120 ml) neutral vegetable oil
- 2 teaspoons vanilla extract
- 1 cup (240 ml) hot brewed coffee
For the Chocolate Buttercream
- 1 1/2 cups (340 g) unsalted butter, softened
- 5 cups (about 600 g) powdered sugar
- 3/4 cup unsweetened cocoa powder
- Up to 1/2 cup (120 ml) heavy cream
- 2 teaspoons vanilla extract
- Pinch of fine salt
For the Chocolate Ganache
- 8 oz (227 g) semi-sweet chocolate, finely chopped
- 3/4 cup (180 ml) heavy cream
For Decorating
- Milk chocolate bars
- Chocolate wafer bars
- Crispy hazelnut-style chocolate truffles
- Milk chocolate eggs
- White chocolate pieces
- Chocolate-covered wafer pieces
- Chocolate curls
- Hollow chocolate shells
Notes
- Do not overbake. A toothpick with a few moist crumbs is preferable to one that comes out completely dry.
- The chocolate batter is intentionally thin after the hot coffee is added.
- All cake layers must be completely cool before frosting.
- Room-temperature eggs and buttermilk mix into the batter more evenly.
- Add the heavy cream to the buttercream gradually. You may not need the entire amount.
- The crumb coat should be cold and firm before applying the final frosting.
- For clean drips, use a cold cake and cooled ganache.
- Always make one test drip on the back before decorating the visible sides.
- The quantity of candy is flexible. Use enough for an abundant finish without making the top unstable.
- Put taller chocolate pieces toward the center/back and support heavy pieces with buttercream.
- If your kitchen is warm, return the cake to the refrigerator during assembly whenever the frosting becomes soft.
- Decoration quantities directly affect the final calorie and sugar values.
- Prep Time: 1 hour
- Additional Cooling/Chilling Time: approximately 1 hour 30 minutes
- Cook Time: 28 minutes
- Category: Dessert
- Method: Baking
- Cuisine: American
A Cake Worth Bringing to the Table
The Ultimate Chocolate Candy Drip Cake looks extravagant because several simple details work together. The layers are tall and dark. The filling is lighter and creamy. The buttercream is smooth. The ganache creates controlled glossy drips. Finally, the mix of milk chocolate, white chocolate, wafers, eggs, truffles, and broken candy pieces gives the cake its unmistakable showpiece finish.
The biggest lesson is not to rush the cold stages. Let the layers cool. Chill the crumb coat. Chill the final buttercream. Let the ganache cool before testing it. Those pauses are what turn a messy chocolate cake into a clean, tall drip cake.
And when you finally cut through the candy-covered top and reveal those alternating chocolate layers, the inside delivers exactly what the outside promised: a rich chocolate celebration cake built for a special occasion.