
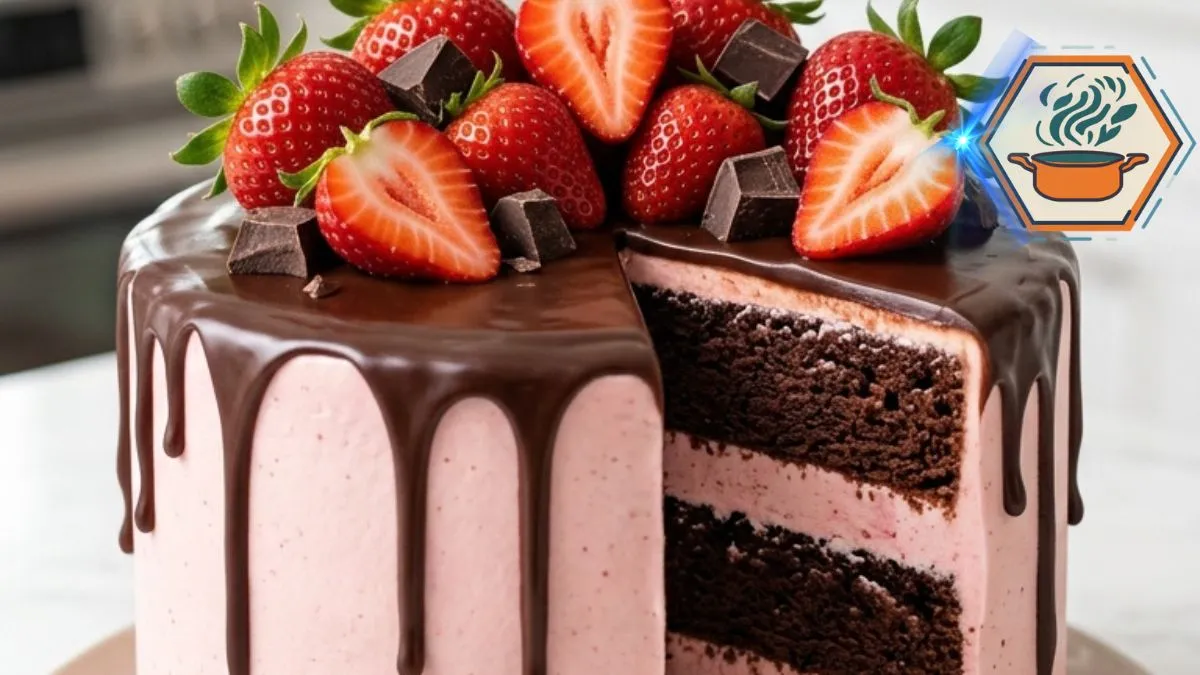
Some cakes disappear from the table quietly. Strawberry Velvet Ganache Dream Cake is not one of them. The moment it arrives, you notice the tall chocolate layers, soft pink strawberry cream, glossy chocolate drips, and a crown of fresh red strawberries. Then the first slice reveals what makes this cake special: dark, tender chocolate cake paired with a bright berry filling.
The original idea sounds simple, but a tall layer cake needs more than a short list of instructions. The temperature of the cake matters. So does the consistency of the frosting. Even the temperature of the ganache can decide whether you get beautiful drips or a chocolate puddle. For more baking inspiration, you can also visit the RecipesMind home page.
There is good baking science behind the method too. Hot coffee is useful in chocolate cakes, while three 8-inch pans can produce the tall format we want. King Arthur Baking also notes that coffee can intensify chocolate flavor without necessarily making a cake taste like coffee. Their guidance on making chocolate ganache is also useful because ganache becomes thicker as it cools. That small detail is particularly important when creating controlled drips.
Affiliate disclosure: As an Amazon Associate I earn from qualifying purchases. This article may contain affiliate links to kitchen tools I find useful for preparing this recipe.
JUMP TO
Why You’ll Love This Strawberry Chocolate Cake
Imagine cutting through a shiny chocolate shell and reaching a thick layer of strawberry cream. Beneath it is a dark chocolate sponge. Then comes more berry cream, another cake layer, and another.
The contrast makes every bite interesting.
The cake is rich without relying on chocolate alone. Freeze-dried strawberries give the buttercream a concentrated berry flavor without adding the large amount of water found in fresh strawberry purée.
Fresh berries then provide a juicy finish.
This recipe is particularly suited to:
- Birthdays
- Valentine’s Day
- Mother’s Day
- Anniversaries
- Summer celebrations
- Dinner parties
- Strawberry season
- Chocolate lovers
It also creates the dramatic tall-cake appearance shown in our reference design.
If strawberries and chocolate are your favorite pairing, see our guide to strawberry-filled chocolate cake for another way to work with these flavors.
Ingredients You’ll Need
For the chocolate cake layers:
- 2 cups (240 g) all-purpose flour
- 3/4 cup (64 g) unsweetened cocoa powder
- 1 3/4 cups (350 g) granulated sugar
- 2 teaspoons baking powder
- 1 1/2 teaspoons baking soda
- 1/2 teaspoon fine salt
- 2 large eggs, preferably at room temperature
- 1 cup (240 ml) whole milk, room temperature
- 1/2 cup (120 ml) neutral vegetable oil
- 2 teaspoons vanilla extract
- 1 cup (240 ml) hot brewed coffee or hot water
For the strawberry buttercream:
- 1 1/2 cups (340 g) unsalted butter, softened
- 4 1/2 cups (540 g) powdered sugar
- 1/3 cup finely ground freeze-dried strawberries
- 1 teaspoon vanilla extract
- 3 to 4 tablespoons heavy cream
- Small pinch of salt, recommended
For the chocolate ganache:
- 8 oz (227 g) semisweet chocolate, finely chopped
- 3/4 cup (180 ml) heavy cream
For decorating:
- About 1 1/2 cups fresh strawberries
- 3 oz (85 g) dark chocolate, broken into irregular pieces
Optional:
- 1/3 to 1/2 cup strawberry preserves
That optional preserve layer is useful when you want an even stronger strawberry center. Keep it thin. Too much jam can cause the layers to slide.
Equipment That Makes the Recipe Easier
You do not need professional pastry equipment, but a few tools make a tall cake much easier to handle.
You will want:
- Three 8-inch round cake pans
- Parchment paper
- Large mixing bowls
- Whisk
- Electric hand mixer or stand mixer
- Digital kitchen scale
- Cooling racks
- Offset spatula
- Cake turntable, optional
- Piping bag, optional
- Serrated knife
- Small spoon or squeeze bottle for ganache
How to Make the Chocolate Cake Layers
Start by placing a rack near the center of your oven. Heat the oven to 350°F (175°C).
Grease three 8-inch round cake pans. Line the bottoms with parchment circles, then lightly grease the parchment.
Do not skip this preparation. These cakes are tender, and clean release makes assembly much easier.
In a large bowl, whisk together the flour, cocoa powder, sugar, baking powder, baking soda, and salt.
Break up every visible lump of cocoa.
In another bowl, whisk the eggs, milk, vegetable oil, and vanilla until combined.
Pour the wet ingredients into the dry mixture.
Mix gently until most of the dry streaks disappear.
Now slowly pour in the hot coffee while whisking at low speed. The finished batter will look much thinner than a traditional butter cake batter.
That is normal. Do not add extra flour.
Coffee is not there to turn this into a coffee cake. It supports the chocolate profile. Hot water can be used instead if you prefer. Coffee is also used in established chocolate-cake formulas, and King Arthur Baking specifically describes it as a way to deepen chocolate flavor.
Divide the batter as evenly as possible among all three pans.
A digital scale is helpful here. Equal quantities produce layers that bake at a similar rate and give the finished cake its neat appearance.
Bake for approximately 25 to 30 minutes.
Start checking near 24 to 25 minutes because ovens vary.
The cakes are ready when:
- The centers no longer look wet.
- The tops spring back lightly when touched.
- A toothpick inserted near the center comes out clean or with a few moist crumbs.
Comparable three-layer 8-inch chocolate cakes can bake in roughly this range, though the exact formula and oven affect timing.
Let the cakes rest in their pans for about 10 minutes.
Carefully turn them onto cooling racks and remove the parchment.
Now comes one of the most important rules in the entire recipe:
Do not frost warm cake.
Let every layer cool completely.
How to Make Real Strawberry Buttercream
The pink filling is a major part of the character of this cake.
Freeze-dried strawberries are ideal because they bring concentrated berry flavor without flooding buttercream with fruit juice.
Process or crush them into a very fine powder. Larger pieces can create an uneven frosting.
Beat the softened butter for about 3 to 4 minutes until pale and creamy.
Add the powdered sugar gradually. Starting slowly keeps it from flying around the kitchen.
Add the strawberry powder, vanilla, and a small pinch of salt.
Beat again.
Add heavy cream one tablespoon at a time until the frosting becomes light and spreadable.
Do not automatically use all four tablespoons.
Your buttercream needs enough body to support three cake layers. If it becomes too loose, the finished cake can bulge or lean.
The correct frosting should hold a soft peak and stay on an offset spatula without running.
How to Build a Tall, Stable Cake
If your cakes have noticeable domes, level them with a serrated knife.
Place the first chocolate layer on a cake board or serving plate.
Spread a generous, even layer of strawberry buttercream over it.
If using strawberry preserves, spread only a very thin layer. For extra security, pipe a ring of buttercream around the outer edge before putting preserves inside it. This creates a barrier and reduces the chance of the filling escaping.
Add the second chocolate layer.
Repeat.
Place the third layer on top, preferably upside down. The flat bottom of the cake becomes your top surface and makes finishing easier.
Check the cake from several angles.
If it is leaning, correct it now.
The Crumb Coat Is Worth the Extra Step
A crumb coat is a very thin first layer of frosting.
It traps loose chocolate crumbs so they do not contaminate the final pink coating.
Spread a thin coat of strawberry buttercream over the top and sides.
Refrigerate the cake for approximately 15 to 20 minutes, or until that coating feels firm.
Then apply the remaining strawberry frosting.
Smooth the sides while keeping enough frosting on the cake to produce the soft pink finish.
This chilling step has another advantage. A cold cake helps the ganache drips set before they travel all the way to the serving plate.
How to Make Glossy Chocolate Ganache
Finely chop the semisweet chocolate and place it in a heat-safe bowl.
Heat the heavy cream until steaming and just beginning to simmer around the edges. It does not need a vigorous boil.
Pour the hot cream over the chocolate.
Leave it untouched for about 2 to 3 minutes.
Then begin stirring slowly from the center outward.
The mixture should gradually become dark, smooth, and glossy.
Ganache is an emulsion of chocolate and cream, and its consistency changes with both the chocolate-to-cream ratio and temperature. It becomes thicker as it cools.
That explains why timing matters so much for a drip cake.
Never pour piping-hot ganache directly over cold buttercream.
It may melt the frosting.
Instead, allow the ganache to cool until it remains fluid but is no longer hot.
Test one small drip on the back of the chilled cake.
Watch it.
If it races all the way down, the ganache is probably too warm or thin. Wait a few minutes and test again.
If it barely moves, it has become too cool.
Once the test drip looks right, add ganache around the upper edge with a spoon or squeeze bottle. Vary the amount slightly so the drips have different lengths.
Then spread a layer across the top.
This produces the natural, irregular chocolate-drip appearance rather than a perfectly uniform pattern.
Decorating It Like the Reference Cake
The final decoration should feel abundant rather than overly arranged.
Wash the fresh strawberries before decorating. Then dry them extremely well.
This detail matters.
Water sitting on berries can transfer to the chocolate surface and spoil the clean glossy appearance.
Keep several strawberries whole with their green leaves attached. Cut others vertically in half so their bright centers are visible.
Arrange them in a mound over the center of the cake.
Nestle irregular pieces of dark chocolate between the berries.
For the closest appearance to our reference cake, aim for:
- Tall dark chocolate layers
- Thick pink strawberry filling
- Pink frosting around the exterior
- Dark glossy ganache on top
- Uneven chocolate drips
- Whole strawberries with green tops
- Halved strawberries facing outward
- Chunky pieces of dark chocolate
- A generous rather than minimalist topping
Refrigerate the decorated cake briefly before slicing.
How to Get a Clean, Dramatic Slice
That first cut is part of the experience.
Use a long, sharp knife.
Run the blade under hot water, then wipe it completely dry.
Make one clean downward cut.
Wipe the blade before cutting again.
This helps reveal the alternating dark chocolate cake and pink strawberry cream instead of smearing them together.
Let a refrigerated slice sit for a short period before eating. Butter-based frosting becomes firmer when cold, so a little time at room temperature gives it a softer mouthfeel.
Common Mistakes and How to Fix Them
The cake layers sink.
Avoid opening the oven repeatedly during the early stage of baking. Measure the leaveners carefully and bake until the centers are actually set.
The cake is dry.
Too much flour or excessive baking time are common causes. Weighing flour is more reliable than packing it into a measuring cup.
The buttercream is runny.
The butter may be too warm, or too much cream may have been added. Chill it briefly, then beat again.
The layers slide.
Your filling may be too soft or too thickly applied. Chill the assembled layers before applying the final coating.
The ganache runs to the bottom.
It is likely too warm or too fluid. Give it more cooling time.
The ganache barely drips.
It has probably cooled too far. Warm it very gently.
The ganache looks grainy or separated.
Excess heat can damage the emulsion. King Arthur Baking identifies overheating as one possible reason for broken ganache.
Chocolate crumbs appear in the pink frosting.
Use the crumb coat. Chill it before applying the final buttercream.
Can You Prepare the Cake Ahead?
Yes. In fact, dividing the work can make this cake easier.
Bake the chocolate layers ahead and cool them completely. Once cool, wrap each layer tightly so it does not dry out.
You can then make the buttercream and assemble the cake later.
For the freshest appearance, I prefer adding the fresh strawberry crown closer to serving time rather than leaving cut berries on the cake longer than necessary.
More Recipes for Chocolate and Strawberry Fans
Once you master this cake, several techniques can carry into other desserts.
Learning how fruit behaves in cake is particularly useful. Our guide to what strawberry purée is made of explains another popular form of strawberry preparation.
You can also read our guide on how to make purée when working with fruit-based fillings and sauces.
The lesson from this cake is simple: dramatic presentation does not require complicated decoration. Good structure, strong color contrast, and careful temperature control do most of the work.
Frequently Asked Questions
What is Strawberry Velvet Ganache Dream Cake?
It is a tall chocolate layer cake filled and coated with strawberry buttercream, finished with chocolate ganache, fresh strawberries, and dark chocolate pieces.
Can I use fresh strawberries in the buttercream?
You can make strawberry frostings with fresh fruit, but you should not simply replace the freeze-dried strawberry powder with the same volume of fresh berries in this formula. Fresh fruit introduces considerably more water and can change the frosting’s structure.
Can I use water instead of coffee?
Yes. Use the same amount of hot water. The cake will still work. Coffee is included mainly to support the chocolate flavor.
Why is my chocolate cake batter so thin?
The liquid consistency is intentional. Do not try to correct it by adding flour just because it looks thinner than a classic butter-cake batter.
How do I stop ganache from melting the frosting?
Chill the frosted cake and allow the ganache to cool before adding it. Always make a single test drip first.
What chocolate is best for the ganache?
A good semisweet chocolate is a practical choice for this recipe. Different chocolates can produce different ganache consistencies because their composition varies.
Can I make this cake without three pans?
You can bake in batches if you only own one or two suitable pans. However, do not leave batter containing activated chemical leaveners sitting around unnecessarily long. Three matching pans are the simplest route to even layers.
Why use freeze-dried strawberries?
They provide concentrated strawberry flavor and color without introducing as much moisture as fresh fruit. That makes them especially useful in a butter-based frosting.
How do I make the cake look like the photo?
Keep the cake tall. Use three dark chocolate layers with thick pink filling. Cover the exterior in strawberry frosting. Add glossy chocolate drips, then pile whole and halved strawberries with rough dark-chocolate pieces on top.
Print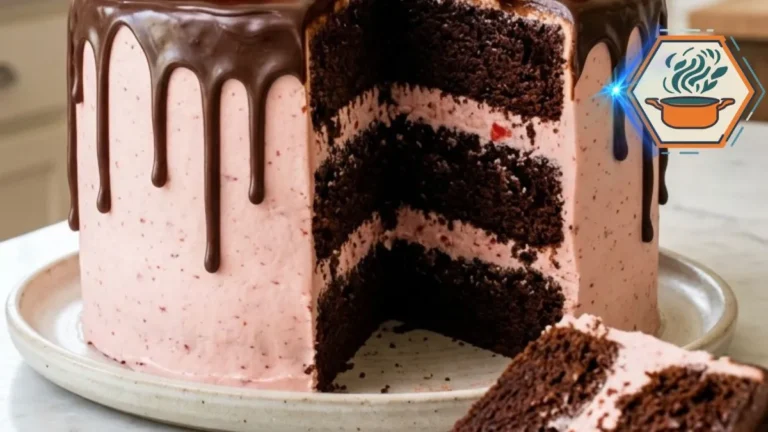
Strawberry Velvet Ganache Dream Cake
A tall chocolate layer cake filled and frosted with fluffy strawberry buttercream, finished with glossy semisweet chocolate ganache, fresh strawberries, and dark chocolate chunks.
- Total Time: About 2 hours 15 minutes, including cooling and chilling
- Yield: 12–14 slices
Ingredients
Chocolate Cake:
2 cups (240 g) all-purpose flour
3/4 cup (64 g) unsweetened cocoa powder
1 3/4 cups (350 g) granulated sugar
2 teaspoons baking powder
1 1/2 teaspoons baking soda
1/2 teaspoon fine salt
2 large eggs, room temperature
1 cup (240 ml) whole milk, room temperature
1/2 cup (120 ml) neutral vegetable oil
2 teaspoons vanilla extract
1 cup (240 ml) hot brewed coffee or hot water
Strawberry Buttercream:
1 1/2 cups (340 g) unsalted butter, softened
4 1/2 cups (540 g) powdered sugar
1/3 cup finely ground freeze-dried strawberries
1 teaspoon vanilla extract
3 to 4 tablespoons heavy cream
1 small pinch fine salt
Chocolate Ganache:
8 oz (227 g) semisweet chocolate, finely chopped
3/4 cup (180 ml) heavy cream
Topping:
1 1/2 cups fresh strawberries, some whole and some halved
3 oz (85 g) dark chocolate, broken into irregular chunks
Optional:
1/3 to 1/2 cup strawberry preserves
Instructions
1. Preheat the oven to 350°F (175°C). Grease three 8-inch round cake pans. Line the bottoms with parchment paper and lightly grease the parchment.
2. In a large bowl, whisk together the flour, cocoa powder, sugar, baking powder, baking soda, and salt. Break up any visible cocoa lumps.
3. In a separate bowl, whisk the eggs, whole milk, vegetable oil, and vanilla extract until combined.
4. Add the wet mixture to the dry ingredients. Mix just until most dry streaks disappear.
5. Slowly pour in the hot coffee or hot water while mixing gently. The batter will be thin; this is expected. Do not add extra flour.
6. Divide the batter evenly among the three prepared pans. For the most even layers, weigh the filled pans or divide the batter by weight.
7. Bake for 25 to 30 minutes, checking near the 25-minute mark. The cakes are ready when the centers spring back lightly and a toothpick inserted near the center comes out clean or with a few moist crumbs.
8. Cool the cakes in their pans for about 10 minutes. Carefully turn them onto cooling racks, remove the parchment, and cool completely before frosting.
9. To make the strawberry buttercream, beat the softened butter for 3 to 4 minutes until creamy and lighter in color.
10. Gradually beat in the powdered sugar. Add the finely ground freeze-dried strawberries, vanilla, and salt.
11. Add heavy cream 1 tablespoon at a time until the buttercream is fluffy and spreadable but still firm enough to support the cake layers.
12. Level any domed cake layers with a serrated knife if needed.
13. Place the first cake layer on a cake board or serving plate. Spread an even layer of strawberry buttercream over the top.
14. If using strawberry preserves, pipe or spread a buttercream border around the edge, then add only a thin layer of preserves inside the border.
15. Add the second cake layer and repeat. Finish with the third layer, preferably placed upside down for a flatter top.
16. Cover the cake with a thin crumb coat of strawberry buttercream. Refrigerate for 15 to 20 minutes, or until the frosting feels firm.
17. Apply the remaining strawberry buttercream over the top and sides. Smooth the frosting, then chill the cake again while preparing the ganache.
18. Place the finely chopped semisweet chocolate in a heat-safe bowl. Heat the heavy cream until steaming and just beginning to simmer around the edges.
19. Pour the hot cream over the chocolate. Leave undisturbed for 2 to 3 minutes, then stir slowly from the center outward until smooth and glossy.
20. Let the ganache cool until fluid but no longer hot. Test one drip on the chilled cake. If it runs too quickly, wait a few more minutes. If it is too thick to drip, warm it very gently.
21. Spoon or pipe ganache around the top edge to create natural drips of different lengths. Spread the remaining ganache across the top.
22. Wash the fresh strawberries and dry them thoroughly. Leave several whole and halve the others lengthwise.
23. Arrange the whole and halved strawberries over the center of the cake. Add irregular dark chocolate chunks between the berries.
24. Chill briefly to set the cake. For cleaner slices, use a sharp knife warmed under hot water and wiped completely dry between cuts.
Notes
Use room-temperature eggs and milk for a smoother cake batter.
The hot coffee strengthens the chocolate flavor. Hot water can be used instead if preferred.
The finished cake batter is intentionally thin. Do not add extra flour to thicken it.
Freeze-dried strawberries work well in buttercream because they add concentrated berry flavor without introducing the amount of water found in fresh strawberries.
Add heavy cream to the buttercream gradually. The frosting must remain firm enough to support three cake layers.
Never frost warm cake layers. They must be completely cool.
A crumb coat helps prevent dark chocolate crumbs from showing through the pink strawberry frosting.
Chill the frosted cake before adding the ganache.
Do not pour very hot ganache over buttercream. Test one drip first to check its consistency.
Wash the decorating strawberries ahead of time and dry them thoroughly before placing them on the ganache.
For stronger strawberry flavor, add a very thin layer of strawberry preserves between the cake and buttercream. A buttercream border can help keep the preserves contained.
For neat slices, warm a sharp knife with hot water, wipe it dry, slice, and clean the blade between cuts.
- Prep Time: 45 minutes
- Time: 40 minutes cooling/chilling, plus additional cake cooling
- Cook Time: 25–30 minutes
- Category: Dessert
- Method: Baking
- Cuisine: American-inspired
Final Baking Notes
The Strawberry Velvet Ganache Dream Cake looks ambitious, but it becomes manageable when you treat it as several small jobs rather than one giant project.
Bake the chocolate layers first. Let them cool completely. Make a stable strawberry buttercream. Build and chill the cake. Add the final frosting. Prepare the ganache and test its consistency. Only then add those signature chocolate drips and fresh strawberries.
The most important ingredient is not hidden in the pantry. It is temperature control. Cool cake keeps buttercream stable. Chilled frosting handles ganache better. Properly cooled ganache creates attractive drips.
Take your time with those stages and the final slice tells the whole story: dark chocolate cake, bright strawberry cream, glossy ganache, and fresh berries in one rich forkful.