
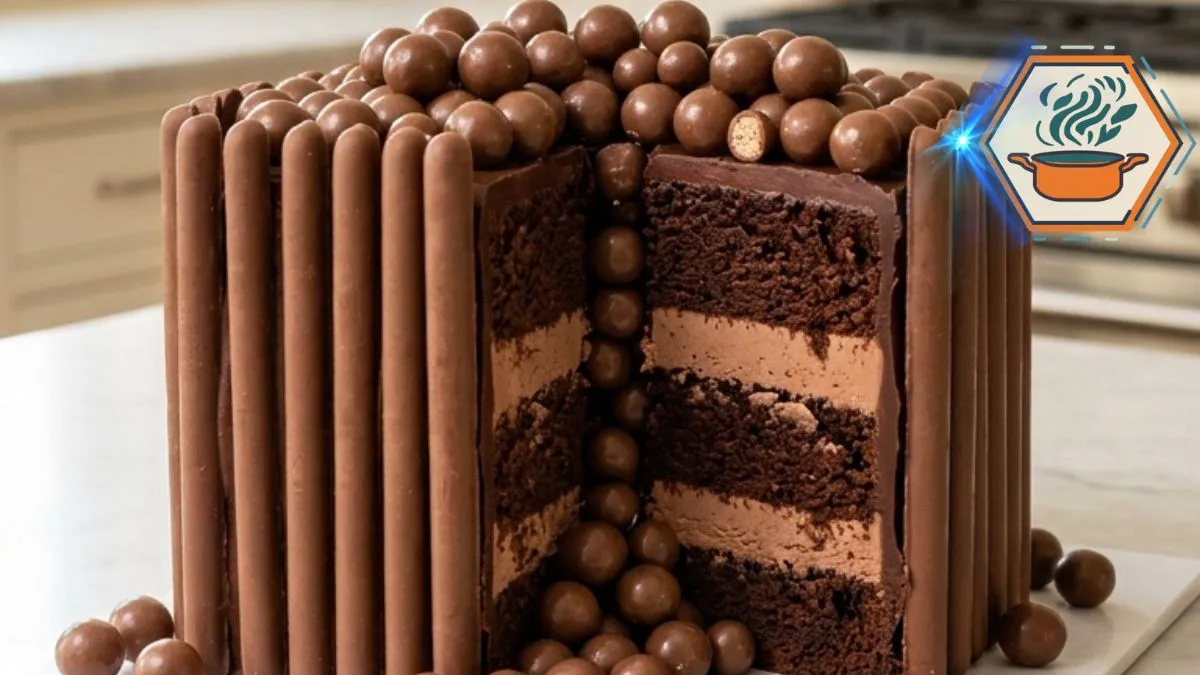
There are cakes you bake for dessert, and then there are cakes that become part of the celebration. This Chocolate Malt Ball Celebration Cake belongs firmly in the second group. Three soft cocoa layers hide a light milk-chocolate cream, while chocolate frosting, crisp wafer fingers, and a huge pile of glossy malt balls turn the outside into a centerpiece.
The first time you look at this cake, the decoration may seem harder than the baking. It is not. The secret is building it in stages and giving every component enough time to cool. Accurate measurements matter too. King Arthur Baking’s ingredient weight chart recommends weighing baking ingredients for consistent results, and that is particularly useful for a tall layer cake.
The other important detail is temperature. The filling contains cream cheese and whipped cream, so the completed cake needs refrigeration. The FDA’s food storage guidance recommends keeping refrigerators at or below 40°F (4°C) and refrigerating perishable foods promptly.
Affiliate disclosure: As an Amazon Associate I earn from qualifying purchases. This article may contain affiliate links to kitchen tools I find useful for preparing this recipe.v
jump to
Why This Chocolate Malt Ball Celebration Cake Works
Cut into the finished cake and you get three distinct experiences.
First comes the slight snap of the chocolate-covered wafer fingers. Then there is soft chocolate frosting and tender cocoa cake. Finally, the milk-chocolate cream makes the center lighter and smoother than the exterior suggests.
The malt balls add another texture. Their crisp malt centers keep every bite from feeling like nothing but cake and frosting.
Coffee is also included in the batter. It is not there to make the finished dessert taste like a cup of coffee. Its roasted character supports the cocoa flavor. If you prefer not to use it, hot water works.
For another chocolate dessert idea, see our chocolate cake guide with a rich filling.
Ingredients You’ll Need
Chocolate cake layers
- 2½ cups (300 g) all-purpose flour
- ¾ cup unsweetened cocoa powder
- 2 teaspoons baking powder
- 1½ teaspoons baking soda
- ½ teaspoon fine salt
- ¾ cup (170 g) unsalted butter, softened
- 1¾ cups (350 g) granulated sugar
- 4 large eggs, at room temperature
- 2 teaspoons vanilla extract
- 1 cup (240 ml) whole milk, at room temperature
- ½ cup (120 g) full-fat sour cream
- ½ cup (120 ml) hot coffee or hot water
Use natural unsweetened cocoa unless your cocoa is clearly labeled as suitable for recipes using baking soda. Different cocoa types have different acidity, which can affect a cake’s rise.
Milk-chocolate cream filling
- 10 oz (285 g) milk chocolate, finely chopped
- 1 cup (240 ml) heavy cream, for the chocolate
- 8 oz (225 g) full-fat cream cheese, softened
- ½ cup (60 g) powdered sugar
- 1 teaspoon vanilla
- 1 cup (240 ml) cold heavy whipping cream
That means you need 2 cups of heavy cream in total for the filling. This is an easy detail to miss when shopping.
Chocolate frosting
- 1½ cups (340 g) unsalted butter, softened
- 4½ cups (540 g) powdered sugar
- ¾ cup unsweetened cocoa powder
- ½ cup (120 ml) heavy cream, plus a little extra if required
- 2 teaspoons vanilla
- ¼ teaspoon salt
Decoration
- 35–45 chocolate-covered wafer fingers or slim chocolate wafer bars
- 5–6 cups chocolate-covered malt balls
- A few tablespoons of reserved chocolate frosting for attaching decorations
The exact quantity depends on the size of the candy and wafer fingers you buy.
Equipment That Makes This Cake Easier
Three identical 8-inch square pans give you the closest result to the tall cake shown here. You will also want parchment paper, mixing bowls, an electric mixer, cooling racks, a cake board, an offset spatula, and a long sharp knife.
Before You Start: Details That Matter
This is where many impressive-looking cake recipes become frustrating.
Do not begin the filling while the cake is still warm and expect to assemble everything immediately. Heat is the enemy of clean layers.
Bring the butter, eggs, milk, sour cream, and cream cheese to the temperatures stated in the recipe. The whipping cream, however, should remain cold.
Grease the pans, then line their bottoms with parchment. Leave enough parchment to make removal easy if needed.
If you only own one or two square pans, avoid leaving a fully mixed baking-soda batter sitting on the counter through several baking cycles. For the most even three-layer result, three matching pans are preferable.
How to Make the Chocolate Cake Layers
Preheat the oven to 350°F (175°C). Position a rack near the center.
Grease three 8-inch square pans. Add parchment to the bottoms and lightly grease the parchment.
Whisk together flour, cocoa powder, baking powder, baking soda, and salt. Break up any cocoa lumps before continuing.
In a large bowl, beat the softened butter and granulated sugar for about 3–4 minutes. The mixture should become paler and fluffy.
Add the eggs one at a time. Beat briefly after each addition. Scrape the bowl as necessary, then mix in the vanilla.
Now work gently.
Add about one-third of the dry mixture. Follow with part of the milk and sour cream. Continue alternating until incorporated.
Pour in the hot coffee slowly with the mixer on low. The batter will become looser. That is expected.
Do not keep beating once everything is combined. Too much mixing after the flour goes in can make the crumb less tender.
Divide the batter evenly among all three pans. A digital scale makes this much easier.
Bake for 24–30 minutes.
Start checking near 24 minutes. A toothpick inserted near the center should emerge with a few moist crumbs rather than wet batter.
Let the cakes rest in their pans for about 10 minutes. Carefully turn them onto cooling racks.
They must be completely cool before filling.
If you enjoy understanding the little details that change a baked dessert, our guide to the secret of crunchy cookies covers another useful side of baking texture.
Make the Silky Milk-Chocolate Filling
Finely chop the milk chocolate and put it into a heat-safe bowl.
Heat 1 cup of heavy cream until steaming and hot but not aggressively boiling. Pour it over the chocolate.
Do nothing for two minutes.
Then stir slowly from the center outward until the mixture becomes glossy and smooth. Let it cool to room temperature.
This cooling stage is essential. Hot chocolate mixture added to cream cheese can leave you with a filling that is far too loose for a tall cake.
Beat the softened cream cheese, powdered sugar, and vanilla until smooth. Mix in the cooled chocolate mixture.
In another cold bowl, whip the remaining 1 cup cold heavy cream until it reaches stiff peaks.
Fold the whipped cream into the chocolate mixture in several additions. Use a spatula and gentle movements so you retain the airy texture.
The finished filling should hold its shape.
If it looks too soft to support a cake layer, refrigerate it for 15–20 minutes and check again.
Make the Chocolate Frosting
Beat softened butter until creamy.
Sift the powdered sugar and cocoa if either is lumpy. Add them gradually to the butter rather than dumping everything into the bowl.
Begin mixing at low speed.
Add vanilla, salt, and most of the heavy cream. Beat until smooth. Add the remaining cream little by little until the frosting spreads easily but still holds a ridge.
For this cake, slightly firm frosting is better than loose frosting. It has to support dozens of decorations.
Assemble the Three Layers
Put a small dab of frosting in the middle of your cake board. Place the first cake layer on top.
Pipe a thick border of chocolate frosting around its upper perimeter. This is your frosting dam.
Spoon half of the milk-chocolate filling inside the dam. Spread it into an even layer without pushing it over the edge.
Add the second cake layer.
Repeat the frosting dam and filling. Add the final cake layer with its flattest side facing upward.
Look at the cake from every side and gently correct the alignment.
Refrigerate it for 30–45 minutes.
This short chill is one of the most important steps in the entire recipe. A tall filled cake is far easier to frost after the filling has firmed.
Crumb Coat and Final Frosting
Spread a thin coat of frosting over the top and all four sides.
This is called a crumb coat. It traps loose chocolate crumbs so they do not spoil your final surface.
Refrigerate the crumb-coated cake for about 15 minutes.
Apply a thicker second coat. Smooth the top and sides with an offset spatula or cake scraper.
The sides do not have to look bakery-perfect because most of them will be covered.
How to Recreate the Chocolate-Finger Exterior
Now the cake starts looking like a celebration centerpiece.
Press chocolate wafer fingers vertically into the tacky frosting. Place them closely together around the sides.
But there is one crucial exception.
At the center front, leave a vertical opening about 3–4 inches wide.
Do not fill this gap with wafer fingers.
This open channel creates the illusion that chocolate malt balls are pouring out of the cake.
If your wafer fingers are taller than the cake, that is fine. A slight border above the frosting helps contain the malt balls piled across the top.
Create the Signature Malt Ball Cascade
This part looks spontaneous. It should actually be carefully constructed.
Cover the top with a generous layer of chocolate-covered malt balls. Concentrate more of them toward the front opening.
Then build the cascade from the bottom upward.
Place several malt balls on the cake board directly below the opening. Dab tiny amounts of reserved frosting behind selected balls. Continue upward until the trail visually connects with the pile on top.
Do not simply pour five cups of malt balls over the cake. Most will roll onto your floor.
The finished decoration should look abundant rather than perfectly arranged. Slight irregularity makes the cascade more convincing.
For more chocolate techniques, our guide to mastering caramelized sugar is useful when you want to expand your celebration-dessert skills.
The Final Chill Is Not Optional
Refrigerate the decorated cake for approximately 1 hour.
Why?
The frosting firms. The filling becomes more stable. The layers settle. The decorative chocolates also grip the exterior better.
This is what gives you a better chance of cutting the tall, defined slice that makes this cake so dramatic.
How to Cut a Clean Slice
Take the cake from the refrigerator shortly before slicing.
Use a long, sharp knife. Dip the blade in hot water, then dry it completely.
Cut straight down through the malt balls, cake layers, filling, and base. Do not saw aggressively.
Wipe the blade clean between cuts.
For the best eating texture, individual slices can sit briefly at room temperature before serving. The frosting softens and the chocolate flavors become more noticeable.
Because the filling contains dairy ingredients that require refrigeration, don’t leave the cake sitting out for extended periods. FDA guidance says foods requiring refrigeration should generally not remain at room temperature for more than two hours, or one hour when temperatures exceed 90°F (32°C).
Common Problems and How to Fix Them
The filling is running out.
It was probably too warm or too soft. Chill it for 15–20 minutes before assembly. Always use a frosting dam.
The cake layers slide.
The filling may be too thickly applied, too warm, or the cake may need its first chilling period. Keep the layers level and refrigerate before exterior frosting.
My cake is dry.
Start checking it at 24 minutes. Do not wait until a tester is completely dry. A few moist crumbs are desirable.
The malt balls keep falling.
Build the cascade from the cake board upward. Use small dots of chocolate frosting as edible glue.
The wafer fingers won’t stick.
The final frosting may have become too cold or crusted. Add a small fresh dab of frosting behind each troublesome piece.
My frosting is too soft.
Avoid adding all the cream at once. Add only enough to reach a thick, spreadable consistency.
Make-Ahead Plan for a Stress-Free Celebration
A showpiece cake becomes much easier when you divide the work.
Day 1: Bake the three layers. Cool them completely. Wrap each layer well and refrigerate.
Day 2: Prepare the filling and frosting. Fill, stack, crumb-coat, frost, and decorate the cake.
Serving day: Give the finished cake its final chill, check the decorations, then slice when needed.
Since this cake contains a perishable dairy filling, keep it refrigerated at 40°F (4°C) or below.
What This Cake Tastes Like
Despite its dramatic appearance, this isn’t just a pile of candy.
The cocoa layers provide a darker chocolate base. Milk-chocolate cream brings a sweeter, softer contrast. The frosting adds richness, while the malt balls and wafer fingers contribute crispness.
That contrast is what makes the cake interesting.
You get soft cake, airy cream, smooth frosting, crisp wafers, and crunchy malt candy in a single slice.
It is particularly well suited to birthdays, family celebrations, chocolate-themed parties, and any occasion where the dessert needs to double as the centerpiece.
For more baking inspiration, browse Recipes Mind and our other step-by-step dessert guides.
FAQs About Chocolate Malt Ball Celebration Cake
Can I make this cake the day before?
Yes. In fact, making it ahead can make slicing easier because the assembled layers have time to become firm. Keep the cake covered and refrigerated because of the cream-cheese and whipped-cream filling.
Can I use hot water instead of coffee?
Yes. Replace the coffee with the same quantity of hot water. Coffee gives the cocoa flavor more depth, but it is not required for the cake to work.
Why does my chocolate cake fall apart when stacking?
The layers may still be warm, overly soft, or uneven. Cool them completely. Chill particularly delicate layers before stacking, and use a firm frosting dam around the filling.
How do I stop the malt balls from rolling off?
Do not pour them onto the cake. Arrange them deliberately. Use small amounts of chocolate frosting beneath strategic pieces to hold the cascade in place.
Can I use dark chocolate instead of milk chocolate?
You can, but the flavor and texture will change. Dark chocolate makes the filling less sweet and potentially firmer depending on its cocoa content. For the intended creamy milk-chocolate profile, use milk chocolate.
How many chocolate fingers do I need?
Plan for approximately 35–45 pieces. The exact count depends on the width of your chocolate fingers and the final dimensions of the frosted cake. Buying a few extras is sensible because some may break.
Does the cake really contain a hollow center filled with malt balls?
No. The cascade is a visual effect. The balls are arranged across the top, through the uncovered front section, and onto the cake board. This gives the appearance of an overflowing center without weakening the cake.
How should I store leftover cake?
Cover leftovers and refrigerate them promptly. The FDA recommends maintaining a refrigerator at or below 40°F (4°C) for foods requiring refrigeration.
Print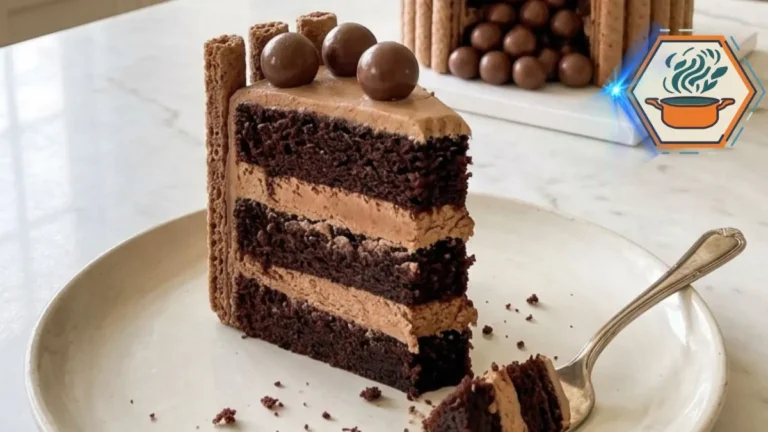
Chocolate Malt Ball Celebration Cake
A showstopping three-layer chocolate cake filled with silky milk-chocolate cream and covered with rich cocoa frosting, crisp chocolate wafer fingers, and a dramatic cascade of chocolate-covered malt balls. Chilling between stages keeps the tall square cake stable and gives you clean, defined slices.
- Total Time: Approximately 4 hours 30 minutes
- Yield: 16 servings (1 tall 8-inch square layer cake)
Ingredients
Chocolate Cake Layers
- 2½ cups (300 g) all-purpose flour
- ¾ cup (65–75 g) unsweetened cocoa powder
- 2 teaspoons baking powder
- 1½ teaspoons baking soda
- ½ teaspoon fine salt
- ¾ cup (170 g) unsalted butter, softened
- 1¾ cups (350 g) granulated sugar
- 4 large eggs, room temperature
- 2 teaspoons vanilla extract
- 1 cup (240 ml) whole milk, room temperature
- ½ cup (120 g) full-fat sour cream, room temperature
- ½ cup (120 ml) hot coffee or hot water
Milk Chocolate Cream Filling
- 10 oz (285 g) milk chocolate, finely chopped
- 1 cup (240 ml) heavy whipping cream, for the chocolate ganache
- 8 oz (225 g) full-fat cream cheese, softened
- ½ cup (60 g) powdered sugar
- 1 teaspoon vanilla extract
- 1 cup (240 ml) cold heavy whipping cream, for whipping
Chocolate Frosting
- 1½ cups (340 g) unsalted butter, softened
- 4½ cups (540 g) powdered sugar
- ¾ cup (65–75 g) unsweetened cocoa powder
- ½ cup (120 ml) heavy cream, plus more only if needed
- 2 teaspoons vanilla extract
- ¼ teaspoon fine salt
Exterior and Topping
- 35–45 chocolate-covered wafer fingers or slim chocolate wafer bars
- 5–6 cups chocolate-covered malt balls
- Reserved chocolate frosting, as needed to secure the malt balls
Instructions
- Prepare the pans. Preheat the oven to 350°F (175°C). Grease three 8-inch square cake pans. Line the bottoms with parchment paper and lightly grease the parchment.
- Combine the dry ingredients. Whisk flour, cocoa powder, baking powder, baking soda, and salt until evenly combined and free from large cocoa lumps.
- Cream the butter and sugar. Beat softened butter and sugar for 3–4 minutes, until lighter and fluffy. Add the eggs one at a time, mixing after each addition. Mix in vanilla.
- Finish the batter. On low speed, alternate additions of the dry mixture with the milk and sour cream. Mix only until combined. Slowly add the hot coffee or hot water. Scrape the bowl and mix briefly until uniform. Do not overmix.
- Divide and bake. Divide the batter evenly between the three prepared pans. Bake for 24–30 minutes. Begin checking at 24 minutes. A toothpick inserted in the center should come out with a few moist crumbs but no liquid batter.
- Cool completely. Leave the cakes in their pans for 10 minutes. Turn them onto cooling racks and remove the parchment. Cool completely before filling.
- Prepare the chocolate base for the filling. Put the finely chopped milk chocolate in a heat-safe bowl. Heat 1 cup heavy cream until steaming but not vigorously boiling. Pour it over the chocolate. Leave untouched for 2 minutes, then stir until smooth. Cool to room temperature.
- Finish the filling. Beat cream cheese, powdered sugar, and vanilla until smooth. Beat in the cooled chocolate mixture. In a separate cold bowl, whip the remaining 1 cup cold heavy cream to stiff peaks. Gently fold it into the chocolate mixture. If the filling does not hold its shape, refrigerate for 15–20 minutes before assembling.
- Make the frosting. Beat butter until creamy. Gradually add powdered sugar and cocoa powder on low speed. Add vanilla, salt, and most of the cream. Beat until smooth. Add additional cream only as necessary. The frosting should be thick enough to hold a piped border.
- Build the cake. Secure the first cake layer to a cake board with a small dab of frosting. Pipe a thick frosting dam around the edge. Spread half the milk-chocolate filling inside it. Add the second cake layer and repeat. Finish with the third layer.
- Chill the stacked cake. Refrigerate for 30–45 minutes to firm the filling and reduce movement.
- Crumb coat. Cover the cake with a thin layer of chocolate frosting. Refrigerate for 15 minutes.
- Apply the final frosting. Cover the top and four sides with the remaining frosting. Smooth the surface while keeping enough frosting on the sides to attach the wafer fingers.
- Add the chocolate fingers. Press the wafer fingers vertically around the sides. Leave a deliberate 3–4-inch-wide opening at the center front.
- Decorate the top. Cover the top generously with chocolate-covered malt balls, placing more near the front opening.
- Build the cascade. Arrange malt balls on the cake board beneath the opening. Work upward toward the top. Secure selected balls with small dots of chocolate frosting. Do not simply pour the candies over the cake.
- Final chill. Refrigerate the finished cake for about 1 hour before slicing.
- Serve. Use a long, sharp knife. For cleaner slices, warm the blade in hot water and wipe it completely dry before cutting. Clean the knife between slices.
Notes
- The cake layers must be completely cool before assembly.
- The milk-chocolate mixture must cool before it is added to the cream-cheese mixture.
- Use cold heavy cream for the portion that will be whipped.
- If the filling seems loose, chill it for 15–20 minutes before stacking.
- Do not skip the frosting dam. It helps keep the soft filling between the layers.
- The malt-ball cascade is decoratively constructed, not poured from a hollow cake.
- Build the cascade from the bottom upward and use frosting as edible adhesive.
- Buy a few extra wafer fingers because breakage is possible.
- Exact quantities of wafer fingers and malt balls depend on their size and brand.
- Because the filling contains cream cheese and whipped cream, keep the cake refrigerated. The FDA advises keeping refrigerated foods at 40°F (4°C) or below and generally not leaving perishables at room temperature for more than two hours.
- For best texture, let an individual refrigerated slice soften briefly before eating rather than leaving the whole cake out for a long period.
- Prep Time: 1 hour 30 minutes
- Chill/Cooling Time: 2 hours 30 minutes
- Cook Time: 24–30 minutes
- Category: Dessert
- Method: Baking
- Cuisine: American-inspired
A Celebration Cake Worth the Extra Steps
The moment that makes this cake worthwhile comes when the first large slice is lifted away.
Suddenly, the decoration tells only half the story.
Behind those crisp chocolate fingers are three dark cocoa layers separated by thick ribbons of milk-chocolate cream. Above them sits a crowd of glossy malt balls. Down the front, more chocolates appear to tumble toward the board.
That dramatic result does not require a professional pastry kitchen. It requires something much more practical: cool cake layers, stable filling, firm frosting, careful chilling, and patient decoration.
Build it in that order and the Chocolate Malt Ball Celebration Cake becomes far more manageable than its extravagant appearance suggests.