
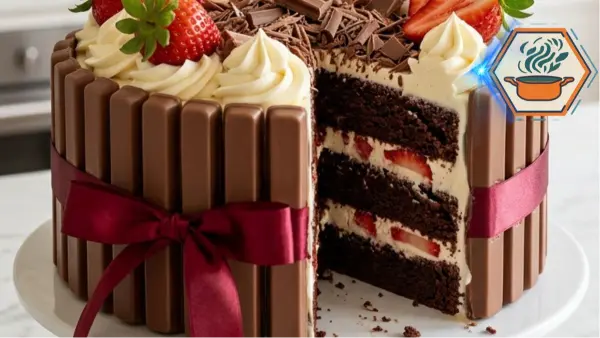
Some cakes taste wonderful but look ordinary. Others make everyone stop talking for a second when they reach the table. This Strawberry Chocolate Gift Cake belongs to the second group. It looks like a present wrapped in chocolate, strawberries, vanilla cream, and a deep red ribbon. Cut into it, and the surprise continues with dark chocolate layers and pockets of strawberry and cream.
The best part is that the design looks harder than it really is. You do not need advanced cake-decorating skills. The chocolate fingers hide small frosting imperfections, while piped vanilla cream and fresh strawberries create most of the decoration. If you enjoy fruit-filled desserts, you may also like our guide to strawberry-filled chocolate cake.
There are, however, a few details that make the difference between a cake that simply looks good and one that can actually be sliced cleanly. The layers must cool fully. The strawberries must be dry. The vanilla cream needs enough structure for piping. The chocolate frosting must also have the right consistency to hold the biscuit border. Even cake doneness deserves attention: King Arthur Baking recommends looking for several signs together, including a set surface, edges beginning to pull from the pan, and a center that springs back when gently pressed.
Affiliate disclosure: As an Amazon Associate I earn from qualifying purchases. This article may contain affiliate links to kitchen tools I find useful for preparing this recipe.
JUMP TO
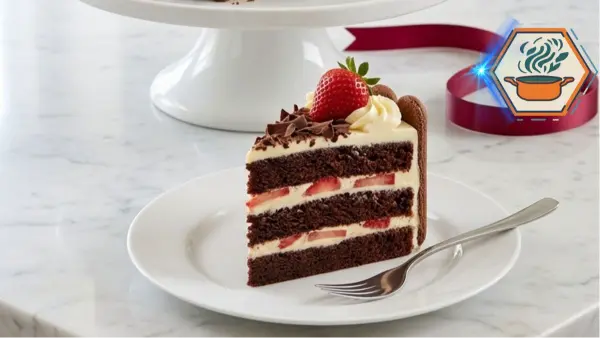
Strawberry Chocolate Gift Cake
A moist chocolate layer cake filled with vanilla cream and fresh strawberries, covered with chocolate frosting, surrounded by chocolate biscuit fingers, and finished with piped vanilla cream, strawberries, chocolate pieces, and a decorative red ribbon.
- Total Time: About 2 hours 10 minutes, including cooling/chilling
- Yield: 1 8-inch layer cake, about 12–16 slices
Ingredients
Chocolate Cake
- 2 cups (240 g) all-purpose flour
- 1 3/4 cups (350 g) granulated sugar
- 3/4 cup (about 65–75 g) unsweetened cocoa powder
- 2 teaspoons baking powder
- 1 1/2 teaspoons baking soda
- 1/2 teaspoon fine salt
- 2 large eggs, room temperature
- 1 cup (240 ml) whole milk, room temperature
- 1/2 cup (120 ml) neutral vegetable oil
- 2 teaspoons vanilla extract
- 1 cup (240 ml) hot brewed coffee or hot water
Chocolate Frosting
- 1 cup (226 g) unsalted butter, softened
- 3 1/2 cups (420 g) powdered sugar
- 3/4 cup (about 65–75 g) unsweetened cocoa powder
- 1/3 cup (80 ml) heavy cream
- 2 teaspoons vanilla extract
- Pinch of fine salt
Vanilla Cream
- 8 oz (226 g) full-fat block cream cheese, softened but not warm
- 1/2 cup (60 g) powdered sugar
- 1 teaspoon vanilla extract
- 1 cup (240 ml) cold heavy whipping cream
Filling and Decoration
- 2–3 cups fresh strawberries, washed and thoroughly dried
- 30–36 chocolate-covered biscuit fingers or chocolate wafer fingers
- 2 oz (55 g) milk or semisweet chocolate, chopped or shaved
- 1 clean red decorative ribbon, for presentation only
Instructions
- Preheat the oven to 350°F (175°C). Lightly grease two 8-inch round cake pans. Line the bottoms with parchment paper and lightly grease the parchment.
- Whisk the flour, sugar, cocoa powder, baking powder, baking soda, and salt in a large mixing bowl.
- Add the eggs, milk, vegetable oil, and vanilla. Mix on low speed until combined, then briefly mix until smooth.
- Slowly pour in the hot coffee while mixing on low. The batter will be thin. This is normal. Do not add extra flour.
- Divide the batter evenly between the prepared pans. Bake for 28–33 minutes, or until the centers are set, spring back lightly when touched, and a tester comes out without wet batter.
- Cool the cakes in their pans for 10–15 minutes. Turn them onto wire racks, remove the parchment, and cool completely before decorating.
- Wash and thoroughly dry the strawberries. Reserve attractive whole and halved berries for the top. Thinly slice enough strawberries for the filling.
- For the chocolate frosting, beat the softened butter until creamy. Gradually beat in powdered sugar and cocoa powder. Add the heavy cream, vanilla, and salt. Beat until smooth and spreadable.
- For the vanilla cream, beat cream cheese, powdered sugar, and vanilla until smooth. Slowly add the cold whipping cream. Whip until the cream forms firm peaks suitable for piping. Do not overbeat.
- If necessary, level the cooled cake layers with a serrated knife. Place the first layer on a cake stand or board.
- Pipe or spread a thin chocolate frosting border around the edge. Add vanilla cream inside the border, followed by a single layer of sliced strawberries. Avoid overfilling.
- Place the second cake layer on top. Apply a thin crumb coat of chocolate frosting over the top and sides. Refrigerate for 15–20 minutes.
- Cover the chilled cake with the remaining chocolate frosting.
- While the frosting is still soft, press the chocolate biscuit fingers vertically around the entire cake. Keep them close together and as straight as possible.
- Transfer the remaining vanilla cream to a piping bag fitted with a large star tip. Pipe generous swirls around the top.
- Arrange whole, halved, and sliced strawberries between the cream swirls. Scatter chopped or shaved chocolate over the center.
- Wrap a clean decorative red ribbon around the chocolate biscuit border for the gift-box appearance. The ribbon is not edible and must be removed before slicing.
- Refrigerate the finished cake for about 30 minutes before cutting. For cleaner slices, use a sharp knife warmed in hot water and wiped dry between cuts.
Notes
- Completely cool the cake before adding any frosting or cream.
- Dry the strawberries very well. Water can soften the cream and cause the fruit to slide.
- Do not add extra flour when the chocolate batter looks thin.
- Use full-fat block cream cheese, not spreadable cream cheese from a tub, for better piping stability.
- Heavy whipping cream should be cold.
- Do not overfill the middle with strawberries. Excess fruit and juice can make the layers slide.
- Add the chocolate fingers before the chocolate frosting becomes firm.
- The number of chocolate fingers depends on their width and the final circumference of the frosted cake.
- The red ribbon is decorative only. Remove it before cutting or serving.
- Because the finished cake contains whipped cream, cream cheese, and cut strawberries, keep it refrigerated.
- Coffee intensifies the chocolate flavor. Hot water can replace it at a 1:1 ratio.
- There is no separate “crust” in this cake. Its structure comes from properly baked chocolate layers, stable filling, frosting, chilling, and the biscuit border.
- Prep Time: 50 minutes
- Additional/Chilling Time: 50 minutes
- Cook Time: 28–33 minutes
- Category: Dessert
- Method: Baking
- Cuisine: American
A Chocolate Cake Made to Look Like a Gift
Imagine bringing a birthday cake to the table without a cake box.
The cake itself looks like the gift.
Tall chocolate fingers form a neat wall around the outside. A red ribbon wraps around them. On top, ripe strawberries sit between white vanilla cream swirls. Small pieces of chocolate cover the center.
Then the first slice is removed.
Inside are dark chocolate cake layers with pale cream and pieces of strawberry. The contrast makes every slice almost as attractive as the whole cake.
That is the idea behind this recipe.
It works for birthdays, anniversaries, Valentine’s Day, Mother’s Day, or a romantic dinner. Change the ribbon color and it can fit many other celebrations too.
The ribbon, however, is decoration only. It should stay outside the food and be removed before slicing.
Why This Strawberry Chocolate Gift Cake Works
Chocolate and strawberry already make a natural pair. This cake adds vanilla and cream cheese without making the flavor complicated.
The chocolate cake uses vegetable oil rather than butter. Oil helps the crumb remain tender after refrigeration.
Hot coffee is another useful ingredient. It deepens the cocoa flavor without making the finished cake taste like a cup of coffee. Hot water can be used instead if you prefer.
The outside has two different creams.
Chocolate frosting covers and supports the cake. A lighter vanilla cream is used for the decorative swirls and filling.
Finally, the chocolate biscuit fingers serve two purposes. They give the cake its gift-box appearance, but they also create a clean outer finish without demanding perfectly smooth frosting.
Ingredients
For the Chocolate Cake
- 2 cups (240 g) all-purpose flour
- 1 3/4 cups (350 g) granulated sugar
- 3/4 cup (65–75 g) unsweetened cocoa powder
- 2 teaspoons baking powder
- 1 1/2 teaspoons baking soda
- 1/2 teaspoon fine salt
- 2 large eggs, preferably at room temperature
- 1 cup (240 ml) whole milk
- 1/2 cup (120 ml) neutral vegetable oil
- 2 teaspoons vanilla extract
- 1 cup (240 ml) hot coffee or hot water
For the Chocolate Frosting
- 1 cup (226 g) unsalted butter, softened
- 3 1/2 cups (420 g) powdered sugar
- 3/4 cup (65–75 g) unsweetened cocoa powder
- 1/3 cup (80 ml) heavy cream, plus a little more if needed
- 2 teaspoons vanilla extract
- 1 pinch salt
For the Vanilla Cream
- 8 oz (226 g) full-fat block cream cheese, softened but not warm
- 1/2 cup (60 g) powdered sugar
- 1 teaspoon vanilla extract
- 1 cup (240 ml) cold heavy whipping cream
For the Decoration and Filling
- 2–3 cups fresh strawberries
- 30–36 chocolate-covered biscuit fingers or wafer fingers
- 2 oz (55 g) milk or semisweet chocolate
- 1 clean decorative red ribbon
Choose firm, bright strawberries rather than very soft berries. Soft fruit releases more juice and can make the cream watery.
Equipment You Will Need
Use two 8-inch round cake pans for the proportions in this recipe. You will also need parchment paper, mixing bowls, an electric mixer, a cooling rack, an offset spatula or regular spatula, a piping bag, and a large star piping tip.
A rotating cake stand is useful but optional.
For the cleanest layers, a long serrated knife or cake leveler also helps.
Step 1: Prepare the Pans Correctly
Preheat the oven to 350°F (175°C).
Grease two 8-inch round cake pans lightly.
Cut two circles of parchment paper and place one in the bottom of each pan. Grease the parchment lightly as well.
This small step matters. A moist chocolate cake can stick to an unlined pan, and forcing it out may tear the layer.
Set the pans aside.
Step 2: Mix the Chocolate Batter
In a large bowl, whisk together the flour, sugar, cocoa powder, baking powder, baking soda, and salt.
Break up any cocoa lumps before adding the wet ingredients.
Add the eggs, whole milk, vegetable oil, and vanilla.
Mix on low speed first so the dry ingredients stay in the bowl. Increase to medium and mix only until the batter becomes smooth.
Now slowly pour in the hot coffee.
The batter will become quite thin.
Do not add extra flour just because it looks runny.
That fluid consistency is expected with this style of chocolate cake. Adding more flour can give you a heavier, drier result.
Step 3: Bake the Layers
Divide the batter evenly between the prepared pans.
If you want flatter layers with less trimming after baking, Wilton Bake-Even Cake Strips can be wrapped around the pans according to the manufacturer’s directions. They are optional, but they are especially useful for tall celebration cakes like this one.
Bake for approximately 28–33 minutes.
Avoid repeatedly opening the oven during the first part of baking. A cake whose structure has not set can sink.
Because chocolate cake does not give you the same golden color cues as vanilla cake, look at several signs. The top should appear set rather than wet and shiny. The center should spring back gently, and a tester inserted near the center should not come out coated in raw batter. These visual and touch tests are particularly useful for chocolate cakes.
Cool the cakes in their pans for about 10–15 minutes.
Carefully turn them onto cooling racks, remove the parchment, and allow them to become completely cool.
Never frost a warm layer. Heat will soften both the butter frosting and cream filling.
Step 4: Prepare the Strawberries
While the cakes cool, wash the strawberries.
If you prepare strawberries often, a strawberry huller makes this step quicker and removes the leafy top without cutting away as much fruit. I like the OXO Good Grips Strawberry Huller for this job.
Then dry the strawberries extremely well.
This is one of the easiest details to overlook.
Water left on the berries can run into the vanilla cream. It can also make strawberries slide across the top of the cake.
Set aside your prettiest whole strawberries for the top.
Remove the stems from the berries used inside the cake and slice them fairly thinly.
For the decoration, use a mixture of whole, halved, and sliced berries to reproduce the full, abundant appearance.
Step 5: Make the Chocolate Frosting
Beat the softened butter until creamy.
Add the powdered sugar and cocoa gradually. Start the mixer on low speed.
Pour in the heavy cream, vanilla, and a pinch of salt.
Beat until the frosting is smooth and spreadable.
Check the texture before assembling.
It should hold onto a spatula but spread without tearing the cake.
If it feels too stiff, add heavy cream one teaspoon at a time. If it is unusually soft, chill it briefly before continuing.
Step 6: Make Stable Vanilla Cream
Beat the softened cream cheese with powdered sugar and vanilla until smooth.
Do not overbeat it.
With the mixer running at low speed, slowly pour in the cold heavy whipping cream.
Once incorporated, increase the speed and whip until the mixture forms firm peaks suitable for piping.
Stop as soon as it becomes firm.
Overwhipping dairy cream can make its texture grainy.
The temperature contrast is intentional here. The cream cheese should be soft enough to mix without lumps, while the heavy cream should remain cold so it whips properly.
Step 7: Build the Cake
If the cakes have large domes, trim them gently with a serrated knife.
Place the first layer on a cake board or serving stand. If you decorate cakes regularly, a revolving cake decorating stand makes the crumb coat and final frosting much easier to control, especially when you need straight sides for the chocolate finger border.
Spread a thin layer of chocolate frosting around the outer edge to create a barrier. Add vanilla cream inside that border, followed by a single layer of sliced strawberries.
Do not pile too many berries in the center. A very thick fruit layer can make the finished cake slide when cut.
Place the second chocolate layer on top.
Check the cake from eye level. Adjust it now if it is leaning.
Apply a thin coating of chocolate frosting over the entire cake. This first coat catches loose crumbs.
Chill for about 15–20 minutes.
Then apply the final chocolate frosting layer.
It does not have to be perfectly smooth because the sides will be covered.
If you want more practice with clean cake finishes, our guide to caramelizing and finishing desserts covers another useful set of dessert techniques.
Step 8: Create the Chocolate Gift-Box Border
Do this while the final frosting is still soft enough to act like glue.
Press the chocolate fingers vertically against the sides of the cake.
Place them close together.
Keep their bottom edges level with the cake board or stand. The tops should rise slightly above the upper edge of the cake, creating the tall border seen in the finished design.
Continue around the entire cake.
Depending on the exact width of your biscuits and cake after frosting, you may need slightly fewer or more than 30–36 pieces.
Do not force the final biscuit into a space that is too narrow. Small spacing adjustments across several biscuits look better.
Step 9: Decorate the Top
Transfer the vanilla cream to a piping bag fitted with a large star tip.
Pipe generous swirls around the upper edge.
Place whole and halved strawberries between the swirls.
Add sliced strawberries where you want more red color without adding too much weight.
Chop or shave the chocolate into small pieces and scatter them through the center.
The goal is not perfect symmetry.
The original gift-cake look works because it feels abundant: dark chocolate, bright berries, white cream, and small chocolate pieces all visible at once.
For another fruit technique that can be useful in future desserts, see our guide on what strawberry puree is made from.
Step 10: Add the Signature Red Ribbon
Wrap a clean red ribbon around the outside of the chocolate fingers.
Tie it securely but gently.
You want enough tension to hold the border visually together without pushing the biscuits into the frosting.
The ribbon should be considered a non-edible presentation element.
Remove it completely before cutting the cake.
Now refrigerate the finished cake for about 30 minutes before serving. This short chilling period helps the creams firm and makes slicing easier.
How to Get Clean, Beautiful Slices
The first cut is the moment when the interior becomes part of the presentation.
Use a long, sharp knife.
Dip the blade in hot water, wipe it dry, and make your cut.
Clean the knife between slices.
This prevents chocolate crumbs and cream from being dragged through every layer.
Do not try to cut through the ribbon. Remove it first. If necessary, move one chocolate finger aside where you plan to make the first cut.
You should see distinct bands of dark chocolate cake, pale cream, and red strawberry.
Common Mistakes to Avoid
Decorating warm cake: Even slightly warm layers can soften the filling and frosting.
Leaving strawberries wet: Moisture can loosen the cream and create red streaks.
Adding too many strawberries between layers: More fruit is not always better. Too much can make the layers unstable.
Making the vanilla cream too soft: It must be firm enough to hold piped ridges.
Waiting too long before adding the chocolate fingers: Add them while the outer frosting is still tacky.
Overbaking the chocolate layers: This cake is meant to have a moist crumb. Watch the cake rather than relying only on the timer.
Can You Make It Ahead?
Yes.
In fact, splitting the work across two days can make this cake much easier.
Bake the chocolate layers one day ahead. Once completely cool, wrap them well and keep them according to your normal cake-storage method.
On serving day, prepare the creams, strawberries, and decoration.
For the freshest appearance, put the cut strawberries and final decorations on the cake reasonably close to serving time.
How to Store Strawberry Chocolate Gift Cake
This finished cake contains cream cheese, whipped cream, and fresh cut fruit, so refrigeration is important. USDA food-safety guidance distinguishes ordinary baked cakes from cakes containing cream cheese frosting or cream fillings, which require colder handling.
Keep the finished cake covered in the refrigerator.
For best texture and appearance, it is particularly good within the first couple of days. The strawberries gradually release moisture as they sit, so the decoration will not remain at its best indefinitely.
Let individual slices lose some of their refrigerator chill before eating if you prefer softer frosting and a fuller chocolate flavor.
Frequently Asked Questions
Can I use water instead of coffee?
Yes. Use the same quantity of hot water. Coffee gives the cocoa a deeper flavor, but the recipe still works without it.
Why is my chocolate cake batter so thin?
That is normal for this recipe. The cup of hot liquid creates a fluid batter. Do not compensate by adding extra flour.
Can I use frozen strawberries?
Fresh strawberries are much better for this design. Thawed berries release considerable liquid and become soft, which can affect both appearance and stability.
How do I stop the chocolate fingers from falling off?
Apply them while the chocolate frosting is still soft. Press each one gently into the frosting. Chilling the assembled cake afterward helps the frosting firm around them.
Can I make the cake without the red ribbon?
Absolutely. The ribbon is decorative. The chocolate border will still work without it.
Can I use three cake layers?
Yes, but the ingredient quantities and structural needs may change. A taller cake also places more pressure on soft strawberry filling. For the most predictable version of this recipe, begin with the two 8-inch layers specified above.
What can I use instead of chocolate wafer fingers?
Use straight chocolate-covered biscuit sticks of similar height and width. Choose a product with enough flat surface to sit firmly against the frosting.
Why did my cake sink in the center?
Possible causes include underbaking, inaccurate leavening measurements, or disturbing the cake before its structure has set. A cake that springs back when gently pressed and begins pulling slightly from the pan is showing useful signs of doneness.
The Moment You Cut Into It
The finished Strawberry Chocolate Gift Cake is designed for two reveals.
The first happens when you bring it to the table. Guests see a tall wall of chocolate fingers tied with a red ribbon, topped with strawberries and generous vanilla swirls.
The second happens when you remove the first slice.
Dark chocolate layers appear behind the decorative shell. Fresh strawberry brings color to the filling. Vanilla cream breaks up the richness of the cocoa.
It looks elaborate, but the method is built from manageable steps.
Bake the layers. Let them cool completely. Prepare firm creams. Dry the berries. Build the cake patiently. Use the chocolate fingers to create the clean outer wall. Then finish with strawberries, chocolate, and that unmistakable red ribbon.
That combination turns a familiar chocolate-and-strawberry cake into something that actually looks like a present.
And unlike a gift box, this is one package everyone will be happy to cut open.