
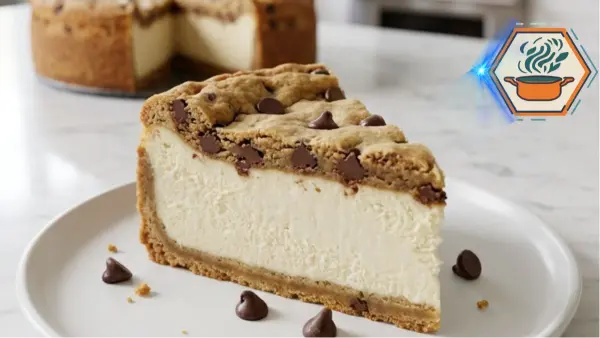
There is something special about cutting into a dessert and seeing three beautiful layers appear at once. That is exactly what happens with this Chocolate Chip Cookie Cheesecake. The top looks like a thick, golden chocolate chip cookie. Underneath waits a tall layer of cool, creamy vanilla cheesecake. Then another buttery cookie layer forms the base.
The contrast is what makes this dessert memorable. You get soft cookie, pockets of semisweet chocolate, and smooth cheesecake in the same forkful. It also makes a wonderful make-ahead dessert because the cheesecake needs several hours in the refrigerator before slicing. For more baking inspiration and approachable homemade recipes, visit RecipesMind.
There is one detail that matters before we begin: this recipe contains eggs and dairy, so correct handling and refrigeration are important. The FDA egg-safety guidance recommends keeping eggs refrigerated and cooking foods containing eggs thoroughly. The FDA also advises keeping refrigerated foods at 40°F (4°C) or below.
Affiliate disclosure: As an Amazon Associate I earn from qualifying purchases. This article may contain affiliate links to kitchen tools I find useful for preparing this recipe.
JUMP TO
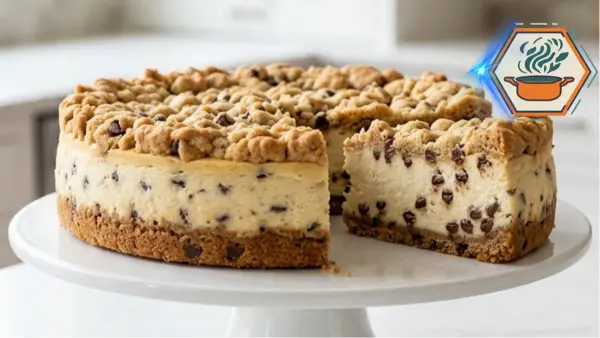
Chocolate Chip Cookie Cheesecake
A rich Chocolate Chip Cookie Cheesecake made with a thick, creamy vanilla cheesecake center between two soft chocolate chip cookie layers. The bottom is lightly pre-baked for structure, while pieces of cookie dough bake into a golden, chewy top.
- Total Time: 7 hours 50 minutes
- Yield: 12 slices
Ingredients
Chocolate Chip Cookie Layers
- 1 cup (226 g) unsalted butter, softened
- 3/4 cup (150 g) packed light brown sugar
- 1/2 cup (100 g) granulated sugar
- 2 large eggs, room temperature
- 2 teaspoons vanilla extract
- 2 1/4 cups (270 g) all-purpose flour
- 1 teaspoon baking soda
- 1/2 teaspoon fine salt
- 1 1/2 cups (255 g) semisweet chocolate chips
Vanilla Cheesecake Filling
- 24 oz (680 g) full-fat block cream cheese, softened
- 3/4 cup (150 g) granulated sugar
- 3/4 cup (180 g) full-fat sour cream, room temperature
- 3 large eggs, room temperature
- 2 teaspoons vanilla extract
- 2 tablespoons (16 g) all-purpose flour
- 1/4 teaspoon fine salt
Instructions
- Preheat the oven to 350°F (175°C). Line the bottom of a 9-inch springform pan with parchment paper. Lightly grease the bottom and sides.
- Add the softened butter, brown sugar, and granulated sugar to a large bowl. Beat for 2–3 minutes, until creamy.
- Add the eggs one at a time. Mix in the vanilla extract.
- In a separate bowl, whisk together the flour, baking soda, and salt.
- Add the dry ingredients gradually to the butter mixture. Mix just until no dry flour remains. Fold in the chocolate chips.
- Reserve about 40–45% of the cookie dough for the top. Press the remaining 55–60% evenly into the bottom of the prepared springform pan.
- Bake the cookie base for 10–12 minutes. It should look lightly set but should not be fully baked or deeply browned.
- Remove the pan from the oven and let the cookie base cool for about 10 minutes. Reduce the oven temperature to 325°F (165°C).
Beat the softened cream cheese and granulated sugar on low to medium-low speed until smooth. A hand mixer with several low-speed settings is especially useful here because cheesecake batter should not be aggressively whipped. [This KitchenAid hand mixer is a useful option for this step.]. Scrape down the bowl.
- Mix in the sour cream, vanilla extract, flour, and salt.
- Add the eggs one at a time on low speed. Stop mixing once each egg has disappeared into the batter. Avoid whipping excess air into the filling.
- Pour the cheesecake filling over the partially baked cookie base. Smooth the surface gently.
- Take small pieces of reserved cookie dough and flatten them between your fingers to around 1/4 inch thick.
- Arrange the flattened cookie pieces over the cheesecake. Cover most of the surface while leaving a few small openings between pieces. Do not push the dough into the filling.
- Bake at 325°F (165°C) for 50–60 minutes. The outer cheesecake should be set, while the center should still have a gentle wobble.
- If the cookie topping becomes too dark before the cheesecake is ready, place a loose sheet of aluminum foil over the pan.
- Turn off the oven. Crack the oven door slightly and leave the cheesecake inside for 20–30 minutes.
- Transfer the pan to a cooling rack and allow the cheesecake to cool completely.
- Cover and refrigerate for at least 6 hours, preferably overnight.
- Run a thin knife around the edge if necessary before releasing the springform ring. Slice with a sharp knife warmed in hot water and wiped dry between cuts.
Notes
- Use full-fat block cream cheese, not whipped or spreadable cream cheese.
- Cream cheese should be soft before mixing to prevent lumps.
- Butter should be softened but not melted.
- Room-temperature eggs and sour cream combine more smoothly.
- Do not skip the short pre-bake of the cookie base. It gives the bottom enough structure to support the cheesecake.
- Do not fully bake the bottom cookie during the first bake.
- Avoid packing flour into measuring cups. A kitchen scale is preferred.
- Mix the cheesecake eggs at low speed. Too much incorporated air can cause excessive rising followed by sinking.
- The middle should still wobble slightly when baking ends.
- Do not wait for the entire center to become firm in the oven.
- Chill overnight for the thick, clean cheesecake layer shown in the reference presentation.
- For slices that resemble the photo, use a warm, clean knife for every cut.
- Keep the cookie topping relatively thick and rustic rather than breaking it into tiny crumbs.
- Leave a few visible semisweet chocolate chips on the surface.
- Prep Time: 30 minutes
- Additional Cooling/Chilling Time:: 6 hours 40 minutes minimum
- Cook Time: 1 hour 10 minutes
- Category: Dessert
- Method: Baking
- Cuisine: American
Why You’ll Love This Chocolate Chip Cookie Cheesecake
Imagine a classic chocolate chip cookie becoming thick enough to hold a full vanilla cheesecake.
That is the idea behind this recipe.
Instead of using crushed cookies for the bottom, we make cookie dough from scratch. A generous portion is pressed directly into a 9-inch springform pan. It is partially baked before the cheesecake filling goes in.
That short first bake is important. It gives the bottom enough structure to support the heavy filling without turning the base into a dry, hard cookie.
The remaining dough becomes the top layer.
Rather than forcing one large sheet of dough over the soft filling, you flatten small pieces between your fingers. Place them gently over the surface. They join together while baking and create the rustic golden cookie top seen in the finished cheesecake.
The result has three distinct textures:
- A sturdy but chewy chocolate chip cookie base
- A thick and creamy vanilla cheesecake center
- A soft golden cookie topping with visible chocolate chips
The overnight chill does the final work. It firms the cheesecake enough to produce those clean, bakery-style slices.
Ingredients You’ll Need
For the Chocolate Chip Cookie Layers
- 1 cup (226 g) unsalted butter, softened but not melted
- 3/4 cup (150 g) packed light brown sugar
- 1/2 cup (100 g) granulated sugar
- 2 large eggs, at room temperature
- 2 teaspoons vanilla extract
- 2 1/4 cups (270 g) all-purpose flour
- 1 teaspoon baking soda
- 1/2 teaspoon fine salt
- 1 1/2 cups (255 g) semisweet chocolate chips
For the Vanilla Cheesecake Filling
- 24 oz (680 g) full-fat block cream cheese, softened
- 3/4 cup (150 g) granulated sugar
- 3/4 cup (180 g) full-fat sour cream, room temperature
- 3 large eggs, room temperature
- 2 teaspoons vanilla extract
- 2 tablespoons (16 g) all-purpose flour
- 1/4 teaspoon fine salt
The Small Ingredient Details That Matter
A short ingredient list can hide important details.
Start with full-fat block cream cheese. Avoid whipped cream cheese sold in tubs. Its texture and moisture level are different and can leave the center softer than intended.
Your butter should be softened, not melted. Press it gently with a finger. It should give slightly while still holding its shape.
Room-temperature cream cheese is especially important. Cold cream cheese tends to leave small lumps in cheesecake batter. Bringing the sour cream and eggs closer to room temperature also helps the ingredients combine smoothly.
Measure the flour carefully. If you use cups, spoon the flour into the measuring cup and level the top rather than packing it down. For the most consistent cookie base, I prefer using a digital kitchen scale, especially for flour, butter, and cream cheese. [This compact Etekcity kitchen scale is a practical option on Amazon.]
Equipment
You do not need professional pastry equipment.
You will need:
- A 9-inch springform pan — a sturdy springform pan makes it much easier to release the tall cheesecake without damaging the cookie edges.
- Parchment paper
- Large mixing bowl
- Medium mixing bowl
- Electric hand mixer or stand mixer
- Silicone spatula
- Measuring cups and spoons or digital scale
- Cooling rack
- Thin sharp knife for slicing
A light-colored metal springform pan is a good choice. Very dark pans can brown the cookie edges more quickly.
How to Make Chocolate Chip Cookie Cheesecake
1. Prepare the Pan
Preheat your oven to 350°F (175°C).
Cut a circle of parchment paper to fit the bottom of a 9-inch springform pan. Lightly grease the pan before placing the parchment inside. Then lightly grease the sides.
For easier release, you can also place a narrow strip of parchment around the inside edge.
Set the prepared pan aside.
2. Make the Chocolate Chip Cookie Dough
Place the softened butter, brown sugar, and granulated sugar in a large bowl.
Beat for about 2 to 3 minutes, until creamy and slightly lighter in color.
Add the two eggs one at a time. Mix after each addition. Add the vanilla.
In another bowl, whisk together the flour, baking soda, and salt.
Add the dry mixture gradually to the butter mixture. Mix only until you no longer see dry streaks of flour.
Fold in the semisweet chocolate chips with a spatula.
Do not continue beating once the flour disappears. Excess mixing can make the baked cookie layers firmer.
If you enjoy understanding how small baking changes affect texture, our guide to the secret to crunchy cookies explains more about cookie texture.
3. Build a Strong Cookie Base
This is one of the details that makes the recipe much more reliable.
Use approximately 55 to 60% of the cookie dough for the bottom. Keep the rest for the topping.
Press the dough evenly over the bottom of the prepared springform pan.
Do not create a thick raised rim around the sides. The goal is a flat, even cookie foundation.
For an attractive finished slice, press the dough all the way to the edge without leaving thin spots.
Bake the cookie base for 10 to 12 minutes.
You are not trying to bake it completely.
The surface should lose its raw shine and the very edges should begin to set. The center can remain soft.
Remove the pan from the oven and allow it to stand for about 10 minutes.
Reduce the oven temperature to 325°F (165°C).
4. Make the Creamy Vanilla Cheesecake Filling
Place the softened cream cheese and granulated sugar in a clean mixing bowl.
Beat on low to medium-low speed until smooth.
Scrape the bottom and sides of the bowl.
Add the sour cream, vanilla, flour, and salt. Mix on low just until smooth.
Now add the three eggs one at a time.
This is the stage when gentle mixing matters most. Once eggs enter cheesecake batter, vigorous beating can incorporate too much air. That extra air expands in the oven and can contribute to sinking or cracking as the cake cools.
Stop mixing as soon as the final egg disappears into the batter.
The mixture should look smooth, thick, and pourable.
5. Add the Cheesecake Layer
Pour the filling slowly over the partially baked cookie base.
Spread it gently with a spatula.
Tap the pan lightly on the counter once or twice to release obvious large air pockets. Do not repeatedly bang the pan.
At this point, you should have a thick cheesecake layer that almost completely hides the cookie base.
6. Create the Cookie Top
The topping technique is important if you want the finished cheesecake to resemble the thick cookie-covered dessert pictured above.
Do not drop one heavy ball of dough into the center.
Take small portions of the reserved cookie dough and flatten them between your fingers until they are roughly 1/4 inch thick.
Lay the pieces gently over the cheesecake.
Continue until most of the filling is covered. Leave a few small gaps between pieces. These allow the cheesecake to expand and also give the finished surface a natural homemade appearance.
Keep some chocolate chips visible on top.
The cookie pieces will spread and connect during baking.
How to Bake It Without Drying the Center
Bake at 325°F (165°C) for approximately 50 to 60 minutes.
Start checking near the 50-minute mark.
Do not wait for the entire cheesecake to become rigid.
The outer area should look set. The center should still move slightly when you gently nudge the pan. Think of a controlled wobble rather than a liquid wave.
The top cookie should look golden with darker chocolate chips scattered across it.
Every oven behaves differently. Baking time is therefore a range, not an absolute number.
If the cookie topping is browning too quickly but the cheesecake still needs time, loosely tent the top with aluminum foil. Do not press the foil onto the cookie surface.
The biggest mistake here is waiting for the middle to look completely firm.
Cheesecake continues to set while cooling. Baking until the center is hard can produce a dry or grainy filling.
The Secret to the Thick, Clean Cheesecake Center
The refrigerator is part of this recipe.
Once baking is complete, turn off the oven. Crack the oven door and allow the cheesecake to sit inside for about 20 to 30 minutes.
This gradual temperature change can reduce the sudden contraction that sometimes contributes to cracks.
Remove the cheesecake and place it on a cooling rack.
Let it cool until it is no longer hot.
Then cover and refrigerate it for at least 6 hours.
For the appearance and texture shown in the photo, overnight chilling is strongly recommended.
The filling becomes firmer without becoming hard. The cookie layers also settle around the creamy center.
If you cut the cake while it is warm, the filling may look too soft even when the cheesecake has been baked correctly.
How to Get Picture-Perfect Slices
There is a simple trick.
Fill a tall glass with hot water.
Dip a thin sharp knife into the water for several seconds. Remove it and wipe the blade completely dry.
Make one cut.
Clean and warm the knife again before the next cut.
This prevents cheesecake filling and melted chocolate from building up on the blade.
For a presentation similar to the finished dessert, cut generous wedges so the tall vanilla center remains the visual focus.
Scatter a few semisweet chocolate chips around the serving plate if desired.
What Makes the Cookie Crust Work?
A good bottom crust must solve two problems.
It has to be firm enough to hold a heavy cheesecake filling, yet soft enough to cut easily with a fork.
That is why we use brown sugar, butter, egg, and a short pre-bake rather than simply putting raw dough underneath the filling.
Brown sugar contributes moisture and a deeper caramel-like flavor. The egg binds the dough. Flour creates structure. The short pre-bake sets the foundation before the wet cheesecake mixture is added.
Do not bake the base until it looks like a finished cookie. It returns to the oven for nearly another hour.
If you enjoy experimenting with cookie recipes, you can also read our guide to baking versus air-frying cookies.
Common Mistakes to Avoid
- Using cold cream cheese: It can leave stubborn lumps in the filling.
- Using spreadable cream cheese: Stick with full-fat block-style cream cheese for predictable structure.
- Melting the cookie butter: Soft butter gives the dough better structure.
- Overbaking the bottom crust: Remember that it will bake again with the filling.
- Beating the eggs aggressively: Mix them in slowly and stop as soon as incorporated.
- Making one solid cookie lid: Small flattened pieces are easier to arrange without pushing into the cheesecake.
- Waiting for a completely firm center: A slight wobble at the end of baking is expected.
- Cutting while warm: The cheesecake needs refrigeration to develop its clean, thick center.
- Skipping the overnight chill when appearance matters: Six hours works, but overnight chilling gives the best slicing texture.
Make It Ahead
This is an excellent dessert for entertaining because you can prepare it the day before you need it.
Bake the cheesecake in the afternoon or evening. Cool it, cover it, and place it in the refrigerator overnight.
The next day, release the springform ring and transfer the cheesecake to a serving plate.
That means there is no last-minute baking when guests arrive.
How to Store Chocolate Chip Cookie Cheesecake
Because this dessert contains cream cheese, sour cream, and eggs, keep it refrigerated.
Store slices in an airtight container or keep the cheesecake well covered. For best texture, enjoy it within about 3 to 4 days. FDA guidance for cooked egg dishes likewise recommends refrigerating leftovers and using them within 3 to 4 days.
Do not leave cheesecake sitting at room temperature for an entire afternoon. FDA guidance says cooked egg-containing foods should not remain unrefrigerated for more than 2 hours, or more than 1 hour when temperatures are above 90°F (32°C).
Can You Freeze It?
Yes.
Chill the cheesecake fully first.
For individual portions, place the cold slices on a parchment-lined tray and freeze until firm. Then wrap each piece carefully and place the wrapped slices in a freezer-safe container.
Thaw them in the refrigerator rather than on the counter.
Keep in mind that freezing can slightly change the texture of dairy-based cheesecake, so a freshly refrigerated cake will generally give you the best creamy consistency.
Serving Ideas
This cheesecake is already rich, so it does not need an elaborate topping.
Try serving it:
- Cold, straight from the refrigerator
- With a few extra semisweet chocolate chips
- With fresh strawberries or raspberries
- With a small spoonful of lightly whipped cream
- With coffee
- With cold milk
Avoid covering the entire cake with heavy chocolate sauce if you want the cookie-and-vanilla contrast to remain the star.
For another dessert where presentation and texture matter, see our guide to keeping madeleines moist.
Frequently Asked Questions
Why is my chocolate chip cookie cheesecake still jiggly?
A small wobble in the center at the end of baking is normal. The filling continues setting while the cheesecake cools and then firms further in the refrigerator. A very liquid or sloshing center, however, needs additional baking time.
Can I use store-bought chocolate chip cookie dough?
You can make similar desserts with prepared dough, and some published versions do use refrigerated cookie dough. However, this recipe is designed around the ingredient ratios of the homemade dough above. Store-bought dough may spread, brown, and bake differently.
Do I need a water bath?
Not for this recipe. The cookie topping makes minor surface imperfections much less important than they would be on a plain cheesecake. Baking gently at 325°F and avoiding excessive mixing are more useful here.
Why did my cheesecake crack?
Common causes include incorporating too much air, baking too long, or cooling too abruptly. Add the eggs on low speed and remove the cheesecake from active baking while the center still has a gentle wobble.
Why is the bottom cookie layer too hard?
It was probably baked too long during the first bake or the flour was overmeasured. The initial 10 to 12 minutes are only meant to partially set the dough.
Can I make Chocolate Chip Cookie Cheesecake the night before?
Yes. In fact, that is the preferred method. An overnight chill gives the cheesecake center time to firm and makes slicing much cleaner.
How do I know when the cheesecake is done?
Look at the movement rather than waiting for the entire center to become solid. The edges should be set while the center has a slight controlled wobble.
Can I use milk chocolate chips?
Yes, but the finished dessert will taste sweeter. Semisweet chocolate provides a stronger contrast against the sweet cookie and vanilla cheesecake.
Can I use mini chocolate chips?
Yes. Mini chips distribute more evenly throughout the dough. Standard semisweet chips, however, give the top the larger visible pockets of chocolate that create the rustic appearance shown here.
Final Kitchen Note
The hardest part of this Chocolate Chip Cookie Cheesecake is waiting overnight.
But that waiting time changes everything.
When the springform ring finally comes away, you get a tall dessert with golden cookie around the outside. Cut through it with a warm knife and the real surprise appears: a thick pale vanilla cheesecake center framed by chocolate-studded cookie.
That is the moment this recipe is built around.
Keep the cookie base only partially baked at the beginning. Keep the cheesecake batter smooth rather than airy. Arrange the top dough gently. Most importantly, do not bake away that creamy center while waiting for it to become solid in the oven.
Give it the night in the refrigerator instead.
The next day, the cookie remains pleasantly chewy, the chocolate is scattered through every layer, and the cheesecake is firm enough to hold a beautiful slice while staying soft and creamy on the fork.