
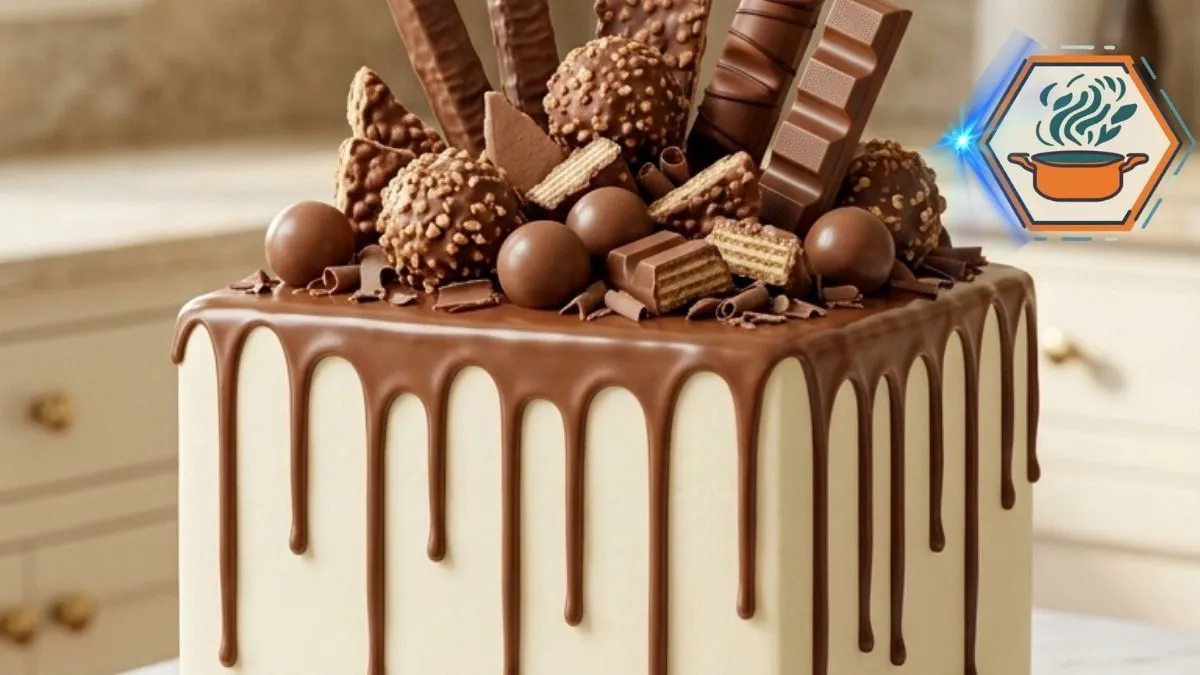
There is a special moment when a celebration cake reaches the table and everyone becomes quiet for a second. This Chocolate Candy Explosion Drip Cake is made for exactly that moment. Before the first slice is served, you see a tall square cake, smooth pale vanilla buttercream, glossy chocolate drips, wafer bars, truffles, chocolate balls, and chunky pieces of chocolate. Then you cut it. Inside are deep chocolate cake layers separated by generous bands of vanilla and chocolate cream.
The appearance may look like something from a professional cake shop, but the techniques are accessible to a careful home baker. The key is not complicated decoration. It is temperature, cake structure, chilling time, and the consistency of the ganache. For comparison, King Arthur Baking’s moist chocolate cake guide also uses cocoa, milk, oil, eggs, and coffee in a chocolate layer cake. Coffee works particularly well here because it supports a deep cocoa flavor without making the finished cake taste like a cup of coffee.
The drip needs just as much attention. Ganache changes significantly depending on the chocolate-to-cream ratio and its temperature. A chilled buttercream surface also helps a drip stop rather than running directly to the cake board. This recipe accounts for those small details so the finished cake can closely match the tall, clean, chocolate-loaded look shown in the reference.
Affiliate disclosure: As an Amazon Associate I earn from qualifying purchases. This article may contain affiliate links to kitchen tools I find useful for preparing this recipe.
jump to
Why This Chocolate Candy Explosion Drip Cake Works
A good drip cake has to taste as good as it looks.
That sounds obvious, but tall decorated cakes sometimes sacrifice texture for stability. Here, vegetable oil keeps the chocolate sponge soft after refrigeration. Whole milk gives the crumb richness. Cocoa provides the main chocolate character, while hot coffee deepens it.
There is another important change from a basic three-layer version.
For the closest match to the reference cake, make four thinner square chocolate layers rather than three thick ones. The visible slice has four dark cake sections with three filling bands. The top and bottom filling bands are pale vanilla buttercream, while the center has a chocolate-hazelnut filling.
That small construction detail creates the dramatic striped interior.
If you enjoy rich homemade cakes, you can also see RecipesMind’s Hurricane Cake recipe for another dessert idea.
Ingredients You’ll Need
Chocolate Cake
For four approximately 8-inch square layers:
- 2½ cups (300 g) all-purpose flour
- 2 cups (400 g) granulated sugar
- ¾ cup (65–75 g) unsweetened cocoa powder
- 2 teaspoons baking powder
- 2 teaspoons baking soda
- ½ teaspoon fine salt
- 3 large eggs, preferably at room temperature
- 1¼ cups (300 ml) whole milk, room temperature
- ½ cup (120 ml) neutral vegetable oil
- 2 teaspoons vanilla extract
- 1 cup (240 ml) hot brewed coffee
Do not worry when the batter looks fairly fluid. Chocolate cakes made with coffee and oil commonly have a thinner batter than traditional butter cakes.
Vanilla Buttercream
- 1½ cups (340 g) unsalted butter, softened
- 5 cups (600 g) powdered sugar, sifted if lumpy
- ⅓ cup (80 ml) heavy cream
- 2 teaspoons vanilla extract
- ¼ teaspoon fine salt
You may need another ½ to 1 cup powdered sugar if your kitchen is warm or the buttercream feels too loose for sharp square edges.
Chocolate-Hazelnut Filling
- 8 oz (225 g) full-fat cream cheese, softened
- ½ cup (150 g) chocolate-hazelnut spread
- 1 cup (240 ml) cold heavy whipping cream
- ½ cup (60 g) powdered sugar
Chocolate Ganache Drip
For a controlled semisweet drip:
- 8 oz (225 g) finely chopped semisweet chocolate
- ⅔ cup (160 ml) heavy cream
If using milk chocolate, start with less cream because milk chocolate generally needs a higher proportion of chocolate for a similarly controlled drip. Different chocolates behave differently, so always make one test drip before coating the entire cake.
Chocolate Explosion Topping
Use a varied combination of:
- Chocolate-covered wafer fingers
- Chocolate-hazelnut truffles
- Round milk chocolate candies
- Segmented chocolate bars
- Chocolate-covered crispy balls
- Small wafer pieces
- Chocolate curls
- Chopped chocolate pieces
Mixing tall, medium, and small decorations is what creates the abundant chocolate explosion appearance.
Equipment That Makes This Cake Easier
You do not need professional bakery equipment, but a few tools make square cakes much easier.
For evenly sized layers, a set of square pans is useful. You can browse 8-inch square cake pans on Amazon. If you bake often, a digital kitchen scale on Amazon is also valuable because weighing flour, chocolate, and frosting ingredients gives more repeatable results.
An offset cake spatula on Amazon helps spread filling into the corners without tearing the cake. For the ganache, an instant-read kitchen thermometer on Amazon can help you avoid applying chocolate while it is still too hot.
Affiliate note: replace these Amazon destination links with your Amazon Associates links before publication.
How to Make the Chocolate Cake Layers
Preheat the oven to 350°F (175°C). Grease four 8-inch square cake pans. Line the bottoms with parchment paper, then lightly grease the parchment.
Only have two pans? Bake in two batches. Try to divide the batter by weight so every layer has similar thickness.
In a large bowl, whisk together:
- Flour
- Sugar
- Cocoa powder
- Baking powder
- Baking soda
- Salt
Break up every visible cocoa lump.
In another bowl, whisk the eggs, milk, vegetable oil, and vanilla.
Pour the wet ingredients into the dry mixture. Mix only until mostly combined.
Slowly pour in the hot coffee while whisking on low speed or stirring by hand. Do not dump it in at once.
Divide the batter equally between four pans.
Because these layers are thinner than the original three-layer version, begin checking them after 18–20 minutes. Depending on the pans and oven, they may need roughly 20–25 minutes.
The cakes are ready when the centers spring back lightly and a toothpick comes out with a few moist crumbs rather than raw batter.
King Arthur Baking similarly recommends checking chocolate layers by their set center and with a toothpick rather than depending solely on a timer.
Cool the cakes in their pans for about 10 minutes. Turn them onto wire racks and remove the parchment.
Do not frost warm cake.
Let every layer cool completely.
Make the Chocolate-Hazelnut Filling
Beat the softened cream cheese until smooth.
Add the chocolate-hazelnut spread and beat again until no streaks remain.
In a separate cold bowl, whip the heavy cream and powdered sugar until medium-stiff peaks form.
Fold about one-third of the whipped cream into the chocolate mixture first. This loosens it. Then gently fold in the remainder.
The finished filling should be airy but sturdy enough to stay between the layers.
Keep it refrigerated while preparing the buttercream.
Make the Vanilla Buttercream
Beat softened butter for 3–4 minutes until pale and creamy.
Add powdered sugar gradually. Starting slowly prevents a cloud of sugar from covering your kitchen.
Add vanilla, salt, and most of the cream. Beat for another 3–5 minutes.
Check the texture.
For this cake, buttercream needs to be slightly firmer than frosting for a casual sheet cake. Square sides and corners need support.
If it is too stiff, add cream one teaspoon at a time.
If it is too soft, add a little powdered sugar.
For more cake inspiration, RecipesMind’s Milk Bar Pie guide is another useful stop for bakers who enjoy rich celebration desserts.
How to Stack the Cake Like the Reference Photo
Place the first chocolate layer on a sturdy square cake board.
Pipe a buttercream border around its outside edge. Fill the center with an even layer of vanilla buttercream.
Add the second chocolate layer.
Pipe another buttercream dam around the edge. Spoon the chocolate-hazelnut cream into the center. Keep the filling slightly below the height of the dam.
Place the third chocolate layer on top. Add another layer of vanilla buttercream.
Finish with the fourth chocolate cake layer.
You should now have:
- Chocolate cake
- Vanilla filling
- Chocolate cake
- Chocolate filling
- Chocolate cake
- Vanilla filling
- Chocolate cake
That arrangement produces the striped interior closest to the reference image.
The Secret to Straight Sides and Sharp Corners
Spread a thin crumb coat over the whole cake.
This first coat does not need to look beautiful. Its purpose is to trap loose chocolate crumbs.
Refrigerate the cake for 20–30 minutes.
Once the crumb coat feels firm, apply a thicker final layer of vanilla buttercream.
Use an offset spatula to fill each corner. Then use a straight cake scraper along each side.
Work one side at a time.
For sharper upper corners, pull excess frosting inward from the outside edge toward the center of the cake.
Chill again for at least 30 minutes before adding ganache.
This chilling step matters. A warm cake or soft buttercream can make the ganache run too far. Testing a single drip before covering the cake is also a useful technique.
How to Make the Glossy Chocolate Drip
Finely chop the chocolate and place it in a heatproof bowl.
Heat the cream until steaming and just beginning to simmer around the edges. Do not aggressively boil it.
Pour the hot cream over the chocolate.
Leave it untouched for 2–3 minutes.
Then stir gently from the center outward until glossy and smooth.
Now comes the part that is often missing from short drip-cake recipes:
Do not immediately pour hot ganache over buttercream.
Let it cool until fluid but no longer hot. Ganache consistency depends on both ratio and temperature, and recipes may use different ratios depending on chocolate type and desired finish.
Test a teaspoon on one back corner of the cold cake.
If it races to the bottom, wait longer.
If it barely moves, gently warm the ganache.
When the test drip stops where you want it, make individual drips around the perimeter. Then cover the top with a thin layer of ganache.
Create the Chocolate Candy Explosion
The reference look is not created by simply dumping candy over the cake.
Start with the tallest wafer bars. Push them gently into the top at slightly different angles.
Next, position chocolate bars and truffles around their bases.
Fill empty spaces with:
- Chocolate balls
- Crispy chocolate pieces
- Broken wafers
- Chocolate chunks
- Small curls
Keep most of the decoration concentrated on top, but place a few chocolate pieces at the base of the cake. This makes the arrangement feel abundant without hiding the clean buttercream sides.
Leave some ganache visible. Those glossy drips are part of the design.
For another chocolate dessert idea, see the RecipesMind guide to strawberry-filled chocolate cake.
Common Mistakes to Avoid
Ganache running to the bottom: The ganache is probably too warm or thin. Chill the frosted cake and test one drip first.
Cake layers sliding: The filling may be too soft or too thickly applied. Use a buttercream dam around softer filling.
Buttercream full of dark crumbs: Apply a thin crumb coat and chill it before the final frosting.
Rounded square corners: Chill between frosting stages and work each side separately with a straight scraper.
Dry chocolate cake: Do not keep baking until the toothpick is completely dry. A few moist crumbs are fine.
Uneven layers: Weigh the batter before dividing it among the pans.
Candy falling over: Place tall decorations while the top coating is still slightly tacky, but insert them carefully so they do not crack the cake.
Make-Ahead, Storage, and Serving
This cake is much easier when you divide the work over two days.
Bake the chocolate layers on day one. Once completely cool, wrap them well and keep them ready for assembly.
Make and decorate the cake on day two.
Because the chocolate filling contains cream cheese and whipped cream, keep the assembled cake refrigerated rather than treating it like a shelf-stable buttercream cake.
For the best eating texture, take the cake from the refrigerator shortly before serving so the buttercream can soften slightly. The exact time depends on room temperature.
Use a long, sharp knife for clean slices. Wipe the blade between cuts.
Frequently Asked Questions
Can I make this Chocolate Candy Explosion Drip Cake with three layers?
Yes. Three 8-inch square layers work well and are easier to stack. However, four thinner chocolate layers give an interior that more closely matches the reference cake.
Why add coffee to chocolate cake?
Coffee supports the roasted notes of cocoa and gives this cake a deeper chocolate character. It does not need to produce a strong coffee flavor.
Can I use water instead?
Yes. Hot water can replace the coffee. The cake will still work, although its chocolate flavor may be slightly less intense.
Why does my chocolate drip melt the buttercream?
The ganache was probably applied while too hot, or the buttercream was not cold enough. Chill the frosted cake first and let the ganache cool before making a test drip.
Can I use milk chocolate for the ganache?
Yes, but do not automatically use the same cream ratio as semisweet chocolate. Milk chocolate sets softer and generally needs less cream for a controlled drip.
How do I get clean square cake edges?
Use a firm buttercream, apply a crumb coat, chill it for 20–30 minutes, and add the final frosting only after the first layer is firm. A straight scraper makes the sides much easier to shape.
What candy works best on an explosion cake?
Choose several shapes and textures. Long wafer fingers provide height. Truffles and chocolate balls add round shapes. Segmented bars add larger blocks. Small crispy pieces and curls fill gaps.
Can I prepare the cake a day before a party?
Yes. In fact, assembling it ahead gives the layers time to settle. Keep it refrigerated because of the cream-cheese and whipped-cream filling. For the freshest appearance, delicate wafer decorations can be added closer to serving if humidity is a concern.
Print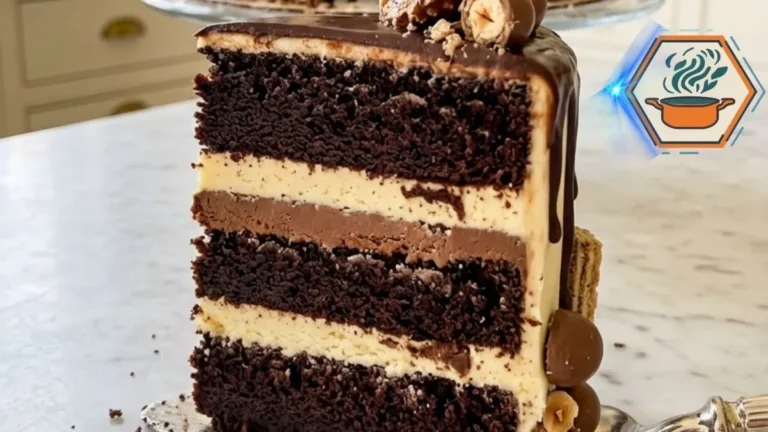
Chocolate Candy Explosion Drip Cake
A tall square chocolate celebration cake with four moist chocolate layers, vanilla buttercream, a creamy chocolate-hazelnut center, glossy chocolate ganache drips, and an abundant topping of wafer bars, truffles, chocolate balls, and chocolate pieces.
- Total Time: 4 hours 7 minutes
- Yield: 16 servings
Ingredients
For the Chocolate Cake
- 2½ cups (300 g) all-purpose flour
- 2 cups (400 g) granulated sugar
- ¾ cup (65–75 g) unsweetened cocoa powder
- 2 teaspoons baking powder
- 2 teaspoons baking soda
- ½ teaspoon fine salt
- 3 large eggs, room temperature
- 1¼ cups (300 ml) whole milk, room temperature
- ½ cup (120 ml) neutral vegetable oil
- 2 teaspoons vanilla extract
- 1 cup (240 ml) hot brewed coffee
For the Vanilla Buttercream
- 1½ cups (340 g) unsalted butter, softened
- 5 cups (600 g) powdered sugar
- ⅓ cup (80 ml) heavy cream
- 2 teaspoons vanilla extract
- ¼ teaspoon fine salt
For the Chocolate-Hazelnut Filling
- 8 oz (225 g) full-fat cream cheese, softened
- ½ cup (150 g) chocolate-hazelnut spread
- 1 cup (240 ml) cold heavy whipping cream
- ½ cup (60 g) powdered sugar
For the Chocolate Ganache
- 8 oz (225 g) semisweet chocolate, finely chopped
- ⅔ cup (160 ml) heavy cream
For Decorating
- 6–8 chocolate-covered wafer fingers
- 6–8 chocolate-hazelnut truffles
- 8–12 milk chocolate balls
- 1–2 segmented chocolate bars, broken into pieces
- ½ cup chocolate-covered crispy pieces
- Chocolate curls or shavings, as needed
Important: decoration amounts are intentionally approximate. Candy brands, bar sizes, and the desired arrangement can vary. This is also why nutrition for a decorated cake can only be an estimate unless the exact brands and weights are entered into a nutrition calculator.
Instructions
- Prepare the pans. Preheat the oven to 350°F (175°C). Grease four 8-inch square cake pans. Line the bottoms with parchment paper and lightly grease the parchment.
- Mix the dry ingredients. In a large bowl, whisk the flour, sugar, cocoa powder, baking powder, baking soda, and salt until evenly combined and free of cocoa lumps.
- Add the wet ingredients. Add the eggs, whole milk, vegetable oil, and vanilla. Mix on low speed until just combined.
- Add the coffee. Slowly pour in the hot coffee while mixing on low speed. The batter will be relatively thin. This is normal.
- Divide the batter. Divide the batter evenly among the four prepared pans. For the most even layers, weigh the batter and place the same amount in each pan.
- Bake. Bake for approximately 20–25 minutes. Begin checking around 18–20 minutes because oven and pan performance varies. The center should spring back lightly when touched, and a toothpick should come out with a few moist crumbs but no wet batter.
- Cool completely. Let the cakes cool in their pans for about 10 minutes. Turn them onto wire racks, remove the parchment, and allow them to cool completely before filling or frosting.
- Make the chocolate filling. Beat the softened cream cheese until smooth. Add the chocolate-hazelnut spread and mix until uniform. In a separate chilled bowl, whip the cold heavy cream with the powdered sugar to medium-stiff peaks. Fold the whipped cream gently into the chocolate mixture. Refrigerate until needed.
- Make the buttercream. Beat the softened butter for 3–4 minutes until pale and creamy. Gradually add the powdered sugar. Add the heavy cream, vanilla, and salt. Beat for another 3–5 minutes until light but firm enough to hold square edges.
- Build the first layer. Place one completely cooled chocolate cake layer on a sturdy square cake board. Pipe a buttercream dam around the perimeter and fill the center with vanilla buttercream.
- Add the chocolate center. Place the second cake layer on top. Pipe a buttercream dam around its edge, then fill the center with the chocolate-hazelnut cream.
- Finish the layers. Add the third cake layer. Spread or pipe another layer of vanilla buttercream. Top with the fourth chocolate cake layer.
- Crumb-coat the cake. Apply a thin layer of vanilla buttercream over the top and all four sides. Refrigerate for 20–30 minutes, or until the crumb coat feels firm.
- Apply the final frosting. Cover the chilled cake with the remaining vanilla buttercream. Smooth each side with a straight scraper. Work the frosting into the corners to create clean square edges. Chill for at least 30 minutes.
- Make the ganache. Place the finely chopped chocolate in a heatproof bowl. Heat the cream until steaming and just beginning to simmer around the perimeter. Pour it over the chocolate and leave untouched for 2–3 minutes. Stir gently from the center outward until smooth and glossy.
- Test the drip. Let the ganache cool until fluid but no longer hot. Place one test drip on the back of the cold cake. If it runs straight to the bottom, wait a little longer. If it barely moves, gently warm the ganache.
- Decorate the cake. Once the test drip has the right consistency, create individual drips around the edges and spread a thin layer of ganache across the top.
- Create the candy explosion. Position the tall wafer fingers first, angling them slightly. Add truffles and larger chocolate-bar pieces around them. Fill the gaps with chocolate balls, crispy pieces, broken wafers, and chocolate curls.
- Chill before serving. Refrigerate until the cake and filling are stable. For a softer eating texture, remove the cake from the refrigerator for a short period before serving, while observing safe handling for its dairy-based filling.
Notes
For the closest match to the reference cake, use four thinner square chocolate layers rather than three thick layers. The filling order should be vanilla, chocolate-hazelnut, then vanilla.
The cake layers must be completely cool before assembly. Warm cake will soften the filling and buttercream.
For sharp square edges, chill the crumb-coated cake for 20–30 minutes before applying the final buttercream.
Always apply ganache to a cold, firm buttercream surface. Test one drip before decorating the entire cake.
If the ganache runs too quickly, allow it to cool further. If it is too thick, warm it very gently.
Because the filling contains cream cheese and whipped cream, refrigerate the finished cake at 40°F (4.4°C) or below. Do not leave perishable food at room temperature for more than two hours.
Candy quantities are flexible. For the reference appearance, combine tall wafer bars with round truffles, chocolate balls, segmented bars, and smaller crispy pieces.
- Prep Time: 1 hour 15 minutes
- Additional Time / Chilling & Cooling Time:: 2 hours 30 minutes
- Cook Time: 22 minutes
- Category: Dessert
- Method: Baking
- Cuisine: American-inspired
Final Baking Notes
The secret behind this Chocolate Candy Explosion Drip Cake is not adding as much chocolate as possible. It is building contrast.
Dark cake sits against pale vanilla cream. A single chocolate filling creates a darker stripe through the center. White buttercream gives the glossy ganache a clean background. Tall wafer bars create height, while truffles, chocolate balls, and broken bars create the overflowing finish.
Most importantly, give the cake time to chill between stages. Bake the layers evenly. Cool them completely. Build filling dams. Crumb-coat before the final buttercream. Chill again. Test the ganache on one corner before committing to the full drip.
Follow those details and the dramatic exterior becomes much more achievable at home. Then comes the best part: cutting through that polished chocolate-covered exterior and revealing four dark, moist layers and three thick bands of cream inside.