
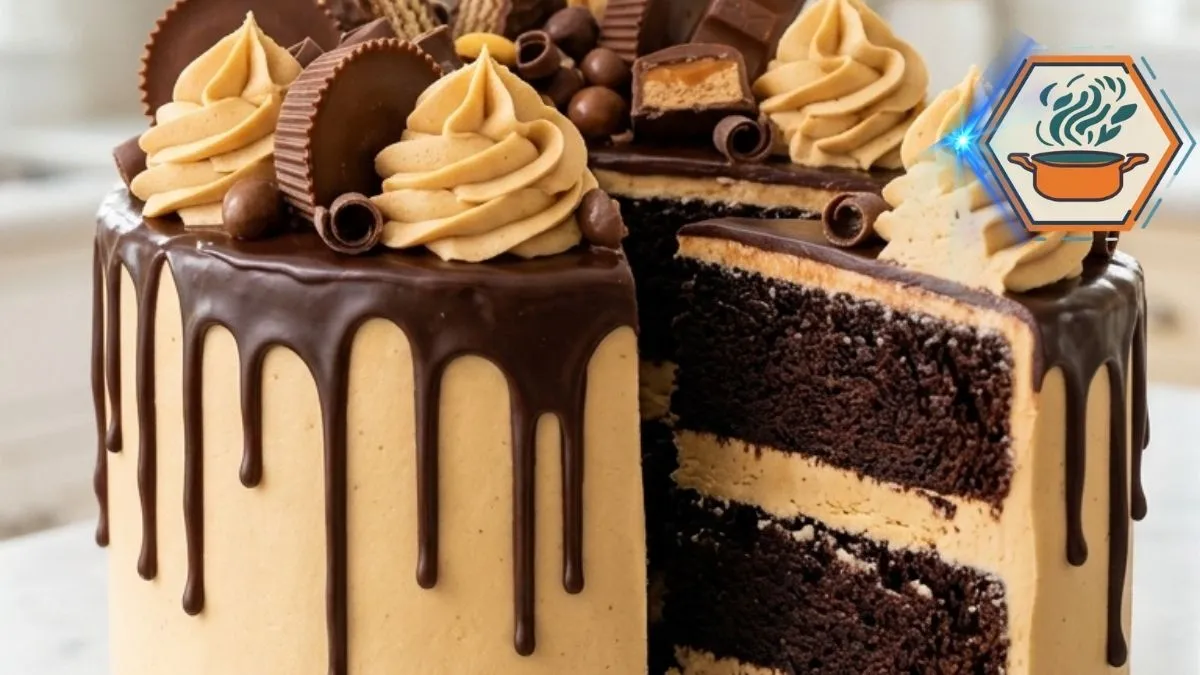
Some cakes quietly wait for dessert. A Chocolate Peanut Butter Candy Drip Cake does the opposite. It arrives at the table with three dark chocolate layers, thick peanut butter filling, glossy chocolate drips, tall frosting swirls, and enough chocolate candy on top to make people stop before the first slice is even cut.
The dramatic finish may look like it came from a bakery, but the individual techniques are surprisingly approachable. The real secret is not adding more decoration. It is controlling temperature, texture, and timing. For additional cake-baking fundamentals, the King Arthur Baking cake guide is a useful reference for home bakers. Their tested chocolate layer cakes also use 350°F ovens and three 8-inch pans, which makes that setup a practical starting point for this recipe.
This version is designed around that goal. The cake gets its deep flavor from cocoa and coffee. Vegetable oil helps produce a soft crumb. The peanut butter buttercream is thick enough to support three layers but soft enough to pipe. Finally, semisweet ganache creates the dark drips that contrast with the pale peanut butter frosting. If you are still building your baking skills, RecipesMind’s guide to keeping cakes and baked goods moist offers related tips about moisture and storage.
Affiliate disclosure: As an Amazon Associate I earn from qualifying purchases. This article may contain affiliate links to kitchen tools I find useful for preparing this recipe.
jump to
Why This Chocolate Peanut Butter Candy Drip Cake Works
The first bite has several distinct textures. You get tender chocolate cake, creamy peanut butter buttercream, soft chocolate ganache, and crunchy candy pieces.
Coffee is particularly useful in the chocolate layers. It contributes liquid while supporting the cake’s strong cocoa profile. Coffee or water is also used in tested chocolate cake formulas from King Arthur Baking.
Then there is the visual contrast. Dark cake against golden peanut butter frosting creates the striped interior visible when a tall slice is removed. On the outside, the smooth tan buttercream gives the dark ganache drips a clean background.
The candy should be the final accent rather than something that hides the cake. Use different heights and shapes. Peanut butter cups, wafer bars, mini chocolate bars, caramel chocolates, and chocolate curls recreate the abundant finish while keeping the decoration visually balanced.
Ingredients You’ll Need
For the chocolate cake:
- 2 cups (240 g) all-purpose flour
- 1¾ cups (350 g) granulated sugar
- ¾ cup (64 g) unsweetened cocoa powder
- 2 teaspoons baking powder
- 1½ teaspoons baking soda
- ½ teaspoon fine salt
- 2 large eggs, preferably at room temperature
- 1 cup (240 ml) whole milk, at room temperature
- ½ cup (120 ml) neutral vegetable oil
- 2 teaspoons vanilla extract
- 1 cup (240 ml) hot brewed coffee
For the peanut butter frosting, use 1 cup softened unsalted butter, 1¼ cups creamy peanut butter, 4 cups powdered sugar, ⅓ cup heavy cream, 2 teaspoons vanilla, and a pinch of salt.
For the ganache, you need 8 ounces finely chopped semisweet chocolate and ¾ cup heavy cream.
For decorating, gather peanut butter cups, chocolate-covered wafers, caramel chocolates, mini chocolate bars, chocolate curls, and small chocolate candies.
Important: use conventional creamy peanut butter for the most predictable frosting texture. Natural peanut butter can separate and may make the buttercream softer or oily.
If you bake layer cakes regularly, matching pans make dividing the batter easier. Here is an Amazon search for 8-inch round cake pans. Choose three pans of the same material and dimensions so the layers bake at similar rates.
Prepare the Pans Before Mixing
Heat the oven to 350°F (175°C) with a rack near the center.
Grease three 8-inch round cake pans. Put a parchment circle on the bottom of each pan, then lightly grease the parchment.
This small step matters. A moist chocolate cake can stick easily, and trying to force a warm layer from a pan can split it.
If possible, weigh the empty mixing bowl before making the batter. Once mixed, weigh it again, subtract the bowl weight, and divide the batter equally among three pans. Equal portions give you the neat, evenly sized layers that make this cake look so striking.
How to Make the Moist Chocolate Cake Layers
Whisk the flour, granulated sugar, cocoa powder, baking powder, baking soda, and salt in a large bowl. Break up every visible cocoa lump.
In another bowl, lightly whisk the eggs, milk, oil, and vanilla.
Pour the wet ingredients into the dry mixture and stir until mostly combined.
Now slowly add the hot coffee while whisking gently.
Do not worry when the batter becomes thin. That is expected for this style of chocolate cake. Other tested moist chocolate cake formulas also produce thin batter.
Avoid beating aggressively after the flour is wet. Mix only until no dry pockets remain.
Divide the batter evenly among your prepared pans.
Bake for approximately 25 to 30 minutes, but start checking near 24–25 minutes because ovens and cake pans differ. The center should spring back gently when touched. A toothpick inserted near the center should come out clean or with a few moist crumbs rather than raw batter.
King Arthur similarly recommends checking chocolate cake with a toothpick and judging whether the center feels set rather than depending solely on the timer.
Let the cakes rest in their pans for about 10 minutes. Carefully turn them onto wire racks and remove the parchment.
They must cool completely before frosting.
Warm cake plus buttercream equals sliding layers.
Make Fluffy Peanut Butter Buttercream
The frosting creates both the flavor and the structure of this tall cake.
Beat 1 cup softened unsalted butter for about 2 minutes. Add 1¼ cups creamy peanut butter and beat again until the mixture looks uniform and creamy.
Add the 4 cups powdered sugar gradually. Start the mixer on low so the sugar stays in the bowl.
Add the vanilla, salt, and most of the heavy cream. Beat for another 2 to 3 minutes until fluffy.
Check the consistency before adding the remaining cream.
The finished frosting should hold a peak but spread without tearing the cake. If it feels too stiff, add cream about 1 teaspoon at a time. If it becomes too soft, add a small amount of powdered sugar.
The butter also needs to be genuinely soft rather than melted. Softened butter should accept a light finger impression while still holding its shape, a consistency also emphasized in King Arthur’s layer-cake guidance.
How to Build a Tall, Straight Cake
If the cake layers developed noticeable domes, trim them with a long serrated knife. Flat layers make a tall cake much more stable.
Place the first layer on a cake board. Add a generous, even layer of peanut butter frosting. Keep it level rather than creating a mound in the middle.
Add the second chocolate layer and repeat.
Place the final layer upside down. The flat bottom of the cake becomes your top surface and makes finishing much easier.
Spread a very thin coat of buttercream over the entire cake. This is your crumb coat. Its job is to trap loose chocolate crumbs.
Refrigerate for 20 to 30 minutes.
Then apply the final coat of peanut butter buttercream. Smooth the sides and top.
A rotating stand can make this much easier. You can compare options through this Amazon search for cake decorating turntables.
An offset spatula is also useful for spreading filling without dragging crumbs through it. Here is an Amazon search for cake offset spatulas.
Chill the finished frosted cake for another 30 minutes before making the drips. This is one of the most important steps in the recipe.
How to Make Chocolate Ganache Drips That Stop at the Right Height
Finely chop 8 ounces of semisweet chocolate and put it in a heatproof bowl.
Heat ¾ cup heavy cream until steaming and just beginning to simmer around the edges. Do not aggressively boil it.
Pour the cream over the chocolate. Leave it untouched for 2 minutes. Then stir slowly from the center outward until smooth and glossy.
Now comes the detail many drip-cake recipes overlook: do not immediately pour hot ganache over your cake.
It needs to cool and thicken slightly first.
Test a single drip on the chilled cake. Spoon a small amount over one edge and watch it.
If it races to the cake board, the ganache is too warm or thin. Wait a few more minutes.
If it barely moves, it has become too cool. Warm it very briefly and stir again.
When the test drip slowly travels partway down the cold buttercream, you have the right consistency.
Add individual drips around the perimeter first. Vary their lengths naturally. Once you like the border, spread a thin layer of ganache across the top.
That controlled contrast is what creates the glossy dark chocolate edge seen on professional drip cakes.
Create the Candy-Loaded Finish
Allow the ganache to set slightly before adding the final decorations.
Pipe tall peanut butter buttercream swirls around the top. A large open-star piping tip gives the frosting the bold ridges seen on bakery celebration cakes.
For a similar setup, browse this piping bags and large star tips.
Now arrange your candies.
Do not place everything at the same height. Push some pieces upright into the frosting. Lay others at an angle. Cut peanut butter cups and wafer bars in half so the interior becomes part of the decoration.
Add chocolate curls and shavings to fill small gaps.
Most importantly, keep the center abundant but not chaotic. You still want the peanut butter swirls and shiny ganache to remain visible.
The Best Way to Cut This Tall Cake
A decorated cake this tall looks wonderful whole, but cutting it with a cold, dirty knife can ruin those beautiful layers.
Let a refrigerated cake sit briefly before serving so the buttercream is pleasant to eat. Dip a long sharp knife into hot water, wipe it completely dry, and make one clean downward cut.
Clean the blade between slices.
The resulting slice should show three dark chocolate layers separated by thick, even bands of peanut butter frosting, with ganache and candy across the top.
If you enjoy learning why texture changes in baked desserts, the RecipesMind guide to the difference between butter cakes is another useful read.
Common Mistakes and How to Fix Them
The cake layers slide. Your cake may still be warm, your frosting may be too soft, or you may have used too much filling. Chill the assembled cake before applying the final frosting.
The ganache runs to the bottom. It was probably too warm or the cake wasn’t cold enough. Always make one test drip first.
The ganache sits in a blob. It cooled too far. Warm it very gently, stir, and test again.
The frosting looks greasy. Your butter may have been too warm, or your peanut butter may have separated. Chill the frosting briefly and beat it again.
The cake is dry. Measure flour carefully and avoid extending the bake simply because a timer says so. Start checking early. For another discussion of moisture in baking, see RecipesMind’s banana bread preparation guide.
The layers break during assembly. They were probably still warm or extremely soft. Fully cooled cake is easier to handle. Briefly chilling the layers can also make a tall cake easier to stack.
Make-Ahead and Storage Tips
You do not need to bake, frost, assemble, and decorate everything within a few frantic hours.
Bake the chocolate layers first. Once completely cool, wrap them well. You can then prepare the frosting and assemble the cake later.
A chilled assembled cake is also easier to slice neatly. King Arthur recommends refrigerating its frosted chocolate layer cake to help the frosting set and make slicing easier.
Because this recipe includes dairy-rich frosting and ganache, a conservative home-storage approach is to keep the finished cake covered in the refrigerator, especially for longer storage. The FDA advises promptly refrigerating foods that require refrigeration and notes a two-hour room-temperature limit for perishable foods.
For the best eating texture, let an individual slice lose some of its refrigerator chill before serving rather than leaving the whole cake out for an extended period.
Why This Cake Is Worth the Extra Steps
There is a moment after the final chocolate curl goes on when this cake stops looking homemade in the ordinary sense.
The pale peanut butter sides make the dark drips stand out. The frosting swirls add height. Candy pieces turn the top into something playful. Then you cut through it and reveal three dark layers separated by thick peanut butter filling.
Yet none of those elements requires an advanced pastry technique.
The real skill is patience.
Cool the cake before frosting. Chill the crumb coat. Chill the final frosting. Let the ganache reach the correct consistency. Test one drip before committing to the entire cake.
Those small decisions are what turn a basic chocolate-and-peanut-butter combination into a showpiece.
Frequently Asked Questions
Can I make Chocolate Peanut Butter Candy Drip Cake ahead of time?
Yes. Baking the layers ahead can actually make assembly less stressful. Cool them completely and wrap them well. Assemble and decorate closer to when you plan to serve the cake.
Why do you put coffee in chocolate cake?
Coffee works as part of the liquid while pairing naturally with cocoa’s roasted flavor profile. It is not unusual in chocolate cake formulas; tested King Arthur recipes also use brewed coffee or offer it as an alternative to water.
Will the finished cake taste strongly like coffee?
The goal here is a rich chocolate flavor rather than a coffee-flavored cake. If you strongly dislike coffee, water can work as an alternative, though the flavor profile will change slightly.
Can I use natural peanut butter for the frosting?
Conventional creamy peanut butter is the safer choice for this recipe. Natural varieties can separate, which makes the frosting’s final consistency harder to predict.
How do I stop ganache from running down the whole cake?
Chill the frosted cake first and allow the freshly made ganache to cool slightly. Test one drip. If it moves too quickly, wait before continuing.
What chocolate is best for a drip cake?
Semisweet chocolate works particularly well here because the frosting and candy are already sweet. Finely chopping the chocolate also helps it melt evenly when the hot cream is added.
Can I make this cake with only two pans?
The recipe is designed for three 8-inch layers. Using a different number or size of pans changes batter depth and therefore baking time. For the tall appearance shown here, three matching 8-inch pans are the simplest option.
What candies should I put on top?
Chocolate-peanut butter cups are the natural centerpiece. Add chocolate-covered wafers, caramel pieces, mini chocolate bars, smaller chocolates, and chocolate curls. Use several shapes and heights rather than one type of candy.
What is the secret to a clean chocolate drip?
Temperature. The cake should be cold while the ganache should be fluid but no longer very hot. A single test drip tells you more than a fixed waiting time because chocolate, cream, and room temperatures vary.
Print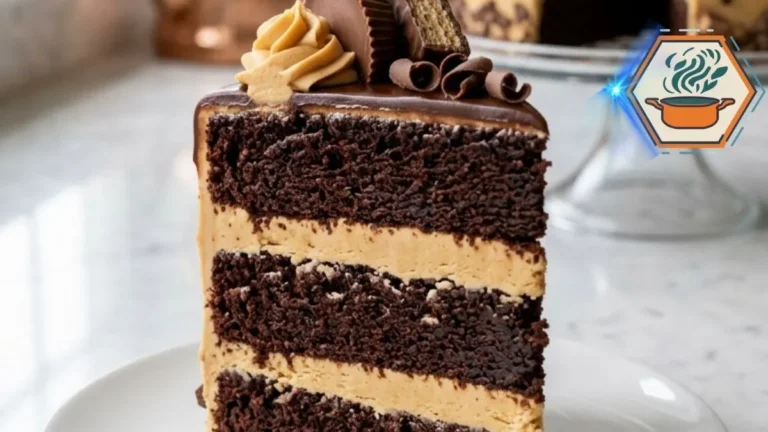
Chocolate Peanut Butter Candy Drip Cake
A tall chocolate layer cake filled with fluffy peanut butter buttercream, covered with smooth peanut butter frosting, finished with glossy chocolate ganache drips, and topped with chocolate-peanut butter candies, wafer pieces, mini chocolate bars, and chocolate curls.
- Total Time: About 2 hours 15 minutes, plus complete cake cooling
- Yield: 1 tall 8-inch cake, about 16 servings
Ingredients
Chocolate Cake
2 cups (240 g) all-purpose flour
1 3/4 cups (350 g) granulated sugar
3/4 cup (64 g) unsweetened cocoa powder
2 teaspoons baking powder
1 1/2 teaspoons baking soda
1/2 teaspoon fine salt
2 large eggs, room temperature
1 cup (240 ml) whole milk, room temperature
1/2 cup (120 ml) neutral vegetable oil
2 teaspoons vanilla extract
1 cup (240 ml) hot brewed coffee
Peanut Butter Frosting
1 cup (226 g) unsalted butter, softened
1 1/4 cups (about 320 g) creamy peanut butter
4 cups (about 480 g) powdered sugar
1/3 cup (80 ml) heavy cream, plus more only if needed
2 teaspoons vanilla extract
1 pinch fine salt
Chocolate Ganache
8 ounces (227 g) semisweet chocolate, finely chopped
3/4 cup (180 ml) heavy cream
Decoration
Assorted chocolate-peanut butter cups
Chocolate-covered wafer pieces
Chocolate-caramel pieces
Mini chocolate bars
Mini chocolate candies
Chocolate curls or shavings
Instructions
1. Preheat the oven to 350°F (175°C). Position a rack near the center. Grease three 8-inch round cake pans, line the bottoms with parchment paper, and lightly grease the parchment.
2. In a large bowl, whisk together the flour, granulated sugar, cocoa powder, baking powder, baking soda, and salt. Break up any visible lumps of cocoa.
3. In a separate bowl, whisk the eggs, whole milk, vegetable oil, and vanilla until combined.
4. Add the wet ingredients to the dry ingredients. Stir just until mostly combined.
5. Slowly pour in the hot coffee while whisking gently. Continue only until the batter is smooth and no dry pockets remain. The batter will be fairly thin; this is expected.
6. Divide the batter as evenly as possible among the three prepared 8-inch pans.
7. Bake for 25 to 30 minutes. Begin checking around 25 minutes. The cakes are ready when the centers spring back lightly and a toothpick inserted near the center comes out clean or with a few moist crumbs.
8. Cool the cakes in their pans for about 10 minutes. Carefully turn them onto wire racks, remove the parchment, and allow them to cool completely before frosting.
9. To make the peanut butter frosting, beat the softened butter for about 2 minutes until creamy. Add the creamy peanut butter and beat until smooth and uniform.
10. Add the powdered sugar gradually with the mixer on low. Add the vanilla, salt, and most of the heavy cream. Beat for 2 to 3 minutes until light and fluffy. Add additional cream 1 teaspoon at a time only if the frosting is too stiff.
11. If necessary, level any domed cake layers with a long serrated knife after they are completely cool.
12. Place the first chocolate cake layer on a cake board or serving plate. Spread an even layer of peanut butter frosting over it. Add the second cake layer and another even layer of frosting.
13. Add the third layer, preferably with its flat bottom facing upward. Apply a thin crumb coat over the top and sides of the entire cake.
14. Refrigerate the crumb-coated cake for 20 to 30 minutes, or until the frosting feels firm.
15. Apply the final coat of peanut butter frosting. Smooth the sides and top, reserving enough frosting for the decorative swirls.
16. Refrigerate the frosted cake for about 30 minutes before adding the chocolate ganache. A cold cake is important for controlled chocolate drips.
17. Place the finely chopped semisweet chocolate in a heatproof bowl. Heat the heavy cream until steaming and just beginning to simmer around the edges. Do not let it boil aggressively.
18. Pour the hot cream over the chocolate. Leave it undisturbed for 2 minutes, then stir slowly from the center outward until completely smooth and glossy.
19. Allow the ganache to cool slightly. Test one small drip on the chilled cake before decorating the entire edge. If it runs quickly to the bottom, allow the ganache to cool longer. If it barely moves, gently warm it again.
20. Once the test drip moves slowly partway down the side, create individual drips around the top edge. Spread a thin layer of the remaining ganache over the top of the cake.
21. Allow the ganache to set slightly. Pipe large peanut butter frosting swirls around the top.
22. Decorate with chocolate-peanut butter cups, chocolate-covered wafer pieces, chocolate-caramel pieces, mini chocolate bars, mini candies, and chocolate curls. Vary the height and angle of the decorations for a full candy-loaded finish.
23. Chill briefly if needed to firm the cake before slicing. For clean slices, use a sharp knife warmed in hot water and wiped completely dry. Clean the blade between cuts.
Notes
Use conventional creamy peanut butter rather than a natural peanut butter that separates. Natural peanut butter may produce a softer or oily frosting.
The butter should be softened but not melted. It should hold its shape while accepting a light finger impression.
Do not frost warm cake layers. Even slightly warm cake can soften the buttercream and cause a tall layer cake to shift.
The chocolate cake batter is relatively thin after adding the hot coffee. Do not add extra flour simply to thicken it.
For the cleanest layers, divide the batter by weight among the three pans.
Chill the cake before adding the ganache. This is one of the most important steps for creating controlled chocolate drips.
Always make one test drip before decorating the entire cake. Ganache consistency changes with temperature.
If the ganache runs directly to the cake board, it is too warm or too fluid. Let it cool longer. If it barely moves, warm it very gently.
Candy quantities are flexible. Use enough to create a full top while leaving some peanut butter swirls and chocolate ganache visible.
For neat slices, warm a sharp knife in hot water, dry it thoroughly, and wipe the blade clean after each cut.
Because the cake contains buttercream and ganache made with dairy ingredients, keep leftovers covered and refrigerated. Allow individual portions to lose some of their refrigerator chill before serving for a softer texture.
- Prep Time: 45 minutes
- Additional/Chill Time: 1 hour
- Cook Time: 25–30 minutes
- Category: Dessert
- Method: Baking
- Cuisine: American
Final Kitchen Note
The most important lesson in this Chocolate Peanut Butter Candy Drip Cake is simple: temperature controls the finish.
Do not rush the cooling stages. A completely cooled cake supports the frosting. A chilled buttercream surface supports the ganache. Slightly cooled ganache creates slow, defined drips rather than thin chocolate streams reaching the cake board.
Once those three temperatures are right, the spectacular part becomes surprisingly easy. Add the peanut butter swirls, build up the chocolate candy pieces, scatter a few curls, and save the best moment for last: cutting the first tall slice and revealing those dramatic layers inside.