
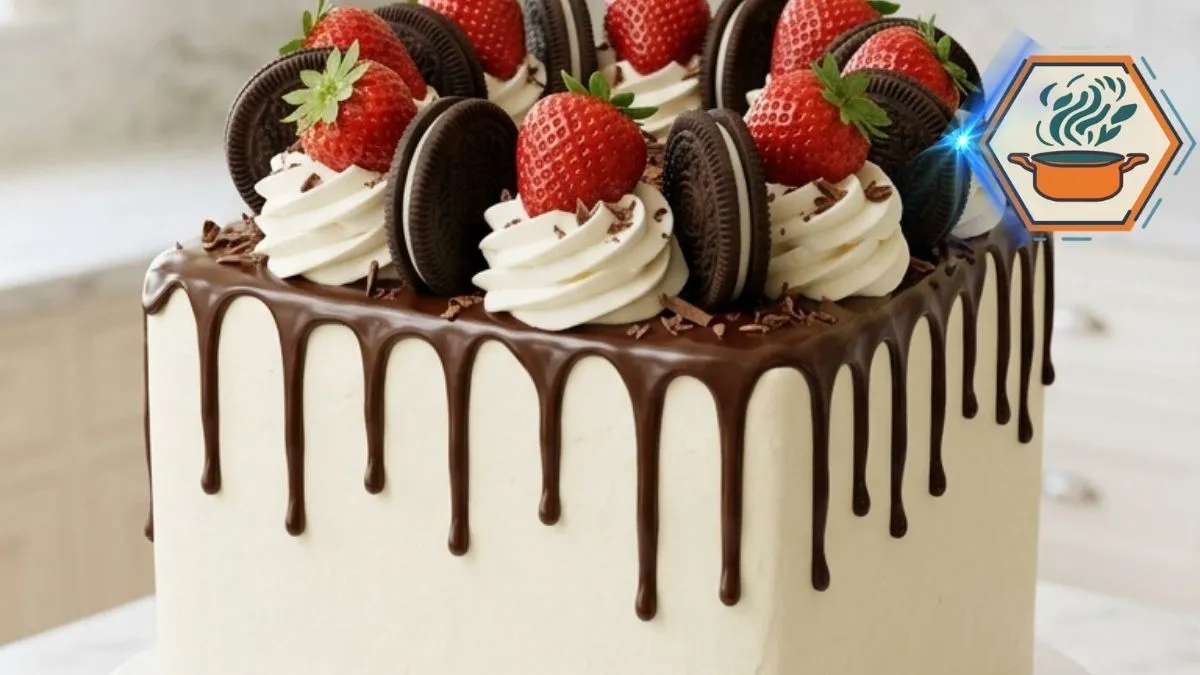
The first time you see a Strawberry Cookies & Cream Drip Cake, it feels like the kind of dessert that belongs behind the glass of a bakery counter. Tall chocolate layers peek through clouds of vanilla cream. Bright strawberries break up the dark cookie colors. Glossy chocolate drips fall down the pale sides. Then you cut the first slice, and the inside may be even prettier than the top.
Yet this cake can be made at home. The secret is not a difficult decorating trick. It is a series of small details: thin, even cake layers, cold cream, dry strawberries, a chilled frosted cake, and chocolate ganache at the right consistency.
There is also some useful baking science behind the chocolate sponge. Cocoa type matters when chemical leaveners are involved. King Arthur Baking explains the difference between natural and Dutch-process cocoa and how their acidity affects baking soda. For this recipe, natural unsweetened cocoa is the safest choice with the listed leaveners. You can read their guide to cocoa powder for more background.
The drip needs similar attention. A cold cake helps ganache set before it travels all the way down the sides. Current drip-cake guidance also recommends testing a single drip before decorating the entire cake. The BBC Good Food drip-cake guide also explains why ganache should cool until it is pourable without being excessively runny. That simple test can save the final finish.
Affiliate disclosure: As an Amazon Associate I earn from qualifying purchases. This article may contain affiliate links to kitchen tools I find useful for preparing this recipe.
JUMP TO
Why This Strawberry Cookies & Cream Drip Cake Works
This cake is built around contrast.
The chocolate sponge is dark, soft, and rich. Vanilla cream brings a lighter flavor. Crushed chocolate sandwich cookies add small bits of crunch. Fresh strawberries add color, acidity, and a juicy fruit note.
Then there is the ganache.
A thin border of semisweet chocolate adds enough bitterness to balance the sweeter cream. Whole cookies, strawberries, whipped cream swirls, and chocolate shavings create the bakery-style top.
The cream cheese is important too. Plain whipped cream can become soft as a tall cake sits. Cream cheese gives whipped cream more structure while keeping it lighter than a traditional buttercream.
For another fruit-and-chocolate dessert idea, see our strawberry-filled chocolate cake guide.
Ingredients You’ll Need
For the chocolate cake
- 2 cups all-purpose flour
- 1 3/4 cups granulated sugar
- 3/4 cup natural unsweetened cocoa powder
- 2 teaspoons baking powder
- 1 1/2 teaspoons baking soda
- 1/2 teaspoon fine salt
- 2 large eggs, at room temperature
- 1 cup whole milk, at room temperature
- 1/2 cup neutral vegetable oil
- 2 teaspoons vanilla extract
- 1 cup freshly brewed hot coffee
The coffee should be hot, but it does not need to be boiling. Coffee deepens the chocolate character without making the finished cake taste like a cup of coffee.
For the filling and frosting
- 8 ounces full-fat block cream cheese, softened but still cool
- 3/4 cup powdered sugar, sifted
- 2 teaspoons vanilla extract
- 2 cups cold heavy whipping cream
- 10 chocolate sandwich cookies, finely crushed
- 4–5 strawberries, finely diced and thoroughly dried
The diced strawberries are an important addition if you want the cut cake to resemble the reference image. The original ingredient list used strawberries only for decoration, while the photographed slice clearly shows strawberry pieces between the chocolate layers.
For the chocolate drip
- 6 ounces semisweet chocolate, finely chopped
- 1/2 cup heavy cream
For decorating
- 8–10 fresh strawberries
- 8 chocolate sandwich cookies
- About 1 cup whipped cream
- 2 ounces semisweet chocolate, for shavings
Useful Cake Decorating Equipment
You do not need a professional kitchen. A few basic tools make the tall square shape much easier to reproduce.
Two straight-sided 9-inch square pans help the layers bake evenly. You can browse 9-inch square cake pans on Amazon before baking.
An offset spatula also makes the cream easier to spread without pulling crumbs through the white exterior. Here are offset cake spatulas on Amazon.
For smoother sides, a rotating stand can be useful even with a square cake. See cake decorating turntables on Amazon.
Finally, piping bags and a large star tip create the tall cream swirls visible across the top. You can find cake piping bags and tips on Amazon.
Affiliate note: replace the four Amazon destinations above with your own Amazon Associates links before publishing.
How to Make the Chocolate Cake Layers
Heat the oven to 350°F (175°C).
Grease two 9-inch square cake pans. Line the bottoms with parchment paper, then lightly grease the parchment.
In a large bowl, whisk the flour, sugar, cocoa powder, baking powder, baking soda, and salt. Break up every visible cocoa lump.
In another bowl, whisk the eggs, milk, oil, and vanilla.
Pour the wet mixture into the dry ingredients. Mix just until mostly combined.
Slowly pour in the hot coffee while mixing on low speed. The batter will become noticeably thin. That is normal. Do not add extra flour.
Divide the batter equally between the pans. A kitchen scale is useful here.
Bake for 28–33 minutes. Start checking near 28 minutes. A toothpick inserted near the center should come out with a few moist crumbs rather than raw batter.
Leave the cakes in their pans for about 10–15 minutes. Turn them onto cooling racks and remove the parchment.
They must be completely cool before cutting.
For the cleanest layers, wrap the cooled cakes and refrigerate them for about 30–60 minutes.
The Extra Step Needed for the Tall Four-Layer Look
This detail makes a major difference.
The reference cake has four visible chocolate sponge layers. Baking two pans gives you two thick cakes, so each cake needs to be sliced horizontally.
Use a long serrated knife.
Trim any large dome first. Then cut each cake through the middle to produce four similar square layers.
Work slowly. Cold cake is less fragile and produces fewer crumbs.
Now you have the height needed for that dramatic bakery-style slice.
Make the Vanilla Cookies & Cream Filling
Beat the cream cheese, powdered sugar, and vanilla until smooth.
Do not beat it for several minutes. You simply want to remove the lumps.
With the mixer on low, gradually pour in the very cold heavy cream.
Increase to medium-high speed and whip until the mixture becomes thick and holds firm peaks. Stop once it has enough structure to spread.
Set aside enough plain white cream to coat the exterior and pipe the decorations.
Fold the crushed sandwich cookies into the remaining portion.
You now have a cookies-and-cream filling with visible chocolate crumbs while preserving clean white frosting for the outside.
Add the Strawberry Layer Without Making the Cake Wet
Fresh strawberries contain plenty of moisture, and this is where many beautiful cakes become unstable.
Wash the berries first. Dry them thoroughly.
For the filling, dice several strawberries into small pieces. Place them on paper towels and gently blot away surface moisture.
Do not add wet strawberry puree directly to this whipped filling.
Spread a layer of cookie cream over the first cake layer. Scatter a modest amount of diced strawberry over it, keeping the fruit about 1/2 inch away from the edges.
Add the next cake layer.
Repeat until all four chocolate layers are stacked.
This produces the dark cake, pale cream, cookie flecks, and red strawberry pockets seen in the reference slice.
If you want to learn more about preparing strawberries for desserts, our guide to what strawberry puree is made of covers the basics.
How to Frost the Cake Cleanly
Once stacked, chill the cake for about 20 minutes.
Apply a very thin coat of plain vanilla cream over the entire cake. This is the crumb coat. Its job is to trap loose chocolate crumbs.
Chill again for 20–30 minutes.
Add the final frosting layer.
Keep the four sides as straight as possible. An offset spatula works well around the corners.
Do not chase absolute perfection. The chocolate drip and toppings will draw the eye upward.
Return the frosted cake to the refrigerator for at least 30 minutes before adding ganache. A cold surface gives you far better control over each drip.
How to Make the Glossy Chocolate Drip
Place the finely chopped semisweet chocolate in a heat-safe bowl.
Heat the heavy cream until steaming. Do not let it boil aggressively.
Pour it over the chocolate.
Wait 2 minutes without stirring. Then begin stirring gently from the center until the mixture becomes dark, smooth, and glossy.
Now comes the part that matters: do not immediately pour hot ganache over the cake.
Let it cool until slightly warm and fluid.
Test one drip on the back corner of the cold cake. If it races to the bottom, wait a little longer. If it barely moves, warm the ganache very gently.
Once the test looks right, make individual drips around the edges. Vary their lengths slightly for a natural finish.
Spread a thin amount of ganache across the top edge if you want the look in the photograph.
Decorating the Cake Like the Reference Photo
The visual arrangement matters as much as the ingredients.
Pipe large white whipped-cream swirls across the top.
Place whole and halved strawberries between the swirls. Keep their green tops attached for color.
Stand chocolate sandwich cookies vertically or at a slight angle. Some can be whole while others can be partially tucked into the cream.
Finish with fine chocolate shavings scattered across the center.
For the closest match to the reference image, aim for:
- Square, tall sides
- Smooth ivory-white frosting
- Long dark chocolate drips
- Four chocolate sponge layers
- Three visible cream filling layers
- Small strawberry pieces inside
- Large strawberries on top
- Whole chocolate sandwich cookies
- Tall white cream swirls
- Fine chocolate curls or shavings
The finished Strawberry Cookies & Cream Drip Cake should feel abundant without looking crowded.
Common Mistakes and How to Avoid Them
The cake breaks while stacking: Chill the layers before cutting and assembling them.
The filling squeezes out: Your cream may be too soft, or you may be adding too much between layers.
The frosting turns gray: Keep cookie crumbs out of the plain frosting reserved for the exterior.
The strawberries slide: Wash them early and dry them thoroughly before decorating.
The ganache reaches the cake board: It is probably too warm or too fluid. Test one drip first.
The chocolate batter looks thin: That is expected after adding coffee. Resist adding more flour.
The cake leans: Use evenly cut layers and spread filling at a consistent thickness.
Storage and Make-Ahead Tips
Because the frosting contains heavy cream and cream cheese, keep the finished cake refrigerated.
For the best texture, you can bake the chocolate layers one day ahead. Cool them fully, wrap them well, and refrigerate them.
Make the cream and assemble the cake closer to serving.
For the freshest appearance, add the strawberries on the day you plan to serve the cake. Cut berries release juice faster than whole berries.
Take the cake from the refrigerator for a short period before slicing so the sponge loses some of its refrigerator firmness. Keep it cool rather than leaving it out for a long party display, since cream-cheese-stabilized whipped frosting performs best chilled.
For more baking ideas, visit RecipesMind.
FAQs About Strawberry Cookies & Cream Drip Cake
Can I make Strawberry Cookies & Cream Drip Cake ahead of time?
Yes. Bake the chocolate cakes a day ahead and refrigerate them once completely cool. Assemble and decorate the cake the next day. Fresh strawberries look best when added close to serving time.
Why is coffee added to chocolate cake?
Coffee works especially well with cocoa and can make the chocolate flavor seem deeper. The finished sponge should taste primarily of chocolate rather than coffee.
Can I make this cake without coffee?
Yes. Replace the hot coffee with the same quantity of hot water. The chocolate character may be slightly less intense, but the cake can still work.
Why did my chocolate drip run too far?
Your ganache was likely too warm, too thin, or applied to a cake that was not cold enough. Chill the frosted cake first and make one test drip before continuing.
Can I put fresh strawberries between cake layers?
Yes, but use them carefully. Dice them into small pieces and blot them thoroughly. Too much fresh fruit can release liquid into the cream and make the layers slide.
Can I use Dutch-process cocoa?
For this exact formula, natural unsweetened cocoa is the safer choice because the recipe contains a significant amount of baking soda. Natural and Dutch-process cocoa have different acidity, so substitutions can affect flavor and rise.
How do I get four layers from two cake pans?
Bake two cakes, cool them fully, chill them briefly, and slice each cake horizontally with a serrated knife. You will end with four thinner layers.
How do I get clean slices?
Chill the assembled cake first. Use a long sharp knife and wipe the blade after every cut. For an especially neat presentation, briefly warm the clean blade, dry it, then slice.
Print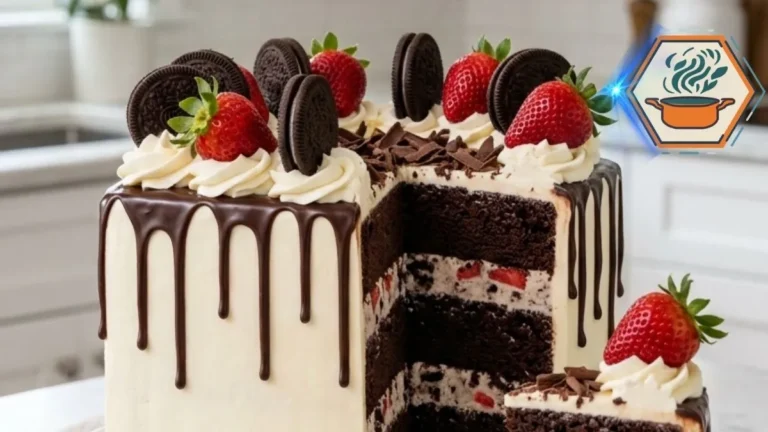
Strawberry Cookies & Cream Drip Cake
A tall chocolate layer cake filled with cookies and cream frosting and fresh strawberries, finished with smooth vanilla cream, glossy chocolate drips, whipped cream swirls, chocolate sandwich cookies, strawberries, and chocolate shavings.
- Total Time: 3 hours 5 minutes
- Yield: 16 servings
Ingredients
For the Chocolate Cake
2 cups (240 g) all-purpose flour
1¾ cups (350 g) granulated sugar
¾ cup (65 g) natural unsweetened cocoa powder
2 tsp baking powder
1½ tsp baking soda
½ tsp fine salt
2 large eggs, room temperature
1 cup (240 ml) whole milk, room temperature
½ cup (120 ml) vegetable oil
2 tsp vanilla extract
1 cup (240 ml) hot brewed coffee
For the Cookies & Cream Frosting
12 oz (340 g) full-fat block cream cheese, softened but still cool
1 cup (120 g) powdered sugar, sifted
2½ tsp vanilla extract
3 cups (720 ml) cold heavy whipping cream
10 chocolate sandwich cookies, finely crushed
For the Strawberry Filling
5–6 medium fresh strawberries, finely diced
Paper towels for thoroughly drying the diced strawberries
For the Chocolate Drip
6 oz (170 g) semisweet chocolate, finely chopped
½ cup (120 ml) heavy cream
For Decorating
8–10 fresh strawberries, washed and thoroughly dried
8 chocolate sandwich cookies
1 cup whipped cream
2 oz (57 g) semisweet chocolate, for shavings
Instructions
1. Preheat the oven to 350°F (175°C). Grease two 9-inch square cake pans. Line the bottoms with parchment paper and lightly grease the parchment.
2. In a large mixing bowl, whisk together the flour, granulated sugar, cocoa powder, baking powder, baking soda, and salt. Break up any visible lumps of cocoa.
3. In a separate bowl, whisk the eggs, whole milk, vegetable oil, and vanilla extract until combined.
4. Add the wet ingredients to the dry ingredients. Mix on low speed just until combined. Do not overmix.
5. Slowly pour in the hot coffee while mixing on low speed. The batter will be thin. This is expected.
6. Divide the batter evenly between the two prepared pans. For the most even layers, weigh the filled pans with a kitchen scale.
7. Bake for 28–33 minutes, or until a toothpick inserted into the center comes out without wet batter. A few moist crumbs are fine.
8. Let the cakes cool in their pans for 10–15 minutes. Turn them onto wire racks, remove the parchment, and allow them to cool completely.
9. For easier cutting and cleaner layers, wrap the cooled cakes and refrigerate them for 30–60 minutes.
10. Use a long serrated knife to level any pronounced domes. Carefully slice each cake horizontally through the center. You should now have four square chocolate cake layers.
11. Prepare the strawberries for the filling. Wash and dry them before cutting. Finely dice 5–6 strawberries, then place the pieces between paper towels and gently blot away excess surface moisture.
12. To make the frosting, beat the cream cheese, powdered sugar, and vanilla just until smooth.
13. With the mixer running on low speed, gradually add the very cold heavy whipping cream. Increase to medium-high speed and whip until the frosting becomes thick and holds firm peaks. Stop beating as soon as it is firm enough to spread.
14. Reserve enough plain white frosting for the exterior of the cake and the final decorations.
15. Gently fold the crushed chocolate sandwich cookies into the portion of frosting reserved for the filling.
16. Place the first chocolate cake layer on a cake board or serving plate. Spread an even layer of cookies and cream filling over it.
17. Scatter a small amount of diced, dried strawberry over the filling. Keep the strawberry pieces about ½ inch from the outer edge.
18. Add the second cake layer and repeat with filling and strawberries. Continue until all four cake layers are stacked.
19. Refrigerate the stacked cake for about 20 minutes to help the filling firm up.
20. Cover the cake with a thin layer of plain frosting to create a crumb coat. Refrigerate for 20–30 minutes.
21. Apply the remaining plain frosting to the top and sides. Smooth the four sides while keeping the corners defined. Refrigerate the frosted cake for at least 30 minutes before adding the chocolate drip.
22. To make the ganache, place the finely chopped semisweet chocolate in a heatproof bowl.
23. Heat ½ cup heavy cream until steaming but not vigorously boiling. Pour it over the chocolate and leave undisturbed for 2 minutes.
24. Stir gently from the center outward until the ganache is completely smooth and glossy.
25. Let the ganache cool until slightly warm and pourable. Test one drip on the back edge of the chilled cake. If it runs immediately to the bottom, allow the ganache to cool longer.
26. Once the consistency is correct, add individual chocolate drips around the cake. Spread a thin layer of ganache around the top edge.
27. Pipe whipped cream swirls across the top of the cake.
28. Decorate with whole and halved strawberries, chocolate sandwich cookies, and semisweet chocolate shavings.
29. Refrigerate the finished cake until ready to serve. For cleaner slices, use a sharp knife and wipe the blade clean between cuts.
Notes
Natural unsweetened cocoa powder is recommended for this exact recipe.
The chocolate cake batter becomes thin after the hot coffee is added. Do not add extra flour.
Cool the cakes completely before slicing them horizontally. Slightly chilled cake is easier to cut into clean layers.
Dry the strawberries thoroughly. Excess water can soften the filling and make the layers slide.
Keep diced strawberries away from the outside edge of each filling layer.
Do not add warm ganache to a room-temperature cake. The frosted cake should be well chilled first.
Always make one test drip before decorating the entire cake.
If the ganache runs too quickly, let it cool for a few more minutes. If it is too thick to drip, warm it very gently.
For the appearance shown in the article, each of the two baked cakes is cut horizontally to create four chocolate cake layers.
Because the frosting contains cream cheese and heavy cream, keep the finished cake refrigerated.
For the best appearance, add the fresh strawberry decorations on the day the cake will be served.
- Prep Time: 1 hour 15 minutes
- Additional/Chilling Time: 1 hour 20 minutes
- Cook Time: 30 minutes
- Category: Dessert
- Method: Baking
- Cuisine: American
A Celebration Cake Worth the Extra Steps
The appeal of this Strawberry Cookies & Cream Drip Cake is not only its dramatic appearance. Every decoration has a purpose.
The strawberries cut through the richness. Cookie pieces add crunch. The whipped cream cheese frosting keeps the cake lighter than a heavy buttercream. Semisweet ganache adds a darker chocolate finish.
Most importantly, the recipe becomes much easier when you treat it as several small jobs instead of one large decorating project.
Bake and cool the chocolate layers. Make the cream. Prepare and dry the strawberries. Stack carefully. Chill. Frost. Chill once more. Test the ganache. Then decorate.
When the first square slice comes away, you get the moment this cake was made for: four dark chocolate layers, ribbons of pale cookies-and-cream filling, flashes of fresh strawberry, white frosting, and a glossy chocolate edge.