
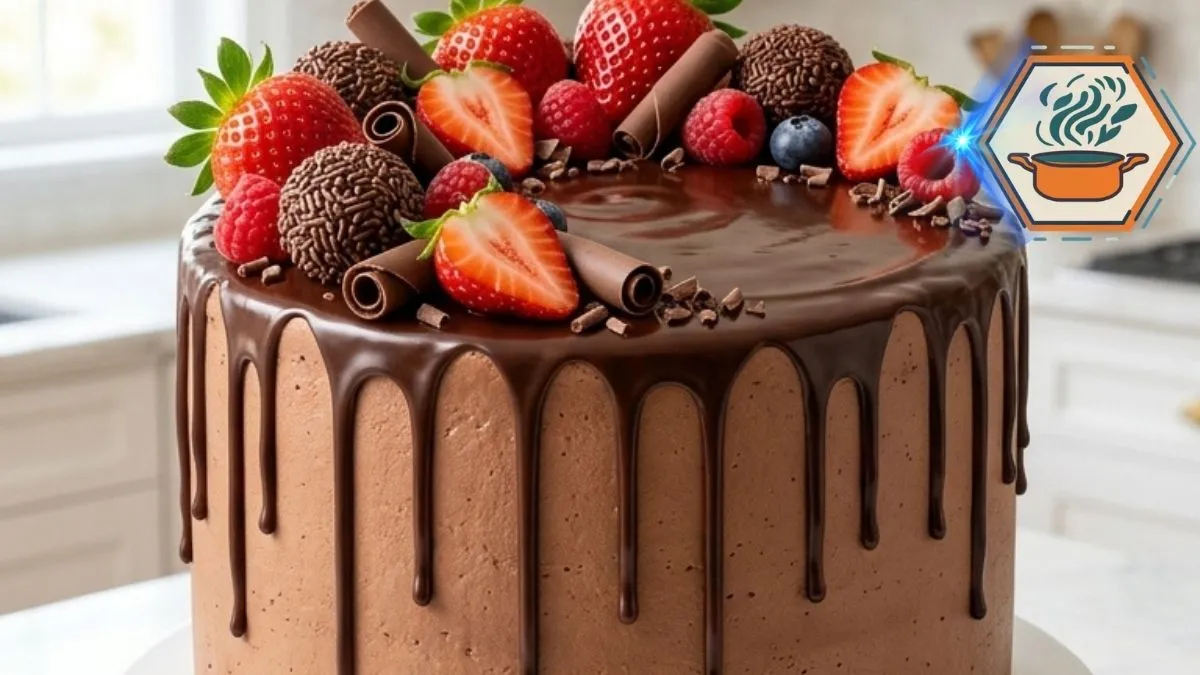
Some cakes look beautiful from across the room. Others make you want to grab a fork before they even reach the table. This Berry Truffle Fudge Drip Cake belongs to the second group. Three dark chocolate cake layers meet creamy cocoa buttercream, glossy chocolate drips, homemade truffles, and a generous crown of fresh strawberries, raspberries, and blueberries.
The contrast is what makes this cake memorable. The chocolate is deep and rich, while the berries bring fresh, slightly tart notes to every slice. The result looks dramatic, but each part uses familiar baking methods. If you are still building your cake-baking skills, the King Arthur Baking cake guide has useful guidance on pan preparation, ingredient measurement, oven temperature, and frosting.
The finishing technique matters just as much as the cake itself. Ganache becomes thicker as it cools, so temperature plays a major role in creating neat drips rather than chocolate streams running to the bottom. King Arthur Baking’s ganache guide explains how chocolate-to-cream ratios and temperature change its consistency. Fresh fruit also needs proper handling. The FDA produce safety guidance recommends washing produce under running water and drying it with a clean towel or paper towel.
This version also fills in details that short social-media recipes often leave out: pan depth, ingredient temperature, batter consistency, crumb coating, cooling, ganache timing, berry preparation, truffle texture, slicing, and storage. Those small details can make the difference between a frustrating cake and one you will want to make again.
Affiliate disclosure: As an Amazon Associate I earn from qualifying purchases. This article may contain affiliate links to kitchen tools I find useful for preparing this recipe.
jump to
Why This Berry Truffle Fudge Drip Cake Works
This isn’t simply chocolate cake with fruit placed on top. Each component has a job.
The chocolate sponge provides a dark, tender foundation. Cocoa buttercream adds a softer chocolate flavor and enough structure to hold three layers. Ganache contributes the glossy finish. Truffles add another texture, while strawberries, raspberries, and blueberries provide color and acidity.
Hot coffee is especially useful in the batter. It intensifies the perception of chocolate flavor without making the finished cake taste like a cup of coffee. If you do not use coffee, hot water works.
Vegetable oil is used instead of butter in the cake itself. Oil remains liquid when cool, which helps give the crumb a soft texture even after the assembled cake has spent time in the refrigerator.
For readers who enjoy rich chocolate desserts, our strawberry-filled chocolate cake guide offers another way to pair chocolate with fresh berry flavor.
Ingredients
Chocolate Cake
For three 8-inch cake layers:
- 2 1/2 cups (300 g) all-purpose flour
- 3/4 cup (64 g) unsweetened cocoa powder
- 2 cups (400 g) granulated sugar
- 2 teaspoons baking soda
- 1 teaspoon baking powder
- 1 teaspoon fine salt
- 3 large eggs, at room temperature
- 1 cup (240 ml) whole milk, at room temperature
- 1/2 cup (120 ml) neutral vegetable oil
- 2 teaspoons vanilla extract
- 1 cup (240 ml) hot brewed coffee or hot water
Use natural unsweetened cocoa unless the product you use is specifically suited to recipes calling for baking soda. Cocoa types differ in acidity, so switching types can affect the result.
Chocolate Buttercream
- 1 1/2 cups (340 g) unsalted butter, softened
- 5 cups (600 g) powdered sugar
- 3/4 cup (64 g) unsweetened cocoa powder
- 1/3 cup (80 ml) heavy cream, plus a little more if needed
- 2 teaspoons vanilla extract
- 1/4 teaspoon fine salt
The butter should be soft enough to indent with a finger but should not look greasy or melted.
Chocolate Ganache Drip
- 10 oz (283 g) semisweet chocolate, finely chopped
- 3/4 cup (180 ml) heavy cream
This produces enough ganache for the top and visible drips. Ganache consistency varies with the chocolate used, so the cooling and drip test described below are important. Ganache is fundamentally an emulsion of chocolate and cream, and a higher chocolate proportion produces a thicker result.
Chocolate Truffles
- 8 oz (227 g) semisweet chocolate, finely chopped
- 1/2 cup (120 ml) heavy cream
- 1/2 to 3/4 cup chocolate sprinkles or finely chopped chocolate
Decoration
- 8 to 10 medium strawberries
- 10 to 14 raspberries
- 1/3 to 1/2 cup blueberries
- 4 to 6 homemade chocolate truffles
- Chocolate curls
- Chocolate sprinkles
Choose firm berries without bruised or leaking areas.
Equipment You Will Need
The cake is much easier to assemble when the right tools are ready before you start.
You will need three 8-inch round cake pans that are preferably about 2 inches deep. King Arthur notes that actual pan dimensions matter because a pan that is too small can cause batter to overflow.
Other useful tools include:
- Parchment paper
- Large mixing bowls
- Whisk
- Electric hand mixer or stand mixer
- Digital kitchen scale
- Wire cooling racks
- Offset spatula
- Cake scraper
- Cake turntable
- Small spoon or squeeze bottle for drips
- Serrated knife or cake leveler
How to Make the Chocolate Cake
Preheat the oven to 350°F (175°C). Give the oven enough time to reach temperature before the batter goes inside.
Grease three 8-inch round pans. Place a parchment circle in the bottom of each pan, then lightly grease the parchment. This extra step makes removing tender chocolate layers much safer. King Arthur also recommends the grease-and-parchment approach for reliable cake release.
In a large bowl, whisk together the flour, cocoa powder, sugar, baking soda, baking powder, and salt. Break up any visible cocoa lumps.
In another bowl, whisk the eggs, milk, oil, and vanilla.
Pour the wet ingredients into the dry mixture. Stir just until most dry streaks disappear.
Now slowly pour in the hot coffee while whisking gently.
Do not worry if the batter looks much thinner than a traditional butter cake batter. That is expected here.
Divide the batter evenly among the three prepared pans. A kitchen scale is the easiest way to create equal layers. Equal amounts of batter also help the cakes finish baking at roughly the same time.
Bake on the center rack for approximately 25 to 30 minutes.
Start checking at 25 minutes. The center should spring back lightly when touched, and a toothpick inserted near the middle should come out with a few moist crumbs rather than raw batter.
Avoid baking until the toothpick is completely dry. An extra few minutes can turn a tender chocolate layer into a dry one.
Let the cakes sit in their pans for about 10 to 15 minutes. Run a thin knife around the edge if needed. Turn each layer onto a cooling rack, remove the parchment, and cool completely.
Never frost warm cake. Warm layers can soften the buttercream and make a tall cake slide. King Arthur likewise advises waiting until cake layers are fully cool before frosting.
How to Make Silky Chocolate Buttercream
Beat the softened butter for about 3 minutes until creamy and lighter in texture.
Sift the powdered sugar and cocoa powder. This small step is worth the effort because cocoa can form stubborn lumps.
Add the sugar-cocoa mixture gradually, mixing on low speed at first.
Add vanilla, salt, and most of the cream. Beat for another 2 to 3 minutes.
Check the consistency.
The frosting needs to spread easily but remain firm enough to hold three cake layers. If it feels stiff, add heavy cream 1 tablespoon at a time. If it becomes too soft, chill it briefly or add a small amount of powdered sugar.
For another detailed look at building reliable chocolate cakes, visit our strawberry-filled chocolate cake recipe and guide.
How to Stack the Cake Without Sliding
If the cakes have prominent domes, trim them with a long serrated knife. Do not remove more cake than necessary.
Place the first layer on your cake board or serving plate.
Spread roughly 3/4 to 1 cup buttercream over it. Keep the filling level rather than piling more frosting in the center.
Add the second layer and repeat.
Place the third cake layer on top, preferably upside down. The flat bottom of the cake creates a cleaner top surface.
Spread a very thin coat of buttercream over the entire cake. This is the crumb coat. Its purpose is to trap loose crumbs before the final frosting goes on.
Refrigerate the cake for 20 to 30 minutes.
Apply the remaining buttercream. Smooth the sides with a scraper while turning the cake. Do not chase absolute perfection. The reference cake has a smooth but slightly handmade finish rather than razor-sharp fondant-style edges.
Return the frosted cake to the refrigerator while preparing the decorations.
How to Make Homemade Chocolate Truffles
Finely chop 8 ounces of semisweet chocolate and place it in a heatproof bowl.
Heat 1/2 cup heavy cream until steaming and hot but not aggressively boiling.
Pour it over the chocolate.
Leave it untouched for 2 to 3 minutes, then stir slowly from the center outward until glossy.
Refrigerate until firm enough to scoop, usually around 1 to 2 hours, depending on your refrigerator and chocolate.
Scoop small portions and roll them quickly between cool hands. Aim for balls about 1 inch wide.
Roll some in chocolate sprinkles. You can coat others with finely chopped chocolate to vary the texture, matching the decorative look in the reference cake.
Keep them chilled until assembly.
How to Make Glossy Chocolate Drips
Finely chop the 10 ounces of semisweet chocolate.
Heat 3/4 cup heavy cream until steaming. Pour it over the chocolate and wait for about 2 minutes.
Stir slowly until smooth and glossy.
Now comes one of the most important parts of the entire recipe:
Do not immediately pour hot ganache over the cake.
Hot, thin ganache can race down the buttercream and pool at the base. Ganache naturally thickens as it cools.
Allow it to cool until it remains fluid but has more body.
The cake itself should be cold.
Before decorating the front, place one test drip on the back of the cake.
Watch what happens.
- If it reaches the bottom almost immediately, the ganache is too warm or thin.
- If it barely moves, it has cooled too much.
- If it travels slowly partway down the cake, the consistency is right.
Once the test looks good, spoon small amounts around the edge. Vary the quantity slightly so some drips are longer than others.
Then spread a thin layer of ganache over the top.
That variation is what creates the natural drip effect visible in the reference photo.
How to Decorate It Like the Reference Cake
The visual target is a tall, three-layer chocolate cake with cocoa-colored buttercream, dark ganache drips, exposed dark layers when sliced, and a generous berry-and-truffle arrangement concentrated across the top.
Wash the strawberries, raspberries, and blueberries before decorating. The FDA recommends rinsing produce under running water rather than using soap or produce detergent. Dry it afterward with a clean cloth or paper towel.
For this particular cake, drying is especially important.
Water left on a strawberry can drip onto the ganache or buttercream. That can spoil the clean glossy appearance.
Leave some strawberries whole with their green tops attached. Halve several others lengthwise to reveal their bright centers.
Arrange the decorations in a loose crescent rather than evenly covering the entire top.
Start with the largest pieces:
- Place whole strawberries first.
- Add strawberry halves at different angles.
- Position the truffles between them.
- Fill gaps with raspberries.
- Add blueberries for dark blue contrast.
- Insert chocolate curls at varied angles.
- Finish with a restrained scattering of chocolate sprinkles.
Do not press berries deeply into the ganache. They should look naturally piled rather than embedded.
The goal is the same abundant style shown in the reference image: deep brown chocolate, vivid red berries, touches of blue, green strawberry leaves, textured truffles, and glossy drips.
How to Get Clean, Dramatic Slices
Once assembled, chill the cake until the layers are stable.
For neat slices, use a long sharp knife. Dip the blade into hot water, wipe it completely dry, then make one cut.
Clean and warm the blade again before the next cut. This hot-knife method is also recommended by King Arthur Baking for cleaner chocolate cake slicing.
The cut slice should reveal three dark chocolate cake layers separated by two visible bands of chocolate buttercream, matching the visual style of the reference cake.
Let individual slices sit briefly before eating if the cake has been deeply chilled. Buttercream becomes firmer in the refrigerator, so a little time at a cooler room temperature gives it a softer mouthfeel.
Common Mistakes to Avoid
Adding ganache to a warm cake: The buttercream may soften and the drips can run too far.
Using wet berries: Surface water can mark the ganache and frosting.
Overbaking the layers: Begin checking before the maximum baking time.
Frosting warm cake: Even slightly warm layers can soften buttercream.
Skipping the crumb coat: Loose chocolate crumbs can become visible throughout the final frosting.
Pouring all the ganache at once: Test a single drip first.
Making truffles immediately before assembly: Their centers need enough chilling time to become rollable.
Putting very large berries only on one edge: A tall cake needs balanced decoration so the top does not become awkwardly weighted.
Make-Ahead and Storage Tips
The cake layers can be prepared ahead. Once completely cool, wrap each one tightly so the crumb does not dry out.
The truffle mixture can also be prepared in advance and chilled before rolling.
For the best-looking berries, add them relatively close to serving rather than days ahead. Cut strawberries release moisture over time.
Keep the decorated cake refrigerated because it contains cream-based ganache and fresh fruit. Cover it without crushing the berry topping.
For more cake inspiration, our Mother’s Day cake ideas can help when turning this design into a celebration centerpiece.
Frequently Asked Questions
Can I use hot water instead of coffee?
Yes. Replace the coffee with the same amount of hot water. Coffee adds depth to the chocolate profile, but the cake can still be made without it.
Why is my chocolate cake batter so thin?
The cup of hot liquid makes this batter relatively fluid. Do not add extra flour simply because it looks thinner than a classic butter cake batter.
Why did my ganache run down the entire cake?
It was probably too warm or too fluid when applied. Let it cool longer and test one drip on the back of the cold cake before continuing.
Why is my ganache too thick to drip?
It has likely cooled too far. Warm it very gently and stir again. Ganache changes considerably in consistency as its temperature changes.
Can I make this cake without three pans?
Yes, but do not place all the batter into one shallow 8-inch pan. If you have fewer pans, bake in batches using pans of suitable depth. Try to divide the batter by weight so the layers remain consistent.
Can I use frozen berries?
Fresh berries are strongly preferred for the decoration. Thawed frozen fruit releases water and becomes softer, which can stain the frosting and glossy ganache.
How do I stop the cake layers from sliding?
Cool the layers fully, use buttercream with enough body, keep the filling reasonably level, apply a crumb coat, and chill the stacked cake before adding the final frosting and ganache.
Can I prepare the Berry Truffle Fudge Drip Cake the day before?
Yes. You can assemble and frost the cake in advance. For the freshest appearance, consider adding the final fresh-berry decoration closer to serving.
What chocolate works best for the drip?
Semisweet chocolate is a practical choice because it gives the cake a dark chocolate appearance without the extreme firmness that can come from some high-cacao chocolates. Different chocolates behave differently in ganache because their proportions of cocoa solids, cocoa butter, and sugar vary.
Print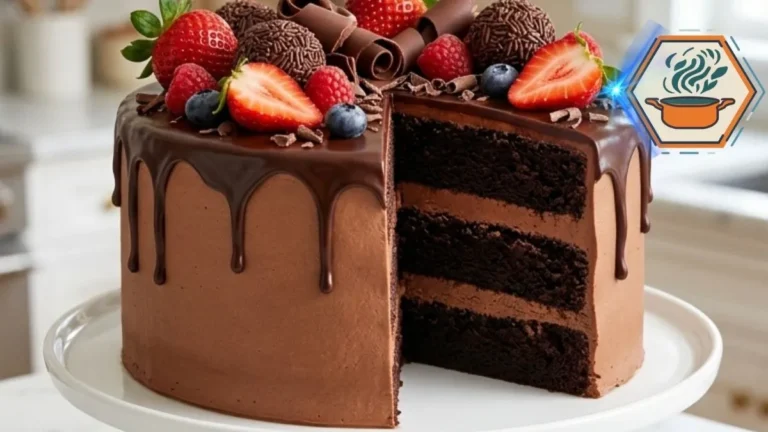
Berry Truffle Fudge Drip Cake
A tall three-layer chocolate cake filled and covered with silky cocoa buttercream, finished with glossy chocolate ganache drips, homemade chocolate truffles, fresh strawberries, raspberries, blueberries, chocolate curls, and sprinkles. The tender chocolate crumb and fresh berries balance the rich chocolate flavors in every slice.
- Total Time: 4 hours 15 minutes
- Yield: 16 slices
Ingredients
Chocolate Cake
2 1/2 cups (300 g) all-purpose flour
3/4 cup (64 g) unsweetened natural cocoa powder
2 cups (400 g) granulated sugar
2 teaspoons baking soda
1 teaspoon baking powder
1 teaspoon fine salt
3 large eggs, room temperature
1 cup (240 ml) whole milk, room temperature
1/2 cup (120 ml) neutral vegetable oil
2 teaspoons vanilla extract
1 cup (240 ml) hot brewed coffee or hot water
Chocolate Buttercream
1 1/2 cups (340 g) unsalted butter, softened
5 cups (600 g) powdered sugar, sifted
3/4 cup (64 g) unsweetened cocoa powder, sifted
1/3 cup (80 ml) heavy cream, plus more if needed
2 teaspoons vanilla extract
1/4 teaspoon fine salt
Chocolate Ganache
10 oz (283 g) semisweet chocolate, finely chopped
3/4 cup (180 ml) heavy cream
Chocolate Truffles
8 oz (227 g) semisweet chocolate, finely chopped
1/2 cup (120 ml) heavy cream
1/2 cup chocolate sprinkles or finely chopped chocolate, for coating
Topping
8 to 10 medium fresh strawberries
10 to 14 fresh raspberries
1/3 to 1/2 cup fresh blueberries
4 to 6 homemade chocolate truffles
Chocolate curls, as needed
Chocolate sprinkles, as neededInstructions
1. PREPARE THE PANS
Preheat the oven to 350°F (175°C). Grease three 8-inch round cake pans, preferably about 2 inches deep. Line the bottoms with parchment paper and lightly grease the parchment.
2. MIX THE DRY INGREDIENTS
In a large bowl, whisk together the flour, cocoa powder, sugar, baking soda, baking powder, and salt. Break up any visible cocoa lumps.
3. ADD THE WET INGREDIENTS
In a separate bowl, whisk the eggs, milk, vegetable oil, and vanilla. Add the wet mixture to the dry ingredients and mix only until most dry streaks disappear.
4. ADD THE HOT COFFEE
Slowly whisk in the hot coffee or hot water. The batter will be noticeably thin. This is normal. Do not add extra flour.
5. DIVIDE AND BAKE
Divide the batter evenly among the three prepared pans. For equal layers, weigh the filled pans or batter portions with a kitchen scale. Bake for 25 to 30 minutes. Begin checking at 25 minutes. A toothpick inserted near the center should come out without wet batter and may have a few moist crumbs.
6. COOL THE CAKES
Cool the cakes in their pans for 10 to 15 minutes. Carefully turn them onto wire racks, remove the parchment, and allow them to cool completely before frosting.
7. MAKE THE BUTTERCREAM
Beat the softened butter for about 3 minutes until creamy. Gradually add the sifted powdered sugar and cocoa powder on low speed. Add the heavy cream, vanilla, and salt. Beat for another 2 to 3 minutes until light and spreadable. Add heavy cream 1 tablespoon at a time if the frosting is too stiff.
8. LEVEL AND STACK
If necessary, level any prominent cake domes with a serrated knife. Place the first cake layer on a cake board or serving plate. Spread about 3/4 to 1 cup of buttercream evenly over the layer. Repeat with the second layer. Add the third layer, preferably upside down for a flatter top.
9. CRUMB COAT
Spread a very thin layer of buttercream over the top and sides of the entire cake to trap loose crumbs. Refrigerate for 20 to 30 minutes.
10. FINAL FROSTING
Cover the chilled cake with the remaining chocolate buttercream. Smooth the sides while retaining a soft handmade finish. Refrigerate the cake while preparing the truffles and ganache.
11. MAKE THE TRUFFLES
Place 8 oz finely chopped semisweet chocolate in a heatproof bowl. Heat 1/2 cup heavy cream until steaming but not vigorously boiling. Pour it over the chocolate and leave untouched for 2 to 3 minutes. Stir slowly until smooth. Refrigerate for 1 to 2 hours, or until firm enough to scoop. Roll into approximately 1-inch balls and coat with chocolate sprinkles or finely chopped chocolate. Keep chilled.
12. PREPARE THE BERRIES
Rinse the strawberries, raspberries, and blueberries under running water. Dry every berry thoroughly. Leave some strawberries whole with their green tops attached and cut several strawberries in half lengthwise.
13. MAKE THE GANACHE
Place 10 oz finely chopped semisweet chocolate in a heatproof bowl. Heat 3/4 cup heavy cream until steaming. Pour it over the chocolate. Wait 2 minutes, then stir slowly from the center outward until smooth and glossy.
14. TEST THE GANACHE
Allow the ganache to cool until fluid but no longer hot. The frosted cake must be cold. Test one drip on the back of the cake. If it quickly runs to the bottom, allow the ganache to cool longer. If it barely moves, warm it very gently.
15. CREATE THE DRIPS
Once the consistency is correct, spoon small amounts of ganache around the top edge. Make some drips slightly longer than others for a natural finish. Spread a thin layer of ganache across the top.
16. DECORATE
Arrange whole and halved strawberries across the top in a loose crescent. Add chocolate truffles, raspberries, and blueberries. Fill small gaps with chocolate curls and finish with a light scattering of chocolate sprinkles.
17. CHILL AND SLICE
Chill until the cake is stable. For cleaner slices, warm a sharp knife in hot water and wipe it completely dry before each cut.
Notes
Use room-temperature eggs and milk for a more even batter.
The chocolate cake batter is supposed to be thin after adding the hot coffee. Do not compensate with extra flour.
Hot coffee deepens the chocolate flavor. Hot water can be substituted in the same quantity.
Do not frost warm cake layers. They must be completely cool.
For a stable three-layer cake, keep the buttercream filling level and avoid overfilling between layers.
A crumb coat helps prevent dark chocolate crumbs from appearing in the final buttercream layer.
The cake must be chilled before adding the chocolate drip.
Ganache consistency changes as it cools. Always test one drip on the back of the cake before decorating the visible sides.
Wash the berries and dry them thoroughly. Surface moisture can mark the buttercream and ganache.
Fresh berries work better than thawed frozen berries for the topping because frozen berries release more liquid as they thaw.
Add the fresh fruit close to serving time for the freshest appearance.
For the reference-photo look, keep the cake tall and use three dark chocolate layers with two visible chocolate buttercream fillings.
Decorate the top generously but leave some glossy ganache visible.
Store the finished cake covered in the refrigerator. For the best texture, allow individual slices to lose some of their refrigerator chill before serving.
- Prep Time: 1 hour 15 minutes
- Additional Time: 2 hours 30 minutes
- Cook Time: 30 minutes
- Category: Dessert
- Method: Baking
- Cuisine: American
Final Kitchen Notes
The secret to this Berry Truffle Fudge Drip Cake is not one complicated pastry trick. It is patience between stages.
Cool the cake before frosting. Chill the crumb coat. Let the ganache reach the right consistency. Test a drip before committing to the entire cake. Wash and thoroughly dry the fruit. Then decorate from the largest pieces to the smallest.
Those details create the look we are aiming for: three tall dark chocolate layers, cocoa buttercream, glossy irregular drips, fresh red berries, blueberries, chocolate curls, and truffles clustered generously across the top.
And when the first slice comes out, the inside should be just as inviting as the outside: dark, moist chocolate cake with clear bands of creamy chocolate filling.
That is when this cake goes from being a centerpiece to being dessert.