
Some cakes arrive at the table quietly. This one does not.
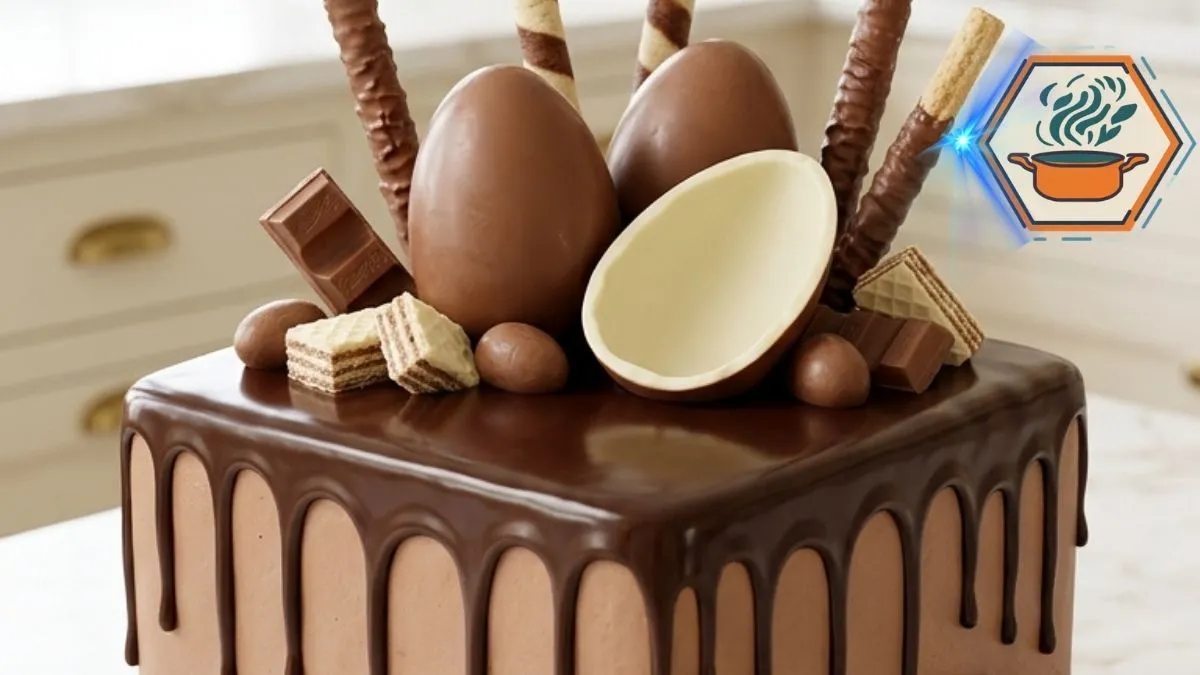
The first thing people notice about this Chocolate Candy Crown Celebration Cake is its height. Then come the glossy chocolate drips. A crown of chocolate eggs, striped wafer rolls, chocolate-covered sticks, broken candy bars, and smaller chocolate bites rises from the top.
But the best moment comes when the first slice is removed.
Inside are dark, moist chocolate cake layers separated by creamy chocolate frosting. That cut section turns an already impressive cake into a true celebration centerpiece.
The cake may look like something reserved for a professional bakery, but the individual techniques are quite approachable. The secret is not rushing. Cool the cakes fully. Build straight layers. Chill the crumb coat. Let the ganache reach the right consistency. Add the candy crown only after the cake is stable.
For more baking inspiration, visit RecipesMind. If you want to work on chocolate cake presentation later, the same attention to moisture and structure that matters in recipes such as this strawberry-filled chocolate cake guide is useful here too.
For general cake-baking guidance, King Arthur Baking’s cake guide covers practical subjects such as even layers, frosting, crumb coats, and cake doneness. Their chocolate cake recipes also use coffee or water in chocolate batter, so the hot-coffee technique in this recipe is not unusual.
Affiliate disclosure: As an Amazon Associate I earn from qualifying purchases. This article may contain affiliate links to kitchen tools I find useful for preparing this recipe.
jump to
Why This Chocolate Celebration Cake Works
A dramatic cake still has to taste good.
The chocolate sponge uses cocoa powder, whole milk, vegetable oil, eggs, and hot coffee. Oil gives the cake a soft texture even after chilling. Coffee adds liquid and supports the cocoa’s chocolate character without making the finished cake taste like a cup of coffee.
There is another useful detail here: the batter is relatively fluid.
Do not panic when you see it.
Once the hot coffee goes in, the batter will be thinner than many butter-based cake batters. That is expected.
The frosting plays a second role. It is not only there for sweetness. It holds the layers together and creates a stable surface for the ganache and candy decorations.
Finally, the dark ganache brings contrast. Its glossy finish sits over the lighter chocolate frosting and creates the thick drip effect seen in the reference cake.
Ingredients You’ll Need
For the chocolate cake
- 2½ cups (300 g) all-purpose flour
- 2 cups (400 g) granulated sugar
- 1 cup (85 g) unsweetened cocoa powder
- 2½ teaspoons baking powder
- 1½ teaspoons baking soda
- ½ teaspoon fine salt
- 3 large eggs, at room temperature
- 1¼ cups (300 ml) whole milk, at room temperature
- ⅔ cup (160 ml) vegetable oil
- 2 teaspoons vanilla extract
- 1 cup (240 ml) hot freshly brewed coffee
For the chocolate frosting
- 1½ cups (340 g) unsalted butter, softened
- 1 cup (85 g) unsweetened cocoa powder
- 5 cups (600 g) powdered sugar, sifted
- ½ cup (120 ml) heavy cream, plus a little more if needed
- 2 teaspoons vanilla extract
- ¼ teaspoon fine salt
For the glossy chocolate ganache
- 8 ounces (225 g) semisweet chocolate, finely chopped
- ¾ cup (180 ml) heavy cream
For the chocolate candy crown
Choose different shapes and heights. This is what creates the full appearance shown in the reference image.
- 2 to 3 large milk-chocolate eggs
- 1 large hollow white-chocolate egg half
- Chocolate wafer bars
- Striped wafer rolls
- Chocolate-covered wafer sticks
- White-chocolate wafer pieces
- Milk-chocolate bar pieces
- Small chocolate eggs or bites
- Broken chocolate chunks
You do not need one particular candy brand. Matching the shape, chocolate colors, height, and arrangement matters more for this visual.
Equipment That Makes the Recipe Easier
You can make the cake with basic baking equipment, but a few tools make the tall square finish much easier.
You will need two square cake pans, parchment paper, mixing bowls, an electric mixer, cooling racks, a serrated knife, and a long offset spatula.
A cake scraper is also very useful for the straight sides.
For readers who need equipment, these are natural places to shop:
- 8-inch square cake pans on Amazon
- offset cake spatulas on Amazon
- cake scrapers on Amazon
- digital kitchen scales on Amazon
For the tall proportions in the reference image, two 8-inch square pans are preferable to 9-inch pans. Two 9-inch pans can still be used, but the finished cake will be wider and visually shorter.
Step 1: Prepare the Pans Correctly
Preheat the oven to 350°F (175°C).
Lightly grease two 8-inch square cake pans. Cut parchment to fit the bottoms, place it inside, and lightly grease the parchment.
Do not rely on butter or cooking spray alone for a tall layer cake. Parchment makes removal safer and reduces the chance of tearing a cake that later needs to be split horizontally.
Set the pans aside.
Step 2: Mix the Chocolate Cake Batter
In a large bowl, whisk together:
- Flour
- Sugar
- Cocoa powder
- Baking powder
- Baking soda
- Salt
Break up every visible cocoa lump.
In another bowl, whisk the eggs, milk, vegetable oil, and vanilla.
Pour the wet mixture into the dry ingredients. Mix on low speed until mostly combined.
Now slowly pour in the hot coffee while mixing on low.
The batter will become thin. That is normal.
Stop mixing as soon as everything is evenly incorporated. Scrape the bottom and sides of the bowl once with a spatula.
Overmixing after the flour has hydrated can make the cake less tender.
Step 3: Bake Even Chocolate Layers
Divide the batter evenly between the two prepared pans.
For the most accurate result, weigh the filled pans with a kitchen scale and adjust until they contain roughly equal amounts of batter.
Bake for approximately 30 to 38 minutes.
Ovens and pan materials vary, so start checking around 30 minutes rather than relying only on the clock.
The cakes are ready when:
- The centers no longer look wet.
- The tops spring back lightly when touched.
- A wooden pick inserted near the center comes out with a few moist crumbs rather than liquid batter.
King Arthur Baking similarly recommends checking chocolate cake through visible set edges and a tester inserted in the center.
Leave the cakes in their pans for about 15 minutes.
Carefully turn them onto cooling racks. Remove the parchment and allow them to cool completely.
Never frost a warm cake.
Step 4: Create Four Layers Like the Reference Cake
This step is important if you want the tall cutaway appearance.
Once completely cool, wrap the two cakes and refrigerate them for 30 to 60 minutes. Slightly chilled cake is easier to cut cleanly.
If either cake has a large dome, level it with a long serrated knife.
Then split each cake horizontally into two layers.
You now have four square chocolate layers.
Work slowly and keep the knife parallel to the counter.
This extra step is what creates the three visible bands of filling between four chocolate sponge layers.
Step 5: Make the Creamy Chocolate Frosting
Beat the softened butter for about 3 minutes until smooth and lighter in texture.
Add the cocoa powder and mix on low.
Gradually add the sifted powdered sugar, alternating it with small additions of heavy cream.
Add vanilla and salt.
Beat for another 2 to 3 minutes until fluffy.
The frosting should hold its shape but spread without tearing the cake.
If it is too stiff, add heavy cream 1 tablespoon at a time.
If it becomes too soft, chill it briefly rather than adding large amounts of powdered sugar.
Step 6: Stack the Cake Without Sliding Layers
Put a small dab of frosting in the center of your cake board or serving plate.
Place the first cake layer on top.
Spread an even layer of chocolate frosting over it. Keep the filling approximately ¼ to ⅓ inch thick.
Add the second cake layer.
Repeat with frosting, then add the third layer. Frost again and finish with the fourth cake layer.
Check the cake from every side.
If it leans, correct it now.
Chill the stacked cake for about 20 minutes before covering the outside.
Step 7: Apply a Crumb Coat
Spread a very thin layer of frosting over the entire cake.
This first coating catches loose chocolate crumbs.
It does not need to look beautiful.
Chill for 20 to 30 minutes, or until the frosting feels firm.
This technique is also recommended in professional-style cake assembly guidance; King Arthur’s instructions describe chilling after a thin crumb coat before adding the finishing layer.
Add the remaining frosting.
Use an offset spatula and cake scraper to make the four sides as straight as possible. Slight imperfections are fine, but the reference cake has clean, sharp square walls.
Chill again for at least 30 minutes before adding ganache.
Step 8: Make the Glossy Ganache
Finely chop the semisweet chocolate and place it in a heatproof bowl.
Heat the cream until steaming and just beginning to show tiny bubbles around the edge. Do not aggressively boil it.
Pour it over the chocolate.
Leave untouched for 2 to 3 minutes.
Then stir slowly from the center outward until glossy.
Here comes one of the most important details in the entire recipe:
Do not pour hot ganache directly over the buttercream.
Let it cool until thickened but still pourable.
Ganache consistency changes with both chocolate-to-cream ratio and temperature, which is why a drip should be tested before covering the cake.
Step 9: Test One Drip First
Take the chilled cake from the refrigerator.
Put a teaspoon of ganache near a back corner and allow a small amount to travel over the edge.
Watch it.
If it immediately reaches the cake board, the ganache is too warm or thin. Wait several more minutes.
If it barely moves, gently warm the ganache for a few seconds.
The target is a thick, slow drip similar to the reference image.
Once the test looks right, spoon ganache around the perimeter. Let some drips remain short while others travel farther.
Cover the center of the top with a thin layer of ganache.
Step 10: Build the Chocolate Candy Crown
Now comes the part everyone remembers.
Do not randomly dump candy over the cake. The reference design has deliberate height and balance.
Start with the largest chocolate eggs near the center.
Place the open white-chocolate egg half toward the front so its pale interior remains visible.
Then insert tall wafer rolls and chocolate-covered sticks vertically behind and around the eggs.
Use different heights.
Add broken chocolate bars at angles. Fill empty areas with smaller eggs, chocolate balls, wafer chunks, and irregular chocolate pieces.
A useful arrangement is:
- Tall wafer sticks at the back.
- Large eggs around the middle.
- Open white-chocolate shell toward the front.
- Medium chocolate bars along both sides.
- Small chocolates near the base.
Press tall decorations only far enough into the top to hold them securely. If necessary, dip the bottom of a wafer stick in melted chocolate and allow it to set against another piece for extra support.
The goal is a dense chocolate crown, not a flat pile of candy.
How to Get the Cutaway Look
The reference image has a dramatic missing corner that reveals the interior.
Do not cut that section before presenting the finished cake.
Decorate the whole cake first.
Chill it until firm. Then use a long sharp knife to cut a generous corner serving from the front.
Wipe the knife between cuts.
Removing a neat section reveals the dark cake and lighter chocolate filling while leaving the candy crown standing above it.
For another dessert where presentation and texture matter together, see our guide to mastering caramelized sugar.
Common Mistakes to Avoid
Frosting warm cake: The frosting can soften, move, and collect crumbs.
Skipping the crumb coat: Dark chocolate crumbs become very visible in lighter milk-chocolate frosting.
Making uneven layers: A tall square cake makes crooked layers easier to notice.
Adding hot ganache: It can melt the chilled frosting and produce long, thin drips.
Using warm cake for the drip: The ganache needs a cold, firm frosting surface.
Adding every candy at the same height: The crown loses the vertical shape shown in the reference.
Cutting immediately: A freshly assembled tall cake is softer. A short chilling period makes cleaner slices.
Make-Ahead and Storage Tips
The chocolate cakes can be baked a day ahead. Once completely cool, wrap them well so they do not dry out.
You can also prepare the frosting ahead and refrigerate it. Bring it back toward cool room temperature and beat it again before using.
The fully assembled cake should be kept covered and cool, especially because the frosting and ganache contain dairy.
For the best eating texture, do not serve the cake ice-cold. Butter-based frostings become firmer in the refrigerator. King Arthur likewise notes that buttercream cakes become softer as they return toward room temperature.
Add especially delicate wafer decorations as close to serving as practical. Long refrigeration can cause some crisp decorations to lose texture.
Serving the Cake
This is a rich cake, so slices do not need to be huge.
For neat servings, use a long sharp knife. Warm the blade under hot water, dry it completely, make one cut, and wipe it before cutting again.
Remove loose candy decorations before cutting portions if they make slicing difficult.
A glass of cold milk, coffee, or unsweetened tea works particularly well beside such a chocolate-rich dessert.
Frequently Asked Questions
Can I make this cake without coffee?
Yes. Replace the coffee with the same quantity of hot water. Coffee adds depth to the chocolate flavor, but the cake can still be made without it.
Why is my chocolate cake batter so thin?
The hot coffee adds a substantial amount of liquid. A thin batter is expected with this style of oil-based chocolate cake. Do not add extra flour just because it looks thinner than a traditional butter cake batter.
Can I use 9-inch square pans?
Yes. The original version calls for two 9-inch square pans. However, the layers will be wider and less tall. For a finished cake closer to the tall proportions in the reference image, two 8-inch square pans are a better choice.
How do I stop ganache from running to the bottom?
Start with a chilled frosted cake and ganache that has cooled enough to become slightly thicker. Test a single drip on the back before adding the rest.
How do I get four visible cake layers?
Bake two square cakes, cool them fully, chill briefly, and split each cake horizontally. You will have four cake layers and three frosting layers.
Can I make the Chocolate Candy Crown Celebration Cake a day ahead?
Yes. Assemble and frost it the day before, then refrigerate it covered. For the crispest finish, you can add fragile wafer decorations closer to serving time.
What chocolates work best for the crown?
Use a mixture rather than one candy. Large chocolate eggs create the central shape. Long wafer rolls provide height. Broken bars add angles, while small chocolate bites fill gaps.
Why does my cake lean after stacking?
The layers may not be level, the filling may be too thick, or the buttercream may be too warm. Level each sponge and chill the cake during assembly if it starts moving.
Print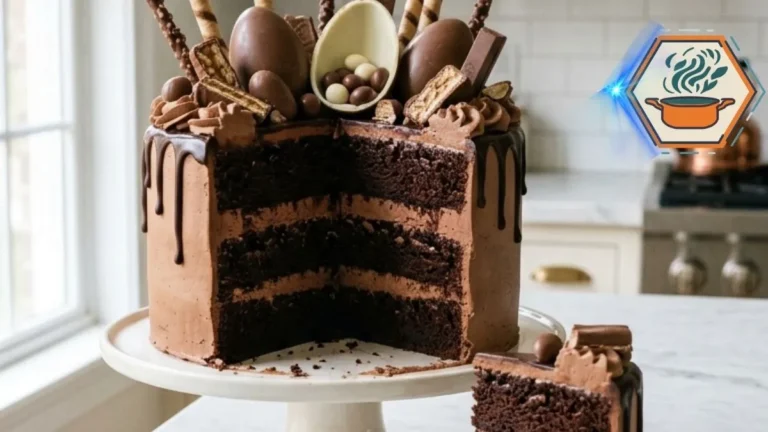
Chocolate Candy Crown Celebration Cake
A tall four-layer chocolate celebration cake filled and covered with creamy chocolate frosting, finished with glossy semisweet chocolate ganache, and topped with a dramatic crown of chocolate eggs, wafer rolls, chocolate bars, and bite-size candies.
- Total Time: 3 hours 50 minutes
- Yield: 16 servings
Ingredients
Chocolate Cake
2 1/2 cups (300 g) all-purpose flour
2 cups (400 g) granulated sugar
1 cup (85 g) unsweetened cocoa powder
2 1/2 teaspoons baking powder
1 1/2 teaspoons baking soda
1/2 teaspoon fine salt
3 large eggs, room temperature
1 1/4 cups (300 ml) whole milk, room temperature
2/3 cup (160 ml) vegetable oil
2 teaspoons vanilla extract
1 cup (240 ml) hot brewed coffee
Chocolate Frosting
1 1/2 cups (340 g) unsalted butter, softened
1 cup (85 g) unsweetened cocoa powder
5 cups (600 g) powdered sugar, sifted
1/2 cup (120 ml) heavy cream, plus more if needed
2 teaspoons vanilla extract
1/4 teaspoon fine salt
Chocolate Ganache
8 oz (225 g) semisweet chocolate, finely chopped
3/4 cup (180 ml) heavy cream
Candy Crown
Because candy sizes differ by brand, I recommend specifying an approximate decorating quantity rather than leaving this completely open:
2 to 3 large hollow milk-chocolate eggs
1 large hollow white-chocolate egg half
4 to 6 striped wafer rolls
3 to 5 chocolate-covered wafer sticks
2 to 3 chocolate wafer bars, cut or broken into pieces
2 oz (55 g) milk chocolate, broken into pieces
2 oz (55 g) white chocolate or white-chocolate wafer pieces
8 to 12 small chocolate eggs or chocolate bites
The candy quantities can be adjusted to achieve the same dense crown shown in the reference image.
Instructions
1. Preheat the oven to 350°F (175°C). Lightly grease two 8-inch square cake pans. Line the bottoms with parchment paper and lightly grease the parchment.
2. In a large bowl, whisk together the flour, sugar, cocoa powder, baking powder, baking soda, and salt. Break up any cocoa lumps.
3. In a separate bowl, whisk the eggs, whole milk, vegetable oil, and vanilla. Add the wet ingredients to the dry ingredients and mix on low speed until mostly combined.
4. Slowly add the hot coffee while mixing on low. Continue only until the batter is smooth and evenly combined. The batter will be fairly thin.
5. Divide the batter evenly between the prepared pans. Bake for about 30 to 38 minutes, or until the centers are set and a tester inserted near the center comes out with a few moist crumbs but no wet batter.
6. Cool the cakes in their pans for about 15 minutes. Turn them onto cooling racks, remove the parchment, and cool completely.
7. Chill the cooled cakes for 30 to 60 minutes. Level any domed tops if necessary. Using a long serrated knife, carefully split each cake horizontally to create four square cake layers.
8. Make the frosting. Beat the softened butter for about 3 minutes. Mix in the cocoa powder. Gradually add the powdered sugar, alternating with the heavy cream. Add the vanilla and salt. Beat for another 2 to 3 minutes until fluffy. Add heavy cream 1 tablespoon at a time if the frosting is too stiff.
9. Place the first cake layer on a cake board or serving plate. Spread an even 1/4- to 1/3-inch layer of frosting over it. Repeat with the second and third layers, then place the fourth cake layer on top.
10. Check that the cake is straight and chill for about 20 minutes.
11. Spread a thin crumb coat over the top and sides. Refrigerate for 20 to 30 minutes, or until firm
12. Cover the chilled cake with the remaining chocolate frosting. Smooth the top and square sides with an offset spatula and cake scraper. Chill for at least 30 minutes.
13. For the ganache, place the finely chopped semisweet chocolate in a heatproof bowl. Heat the heavy cream until steaming with small bubbles around the edge. Pour it over the chocolate and leave undisturbed for 2 to 3 minutes.
14. Stir slowly from the center outward until smooth and glossy. Allow the ganache to cool until thickened but still pourable.
15. Test one small ganache drip on the back edge of the chilled cake. If it runs to the bottom immediately, allow the ganache to cool longer. Once the consistency is right, create controlled drips around the edges and spread a thin layer over the top.
16. Build the candy crown while the ganache is still slightly tacky. Position the largest chocolate eggs near the center. Place the open white-chocolate shell toward the front. Add tall wafer rolls and chocolate-covered sticks behind the eggs, then fill the gaps with chocolate bars, wafer pieces, small eggs, and chocolate bites.
17. Chill briefly until the cake is firm. For the dramatic cutaway presentation, use a clean sharp knife to remove a generous corner portion just before serving.
Notes
For a cake closer to the tall proportions in the reference image, use two 8-inch square pans rather than 9-inch pans.
Cool the cakes completely before cutting or frosting them.
Chilling the cakes before splitting them makes the four layers easier to cut evenly.
The hot coffee strengthens the chocolate flavor. Hot water can be substituted in the same quantity if desired.
The finished batter is thinner than many traditional cake batters. Do not add extra flour simply to thicken it.
Always apply ganache to a chilled, firmly frosted cake.
Test one ganache drip before covering the cake. Warm ganache creates thin, fast drips. Slightly cooled ganache produces thicker, slower drips.
For the reference-photo appearance, arrange the candy in different heights rather than laying every piece flat.
Tall wafer sticks should be inserted securely but not pushed deeply enough to damage the cake layers.
For cleaner slices, chill the completed cake briefly and wipe the knife between cuts.
Exact baking time varies with the oven, pan material, and actual pan dimensions. Check the cake itself rather than relying only on the timer.
- Prep Time: 1 hour 30 minutes
- Additional/Chilling Time: 1 hour 45 minutes
- Cook Time: 35 minutes
- Category: Dessert
- Method: Baking
- Cuisine: American
A Celebration Cake Worth Cutting Into
The real appeal of this Chocolate Candy Crown Celebration Cake comes from contrast.
You have soft chocolate sponge against creamy frosting. Smooth buttercream sits beneath glossy dark ganache. Crisp wafers meet tender cake. Large chocolate eggs create height while tiny chocolate pieces fill the spaces between them.
Then the first corner is cut away and the inside becomes part of the presentation.
That is the detail that turns a candy-covered chocolate cake into the dramatic centerpiece shown in the reference: four dark cake layers, three creamy filling layers, smooth square sides, controlled ganache drips, and a tall mixed-chocolate crown.
Take your time during assembly. Chill between the important stages. Test the ganache before pouring it. Most importantly, build the candy crown with different heights instead of simply covering the surface.
The result is a cake made for birthdays, chocolate-themed parties, anniversaries, family celebrations, and any occasion when an ordinary chocolate cake simply isn’t enough.