
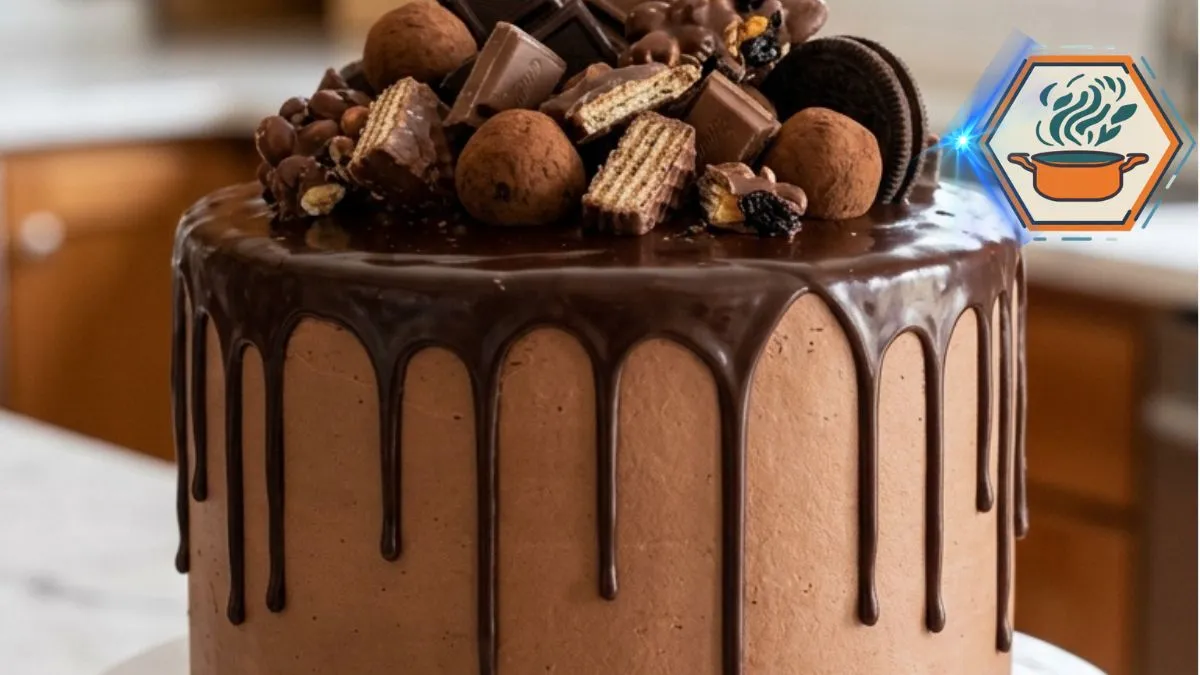
Some cakes disappear quietly after dinner. The Ultimate Chocolate Overload Cake is not one of them. Put this tall chocolate cake on the table and people notice it before the first slice is cut. Three dark, moist layers sit beneath creamy chocolate buttercream. Thick ganache falls down the sides in irregular drips. On top, truffles, broken chocolate, coated wafers, and cookies create the kind of intentionally messy finish that makes a celebration cake feel special.
The first time you build a cake like this, the decorating can look harder than the baking. It is not. The secret is to treat it as several small jobs rather than one huge project. Bake the layers. Cool them. Make the frosting. Stack and chill. Then add the ganache and chocolate topping. King Arthur Baking also recommends cooling cake layers before frosting and notes that chilling an assembled layer cake helps the frosting set and makes slicing easier. King Arthur Baking cake guide
There is also a reason coffee works so well here. It contributes liquid while supporting the deep cocoa character of the cake. Coffee or water appears in several tested chocolate cake formulas from King Arthur Baking. Their baking guidance also confirms that three 8-inch rounds are a practical format for a tall chocolate layer cake.
This recipe keeps the dramatic appearance of our reference cake, but the instructions go much further. Small details such as ingredient temperature, pan preparation, cooling time, frosting texture, crumb coating, ganache consistency, and decorating order can decide whether your finished cake stands tall or turns into a chocolate landslide.
Affiliate disclosure: As an Amazon Associate I earn from qualifying purchases. This article may contain affiliate links to kitchen tools I find useful for preparing this recipe.
jump to
Why This Ultimate Chocolate Overload Cake Works
A good chocolate overload cake needs contrast. Adding more chocolate alone does not necessarily make a better dessert.
Here, each component has a different job.
The cake layers are soft and moist. Cocoa supplies the main chocolate flavor, while buttermilk adds acidity and tenderness. Vegetable oil helps the crumb stay soft even after the cake has been chilled.
The buttercream is richer and denser. It holds the layers together and creates the smooth brown exterior visible in the finished cake.
Then comes the semisweet chocolate ganache. It has a darker flavor and glossy appearance. Finally, the topping adds crunch through chocolate pieces, wafers, cookies, and truffles.
The result is chocolate in several textures rather than one flat note.
If you enjoy learning why cake ingredients behave differently, our guide to the difference between butter cake styles is another useful read.
Ingredients You Will Need
For the chocolate cake
- 2½ cups (300 g) all-purpose flour
- 1 cup (85 g) unsweetened cocoa powder
- 2 cups (400 g) granulated sugar
- 2 teaspoons baking soda
- 1 teaspoon baking powder
- ½ teaspoon fine salt
- 3 large eggs, preferably at room temperature
- 1¼ cups (300 ml) buttermilk, preferably at room temperature
- ¾ cup (180 ml) neutral vegetable oil
- 2 teaspoons vanilla extract
- 1 cup (240 ml) hot brewed coffee
The coffee should be hot but does not need to be aggressively boiling.
Don’t have buttermilk? A cultured substitute such as thinned plain Greek yogurt can work in cakes. Plain milk is a less suitable direct substitute when baking soda depends on acidity in the formula.
For the chocolate buttercream
- 1½ cups (340 g) unsalted butter, softened
- 1 cup (85 g) unsweetened cocoa powder
- 5 cups (600 g) powdered sugar, sifted if lumpy
- ½ cup (120 ml) heavy cream, added gradually
- 2 teaspoons vanilla extract
- ¼ teaspoon fine salt
For the ganache
- 8 oz (225 g) semisweet chocolate, finely chopped
- ¾ cup (180 ml) heavy cream
This produces a relatively fluid ganache. Because brands and cocoa percentages behave differently, treat the cooling time as a guide rather than a fixed rule. King Arthur notes that the chocolate-to-cream ratio changes the final consistency of ganache.
For the chocolate overload topping
Use enough decorations to cover the center without hiding the ganache completely:
- Homemade chocolate truffles
- Dark chocolate pieces
- Milk chocolate pieces
- Chocolate-coated wafers
- Chocolate-coated cookies
- Small chocolate chunks
Different sizes matter. Large pieces give height. Smaller truffles and chunks fill the gaps.
Useful Cake Equipment
You do not need professional bakery equipment, but a few tools make a tall layer cake much easier to handle.
For readers who need baking equipment :
- 8-inch round cake pans on Amazon
- Offset cake spatulas on Amazon
- Rotating cake turntables on Amazon
- Digital kitchen scales on Amazon
You will also want parchment paper, mixing bowls, a whisk, an electric mixer, a cooling rack, and preferably a cake scraper.
How to Make the Chocolate Cake Layers
Preheat the oven to 350°F (175°C). Put a rack near the center of the oven.
Grease three 8-inch round cake pans. Cut parchment circles for the bottoms, place them inside, then lightly grease the parchment. Proper pan preparation matters with a soft chocolate crumb.
In a large bowl, whisk together:
- Flour
- Cocoa powder
- Sugar
- Baking soda
- Baking powder
- Salt
Break apart every visible cocoa lump.
In another bowl, whisk the eggs, buttermilk, vegetable oil, and vanilla until combined.
Pour the wet mixture into the dry ingredients. Mix only until most dry patches disappear.
Now slowly pour in the hot coffee while whisking gently.
Do not panic when the batter becomes thin. A fluid batter is normal for this style of cocoa-based chocolate cake. King Arthur’s moist chocolate cake guidance similarly notes that its batter is thin.
Divide the batter equally among the three pans. A digital scale is especially useful here because equal batter weights give you layers of similar height.
Bake for 25 to 30 minutes.
Start checking at about 24–25 minutes because ovens vary. A toothpick inserted near the center should emerge clean or with a few moist crumbs rather than wet batter.
Comparable tested 8-inch chocolate cake recipes commonly fall around this baking range.
Let the cakes rest in their pans for about 10 minutes. Carefully turn them onto cooling racks and remove the parchment.
They must cool completely before frosting.
Warm cake plus buttercream equals sliding layers.
How to Make Creamy Chocolate Buttercream
The butter should be soft enough to beat smoothly but should not look greasy or partly melted.
Beat it for about 2 minutes.
Add the cocoa powder and mix at low speed first. Starting slowly keeps your kitchen from disappearing beneath a cocoa cloud.
Add the powdered sugar in several additions.
Pour in the vanilla, salt, and about half of the heavy cream. Beat until smooth. Add more cream gradually until the frosting becomes creamy and spreadable.
If it feels too stiff, add cream one tablespoon at a time.
If it becomes too loose, add a little powdered sugar or chill it briefly.
The finished buttercream needs enough body to support three cake layers.
The Step People Skip: Level, Fill, and Crumb Coat
If the cakes have noticeable domes, trim them with a long serrated knife once completely cool.
Put the first layer on a cake board or serving plate. Spread an even layer of chocolate buttercream over it.
Add the second cake layer. Repeat.
Place the final layer on top. Many bakers place the final layer cut-side down or bottom-side up to get a flatter top.
Now apply a very thin coat of buttercream over the entire cake.
This is your crumb coat. Its job is to catch loose crumbs before the final frosting goes on.
Chill the cake for roughly 20–30 minutes, or until that thin coat feels firm.
Then apply the remaining buttercream. Use an offset spatula and cake scraper to create smooth sides, but don’t chase absolute perfection. The reference cake has a slightly rustic buttercream finish.
For another dessert where texture and finishing technique matter, see our guide to caramelizing sugar correctly.
How to Get Thick Chocolate Ganache Drips
This is the stage that gives the Ultimate Chocolate Overload Cake its signature appearance.
Finely chop the semisweet chocolate and place it in a heatproof bowl.
Heat the heavy cream until it is steaming and just approaching a simmer. Pour it over the chocolate.
Wait about 2 minutes.
Then stir slowly from the center outward until smooth and glossy.
Do not immediately pour it onto your cake.
Fresh hot ganache can race down the frosting and pool around the cake stand.
Instead, allow it to cool until it thickens slightly.
Here is a useful test: put a small spoonful on the edge of the chilled cake.
Watch it.
If it runs straight to the bottom, wait longer.
If it barely moves, the ganache is too cool. Gently warm a small portion or give it a little more time at room temperature after stirring.
If it moves slowly down the side and stops naturally, you’re ready.
Creating the Chocolate Drip
Work with a chilled frosted cake.
Start with individual test drips around the edge. Some can be longer than others. The irregular lengths are part of the homemade celebration-cake look shown in the reference.
Once you like the consistency, spoon ganache around the perimeter.
Spread a thin layer across the top.
Do not flood the cake.
You want visible dark ganache over the lighter chocolate buttercream, with thick drips forming distinct vertical lines.
How to Decorate the Top Like the Reference Cake
Wait until the ganache has begun to set but is still slightly tacky.
Start with your largest chocolate pieces.
Place them upright near the back and center. Vary their angles rather than making a perfect row.
Next add:
- Chocolate truffles
- Broken wafer pieces
- Chocolate-covered cookies
- Medium chocolate chunks
- Small pieces to fill open spaces
Build upward near the middle.
Keep some ganache visible around the outer edge. That small detail stops the topping from looking like an uncontrolled pile of candy.
The goal is abundance with structure.
Mistakes That Can Ruin a Chocolate Overload Cake
Frosting warm layers: The buttercream softens and the cake may slide.
Overbaking: Cocoa cakes can taste dry when baked too long. Begin testing before the maximum stated time.
Adding flour by packed cupfuls: Too much flour can make the crumb heavy. Weighing it is more consistent.
Pouring hot ganache over buttercream: It can melt the frosting and create very long, thin drips.
Adding decorations too late: Fully hardened ganache may not hold heavy toppings well.
Stacking uneven layers: A small tilt becomes much more obvious as the cake gets taller.
Overmixing after adding flour: Mix only as much as needed to combine the batter.
Make It Ahead Without Losing the Fresh Texture
This cake is actually easier when divided across two days.
Day 1: Bake and cool the cake layers. Wrap them well once fully cool.
Day 2: Make the buttercream, assemble, chill, prepare the ganache, and decorate.
For clean slices, chill the finished cake until stable. Then use a large sharp knife. Wipe the blade between cuts.
Because the frosting and ganache contain dairy, refrigerating leftovers is the cautious storage choice. Keep the cake covered so the exposed crumb does not dry out. For the best eating texture, let an individual refrigerated slice lose some of its chill before serving.
If you enjoy rich layered desserts, you may also like our Milk Bar Pie guide or our guide explaining what crème brûlée is made of.
Frequently Asked Questions
What makes chocolate cake moist?
Fat, liquid, sugar, eggs, and correct baking time all affect moisture. This recipe combines vegetable oil and buttermilk with a fluid cocoa batter. Avoid baking the layers longer than necessary.
Why put coffee in chocolate cake?
Coffee pairs naturally with cocoa and can make the chocolate character taste deeper without turning the finished cake into a coffee-flavored dessert. Coffee or water is also used as the liquid in tested chocolate cake formulas from King Arthur Baking.
Can I make this cake without coffee?
Yes. Replace the brewed coffee with hot water. The chocolate flavor may be slightly different, but the recipe can still work.
Why is my ganache running down the whole cake?
It is usually too warm or too fluid. Let it cool and thicken before trying again. Test one drip before covering the cake.
Can I make the Ultimate Chocolate Overload Cake ahead of time?
Yes. Baking the layers one day ahead can make assembly easier. Cool them completely before wrapping them well.
Can I use two cake pans instead of three?
It is safer not to force all the batter into two standard 8-inch pans unless you know their capacity. Overfilled pans can overflow and bake unevenly. Three 8-inch pans also create the tall proportions intended for this recipe.
Can I freeze chocolate cake layers?
Yes. Cool them completely, wrap them tightly, and freeze them before frosting. Thaw with the wrapping still in place so condensation forms mainly on the wrapping rather than directly on the cake.
Print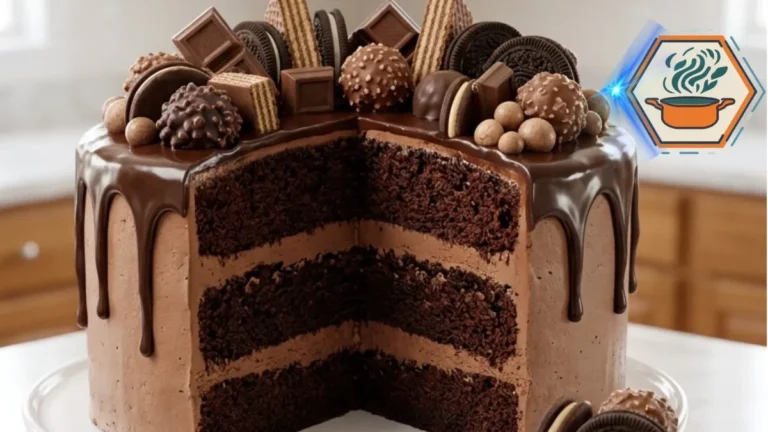
Ultimate Chocolate Overload Cake
A tall, moist chocolate layer cake filled and covered with creamy chocolate buttercream, finished with glossy semisweet chocolate ganache and a generous topping of truffles, chocolate pieces, coated wafers, and cookies.
- Total Time: 3 hours 15 minutes
- Yield: 16 servings
Ingredients
Chocolate Cake
2 1/2 cups (300 g) all-purpose flour
1 cup (85 g) unsweetened cocoa powder
2 cups (400 g) granulated sugar
2 teaspoons baking soda
1 teaspoon baking powder
1/2 teaspoon fine salt
3 large eggs, room temperature
1 1/4 cups (300 ml) buttermilk, room temperature
3/4 cup (180 ml) neutral vegetable oil
2 teaspoons vanilla extract
1 cup (240 ml) hot brewed coffee
Chocolate Buttercream
1 1/2 cups (340 g) unsalted butter, softened
1 cup (85 g) unsweetened cocoa powder
5 cups (600 g) powdered sugar
1/2 cup (120 ml) heavy cream, added gradually
2 teaspoons vanilla extract
1/4 teaspoon fine salt
Chocolate Ganache
8 oz (225 g) semisweet chocolate, finely chopped
3/4 cup (180 ml) heavy cream
Chocolate Topping
Pour rendre le résultat reproductible, je te recommande cette répartition :
4 oz (115 g) chocolate truffles
4 oz (115 g) broken milk and dark chocolate pieces
3 oz (85 g) chocolate-coated wafer pieces
3 oz (85 g) chocolate-coated cookieInstructions
1. Preheat the oven to 350°F (175°C). Place a rack in the center of the oven. Grease three 8-inch round cake pans, line the bottoms with parchment paper, then lightly grease the parchment.
2. In a large mixing bowl, whisk together the flour, cocoa powder, granulated sugar, baking soda, baking powder, and salt until evenly combined and free of large cocoa lumps.
3. In a separate bowl, whisk the eggs, buttermilk, vegetable oil, and vanilla extract until smooth.
4. Add the wet ingredients to the dry ingredients. Mix gently just until most of the dry streaks disappear.
5. Slowly pour in the hot coffee while whisking on low speed or stirring gently. The batter will become fairly thin; this is normal.
6. Divide the batter evenly between the three prepared pans. For layers of similar height, weigh the filled pans or divide the batter by weight.
7. Bake for 25 to 30 minutes. Begin checking at about 25 minutes. The cakes are ready when the centers spring back lightly and a toothpick inserted near the center comes out clean or with a few moist crumbs.
8. Cool the cakes in their pans for 10 minutes. Turn them onto wire racks, remove the parchment paper, and allow them to cool completely before frosting.
9. To make the chocolate buttercream, beat the softened butter for about 2 minutes until creamy. Add the cocoa powder and mix on low speed.
10. Gradually add the powdered sugar. Add the vanilla, salt, and about half of the heavy cream. Beat until creamy. Add the remaining cream gradually until the frosting is smooth and spreadable but firm enough to hold the cake layers.
11. If necessary, level completely cooled cake layers with a serrated knife.
12. Place the first cake layer on a cake board or serving plate. Spread an even layer of chocolate buttercream over the top. Add the second layer and repeat. Add the final layer.
13. Spread a very thin layer of buttercream over the entire cake to create a crumb coat. Refrigerate for 20 to 30 minutes, or until firm.
14. Cover the chilled cake with the remaining chocolate buttercream. Smooth the sides with an offset spatula or cake scraper while keeping a slightly rustic homemade finish.
15. Refrigerate the frosted cake for at least 20 minutes before adding the ganache.
16. Place the finely chopped semisweet chocolate in a heatproof bowl. Heat the heavy cream until steaming and just beginning to simmer around the edges. Do not vigorously boil it.
17. Pour the hot cream over the chopped chocolate. Let it stand untouched for 2 minutes, then stir slowly from the center outward until glossy and smooth.
18. Allow the ganache to cool until slightly thickened. Test one small drip on the chilled cake. It should slowly travel down part of the side instead of immediately reaching the cake plate.
19. Spoon ganache around the top edge, creating drips of different lengths. Spread a thin layer of ganache over the top of the cake.
20. Allow the ganache to begin setting for several minutes. Arrange the largest chocolate pieces toward the center and back of the cake.
21. Add the chocolate truffles, wafer pieces, chocolate-coated cookies, and smaller chocolate pieces. Vary their height and angle to create the abundant but intentionally arranged appearance.
22. Chill briefly to stabilize the finished cake. For easier slicing, use a large sharp knife and wipe the blade clean between portions.
Notes
Measure flour by weight when possible. Too much flour can make a chocolate cake dense or dry.
Use room-temperature eggs and buttermilk for more even mixing.
The batter is intentionally thin after the hot coffee is added.
Do not frost warm cake layers. Even slightly warm cake can soften the buttercream and cause the layers to slide.
The crumb coat is important for a tall chocolate cake because it traps loose crumbs before the final layer of frosting.
Always chill the frosted cake before adding ganache.
Ganache consistency matters more than an exact cooling time. Test one drip before decorating the whole cake.
If the ganache immediately reaches the bottom of the cake, it is still too warm or thin. Let it cool longer.
If it barely moves, allow it to warm slightly or stir until it loosens.
Add the chocolate decorations while the ganache is tacky enough to hold them.
For the closest visual match to the recipe image, use a mix of large chocolate rectangles, round truffles, broken wafer pieces, irregular chocolate clusters, and chocolate-coated cookies.
- Prep Time: 1 hour 15 minutes
- Additional / Cooling Time:: 1 hour 30 minutes
- Cook Time: 30 minutes
- Category: Dessert
- Method: Baking
- Cuisine: American
A Celebration Cake Worth the Extra Steps
The Ultimate Chocolate Overload Cake looks extravagant, but there is no single difficult trick behind it. Its appearance comes from doing several simple things at the right moment.
Bake three moist chocolate layers. Cool them fully. Build a stable stack with chocolate buttercream. Chill it. Let the ganache reach the right consistency. Then add the drip and pile the top with chocolates of different shapes and textures.
That order matters.
Once sliced, the dramatic exterior gives way to soft chocolate cake and creamy frosting, while the truffles, wafers, cookies, and broken chocolate add little pockets of crunch.
It is rich. It is tall. It is intentionally excessive.
And that is exactly what an Ultimate Chocolate Overload Cake should be.