
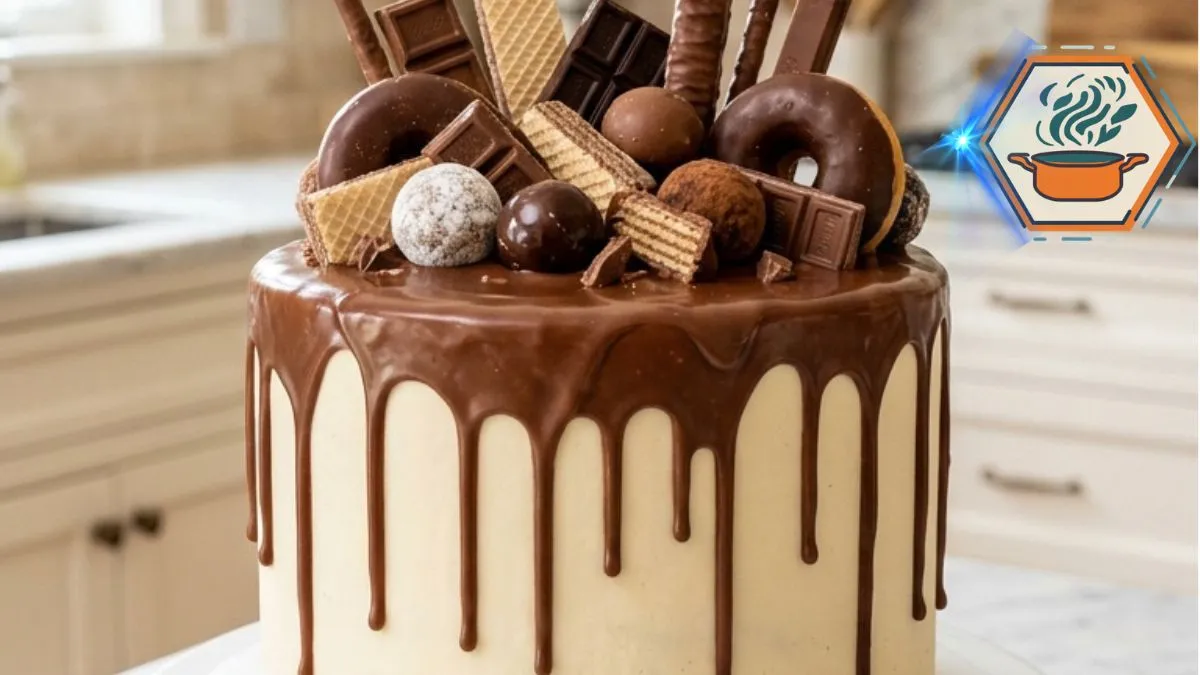
There is a moment when a homemade cake stops looking like dessert and starts looking like the centerpiece of the whole celebration. This Chocolate Candy Overload Cake is made for that moment. Three tall vanilla-and-chocolate layers hide beneath creamy vanilla buttercream. Milk chocolate ganache drips down the sides, while chocolate bars, truffles, wafers, wafer sticks, and mini chocolate-glazed donuts form a playful crown on top.
The impressive appearance does not mean you need professional pastry training. The real secret is doing each stage at the right time. Accurate measurements matter too. King Arthur Baking recommends weighing flour because volume measurements can vary significantly. Their standard for all-purpose flour is 120 grams per cup. You can read their guide to measuring flour correctly before starting if you normally scoop flour directly from the bag.
Temperature is just as important. Soft butter creams properly with sugar, while room-temperature eggs mix more smoothly into the batter. King Arthur Baking also recommends room-temperature ingredients for many butter-style cakes and warns that cold eggs can interfere with the air created during creaming. Their cake baking guide is a useful reference for understanding these small details.
This recipe fills in the details that short social-media recipes often leave out. You will know what texture to look for, how to prepare the pans, how much batter to use, when the layers are baked, how cold the cake should be before the drip, and how to keep a tall decorated cake stable.
Affiliate disclosure: As an Amazon Associate I earn from qualifying purchases. This article may contain affiliate links to kitchen tools I find useful for preparing this recipe.
jump to
Why This Chocolate Candy Overload Cake Works
The first attraction is obvious: chocolate.
But this is not simply a chocolate cake covered with more chocolate. The inside balances vanilla and cocoa, giving the cut slices the marbled, speckled appearance shown in the finished cake.
The vanilla buttercream adds a lighter visual contrast. The milk chocolate ganache creates thick, glossy drips rather than covering the entire cake. Finally, different chocolates on top add height and texture.
Another advantage is that you can prepare the recipe in stages. Bake the layers one day, frost them the next, and decorate the cake closer to serving.
For more baking ideas and dessert guides, visit RecipesMind.
Ingredients for Chocolate Candy Overload Cake
For the cake layers:
- 3 cups (360 g) all-purpose flour
- 2½ teaspoons baking powder
- ½ teaspoon fine salt
- 1 cup (226 g) unsalted butter, softened
- 1¾ cups (350 g) granulated sugar
- 4 large eggs, at room temperature
- 1 tablespoon vanilla extract
- 1¼ cups (300 ml) whole milk, at room temperature
- ⅓ cup (28 g) unsweetened cocoa powder
- 2 tablespoons milk, reserved for the cocoa batter
That final splash of milk is important. Cocoa absorbs moisture. Mixing cocoa directly into part of the vanilla batter without adding a little liquid can make the chocolate sections noticeably drier.
For the vanilla buttercream:
- 1½ cups (340 g) unsalted butter, softened
- 5 cups (600 g) powdered sugar, sifted
- 2 teaspoons vanilla extract
- 3–5 tablespoons heavy cream
- ⅛ teaspoon fine salt
For the milk chocolate ganache:
- 8 ounces (226 g) milk chocolate, finely chopped
- ¾ cup (180 ml) heavy cream
For decorating:
- Chocolate bars, broken into irregular pieces
- Chocolate wafer cookies
- Chocolate-covered wafer sticks
- Homemade or ready-made chocolate truffles
- Mini chocolate-glazed donuts
Choose decorations with different shapes. Flat chocolate bars give height. Round truffles soften the arrangement. Wafer sticks create vertical lines, while the mini donuts become the visual focal point.
Equipment You Will Need
Three matching 8-inch round pans make it much easier to produce the tall shape pictured above. The pans should ideally be around 2 inches deep. King Arthur Baking notes that pan dimensions matter and recommends greasing and lining cake pans with parchment for easier release.
A few tools make the job much easier:
- 8-inch round cake pans on Amazon
- offset cake spatulas on Amazon
- rotating cake turntables on Amazon
- digital kitchen scales on Amazon
A digital scale is especially useful here. Too much flour is one of the easiest ways to turn soft cake layers into dense ones.
How to Make the Vanilla-Chocolate Cake Layers
Preheat the oven to 350°F (175°C). Give it enough time to reach temperature before the pans go inside.
Grease three 8-inch round cake pans. Put a parchment circle in the bottom of each pan, then lightly grease the parchment.
Whisk the flour, baking powder, and salt together for about 20 seconds. Set aside.
In a large mixing bowl, beat the softened butter and granulated sugar at medium-high speed for about 3 to 4 minutes. The mixture should become noticeably lighter and fluffy.
Add the eggs one at a time. Beat just until each egg disappears before adding the next. Scrape the bottom and sides of the bowl as needed.
Mix in the vanilla.
Turn the mixer to low. Add roughly one-third of the flour mixture. Follow with half of the milk. Repeat, ending with the final portion of flour.
Stop mixing as soon as the flour disappears. Excess mixing after flour is added can give the cake a tighter texture. Gentle mixing and alternating flour with liquid are common techniques for keeping butter cakes tender.
Now transfer about one-third of the finished vanilla batter to another bowl.
Sift the cocoa over this smaller portion. Add the reserved 2 tablespoons of milk and fold until the cocoa is evenly incorporated.
Divide the vanilla batter among the three pans. Spoon portions of chocolate batter over it. Use a butter knife or skewer to make two or three broad swirls.
Do not keep stirring. Too many swirls will blend both batters together and remove the distinct chocolate ribbons.
Bake for approximately 25–30 minutes.
Start checking at 25 minutes. The center should spring back gently when touched, and a toothpick should come out clean or with a few moist crumbs rather than wet batter.
Cool the layers in their pans for about 10 minutes. Carefully turn them onto wire racks and remove the parchment.
Cool completely before frosting.
This part cannot be rushed. Warm layers soften buttercream and can make a tall cake slide.
How to Make Fluffy Vanilla Buttercream
Beat the softened butter for about 3 minutes until creamy and lighter in color.
Add the powdered sugar gradually with the mixer running at low speed. Once incorporated, add vanilla, salt, and 3 tablespoons of heavy cream.
Beat at medium speed for another 2–3 minutes.
Check the consistency.
The frosting needs to be soft enough to spread but firm enough to hold three cake layers. If it feels too stiff, add heavy cream 1 teaspoon at a time. If it becomes too loose, add a small amount of powdered sugar.
For another example of how small ingredient choices affect baked texture, see our guide to the secret to crunchy cookies.
How to Assemble a Tall Layer Cake
If your cakes have large domes, level them with a long serrated knife.
Put a small dot of buttercream on a cake board or serving plate. Place the first layer on top.
Spread approximately ¾ cup buttercream across it.
Add the second cake layer. Repeat with another ¾ cup frosting, then add the final layer upside down. The flat bottom of that layer gives you a cleaner top surface.
Apply a very thin layer of frosting over the entire cake. This is the crumb coat. It traps loose cake crumbs.
Refrigerate for 20–30 minutes.
Cover the chilled cake with the remaining buttercream. Smooth the sides with a bench scraper while slowly turning the cake.
The goal does not need to be a flawless bakery finish. Slightly relaxed buttercream suits the overloaded chocolate decoration.
Chill the frosted cake again for at least 20 minutes before adding ganache.
How to Make Thick Chocolate Ganache Drips
Finely chop 8 ounces of milk chocolate and place it in a heatproof bowl.
Heat the heavy cream until it is steaming and just beginning to show tiny bubbles around the edge. Do not let it boil aggressively.
Pour the hot cream over the chocolate.
Wait 2–3 minutes without stirring. Then stir slowly from the center outward until glossy and smooth.
Now comes one of the most important parts of the entire recipe: wait.
Hot ganache poured onto buttercream will rush down the sides and may melt the frosting. The ganache should cool until it falls slowly from a spoon.
Test one drip on the back of the chilled cake.
If it stops partway down, the consistency is right. If it races to the cake board, wait several more minutes. If it barely moves, warm the ganache very briefly.
For more caramel and sugar-finishing skills, our guide to caramelizing sugar covers another useful dessert technique.
Decorating the Chocolate Candy Overload Cake
Once the test drip looks right, spoon or pipe ganache around the top edge. Vary the amount slightly so some drips are short and others are longer.
Spread a thin layer across the top.
Wait a few minutes before adding heavy decorations.
Start with the largest pieces. Place broken chocolate bars toward the back. Add the mini donuts next. Then fill the gaps with truffles, wafers, and wafer sticks.
Avoid arranging every piece at the same height. The cake in our inspiration image works because the decoration looks abundant but not perfectly symmetrical.
Keep some open space visible. A crowded cake can quickly turn into an indistinct pile of brown shapes.
For another dramatic celebration dessert, take a look at our strawberry-filled chocolate cake guide.
A Few Details That Make a Big Difference
Use room-temperature butter, milk, and eggs for the cake batter. This supports smoother mixing and a more even crumb.
Measure flour carefully. Better still, weigh 360 grams rather than relying on cups.
Do not overmix once the flour goes into the bowl.
Use parchment circles. A tall celebration cake is much harder to assemble if pieces of the layers remain stuck to the pans.
Most importantly, chill between decorating stages. Cold buttercream gives the ganache a firm surface and helps support the chocolate decorations.
There is also one basic food-safety rule worth remembering: do not taste raw cake batter. Flour is a raw agricultural product, and raw flour and eggs can carry harmful microorganisms. The FDA advises baking flour-containing batters before eating them.
Storage and Make-Ahead Tips
The cake layers can be prepared ahead. Once completely cool, wrap each layer tightly and refrigerate overnight.
You can also freeze well-wrapped, undecorated layers for longer storage. Thaw them while still wrapped so condensation forms mainly on the wrapping rather than directly on the cake.
The buttercream can be prepared ahead and refrigerated. Bring it back toward room temperature and beat briefly before frosting.
For the best appearance, add crisp wafers close to serving time. Moisture from the refrigerator and frosting can gradually soften them.
Once decorated, keep the cake cool, especially if your kitchen is warm. Before serving, let a refrigerated cake sit at room temperature long enough for the buttercream and cake crumb to soften.
Common Chocolate Candy Overload Cake Mistakes
The cake came out dry. Too much flour or too much oven time are likely causes. Weighing flour gives more repeatable results.
The layers are dense. Butter may have been too cold, the butter and sugar may not have been creamed enough, or the batter may have been mixed too much after adding flour.
The frosting slides. The layers were probably still warm or the buttercream became too soft. Chill the cake before continuing.
The ganache runs to the bottom. It is too warm or thin. Let it cool and test another drip.
The ganache will not drip. It has cooled too much. Warm it carefully for a few seconds and stir.
The decorations fall over. Insert the largest chocolate pieces slightly into the buttercream and add the heaviest pieces while the ganache is still tacky.
Frequently Asked Questions
What is a Chocolate Candy Overload Cake?
It is a tall celebration cake decorated generously with several types of chocolate candy and treats. This version combines vanilla-chocolate cake layers, vanilla buttercream, milk chocolate ganache, chocolate bars, wafers, truffles, and mini donuts.
Can I make this cake the day before?
Yes. In fact, preparing the layers ahead can make assembly easier. Bake and cool the cakes, wrap them well, and assemble the dessert the following day.
How do I stop chocolate ganache from running down the whole cake?
Cool both components. The buttercream-covered cake should be chilled, while the ganache should be cool enough to flow slowly rather than pour like warm cream. Always make one test drip before covering the front of the cake.
Can I use dark chocolate instead of milk chocolate?
Yes, but changing the chocolate type can change ganache behavior because chocolates differ in cocoa solids, sugar, and fat. You may need to adjust the cream ratio rather than automatically using the same proportions.
Can I bake the recipe in two pans?
Three 8-inch pans create the tall appearance featured here. Using only two pans means each pan receives considerably more batter. That changes baking time and can risk overflow if the pans are not deep enough.
How do I get clean slices?
Chill the finished cake briefly before cutting. Use a long sharp knife. Dip the blade in hot water, wipe it dry, make one cut, then clean the knife before the next slice.
What chocolates are best for decorating?
Use different shapes and textures rather than buying five versions of the same candy. Chocolate bars, wafer sticks, round truffles, wafer cookies, and mini glazed donuts give the cake the varied appearance that makes this design stand out.
Print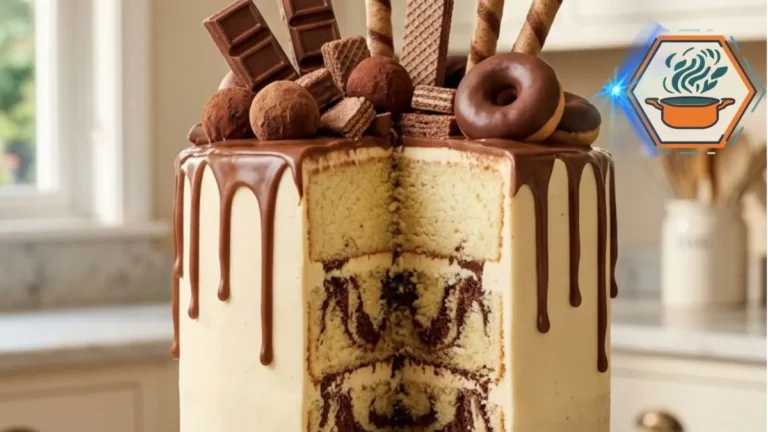
Chocolate Candy Overload Cake
A tall celebration cake with soft vanilla-chocolate marble layers, fluffy vanilla buttercream, glossy milk chocolate ganache, chocolate bars, wafers, truffles, and mini chocolate-glazed donuts.
- Total Time: About 2 hours 30 minutes, plus final cooling time
- Yield: 16 servings
Ingredients
For the vanilla-chocolate cake layers
- 3 cups (360 g) all-purpose flour
- 2½ teaspoons baking powder
- ½ teaspoon fine salt
- 1 cup (226 g) unsalted butter, softened
- 1¾ cups (350 g) granulated sugar
- 4 large eggs, room temperature
- 1 tablespoon vanilla extract
- 1¼ cups (300 ml) whole milk, room temperature
- ⅓ cup (28 g) unsweetened cocoa powder
- 2 tablespoons whole milk, reserved for the chocolate batter
For the vanilla buttercream
- 1½ cups (340 g) unsalted butter, softened
- 5 cups (600 g) powdered sugar, sifted
- 2 teaspoons vanilla extract
- 3–5 tablespoons heavy cream
- ⅛ teaspoon fine salt
For the milk chocolate ganache
- 8 oz (226 g) milk chocolate, finely chopped
- ¾ cup (180 ml) heavy cream
For decorating
- Broken milk or dark chocolate bars
- Chocolate wafer cookies
- Chocolate-covered wafer sticks
- Chocolate truffles
- Mini chocolate-glazed donuts
Instructions
- Prepare the oven and pans. Preheat the oven to 350°F (175°C). Grease three 8-inch round cake pans. Line the bottoms with parchment circles and lightly grease the parchment.
- Combine the dry ingredients. Whisk the flour, baking powder, and salt in a medium bowl.
- Cream the butter and sugar. Beat softened butter and granulated sugar for 3–4 minutes, until pale and fluffy.
- Add the eggs. Beat in the eggs one at a time. Let each egg mix in before adding the next. Scrape down the bowl when needed. Mix in the vanilla.
- Finish the vanilla batter. On low speed, alternate the flour mixture with the 1¼ cups milk. Begin and finish with flour. Mix only until combined.
- Make the chocolate batter. Transfer about one-third of the batter to another bowl. Sift in the cocoa powder. Fold in the reserved 2 tablespoons milk until smooth.
- Create the marble layers. Divide the vanilla batter between the three pans. Spoon chocolate batter over each portion. Make a few broad swirls with a knife or skewer. Do not over-swirl.
- Bake. Bake for 25–30 minutes. Begin checking at 25 minutes. A toothpick inserted near the center should come out clean or with a few moist crumbs.
- Cool. Leave the cakes in their pans for about 10 minutes. Turn onto wire racks, remove the parchment, and cool completely.
- Make the buttercream. Beat the butter for about 3 minutes. Gradually beat in the powdered sugar. Add vanilla, salt, and 3 tablespoons heavy cream. Beat until light and creamy. Add more cream, one teaspoon at a time, only if needed.
- Stack the cake. Level cooled layers if necessary. Put the first layer on the cake board. Spread about ¾ cup buttercream over it. Repeat with the second layer. Add the final layer upside down for a flatter top.
- Crumb coat. Cover the entire cake with a thin coat of buttercream. Refrigerate for 20–30 minutes.
- Final coat. Cover the chilled cake with the remaining buttercream. Smooth the sides while keeping the tall cylindrical appearance. Chill for another 20–30 minutes.
- Make the ganache. Put finely chopped milk chocolate in a heatproof bowl. Heat the cream until steaming but not vigorously boiling. Pour it over the chocolate and wait 2–3 minutes. Stir gently until glossy.
- Test the drip. Allow the ganache to cool until it falls slowly from a spoon. Test one drip on the back of the cold cake. It should travel partway down the side rather than reaching the cake board immediately.
- Decorate. Add ganache around the rim and spread some across the top. Arrange broken chocolate bars, wafer cookies, wafer sticks, truffles, chocolate pieces, and mini chocolate-glazed donuts in a loose cluster across the top.
- Set and serve. Let the finished cake settle before cutting. For cleaner slices, use a sharp knife warmed with hot water and wiped dry between cuts.
Notes
- Do not skip the extra 2 tablespoons of milk in the cocoa portion. Cocoa absorbs moisture, and this small addition helps the chocolate sections remain closer in texture to the vanilla cake.
- Use room-temperature eggs, milk, and butter for smoother batter.
- Weighing the flour is preferable. Use 360 g when possible.
- Do not overmix after adding flour.
- Do not frost warm cake layers.
- Chill the buttercream-covered cake before adding ganache.
- Always make one test drip at the back before decorating the visible sides.
- If the ganache races downward, it is too warm. Wait a few minutes.
- If it barely moves, gently warm it again.
- Add the largest chocolate decorations first.
- Add wafer decorations relatively close to serving time if you want them crisp.
- Exact decoration quantities are intentionally flexible because chocolate bars, wafers, truffles, and mini donuts differ greatly in size.
- Prep Time: 1 hour 10 minutes
- Additional/Chilling Time: 50 minutes
- Cook Time: 25–30 minutes
- Category: Dessert
- Method: Baking
- Cuisine: American-style
Final Kitchen Note
The magic of this Chocolate Candy Overload Cake comes from contrast. Soft vanilla-chocolate crumb sits beneath creamy buttercream. Smooth ganache meets crisp wafers. Neat cake layers support a deliberately playful pile of chocolates.
The most important decorating trick is also the simplest: control the temperature. Cool cake, chilled buttercream, and slightly cooled ganache make those thick chocolate drips far easier to achieve.
Take your time with the final decoration. Begin with the large chocolate pieces, fill the gaps with smaller treats, and stop before every inch disappears.
Then comes the best part: cutting through that chocolate-covered exterior and revealing three tall, soft, marbled layers inside. That first slice is exactly why this cake deserves a place at the center of the table.