
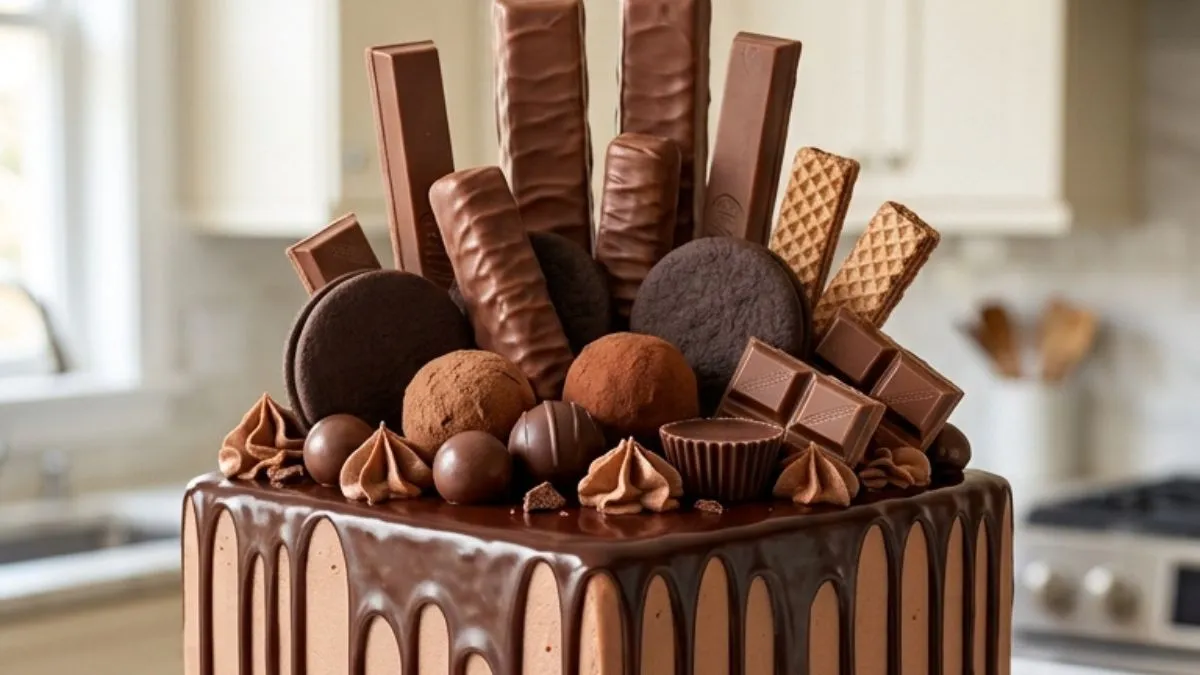
The first thing you notice about this Loaded Chocolate Candy Drip Cake is not simply the chocolate. It is the height. Then come the clean square corners, the smooth milk-chocolate frosting, the dark ganache slowly running down each side, and finally that almost outrageous crown of cookies, wafers, truffles, chocolate cups, and chocolate pieces.
It looks like the sort of celebration cake that requires professional equipment and years of decorating experience. Yet each part is manageable when you treat the cake as a series of small jobs. The secret is not adding more candy. It is building a stable cake first and decorating it in the right order.
The chocolate sponge uses cocoa, buttermilk, oil, and hot coffee. That combination gives us a moist crumb while keeping the layers firm enough for stacking. Coffee is also commonly paired with cocoa in chocolate cakes; for example, King Arthur Baking’s chocolate cake recipe uses brewed coffee or water alongside cocoa. Hot coffee is especially useful here because it helps bring out a deeper cocoa character without making the finished cake taste strongly of coffee.
There is also one small food-safety detail worth remembering while baking with children: don’t taste the raw batter. The U.S. Food and Drug Administration’s flour safety guidance explains that ordinary flour is a raw food and can carry harmful bacteria. Baking is what makes flour-containing batter safe to eat.
Affiliate disclosure: As an Amazon Associate I earn from qualifying purchases. This article may contain affiliate links to kitchen tools I find useful for preparing this recipe.
JUMP TO
Why This Loaded Chocolate Candy Drip Cake Works
A tall decorated cake needs more than a good chocolate sponge. It needs balance.
The sponge must be moist, but it cannot be so fragile that it collapses under three layers of cake and frosting. The buttercream must be creamy enough to eat comfortably but firm enough to create those distinctive straight sides.
Then there is the ganache.
Too hot, and it races to the cake board. Too cold, and you get thick blobs instead of elegant drips.
Finally, the chocolate topping needs controlled abundance. The finished cake should look loaded, but not random.
That is why the recipe is divided into four clear components:
- Three square moist chocolate cake layers
- Firm chocolate buttercream
- Semisweet chocolate ganache
- A varied chocolate and candy arrangement
If you enjoy understanding the small details that make cakes better, our guide to making banana flavor stronger follows the same ingredient-focused approach.
Ingredients You’ll Need
Chocolate Cake
- 2½ cups (300 g) all-purpose flour
- 1 cup (85 g) unsweetened cocoa powder
- 2 cups (400 g) granulated sugar
- 2 teaspoons baking soda
- 1½ teaspoons baking powder
- ½ teaspoon fine salt
- 3 large eggs, preferably at room temperature
- 1¼ cups (300 ml) buttermilk, room temperature
- ¾ cup (180 ml) neutral vegetable oil
- 2 teaspoons vanilla extract
- 1 cup (240 ml) hot freshly brewed coffee
Important: Use hot coffee, not violently boiling coffee. The finished batter will be thin. That is normal.
For consistent cake layers, weighing ingredients is particularly helpful. A digital scale also lets you weigh the filled mixing bowl and divide the batter almost perfectly between three pans.
A good example is a larger-capacity digital kitchen scale with a tare function.
Chocolate Buttercream
- 2 cups (454 g) unsalted butter, softened but not greasy
- ¾ cup (64 g) unsweetened cocoa powder
- 5½ cups (660 g) powdered sugar, sifted if lumpy
- ½ cup (120 ml) heavy cream
- 2 teaspoons vanilla extract
- ¼ teaspoon fine salt
Keep another 1–2 tablespoons of cream nearby, but don’t add it automatically.
The frosting needs to remain fairly firm.
Chocolate Ganache
- 8 oz (225 g) semisweet chocolate, finely chopped
- ¾ cup (180 ml) heavy cream
Decorations
Use unbranded chocolate treats in different sizes and shapes:
- 6–8 chocolate sandwich cookies
- 5–6 chocolate-covered wafer fingers
- 3–4 rectangular chocolate wafer bars
- 6–8 chocolate truffles
- 6–8 small chocolate balls
- 4–6 mini chocolate cups
- 1 small milk-chocolate bar, broken into squares
- Reserved chocolate buttercream for rosettes
Choose chocolates with different heights and shapes. That variation is what creates the full appearance seen in the reference cake.
Equipment That Actually Makes a Difference
You don’t need a professional bakery setup. Still, this particular cake becomes much easier with the right tools.
Three 8-inch square cake pans are important. Using pans of the same size and material helps the layers bake at a similar rate.
A rotating cake stand is even more useful during frosting. Instead of repeatedly moving your scraper around four sides, you can work from a steadier position. For anyone who regularly makes celebration cakes, a heavier decorating turntable can be a more useful purchase than another small single-purpose gadget.
You will also want:
- Parchment paper
- Large mixing bowls
- Whisk
- Electric mixer
- Offset spatula
- Tall straight cake scraper
- Cooling racks
- Piping bag
- Open-star piping tip
- Cake board
If you bake frequently, a cordless hand mixer is another higher-value tool that can move between the batter, buttercream, and other baking projects without occupying the space of a full stand mixer. See cordless hand mixers on Amazon.
How to Make the Chocolate Cake Layers
Heat the oven to 350°F (175°C).
Grease three 8-inch square pans. Line the bottoms with parchment, then lightly grease the parchment as well.
Whisk the flour, cocoa powder, sugar, baking soda, baking powder, and salt in a large bowl. Break up every visible cocoa lump before adding liquid.
In another bowl, combine the eggs, buttermilk, vegetable oil, and vanilla.
Add the wet mixture to the dry ingredients. Mix only until largely combined.
Now slowly pour in the hot coffee while mixing on low speed.
Don’t panic when the batter becomes thin. Chocolate cake recipes using coffee and buttermilk commonly produce loose batter.
Divide the batter evenly among the three pans. A scale gives the most accurate result.
Bake for 25–30 minutes.
Start checking around 24–25 minutes because ovens and metal pans differ. Insert a toothpick near the center. It should emerge with a few moist crumbs rather than liquid batter.
Allow the cakes to rest in their pans for about 10–15 minutes. Turn them onto cooling racks and remove the parchment.
They must cool completely before frosting.
Warm cake plus buttercream equals sliding layers.
Make the Chocolate Buttercream
Beat the softened butter for 3–4 minutes until creamy.
Add the cocoa powder on low speed.
Gradually add the powdered sugar, alternating with small amounts of heavy cream. Add the vanilla and salt.
Beat until smooth.
Now check the texture.
For this cake, the buttercream should hold a peak and stay on a vertical spatula without quickly sliding off. If it is stiff and tearing the cake, add cream one teaspoon at a time.
If it feels loose, don’t keep adding powdered sugar immediately. The butter may simply be too warm. Chill the bowl for 10 minutes, then mix again.
This is one of the details that separates a square cake with crisp edges from a soft, rounded cake.
How to Build the Tall Square Cake
Place a small dab of buttercream on the cake board.
Add the first layer.
Spread an even layer of chocolate buttercream across it. Keep the filling level, particularly near the corners.
Add the second layer and repeat.
Place the final layer upside down. Its flat bottom now becomes the top of your cake.
Check the cake from every side.
If it leans, correct it now.
Apply a thin crumb coat across the top and all four sides. Refrigerate for 20–30 minutes, until the frosting feels firm.
Add the final buttercream coat.
Work on one side at a time with a tall scraper. At each corner, pull excess buttercream inward rather than repeatedly rounding the corner with your spatula.
This process takes patience. Don’t try to make the surface perfect in one pass.
A sturdy rotating decorating stand is especially helpful here because this is a tall, heavy cake rather than a small cupcake project.
How to Get Slow, Glossy Chocolate Drips
Finely chop the semisweet chocolate and place it in a heatproof bowl.
Heat the heavy cream until steaming and just beginning to show tiny bubbles around the edge. Don’t aggressively boil it.
Pour it over the chocolate.
Wait 2 minutes.
Stir slowly from the center outward until the ganache becomes dark and glossy.
Then wait.
The ganache needs to cool before it touches the chilled buttercream. Drip-cake technique works best when the frosted cake is cold and the ganache is only slightly warm rather than hot.
Test one drip on the back of the cake.
If it immediately reaches the bottom, wait longer.
If it barely moves, gently warm the ganache.
Once the consistency is right, make drips of deliberately different lengths. Don’t create identical lines around the cake. The reference appearance has long, narrow, irregular drips.
Spread a thin layer of remaining ganache across the top.
Decorate It Like the Reference Cake
This is where the cake gets its personality.
Start with the tallest pieces toward the back. Insert rectangular wafer bars vertically at slightly different heights.
Next add chocolate-covered wafer fingers.
Place sandwich cookies and larger round chocolates through the middle.
Fill smaller spaces with:
- Truffles
- Mini chocolate cups
- Chocolate balls
- Broken chocolate squares
- Buttercream rosettes
Don’t place every item flat.
Some pieces should stand vertically. Others can lean against neighboring chocolates. A few should sit lower toward the front.
The goal is a dense triangular composition: tallest at the rear, medium pieces in the center, smaller chocolates toward the front.
Reserve several pieces for the base.
Create two or three small clusters around the bottom edge using cookies, chocolate squares, balls, wafer fingers, and piped rosettes. Don’t make a complete candy border. Leaving open spaces keeps the decoration closer to the reference image.
For detailed piping and ganache work, a rechargeable cordless mixer can be useful, but another interesting investment for frequent bakers is a digital instant-read thermometer. It can help monitor chocolate and other temperature-sensitive preparations beyond this cake. Browse digital kitchen thermometers on Amazon.
The Small Details That Make This Cake More Reliable
Several details matter more than they appear.
First, use room-temperature eggs and buttermilk. They mix into the batter more evenly.
Second, don’t overmix after adding flour. Stop once the batter is smooth.
Third, cool every layer fully.
Fourth, chill the crumb-coated cake before adding the final frosting.
Most importantly, chill the finished buttercream surface before adding ganache. A cold surface gives the chocolate time to set as it travels downward.
For the square shape, your buttercream cannot be overly soft. Defined corners require a firm final coat.
And don’t decorate the cake with very heavy chocolate bars until the frosting and ganache have had time to firm. Otherwise the weight can disturb the surface.
Make-Ahead and Storage
You don’t need to complete the whole cake in one afternoon.
Bake the chocolate layers one day ahead. Once completely cool, wrap each one well and keep it at room temperature overnight or freeze it for longer storage.
Buttercream can also be prepared ahead and refrigerated in an airtight container. Bring it back toward room temperature and beat briefly before using.
For the cleanest decoration, assemble and frost the cake first. Add the ganache after chilling. Add the candy decorations last.
If refrigerating the completed cake, keep it protected from strong refrigerator odors. Allow slices some time to lose their refrigerator chill before serving so the buttercream softens.
For another dessert where texture depends heavily on technique, see our guide to caramelizing sugar for crème brûlée.
Common Mistakes to Avoid
The cake layers sink.
Check that your baking powder and baking soda are fresh. Don’t open the oven repeatedly during the first part of baking.
The buttercream looks rounded instead of square.
It is probably too soft, or too little frosting was placed at the corners.
Ganache reaches the cake board.
It was likely too warm or too fluid. Always perform a single test drip first.
The chocolate decorations fall over.
Insert larger pieces into firm buttercream and support them with nearby chocolates.
The cake looks cluttered rather than luxurious.
Work from large decorations to small ones. Repeating a few shapes and colors creates cohesion.
If buttercream and cake texture are topics you enjoy learning about, you may also like our guide to keeping madeleines moist.
Loaded Chocolate Candy Drip Cake Recipe at a Glance
Prep time: 1 hour
Bake time: 25–30 minutes
Cooling and assembly: About 2 hours
Total time: About 3 hours 30 minutes
Yield: 16–20 servings
Oven: 350°F / 175°C
Pan size: Three 8-inch square pans
Difficulty: Intermediate
The most important timing rule is simple: don’t rush the cooling and chilling stages. Most decorating failures on this cake happen because the next component is added before the previous one is firm enough.
Frequently Asked Questions
Can I make a Loaded Chocolate Candy Drip Cake the day before?
Yes. In fact, making the cake ahead can make serving day much easier. Bake and assemble it the day before, refrigerate it, and keep it protected. For the freshest appearance, delicate chocolate decorations can be added closer to serving.
Why do you put coffee in chocolate cake?
Coffee contributes liquid while reinforcing the cocoa character. Properly balanced chocolate cake should not taste like a cup of coffee. Hot liquid also helps hydrate and bloom cocoa. Coffee-and-cocoa combinations appear in many established chocolate cake formulas.
Why is my chocolate cake batter so thin?
That is expected here. The coffee adds substantial liquid. Don’t compensate by adding extra flour, since that changes the intended ratio and can leave you with a dry cake.
How do I stop chocolate ganache from running down the whole cake?
Chill the frosted cake first. Let the ganache cool until it moves slowly from a spoon, then make one test drip. If that drip travels too far, wait before continuing.
Can I use milk chocolate for the ganache?
Yes, but you should not automatically use the same chocolate-to-cream ratio. Milk chocolate generally needs proportionally less cream for a firm drip than semisweet or dark chocolate. One established drip-cake guide, for example, recommends different ratios according to the type of chocolate.
Can I replace the coffee?
Yes. Hot water can work if you don’t want coffee. You will still get a chocolate cake, though coffee can give the cocoa flavor more depth.
How do I get sharp square corners?
Use firm buttercream, a straight scraper, a chilled crumb coat, and enough frosting at each corner. Build the sides first. Then pull the raised frosting along the top edges inward with an offset spatula.
What chocolates should I put on top?
You don’t need specific brands. The visual effect comes from contrast in height, shape, and texture. Combine sandwich cookies, wafer bars, chocolate fingers, truffles, small cups, round chocolates, and broken chocolate-bar squares.
Print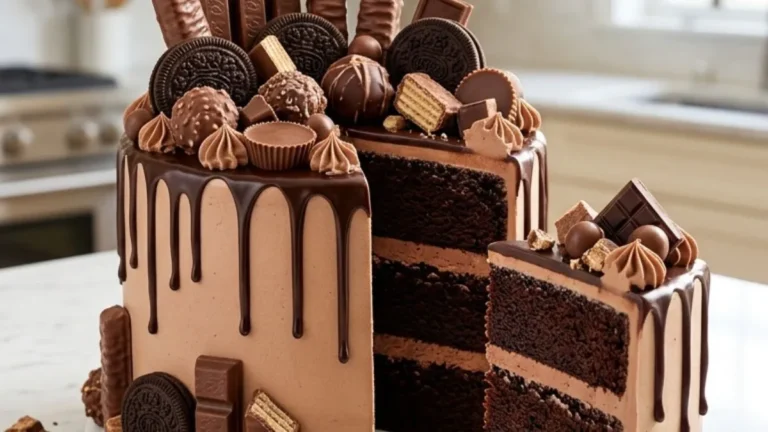
Loaded Chocolate Candy Drip Cake
A tall three-layer square chocolate cake covered with smooth chocolate buttercream, glossy semisweet chocolate ganache drips, and a generous assortment of cookies, wafers, truffles, chocolate cups, and chocolate pieces. The cake has moist chocolate layers, defined square corners, varied ganache drips, and a dramatic loaded chocolate topping perfect for birthdays and celebrations.
- Total Time: 3 hours 30 minutes
- Yield: 16–20 servings
Ingredients
Chocolate Cake
2 1/2 cups (300 g) all-purpose flour
1 cup (85 g) unsweetened cocoa powder
2 cups (400 g) granulated sugar
2 teaspoons baking soda
1 1/2 teaspoons baking powder
1/2 teaspoon fine salt
3 large eggs, room temperature
1 1/4 cups (300 ml) buttermilk, room temperature
3/4 cup (180 ml) neutral vegetable oil
2 teaspoons vanilla extract
1 cup (240 ml) hot freshly brewed coffee
Chocolate Buttercream
2 cups (454 g) unsalted butter, softened
3/4 cup (64 g) unsweetened cocoa powder
5 1/2 cups (660 g) powdered sugar
1/2 cup (120 ml) heavy cream, plus 1–2 tablespoons only if needed
2 teaspoons vanilla extract
1/4 teaspoon fine salt
Chocolate Ganache
8 ounces (225 g) semisweet chocolate, finely chopped
3/4 cup (180 ml) heavy cream
Chocolate Decorations
6–8 chocolate sandwich cookies
5–6 chocolate-covered wafer fingers
3–4 rectangular milk-chocolate wafer bars
6–8 chocolate truffles
6–8 small chocolate balls
4–6 mini chocolate cups
1 small milk-chocolate bar, broken into squares
Reserved chocolate buttercream, for rosettesInstructions
Preheat the oven to 350°F (175°C). Grease three 8-inch square cake pans. Line the bottoms with parchment paper and lightly grease the parchment. Position a rack in the center of the oven.In a large bowl, whisk the flour, cocoa powder, granulated sugar, baking soda, baking powder, and salt until evenly combined and no large cocoa lumps remain.Add the eggs, buttermilk, vegetable oil, and vanilla. Mix on low speed just until the dry ingredients are mostly incorporated. Do not overmix.Slowly pour in the hot coffee while mixing on low speed. Mix only until the batter is smooth and evenly combined. The batter will be quite thin; this is normal.Divide the batter evenly among the three prepared pans. For layers of equal height, weigh the filled pans or divide the batter by weight. Bake for 25–30 minutes, or until a toothpick inserted near the center comes out with a few moist crumbs and no wet batter.Let the cakes cool in their pans for 10–15 minutes. Carefully turn them onto wire racks, remove the parchment, and allow them to cool completely before frosting. Do not frost warm cake layers.Beat the softened butter for 3–4 minutes until creamy. Add the cocoa powder and mix on low speed. Gradually add the powdered sugar, alternating with the heavy cream. Add the vanilla and salt. Beat until smooth and fluffy but still firm enough to hold its shape. If needed, add additional cream 1 teaspoon at a time.Place a small dab of buttercream in the center of an 8- to 10-inch square cake board. Place the first cake layer on top. Spread an even layer of chocolate buttercream over it. Add the second layer and repeat. Place the third layer upside down so its flat bottom becomes the top of the cake.Cover the entire cake with a thin layer of chocolate buttercream to trap loose crumbs. Check that the layers are straight and level. Refrigerate for 20–30 minutes, or until the crumb coat feels firm.Apply a thicker final layer of chocolate buttercream to the top and all four sides. Use a tall straight cake scraper to smooth each side. Leave a small ridge of frosting above the top edges, then gently pull those ridges inward with an offset spatula to create defined square corners. Chill the frosted cake for at least 20 minutes before adding the ganache.Place the finely chopped semisweet chocolate in a heatproof bowl. Heat the heavy cream just until steaming with small bubbles beginning to appear around the edge. Pour the cream over the chocolate and leave undisturbed for 2 minutes. Stir slowly from the center outward until completely smooth and glossy.Allow the ganache to cool until slightly warm and thick enough to flow slowly. Test one drip on the back of the chilled cake. It should travel gradually down the side without reaching the cake board. If it runs too quickly, let the ganache cool longer. If it barely moves, warm it very briefly.Create different-length ganache drips around all four top edges. Spread a thin layer of remaining ganache over the top without disturbing the buttercream corners. Let the ganache begin to set before adding heavy decorations.Pipe several small chocolate buttercream rosettes across the top. Insert the tallest rectangular wafer bars toward the back. Add chocolate-covered wafer fingers, sandwich cookies, truffles, chocolate cups, chocolate balls, and broken chocolate squares. Keep taller pieces toward the back and smaller pieces toward the front to create a full but structured arrangement.Arrange a smaller number of sandwich cookies, chocolate pieces, wafer fingers, chocolate balls, and buttercream rosettes around selected areas of the bottom edge. Leave some sections undecorated rather than creating a complete border.
Chill the decorated cake briefly if needed to firm the buttercream and ganache. For the best texture, let refrigeraNotes
For the cleanest square shape, the buttercream should be soft enough to spread but firm enough to hold a peak.
The cake layers must be completely cool before stacking.
Chill the crumb coat before applying the final buttercream layer, then chill the finished frosting again before adding ganache.
Always make one test drip on the back of the cake before decorating all four sides.
The ganache should be fluid but not hot. Hot ganache can melt the buttercream and create very long or uncontrolled drips.
Do not add extra flour because the chocolate cake batter appears thin. The loose consistency is intentional.
For even cake layers, weigh the batter before dividing it among the three pans.
Very heavy chocolate decorations should be inserted only after the frosting and ganache are firm enough to support them.
Use unbranded chocolate candies or your preferred chocolate treats. Exact nutrition will change according to the decorations used.
For cleaner slices, chill the cake until stable, use a sharp knife, and wipe the blade clean between cuts.
- Prep Time: 1 hour
- Additional Time: 2 hours
- Cook Time: 30 minutes
- Category: Dessert
- Method: Baking
- Cuisine: American
Final Decorating Tip
The best Loaded Chocolate Candy Drip Cake is not the one with the greatest number of chocolates.
It is the one that looks abundant without losing its structure.
Keep the cake tall and square. Keep the buttercream smooth. Let some ganache drips run longer than others. Build height at the back. Fill the center generously. Finish with smaller chocolate pieces and rosettes at the front and around selected areas of the base.