
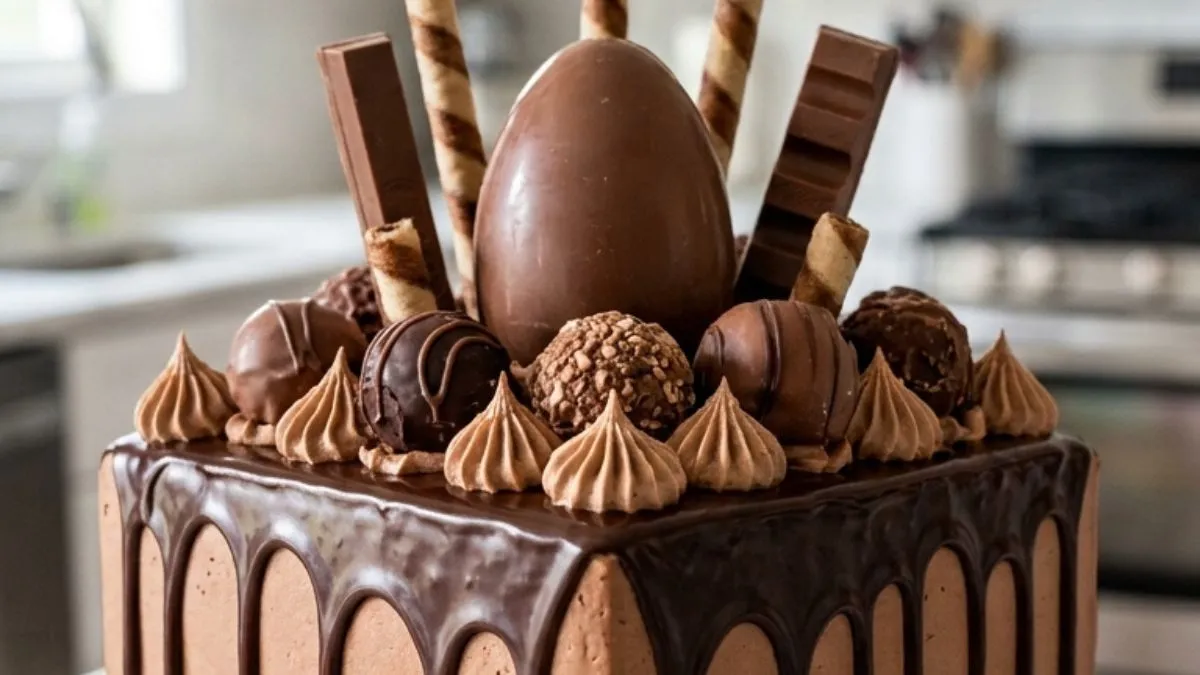
There are cakes you place quietly on the dessert table, and then there are cakes that make everyone stop before you have even cut the first slice. This Chocolate Overload Square Drip Cake belongs firmly in the second group.
The first time you look at it, the height gets your attention. Then you notice the glossy dark chocolate drips, the smooth milk-chocolate frosting, and that large chocolate egg rising from the center. Behind it sit striped wafer rolls and tall chocolate bars. Truffles and piped chocolate kisses fill the smaller gaps. It looks extravagant, yet the construction is surprisingly logical once you break it into stages.
The secret is not adding as much chocolate as possible. It is building a stable cake first. That matters with a tall square design. According to Wilton’s cake baking and serving guide, cake pans generally need room for the batter to rise rather than being filled to the rim. And when judging whether dark chocolate layers are baked, visual color alone is not enough. King Arthur Baking’s cake doneness guide recommends looking at several signs, including a set surface, edges pulling slightly away, a clean tester, and a center that springs back.
This recipe takes those practical details seriously. The goal is a cake that can actually be recreated at home while keeping the tall, chocolate-loaded appearance shown in the reference.
Affiliate disclosure: As an Amazon Associate I earn from qualifying purchases. This article may contain affiliate links to kitchen tools I find useful for preparing this recipe.
JUMP TO
Why This Chocolate Overload Cake Actually Works
A dramatic cake needs more than decoration.
The sponge must be moist but strong enough to carry several layers of frosting and a fairly heavy chocolate centerpiece. Vegetable oil helps the crumb remain soft after refrigeration. Buttermilk brings moisture and acidity. Cocoa gives the cake its deep chocolate base.
Then comes hot coffee.
Don’t worry if you dislike coffee-flavored desserts. Coffee is here mainly to deepen the cocoa character. The final cake should still taste strongly of chocolate.
The most important structural detail is the frosting. A loose chocolate frosting may taste wonderful on cupcakes, but it can cause a tall square cake to shift. Our buttercream is deliberately firm enough to support the layers while remaining creamy when served near room temperature.
Ingredients You’ll Need
Chocolate cake
- 2½ cups (300 g) all-purpose flour
- 1 cup (85 g) unsweetened cocoa powder
- 2 cups (400 g) granulated sugar
- 2 teaspoons baking soda
- 1½ teaspoons baking powder
- ½ teaspoon fine salt
- 3 large eggs, at room temperature
- 1¼ cups (300 ml) buttermilk, at room temperature
- ¾ cup (180 ml) neutral vegetable oil
- 2 teaspoons vanilla extract
- 1 cup (240 ml) hot freshly brewed coffee
Important: pan dimensions affect height considerably. For an especially tall result like the reference cake, don’t simply pour excessive batter into shallow pans. Use proper 2-inch-deep square cake pans and keep enough headroom for rising. Wilton recommends filling many cake pans around one-half to two-thirds full.
If your three 8-inch pans cannot safely hold the batter at the recommended depth, bake excess batter separately as cupcakes rather than overfilling them.
Milk-chocolate-style cocoa buttercream
- 2 cups (454 g) unsalted butter, softened but not greasy
- 6 cups (680–720 g) powdered sugar, sifted
- ¾ cup (64 g) unsweetened cocoa powder
- ½ cup (120 ml) heavy cream, added gradually
- 2 teaspoons vanilla extract
- ¼ teaspoon fine salt
Dark chocolate drip
- 10 oz (283 g) semisweet chocolate, finely chopped
- ¾ cup (180 ml) heavy cream
Different chocolates behave differently in ganache. If yours seems unusually fluid, don’t pour it straight onto the cake. Testing one drip first is far safer. Current drip-cake guidance also stresses placing ganache on a cold buttercream cake and checking the flow before completing the edge.
Chocolate decoration
To reproduce the same abundant vertical style, prepare:
- 1 medium hollow milk-chocolate egg
- 5–6 chocolate wafer rolls
- Several striped wafer rolls
- 4–5 rectangular milk-chocolate bars
- 4 chocolate-covered wafer fingers
- 4–5 chocolate-hazelnut-style truffles
- ⅓ cup dark chocolate pearls
- ⅓ cup chocolate sprinkles
- 2 tablespoons finely chopped white chocolate
- Reserved chocolate buttercream
Try to vary the height of the pieces. That variation creates the dramatic silhouette.
Four Tools That Make This Cake Much Easier
You don’t need to buy a kitchen full of cake gadgets. For this particular project, however, a few good tools solve genuine problems.
For bakers who make layer cakes regularly, a strong stand mixer is far more useful than another small decorating gadget. A KitchenAid Artisan 5-Quart Stand Mixer on Amazon can handle the long buttercream mixing stage and has uses far beyond this recipe.
Square cakes also expose uneven sides more readily than round ones. Three matching, light-colored 8-inch square aluminum cake pans on Amazon are a worthwhile choice for someone planning to make this style more than once.
For decorating, a heavy revolving stand gives you better control while scraping the four faces and corners. An Ateco revolving cake decorating stand on Amazon is especially useful when you move from the crumb coat to the final finish.
Finally, a quality instant-read thermometer has uses far beyond cake. It can help with chocolate work, caramel, bread, meat and many other recipes. The Thermapen ONE is a premium option. ThermoWorks lists a one-second response and ±0.5°F accuracy through its key range.
Step 1: Prepare the Square Cake Pans
Heat the oven to 350°F (175°C).
Grease three 8-inch square pans lightly. Line each bottom with parchment paper. Add narrow parchment strips along the sides if your pans tend to stick.
Square cakes need special attention at the corners because they can cook faster there.
Don’t substitute one huge deep pan and plan to cut it into three layers. Three separately baked layers give you more predictable baking and cleaner assembly.
Step 2: Make the Chocolate Batter
In a large bowl, whisk together:
- Flour
- Cocoa powder
- Sugar
- Baking soda
- Baking powder
- Salt
Break up every cocoa lump before adding the liquids.
In another bowl, combine the eggs, buttermilk, oil and vanilla.
Pour the wet mixture into the dry ingredients and mix only until most dry streaks disappear.
Now slowly add the hot coffee.
The batter will become fairly thin. That is expected. Don’t add extra flour simply because it looks looser than a vanilla cake batter.
Divide the batter by weight between the pans. Equal quantities produce layers of similar height, which makes the finished square much easier to stack.
Step 3: Bake Without Drying the Cake
Bake for about 25–35 minutes, but treat time as a guide rather than a guarantee.
Start checking the center around 25 minutes.
A finished chocolate layer should:
- Have a matte rather than wet-looking surface
- Spring back after a light touch
- Show slight separation at the edges
- Produce a tester with no wet batter
King Arthur notes that chocolate cake is harder to judge by color and recommends combining several doneness signs rather than relying on one test.
Leave the cakes in their pans for about 10 minutes. Carefully turn them onto racks.
Cool completely.
Warm cake plus buttercream equals sliding layers.
For easier decorating, wrap the cooled layers and chill them for 30–60 minutes.
Step 4: Make Firm Chocolate Buttercream
Beat the softened butter for 4–5 minutes until noticeably paler.
Add powdered sugar gradually on low speed. Add the cocoa powder in stages.
Pour in vanilla and salt.
Add heavy cream one tablespoon at a time rather than pouring in the entire ½ cup immediately.
This is one of the details that can save the cake.
Your kitchen temperature and powdered sugar can change the frosting’s consistency. You may not need every drop of cream.
The final buttercream should hold a firm peak while spreading without tearing the cake.
If it droops from the spatula, chill it briefly or mix in a little more powdered sugar.
Step 5: Build a Tall, Straight Square Cake
Put a small dab of buttercream in the center of a sturdy square cake board.
Place the first cold layer on top.
Spread an even buttercream layer over it. Keep the filling moderate. Thick filling looks tempting, but excessive buttercream between heavy cake layers encourages movement.
Add the second layer. Check it from every side.
Add another even layer of frosting, followed by the final cake.
If necessary, use a serrated knife to level the layers before stacking.
Now apply a thin crumb coat over the entire cake.
Pay attention to those four vertical corners. A bench scraper or tall cake scraper helps create the straight geometry seen in the reference image.
Refrigerate for 30–45 minutes.
Add the final buttercream coat. Smooth the sides while leaving faint handmade spatula marks. The reference isn’t a perfectly airbrushed fondant cube. A little texture makes the finish warmer and more realistic.
Chill again until the exterior feels firm.
Step 6: Make Those Long Chocolate Drips
Finely chop the semisweet chocolate and place it in a heatproof bowl.
Heat the cream until steaming. Don’t aggressively boil it.
Pour it over the chocolate.
Wait about two minutes, then stir gently from the center outward until glossy.
Now comes the step people rush.
Let the ganache cool.
Warm, thin ganache can race straight down the cake and pool on the board. Ganache that has cooled too far barely moves.
Drip-cake specialists consistently recommend a chilled frosted cake and a test drip before decorating the whole cake.
Test one small spoonful on the back corner.
You want a slow line that travels partway down the side.
If it reaches the board, wait longer.
If it stops almost immediately, warm the ganache very gently.
Create different drip lengths deliberately. The reference cake has long and short drips rather than an identical curtain around every side.
Fill the top with ganache and smooth it carefully.
Step 7: Recreate the Chocolate Arrangement
This is where the cake gets its personality.
Pipe several small chocolate buttercream kisses across the front of the top.
Place the large hollow chocolate egg slightly behind the center. It should become the focal point without hiding every decoration behind it.
Next, build upward.
Insert the tallest thin chocolate pieces and wafer rolls behind the egg. Place striped wafer rolls at different heights. Add rectangular chocolate bars around them.
Don’t make the arrangement perfectly symmetrical.
The reference works because the decoration feels abundant but still has direction.
Use a dab of thick ganache or melted chocolate as edible “glue” for pieces that need support. A similar support technique is recommended for upright chocolate decorations on overload cakes.
Place truffles toward the front.
Add chocolate-covered wafer fingers diagonally or vertically to break up the straight lines.
Scatter only a small quantity of chocolate pearls and finely chopped white chocolate. The pale chocolate creates contrast against all the brown tones.
Finally, press chocolate sprinkles around the bottom edge.
Place just a few chocolate pieces at the front corners of the board. Do not completely surround the base. Leaving open space is part of what makes the reference design look polished rather than cluttered.
How to Keep the Cake Stable
A tall square cake is less forgiving than a basic two-layer birthday cake.
Keep these rules in mind:
- Work with cold cake layers.
- Level noticeable domes.
- Don’t make the filling excessively thick.
- Chill after the crumb coat.
- Chill again before ganache.
- Use a rigid cake board.
- Add heavy decorations only after the cake is fully assembled.
- Anchor tall chocolate pieces with firm ganache or melted chocolate.
For a three-layer cake of this size, internal dowels are generally unnecessary when the cake and buttercream are properly chilled and the top decorations are reasonably light. If you increase the height significantly or add unusually heavy decorations, structural support becomes more important.
Does This Cake Need a Special Crust?
No.
This is worth clarifying because a cake like this can look almost brownie-like in photographs.
You do not want a hard crust on these layers. The goal is a tender but stable crumb. Adding ingredients simply to produce a thick crust would work against that goal and could make stacking and eating the cake less pleasant.
What you need is structure, not crust.
That structure comes from the flour, eggs, correct bake, cooling time and firm buttercream.
If your cake has a very hard outer edge, it may have spent too long in the oven.
Make-Ahead and Storage
You can make this cake without spending the entire celebration day in the kitchen.
Bake the layers one day ahead. Once completely cool, wrap them well and refrigerate.
Buttercream can also be prepared ahead and brought back to a workable temperature before decorating.
Once decorated, keep the cake refrigerated if your room is warm.
Before serving, allow it to lose its refrigerator chill. Butter-based frosting tastes creamier when it isn’t ice-cold.
Remove very tall or hard chocolate decorations before cutting if they make slicing awkward.
Use a long sharp knife and wipe it between cuts.
This tall 8-inch square cake can provide roughly 16–20 generous celebration portions, depending on how it is cut.
If you’re interested in more cake ideas, the RecipesMind baking and recipe collection includes other guides that can help build your decorating and dessert skills. For another chocolate-centered project, see the strawberry-filled chocolate cake guide.
Common Problems and Quick Fixes
The cake layers sank. The center may have been underbaked, the oven door may have opened too early, or the batter sat too long before baking.
The layers are dry. Check earlier next time. Dark cocoa makes visual browning difficult to judge.
The buttercream slides. Your cake or room may be too warm. Chill the cake before continuing.
The ganache runs to the board. It is probably too warm or fluid. Stop after your test drip and allow the remaining ganache to cool.
The ganache barely moves. It has probably cooled too much. Warm it gently in very short intervals.
The square corners look rounded. Add a little extra buttercream at each corner, then pull a tall scraper along each flat face.
The decorations fall over. Add them to a cold cake and anchor larger pieces with thick ganache or melted chocolate.
Frequently Asked Questions
Can I make a Chocolate Overload Square Drip Cake the day before?
Yes. In fact, preparing the cake ahead can make decorating easier. Bake and cool the layers first, then assemble and chill. Add fragile wafer pieces closer to serving time if your refrigerator is humid.
Why does my chocolate ganache drip run all the way down?
It is usually too warm or too fluid, or the buttercream surface isn’t cold enough. Always make one test drip first.
Can I make this cake without coffee?
Yes. Replace the hot coffee with hot water. The cake will still work, although coffee gives the cocoa flavor more depth.
Can I use milk chocolate for the drip?
Yes, but don’t automatically use the same chocolate-to-cream proportions. Milk chocolate contains a different balance of cocoa solids, sugar and milk solids, so the ganache can behave differently.
Can I use chocolate chips?
They can work, but a good-quality chopped chocolate bar generally melts more predictably for ganache. Whatever chocolate you choose, judge the final consistency before putting it on the cake.
Why chill a cake before adding ganache?
Cold buttercream helps the ganache slow and set as it travels down the side. That gives you controlled drips instead of chocolate running onto the cake board.
How do I get the same tall appearance as the reference photo?
Use evenly baked layers, level them when needed, keep filling thickness controlled, and build straight sides with a firm buttercream. Most importantly, don’t try to create extra height by dangerously overfilling the pans. Your pans need room for the batter to rise.
What chocolates should I put on top?
Use a mix of shapes rather than buying ten versions of the same candy. A hollow milk-chocolate egg creates the center. Tall wafer rolls and chocolate bars add height. Truffles and buttercream kisses fill the foreground. Small chocolate pearls finish the empty spaces.
Print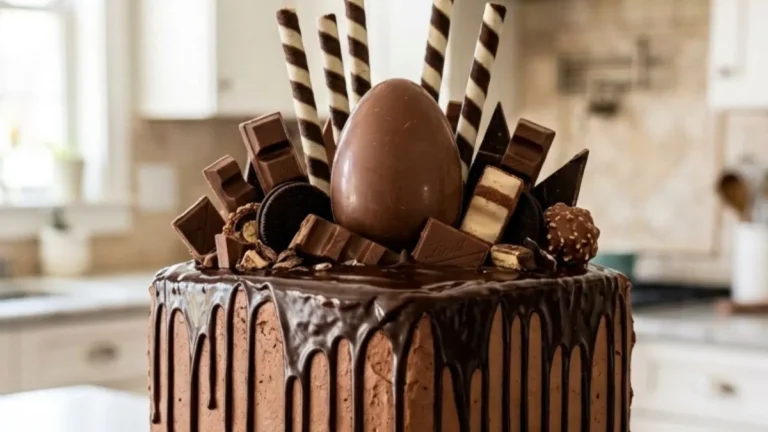
Chocolate Overload Square Drip Cake
A tall three-layer square chocolate cake covered with creamy chocolate buttercream and glossy dark chocolate ganache. A hollow chocolate egg, striped wafer rolls, chocolate bars, truffles, chocolate-covered wafers, and chocolate pearls create a dramatic celebration cake with plenty of height and texture.
- Total Time: 3 hours
- Yield: 16–20 servings
Ingredients
Chocolate Cake
- 2½ cups (300 g) all-purpose flour
- 1 cup (85 g) unsweetened cocoa powder
- 2 cups (400 g) granulated sugar
- 2 teaspoons baking soda
- 1½ teaspoons baking powder
- ½ teaspoon fine salt
- 3 large eggs, room temperature
- 1¼ cups (300 ml) buttermilk, room temperature
- ¾ cup (180 ml) neutral vegetable oil
- 2 teaspoons vanilla extract
- 1 cup (240 ml) hot brewed coffee
Chocolate Buttercream
- 2 cups (454 g) unsalted butter, softened
- 6 cups (about 720 g) powdered sugar, sifted
- ¾ cup (64 g) unsweetened cocoa powder
- Up to ½ cup (120 ml) heavy cream, added gradually
- 2 teaspoons vanilla extract
- ¼ teaspoon fine salt
Dark Chocolate Ganache
- 10 oz (283 g) semisweet chocolate, finely chopped
- ¾ cup (180 ml) heavy cream
Chocolate Decoration
- 1 medium hollow milk-chocolate egg
- 5–6 chocolate wafer rolls, including striped varieties
- 4–5 rectangular milk-chocolate bar pieces
- 4 chocolate-covered wafer fingers
- 4–5 chocolate-hazelnut-style truffles
- ⅓ cup small dark chocolate pearls
- ⅓ cup chocolate sprinkles
- 2 tablespoons finely chopped white chocolate
- Reserved chocolate buttercream for piping
Instructions
- Preheat the oven to 350°F (175°C). Lightly grease three 8-inch square cake pans and line the bottoms with parchment paper.
- In a large bowl, whisk the flour, cocoa powder, sugar, baking soda, baking powder, and salt until evenly combined. Break apart any cocoa lumps.
- In another bowl, whisk the eggs, buttermilk, vegetable oil, and vanilla. Add the wet mixture to the dry ingredients and mix just until combined.
- Slowly pour in the hot coffee while mixing on low speed. The batter will be fairly thin. This is normal.
- Divide the batter evenly between the prepared pans, preferably using a kitchen scale. Do not fill a pan beyond a safe baking level; bake excess batter separately if necessary.
- Bake for 25–35 minutes, checking around the 25-minute mark. The cakes are ready when the centers spring back lightly and a tester inserted into the middle comes out without wet batter.
- Cool in the pans for about 10 minutes. Turn onto wire racks and cool completely. For easier stacking, chill the cooled layers for 30–60 minutes.
- For the buttercream, beat the softened butter for 4–5 minutes until creamy and paler in color. Gradually mix in the powdered sugar and cocoa powder.
- Add vanilla and salt. Add the heavy cream 1 tablespoon at a time until the frosting is smooth but firm enough to hold the tall cake. You may not need the entire ½ cup.
- Level the cakes if necessary. Place the first layer on a sturdy square cake board. Spread an even layer of buttercream over it. Repeat with the second layer, then place the final cake layer on top.
- Cover the cake with a thin crumb coat. Refrigerate for 30–45 minutes.
- Apply the final buttercream layer. Smooth the four sides and define the square corners with a cake scraper. Chill until the frosting feels firm.
- Put the finely chopped semisweet chocolate in a heatproof bowl. Heat the cream until steaming, then pour it over the chocolate. Leave for 2 minutes.
- Stir gently until smooth and glossy. Allow the ganache to cool until it flows slowly from a spoon.
- Test one drip on the back of the cold cake. If it reaches the cake board quickly, the ganache is too warm. If it barely moves, warm it very slightly.
- Create irregular drips around the cake, alternating shorter and longer lines. Spread a thin layer of ganache across the top.
- Pipe chocolate buttercream kisses across the front portion of the cake.
- Position the hollow chocolate egg near the center-back. Insert tall chocolate bars and striped wafer rolls behind and beside it.
- Arrange truffles, chocolate-covered wafer fingers, and smaller chocolate pieces toward the front. Use a small amount of thick ganache or melted chocolate to secure unstable decorations.
- Scatter chocolate pearls and chopped white chocolate sparingly over the top. Press chocolate sprinkles around the lower edge.
- Place a few wafer pieces, chocolate pieces, and one or two truffles around the front corners of the cake board. Keep part of the board visible to match the clean reference style.
- Chill briefly to stabilize. Allow the cake to lose some of its refrigerator chill before serving for a softer crumb and creamier buttercream.
Notes
- Do not overfill the cake pans. The batter needs space to rise.
- All three cake layers should be completely cool before assembly.
- Chilled layers are much easier to stack and frost.
- Add the heavy cream to the buttercream gradually. The frosting must remain firm enough to support the layers.
- Hot ganache will create uncontrolled drips. Always test one drip first.
- The buttercream-covered cake should be cold before applying the ganache.
- Use a sturdy cake board because the finished cake is heavy.
- Use a small amount of melted chocolate or thick ganache to secure tall chocolate decorations.
- For the closest visual match, keep the large chocolate egg near the center-back and create height with vertical wafer rolls and chocolate bars.
- Do not overcrowd the cake board. A few chocolates around the front corners are enough.
- Remove awkward or very hard upright decorations before slicing.
- Ingredient brands and decoration choices can change the final nutritional values substantially
- Prep Time: 1 hour
- Additional / Assembly Time: 1 hour 30 minutes
- Cook Time: 30 minutes
- Category: Dessert
- Method: Baking
- Cuisine: American-inspired
The Final Look
When this Chocolate Overload Square Drip Cake reaches the table, it should look tall before it looks busy.
The milk-chocolate buttercream forms a clean square column. Dark ganache falls in irregular glossy lines. The large chocolate egg sits high in the center. Striped wafer rolls and slim chocolate sticks rise behind it. Chunkier bars fill the middle level. Truffles, piped kisses and scattered chocolate pieces create the foreground.
And around the base? Keep it restrained.
A few wafer pieces, one or two chocolates and a narrow border of sprinkles are enough.
That balance is what turns a pile of chocolate into a celebration cake. Better still, every visual element has a practical method behind it. Once the layers are cold, the buttercream is firm and the ganache passes its test drip, the dramatic finish becomes far more achievable than it first appears.