
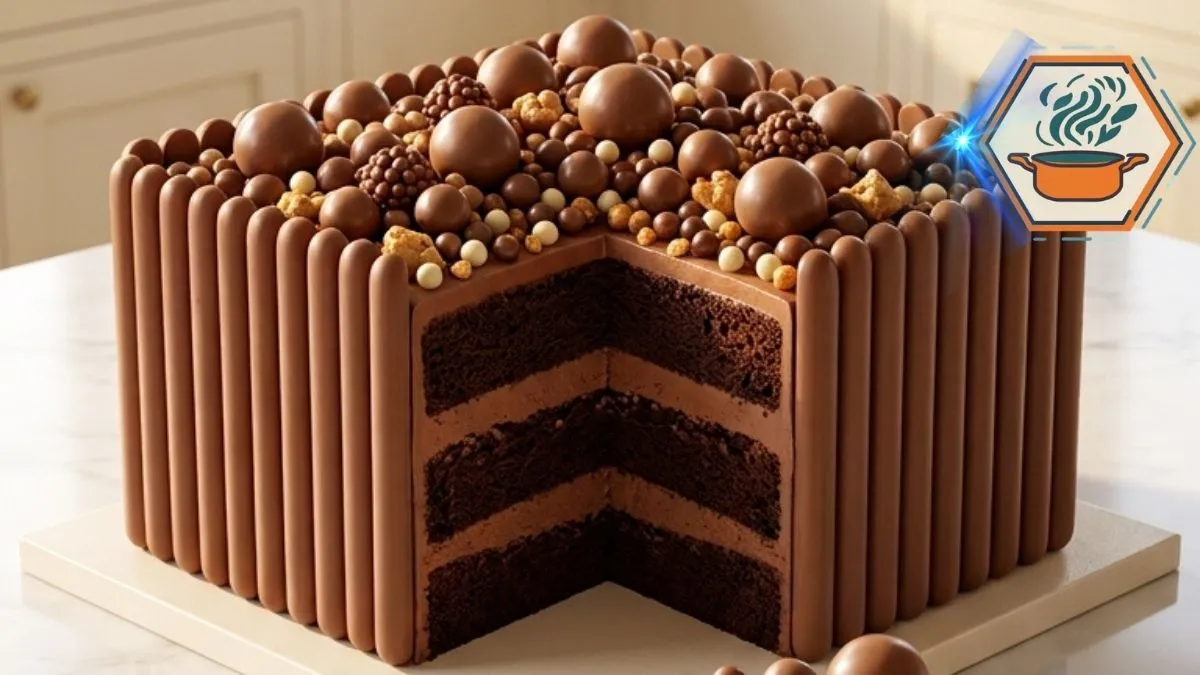
The first thing you notice about a Golden Crunch Chocolate Gift Cake is not the frosting. It is the shape. Tall, square, and surrounded by neat rows of chocolate biscuit fingers, the finished cake looks almost like a carefully wrapped chocolate present. Then you cut the first slice. Inside are dark, soft chocolate layers separated by smooth chocolate cream. On top, malted chocolate balls, crisp pearls, and little golden pieces add the crunch that gives this celebration cake its character.
The dramatic finish can make this dessert look harder than it really is. The secret is to treat it as three small projects: bake stable chocolate layers, make a frosting firm enough for stacking, then decorate the chilled cake. Reliable baking guidance from King Arthur Baking’s cake guide also stresses the importance of proper mixing, cooling, and assembly when making layer cakes. Those details matter even more here because the exterior decoration adds extra weight.
The original idea is simple, but a few details need more explanation if you want repeatable results at home. Chocolate cake can be difficult to judge by color alone. King Arthur Baking recommends looking for several signs, including a matte surface, edges beginning to pull from the pan, a center that springs back, and a tester that comes out clean. We will use those practical checks rather than relying only on the timer.
Affiliate disclosure: As an Amazon Associate I earn from qualifying purchases. This article may contain affiliate links to kitchen tools I find useful for preparing this recipe.
jump to
Why This Golden Crunch Chocolate Gift Cake Works
This cake is built around contrast.
The sponge is dark and tender. The chocolate cream is soft but stable. The biscuit fingers create straight, crisp edges. The chocolate balls and pearls on top bring several different textures.
Coffee is particularly useful in the batter. It adds liquid and complements cocoa without turning the finished cake into a coffee-flavored dessert. If you do not want coffee, hot water works too.
Oil is another important part of the recipe. A heavily decorated cake needs enough structure to remain upright, but nobody wants a dry celebration cake. Vegetable oil helps the crumb stay soft even after the cake has been chilled for assembly.
This approach is also consistent with tested chocolate-cake formulas that pair cocoa with oil and coffee or water for a moist crumb.
If chocolate celebration desserts are your favorite kind of baking project, you may also enjoy these strawberry-filled chocolate cake ideas.
Ingredients You’ll Need
For the chocolate cake:
- 2 cups (240 g) all-purpose flour
- 3/4 cup (64 g) unsweetened cocoa powder
- 1 3/4 cups (350 g) granulated sugar
- 2 teaspoons baking powder
- 1 1/2 teaspoons baking soda
- 1/2 teaspoon fine salt
- 2 large eggs, preferably at room temperature
- 1 cup (240 ml) whole milk, at room temperature
- 1/2 cup (120 ml) neutral vegetable oil
- 2 teaspoons vanilla extract
- 1 cup (240 ml) hot brewed coffee or hot water
For the chocolate cream:
- 1 1/2 cups (340 g) unsalted butter, softened
- 4 1/2 cups (540 g) powdered sugar, sifted if lumpy
- 3/4 cup (64 g) unsweetened cocoa powder, sifted
- 1/3 cup (80 ml) heavy cream, plus a little extra if required
- 2 teaspoons vanilla extract
- 1/4 teaspoon fine salt
For the gift-style decoration:
- About 35–45 chocolate-covered biscuit fingers
- About 3 cups assorted chocolate-coated malt balls and crispy chocolate bites
- 1/2 cup small chocolate pearls
- 1/4 cup golden crunchy sprinkles, golden crisp pieces, or small edible stars
The exact number of biscuit fingers depends on their width and the final dimensions of your frosted cake. Buy a few extras. Broken biscuits are much less frustrating when you have replacements ready.
For another dessert where texture is central to the final result, see our guide to the secret to crunchy cookies.
Useful equipment
You will want two 8-inch square cake pans, parchment paper, mixing bowls, an electric mixer, cooling racks, an offset spatula, and a long serrated knife.
A kitchen scale is also useful. Measuring flour and cocoa by weight reduces variation between batches.
Amazon equipment opportunity: A pair of sturdy 8-inch square aluminum cake pans makes it much easier to create matching layers. Replace this Amazon search URL with your affiliate link before publishing.
For cleaner frosting, an offset cake spatula is another practical tool.
Step 1: Prepare the Pans Correctly
Heat the oven to 350°F (175°C).
Place a rack near the center of the oven. Grease two 8-inch square pans lightly. Line the bottoms with parchment, then lightly grease the parchment.
Do not skip the paper. The corners of a square cake are more vulnerable when you turn the layers out.
For the clean gift-box appearance in this recipe, intact corners matter.
Step 2: Mix the Chocolate Batter
In a large bowl, whisk together the flour, cocoa powder, sugar, baking powder, baking soda, and salt.
Break up every visible cocoa lump.
In another bowl, whisk the eggs, milk, vegetable oil, and vanilla. Pour the wet mixture into the dry ingredients.
Mix only until mostly combined.
Now slowly pour in the hot coffee while mixing on low speed. The finished batter will be quite thin. That is expected. Do not add extra flour because the batter looks looser than a traditional butter-cake batter.
Coffee-or-water chocolate cake batters can naturally be thin; comparable tested formulas also produce a loose batter before baking.
Divide the mixture as evenly as possible between the two pans.
Step 3: Bake Without Drying the Cake
Bake for approximately 28–34 minutes.
Start checking around 28 minutes because ovens vary.
The cake is ready when the center springs back after a light touch and a toothpick or thin knife inserted near the center comes out clean or with a few moist crumbs rather than wet batter. The edges may also begin to pull slightly from the pan. These physical signs are more useful than judging a dark chocolate cake by color.
Do not keep baking merely because the surface still looks very dark.
Amazon equipment opportunity: An instant-read digital kitchen thermometer can be useful for many baking projects, although visual and texture tests remain particularly important for cake doneness.
Let the layers sit in their pans for about 10–15 minutes. Carefully turn them onto cooling racks.
Remove the parchment.
Then wait.
The cakes need to become completely cool before frosting.
Step 4: Make Silky Chocolate Cream
Place the softened butter in a large mixing bowl.
Beat for about 2–3 minutes until creamy and lighter in texture.
Add the powdered sugar gradually. Do not dump it in at once. Follow with the sifted cocoa powder.
Mix initially at low speed.
Pour in most of the heavy cream, then add vanilla and salt. Increase the mixer to medium speed and beat until smooth.
Now check the consistency.
For this particular cake, the frosting cannot be too loose. It must support the layers and hold the vertical chocolate biscuits.
Lift some frosting with your spatula. It should form a soft peak without immediately sliding away.
If it is very stiff, add heavy cream 1 teaspoon at a time.
If it becomes too loose, add a little sifted powdered sugar or cocoa.
Step 5: Level the Cake Layers
This small step makes a large visual difference.
If your cakes have domed tops, trim them with a long serrated knife. You want flat surfaces.
Do not aggressively carve the corners. Those corners create the square silhouette.
For the tall layered appearance shown in this style of cake, you can carefully split each cooled 8-inch cake horizontally to create four thinner layers. This is the better choice when you want several visible chocolate-and-cream stripes after slicing.
If you prefer an easier build, keep the two cakes whole.
The four-layer version is more dramatic.
For another guide focused on dependable cake results, you can read our banana bread preparation guide for additional baking and cooling principles that apply to home baking.
Step 6: Assemble the Layers
Place the first layer on a square cake board or serving plate.
Spread an even layer of chocolate cream over it.
Add the next cake layer and gently press it into position. Repeat until the final layer is in place.
Check the cake from every side.
If it begins leaning, correct it now.
Spread a thin crumb coat over the entire cake. This first coat catches loose chocolate crumbs so they do not appear in the finished frosting.
Chill the cake for about 15–20 minutes, or until the coating feels firm.
Then apply the final chocolate frosting.
Keep the sides as straight as possible. They do not have to look flawless because the biscuit fingers will cover them.
Step 7: Build the Chocolate Biscuit-Finger Walls
This is the moment when an ordinary chocolate layer cake begins to look like a gift.
Chill the frosted cake for roughly 15 minutes first.
There is an important balance here. The frosting needs to be firm enough that the biscuits do not slide, but the surface must remain tacky enough for them to adhere.
Start at one corner.
Press one chocolate-covered biscuit finger vertically against the frosting. Place another directly beside it.
Continue along all four sides.
Keep the bottom edges aligned with the cake board. Try to keep the tops at approximately the same height.
Work gently. Pressing too hard can crack the biscuit coating or push frosting out between the pieces.
Amazon equipment opportunity: A rotating cake decorating turntable can make it easier to work around all four sides while keeping the biscuit rows straight.
Step 8: Create the Golden Crunch Topping
Now comes the fun part.
Cover the top generously with chocolate-coated malt balls and crispy chocolate bites.
Do not arrange everything into perfect rows. A slightly irregular pile creates the abundant candy-covered appearance.
Use the largest chocolate balls first. Fill spaces with smaller crispy bites and chocolate pearls. Finish with the golden crunchy pieces.
This size variation matters.
If every decoration is identical, the surface can look flat. Several sizes create the rich, piled-high effect associated with this chocolate gift cake.
Add delicate crunchy decorations as close to serving time as practical. Moisture can gradually soften some crisp toppings.
How to Get Clean, Beautiful Slices
Chill the assembled cake before slicing. A short rest in the refrigerator firms the butter-based frosting and makes the layers easier to cut.
Use a long, sharp knife.
Run the blade under hot water, wipe it completely dry, then make the first cut. Clean the knife between slices.
Do not saw aggressively through the cake.
The vertical biscuits can also make cutting directly through the exterior awkward. Depending on their placement, you can remove one or two biscuit fingers where you plan to cut.
That gives the knife a cleaner path into the cake.
Common Mistakes to Avoid
Frosting a warm cake: Even slightly warm layers can soften buttercream and make the structure unstable.
Adding more flour to thin batter: This chocolate batter is supposed to be fluid. Extra flour may make the cake dry.
Using warm buttercream: If the frosting is overly soft, the vertical biscuits may slide.
Skipping the crumb coat: Dark chocolate crumbs are easy to see in smooth frosting.
Making uneven layers: A tall square cake makes leaning much more obvious.
Attaching biscuits to very cold, hard frosting: They need something slightly tacky to grip.
Decorating the crunchy top too early: Some crispy pieces can lose texture as they sit against frosting.
If you enjoy learning the small details that change a dessert’s final texture, our guide on how to keep madeleines moist covers another common baking challenge.
Storage and Make-Ahead Tips
You can bake the chocolate layers ahead of time. Once completely cool, wrap them tightly so they do not dry out.
You can also chill cake layers before assembly. Cold layers are often easier to level and stack.
Once decorated, keep the cake covered and refrigerated when it needs extended storage, particularly because this is a layered, frosted cake. USDA storage guidance lists frosted cakes and layered tortes at about three days refrigerated.
For the best eating texture, allow a refrigerated slice some time to lose its refrigerator chill before serving. Butter-based frosting becomes considerably firmer when cold.
The crunchy decorations are best added relatively late if maintaining their crisp texture is a priority.
Golden Crunch Chocolate Gift Cake FAQs
Can I make this cake without coffee?
Yes. Replace the hot coffee with the same quantity of hot water. Coffee complements the cocoa, but the cake does not depend on it.
Why is my chocolate cake batter so thin?
The liquid level is intentional. Do not try to correct it by adding extra flour. Similar tested cocoa cakes made with coffee or water also use relatively fluid batters.
Can I make the cake the day before?
Yes. In fact, baking the layers ahead can make assembly easier. Cool them fully and wrap them well before storing.
How do I stop the biscuit fingers from falling off?
Use frosting with enough body, chill the frosted cake briefly, and attach the biscuits while the frosting remains slightly tacky. Press each biscuit gently rather than forcing it into the cake.
How many chocolate biscuit fingers do I need?
Plan on approximately 35–45 pieces for an 8-inch square cake, but buy extras. The final number varies with biscuit width and frosting thickness.
Can I make four layers instead of two?
Yes. Once completely cool, split each square cake horizontally with a serrated knife. Four thinner layers create the tall striped interior seen in elaborate celebration cakes.
What can I use instead of malted chocolate balls?
Use crisp chocolate bites, chocolate-covered cereal pieces, small truffles, chocolate pearls, or a combination. Keep several sizes so the top retains its textured appearance.
Why did my cake become dry?
Overbaking is a common cause. Do not rely only on time. Check for a springy center, slightly receding edges, and a clean tester. King Arthur Baking specifically recommends combining several doneness signals for chocolate cakes.
Print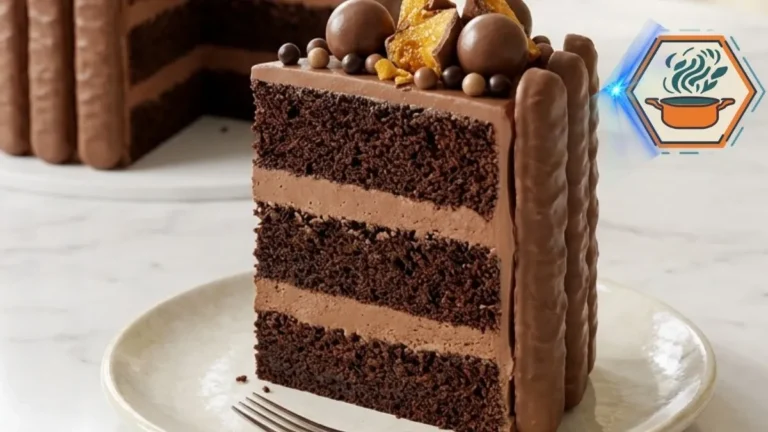
Golden Crunch Chocolate Gift Cake
A tall square chocolate celebration cake with moist chocolate layers, silky chocolate buttercream, vertical chocolate biscuit fingers, malted chocolate balls, crisp chocolate pearls, and golden crunchy pieces. Its gift-box appearance makes it a striking centerpiece for birthdays and special occasions.
- Total Time: approximately 2 hours 30 minutes
- Yield: 1 tall 8-inch square cake, approximately 16 servings
Ingredients
Chocolate Cake
- 2 cups (240 g) all-purpose flour
- 3/4 cup (64 g) unsweetened cocoa powder
- 1 3/4 cups (350 g) granulated sugar
- 2 teaspoons baking powder
- 1 1/2 teaspoons baking soda
- 1/2 teaspoon fine salt
- 2 large eggs, room temperature
- 1 cup (240 ml) whole milk, room temperature
- 1/2 cup (120 ml) neutral vegetable oil
- 2 teaspoons vanilla extract
- 1 cup (240 ml) hot brewed coffee or hot water
Chocolate Buttercream
- 1 1/2 cups (340 g) unsalted butter, softened
- 4 1/2 cups (540 g) powdered sugar
- 3/4 cup (64 g) unsweetened cocoa powder
- 1/3 cup (80 ml) heavy cream, plus more if needed
- 2 teaspoons vanilla extract
- 1/4 teaspoon fine salt
Chocolate Crunch Decoration
- 35–45 chocolate-covered biscuit fingers
- 3 cups assorted chocolate-coated malt balls and crispy chocolate bites
- 1/2 cup small chocolate pearls
- 1/4 cup golden crunchy sprinkles, crisp pieces, or small edible stars
Instructions
- Prepare the oven and pans. Preheat the oven to 350°F (175°C). Lightly grease two 8-inch square cake pans. Line their bottoms with parchment paper and lightly grease the paper.
- Combine the dry ingredients. In a large bowl, whisk the flour, cocoa powder, sugar, baking powder, baking soda, and salt until evenly combined. Break apart any visible cocoa lumps.
- Add the wet ingredients. Add the eggs, milk, vegetable oil, and vanilla. Mix on low speed until mostly combined.
- Add the hot liquid. Slowly pour in the hot coffee while mixing on low. The batter will become thin. This is normal and should not be corrected with additional flour.
- Divide the batter. Pour equal amounts into the two prepared square pans. A kitchen scale can help create layers of equal thickness.
- Bake. Bake for 28–34 minutes. Begin checking at 28 minutes. The cakes are ready when the centers spring back lightly and a tester inserted near the center comes out clean or with a few moist crumbs.
- Cool. Leave the cakes in their pans for 10–15 minutes. Carefully turn them onto cooling racks, remove the parchment, and allow them to cool completely.
- Make the chocolate buttercream. Beat the softened butter for 2–3 minutes until creamy. Gradually beat in the powdered sugar and cocoa. Add the heavy cream, vanilla, and salt. Beat until smooth and fluffy. The frosting should hold a soft peak.
- Create four layers. For the tall appearance shown in the finished cake, carefully slice each completely cooled square cake horizontally into two even layers using a long serrated knife. You will have four cake layers.
- Fill the cake. Put the first layer on a square cake board. Spread an even layer of chocolate buttercream over it. Repeat with the remaining layers.
- Crumb coat. Spread a thin layer of buttercream over the top and four sides. Refrigerate for 15–20 minutes.
- Final frosting. Apply another layer of chocolate buttercream. Keep the sides reasonably straight so the biscuit fingers sit vertically.
- Chill briefly. Refrigerate for about 15 minutes. The frosting should become firmer but remain slightly tacky.
- Attach the biscuit fingers. Starting at one corner, gently press the chocolate-covered biscuit fingers vertically against the four sides. Keep them close together and their bottom edges level.
- Decorate the top. Arrange the larger malted chocolate balls first. Fill the gaps with smaller chocolate bites and pearls. Scatter the golden crunchy pieces between them.
- Set before cutting. Chill briefly if the cake feels unstable. For cleaner portions, use a sharp knife warmed in hot water and wiped completely dry between cuts.
Notes
- Do not add extra flour because the batter appears thin.
- Hot coffee deepens the chocolate character. Hot water can be substituted 1:1.
- Cakes must be completely cool before frosting.
- For the visual appearance of the reference cake, split the two baked cakes into four layers.
- Chill the crumb-coated cake before applying the final frosting.
- The final buttercream must be firm enough to support the biscuit fingers.
- If the frosting becomes too stiff, add heavy cream 1 teaspoon at a time.
- If it becomes too loose, add a small amount of sifted powdered sugar.
- Purchase extra biscuit fingers because some may break.
- Add the crisp topping close to serving time for the best crunch.
- Ingredient brands and the exact quantity of decorations can change nutrition substantially.
- Prep Time: 45 minutes
- Additional cooling/chilling time: 1 hour 15 minutes
- Cook Time: 28–34 minutes
- Category: Dessert
- Method: Baking
- Cuisine: American-inspired
A Chocolate Cake Designed to Be Remembered
The pleasure of the Golden Crunch Chocolate Gift Cake comes from what happens before and after the first cut.
Before cutting, it resembles a chocolate-covered present. Straight biscuit fingers form its walls. Chocolate spheres cover the top. Small golden pieces catch the light.
Then the knife reveals what the decoration has been hiding: alternating layers of dark, moist chocolate cake and silky chocolate cream.
The design may look ambitious, but none of its individual steps requires advanced pastry skills. Give the cake enough time to cool. Keep the frosting firm. Chill between stages. Build the biscuit border patiently. Add the crunchy chocolate topping last.
Those small details turn a simple chocolate layer cake into a centerpiece that looks worthy of a birthday, anniversary, holiday table, or any occasion that deserves something a little more special.