
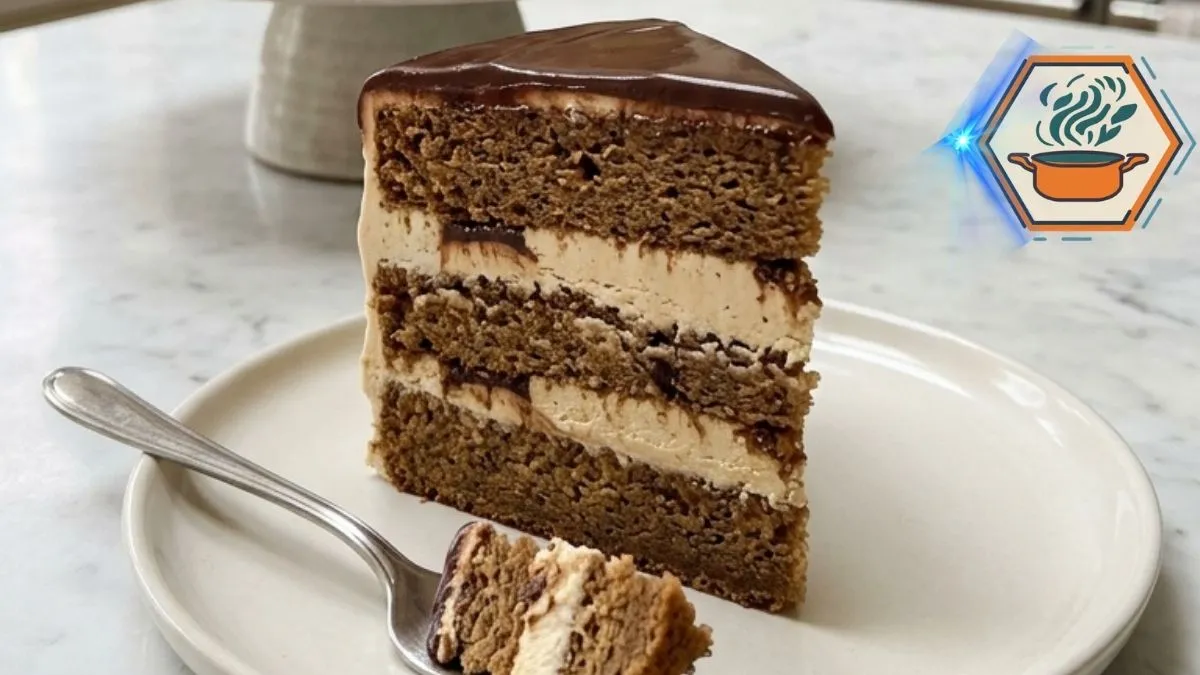
The first thing you notice about this Coffee Chocolate Truffle Cream Cake is its height. Then comes the glossy chocolate dripping over the pale coffee cream. Cut into it, and the real surprise appears: three soft espresso cake layers separated by thick mascarpone cream and darker ribbons of cocoa-coffee filling.
This is the kind of cake I picture sitting in the middle of the table before anyone has touched dessert. Someone asks whether it really tastes as rich as it looks. Then the first slice comes out. The answer is in those layers. Coffee keeps the sweetness in check, mascarpone gives the filling a soft dairy richness, and semisweet chocolate adds a deeper finish without hiding the espresso.
There is also some useful baking science behind the recipe. Correct flour measurement matters because adding too much flour is one of the easiest ways to produce a dry, heavy cake. For more baking fundamentals, the King Arthur Baking ingredient-weight guide is a useful reference when converting volume measurements to weights.
Food handling matters too because this cake contains mascarpone and whipped cream. Once assembled, it belongs in the refrigerator. The USDA food-safety resources provide guidance on refrigeration and safe food handling.
This recipe takes a little time, but none of the individual parts is unusually difficult. The secret is temperature control. Cool cake, cold mascarpone cream, cooled ganache, and a final refrigerator rest create the clean, tall slice we want.
Affiliate disclosure: As an Amazon Associate I earn from qualifying purchases. This article may contain affiliate links to kitchen tools I find useful for preparing this recipe.
JUMP TO
Why This Coffee Chocolate Truffle Cream Cake Works
Coffee and chocolate naturally complement each other. Espresso brings roasted, slightly bitter notes that balance chocolate and sugar.
But flavor is only half of this cake.
Texture matters just as much.
The finished dessert combines:
- Soft, tender espresso cake layers
- Thick but airy mascarpone coffee cream
- Darker cocoa-coffee filling
- Smooth semisweet chocolate ganache
- Toasted hazelnuts
- Firm, crunchy-coated coffee chocolate truffles
- Fine chocolate shavings
The sour cream in the batter also plays an important role. It contributes moisture and acidity while giving the cake a tender crumb.
This isn’t meant to be a dense chocolate mud cake. The cake itself stays relatively light so that the cream, chocolate, and hazelnut elements can provide the richer textures.
If you enjoy learning how ingredients change cakes, our guide to the difference between butter cakes is a useful companion read.
Ingredients You’ll Need
Coffee Cake Layers
- 2½ cups (about 300 g) all-purpose flour
- 2¼ teaspoons baking powder
- ½ teaspoon baking soda
- ½ teaspoon fine salt
- ¾ cup (170 g) unsalted butter, softened
- 1¾ cups (350 g) granulated sugar
- 4 large eggs, room temperature
- 1 cup (240 ml) whole milk
- ½ cup (120 g) full-fat sour cream
- 2 tablespoons instant espresso powder
- 2 teaspoons vanilla extract
Use espresso powder that dissolves readily. Large coffee granules can leave dark specks and uneven pockets of flavor.
Mascarpone Coffee Cream
- 16 oz (454 g) cold mascarpone
- 2 cups (480 ml) cold heavy whipping cream
- ¾ cup (90 g) powdered sugar, sifted
- 2 teaspoons instant espresso powder
- 2 teaspoons vanilla extract
- Pinch of fine salt
Cocoa-Coffee Filling
- 1 cup prepared mascarpone coffee cream
- 2 tablespoons unsweetened cocoa powder, sifted
- 1 teaspoon instant espresso powder
Sifting the cocoa is worth the extra few seconds. Dry cocoa lumps become much harder to remove after they meet thick mascarpone cream.
Chocolate Ganache
- 8 oz (225 g) semisweet chocolate, finely chopped
- ¾ cup (180 ml) heavy cream
Coffee-Hazelnut Truffles
- 6 oz (170 g) semisweet chocolate, finely chopped
- ⅓ cup (80 ml) heavy cream
- 1 teaspoon instant espresso powder
- ¾ cup finely chopped toasted hazelnuts
Decoration
- 2 oz (55 g) dark or semisweet chocolate
- ½ cup chopped toasted hazelnuts
- 5–7 coffee-hazelnut truffles
Equipment That Makes the Job Easier
Three matching 8-inch pans make the layers much easier to bake evenly. If your pans have different materials or colors, baking times can vary.
A useful setup includes an electric mixer, three round cake pans, parchment paper, a cooling rack, offset spatula, digital kitchen scale, and a long sharp knife.
For readers building their baking kit, you can browse 8-inch round cake pans on Amazon.
A scale is especially useful here because three equal portions of batter produce a much cleaner final cake. You can find digital kitchen scales on Amazon.
Step 1: Prepare the Pans and Oven
Set an oven rack near the center.
Preheat the oven to 350°F (175°C).
Grease three 8-inch round cake pans lightly. Add parchment circles to the bottoms. Grease the parchment as well.
Do not skip the parchment. These layers are soft, and a cake sticking to the bottom can break when you turn it out.
For the most consistent result, weigh the empty mixing bowl first. After making the batter, weigh it again and subtract the bowl weight. Divide the remaining number by three.
That tells you exactly how much batter belongs in each pan.
Step 2: Make the Coffee Milk
Take about ¼ cup of the measured milk and warm it.
It should be warm enough to dissolve the espresso powder, but it does not need to boil.
Stir in the 2 tablespoons of espresso powder until no obvious granules remain. Add this mixture back to the remaining milk.
Allow it to return close to room temperature.
Adding very hot liquid directly to creamed butter can soften the butter too much and change the batter’s structure.
Step 3: Mix the Dry Ingredients
Whisk together the flour, baking powder, baking soda, and salt.
For more reliable results, weigh the flour.
If you don’t own a scale, loosen the flour first. Spoon it into the measuring cup and level the surface with a straight edge. Don’t push the cup directly into a packed bag of flour.
Too much flour can turn those soft layers into dry ones.
Step 4: Cream the Butter and Sugar Properly
Place the softened butter and granulated sugar in a large bowl.
Beat for about 3–4 minutes at medium speed.
Don’t judge this step by time alone. The butter should become paler and visibly fluffier.
Your butter should be soft enough to indent when gently pressed, but it should not look greasy or partially melted.
A stand mixer makes this stage and the frosting easier. Readers who bake frequently can browse stand mixers on Amazon.
Add the eggs one at a time.
Mix briefly after each egg. Scrape the bottom and sides of the bowl when needed.
Add the vanilla.
Step 5: Finish the Espresso Cake Batter
Use low mixer speed from this point.
Add roughly one-third of the dry ingredients.
Follow with half of the coffee-milk mixture.
Repeat.
Finish with the final portion of dry ingredients.
Fold in the sour cream by hand or mix it very briefly on low.
Stop when the batter is uniform.
Once flour becomes wet, prolonged mixing can create a tougher texture. A few final folds with a spatula are safer than another minute with the mixer.
Divide the batter equally between your three prepared pans.
Smooth the tops.
Step 6: Bake Without Drying the Layers
Bake for approximately 23–28 minutes.
Start checking around 22–23 minutes because ovens vary.
The cakes are ready when the centers spring back lightly and a toothpick inserted near the center comes out with a few moist crumbs rather than liquid batter.
Avoid waiting for the cake to become deeply browned or completely dry around the edges.
Leave the cakes in their pans for 10 minutes.
Then carefully turn them onto wire racks and remove the parchment.
Cool them completely.
Never add mascarpone cream to a warm cake.
Step 7: Make the Mascarpone Coffee Cream
This is the stage where temperature becomes especially important.
Keep the mascarpone and heavy cream refrigerated until you need them.
Place the mascarpone, sifted powdered sugar, espresso powder, vanilla, and salt into the mixing bowl.
Mix briefly on low to medium-low speed.
You are only trying to make the mixture smooth.
Slowly pour in the cold heavy cream while mixing. Increase the speed gradually and whip until the cream becomes thick enough to hold defined peaks.
Then stop.
Mascarpone doesn’t benefit from aggressive mixing. Excessive beating can make the mixture grainy or cause it to separate.
The finished frosting should hold on a spatula without running.
Step 8: Make the Dark Cocoa-Coffee Filling
Reserve 1 cup of your mascarpone coffee cream.
Sift 2 tablespoons cocoa powder over it.
Add 1 teaspoon espresso powder.
Fold gently until the mixture is evenly chocolate-colored.
For the appearance in our cake, don’t make this layer excessively thick. It should create a darker band through the pale cream rather than dominate the entire filling.
Step 9: Make the Coffee-Hazelnut Truffles
These little truffles are more than decoration. They add the crunchy finish that the soft cake needs.
Put the finely chopped semisweet chocolate and espresso powder in a heatproof bowl.
Heat ⅓ cup heavy cream until steaming and just beginning to simmer around the edges.
Pour it over the chocolate.
Wait 2 minutes.
Stir slowly from the center outward until the ganache becomes smooth.
Refrigerate until firm enough to scoop and roll. Depending on your refrigerator and chocolate, this may take about 1–2 hours.
Toast the hazelnuts before chopping them. Toasting makes their flavor deeper and gives the coating a better crunch.
Scoop small portions of ganache. Roll them quickly between cool hands, then immediately coat them in the finely chopped hazelnuts.
They don’t need to be perfectly round. Slightly irregular truffles give the finished cake a more natural appearance.
Keep them refrigerated until decorating time.
Step 10: Assemble the Cake
If the cooled cake layers have pronounced domes, trim them carefully with a serrated knife.
Place the first layer on your serving plate or cake board.
Add a generous layer of mascarpone coffee cream.
Spread it almost to the edge.
Now add part of the cocoa-coffee cream in irregular streaks across the mascarpone layer. Lightly spread them together without completely blending the two colors.
Add the second cake layer.
Repeat the cream and cocoa-coffee filling.
Place the third cake layer on top.
Look at the cake from eye level. Correct any obvious leaning before frosting the outside.
Step 11: Frost the Tall Cake
Spread mascarpone coffee cream over the top and sides.
The coating should be thick enough to hide most of the cake but still look soft and creamy.
For cleaner sides, apply a thin first coat and refrigerate the cake for about 20–30 minutes. Then add the final cream layer.
An offset spatula makes this much easier. You can browse cake offset spatulas on Amazon.
Don’t chase absolute perfection. The reference style is polished but still generous and homemade.
Chill the frosted cake while preparing the ganache.
Step 12: Make the Glossy Chocolate Ganache
Finely chop 8 oz of semisweet chocolate and place it in a heatproof bowl.
Heat ¾ cup heavy cream until steaming and just beginning to simmer.
Pour the cream over the chocolate.
Wait for 2 minutes before stirring.
Then stir slowly until glossy.
Now comes an important detail that can make or break the finished appearance.
Do not pour hot ganache over mascarpone frosting.
Let it cool until it is still fluid but no longer hot. Test a small drip before covering the entire cake.
If it races down the side like chocolate milk, it is too warm or thin.
If it barely moves, it has cooled too far.
The correct consistency should form slow, rounded drips.
Step 13: Create the Chocolate Drip Finish
Remove the cold cake from the refrigerator.
Test one small spoonful of ganache at the back edge.
If the drip stops partway down the cake, continue.
Create several drips around the edge first. They should vary naturally in length.
Pour or spoon the remaining ganache onto the center and gently spread it toward the edges.
Finish with chocolate shavings.
Pile 5–7 coffee-hazelnut truffles loosely in the center and scatter a few toasted hazelnut pieces nearby.
That combination gives us the same visual character: pale coffee cream, a dark glossy crown, chocolate shavings, nut-coated truffles, and dramatic drips.
If chocolate work is something you want to practice further, our guide to caramelizing sugar covers another useful dessert technique.
The Most Important Step: Chill Before Slicing
The cake may look finished, but don’t cut it yet.
Refrigerate it for at least 2 hours.
A longer chill of around 4 hours can make slicing even easier.
The cold allows the cream and ganache to firm up. It also gives the tall structure more stability.
For the dramatic clean slice shown here, fill a tall container with hot water and dip a long sharp knife into it.
Dry the blade.
Make one straight downward cut.
Clean and warm the knife again before the next cut.
Don’t saw aggressively through the cake. Long downward cuts preserve the visible cream and chocolate bands.
How to Store Coffee Chocolate Truffle Cream Cake
Because the frosting contains mascarpone and heavy cream, store the cake covered in the refrigerator.
For the best texture, I prefer making the cake layers first and assembling the cake either later that day or the day before serving.
You can also prepare the truffle centers ahead.
For another make-ahead baking example, see our banana bread preparation guide.
Before serving, you can let an individual slice sit briefly outside the refrigerator. The cake crumb and chocolate become softer as they lose some of their refrigerator chill.
Common Mistakes to Avoid
A tall cream cake usually fails because of small details rather than one dramatic mistake.
Watch for these problems:
- Warm cake layers: They can soften or melt the mascarpone cream.
- Warm ganache: It can damage the exterior frosting.
- Overbeaten mascarpone: The cream can become grainy or split.
- Too much flour: It makes the cake drier and heavier.
- Overmixed batter: It can produce a tougher crumb.
- Unequal pans: Different quantities of batter produce uneven layers.
- Skipping the final chill: The cake becomes harder to cut cleanly.
- Untoasted hazelnuts: You lose much of the nutty aroma and crunch.
- Large chocolate pieces in ganache: They may not melt before the cream cools.
- Cutting with a cold, dirty knife: Cream and ganache smear across the layers.
These details don’t make the recipe more complicated. They make the result more predictable.
What Does Coffee Chocolate Truffle Cream Cake Taste Like?
Think of it as a meeting point between an espresso layer cake, a chocolate truffle dessert, and some of the flavors people associate with tiramisu.
It isn’t tiramisu, though.
There are no ladyfingers here. Instead, we have proper butter-based coffee cake layers.
The mascarpone provides that familiar creamy richness. Espresso runs through both cake and cream. Cocoa creates darker pockets inside. Semisweet chocolate brings a more intense finish.
Finally, toasted hazelnuts break up all that softness with a crisp bite.
That contrast is what makes the cake memorable.
Frequently Asked Questions
Can I make Coffee Chocolate Truffle Cream Cake the day before?
Yes. In fact, assembling it the day before can make serving easier. Keep the finished cake covered and refrigerated. Add delicate final decorations close to serving if you want them to look their freshest.
Why did my mascarpone cream become grainy?
The most common causes are overmixing and temperature problems. Use cold mascarpone and cold heavy cream. Mix only until the frosting becomes thick enough to hold its shape.
Can I use regular instant coffee instead of espresso powder?
You can, but the flavor may be milder and the granules may dissolve differently. Instant espresso powder is the better choice when you want a distinct coffee flavor without adding much liquid.
Why is my chocolate ganache melting the frosting?
The ganache was probably too warm. The mascarpone-coated cake should be cold, while the ganache should be cooled to a thick but still pourable consistency before you create the drips.
Can I make the cake without hazelnuts?
Yes. Leave the hazelnuts out if necessary. You can coat the truffles with cocoa powder, finely grated chocolate, or chocolate crumbs instead. The appearance and texture will change slightly.
How do I get clean cake slices?
Chill the assembled cake thoroughly. Warm a sharp knife in hot water, wipe it completely dry, and cut straight downward. Clean and rewarm the blade between slices.
Print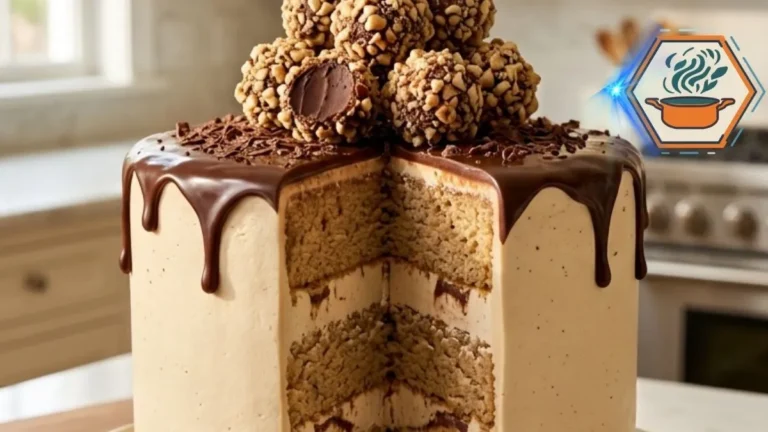
Coffee Chocolate Truffle Cream Cake
A tall Coffee Chocolate Truffle Cream Cake with three tender espresso cake layers, fluffy mascarpone coffee cream, cocoa-coffee filling, glossy chocolate ganache, toasted hazelnuts, and homemade coffee-hazelnut truffles. Rich and creamy with tiramisu-inspired flavors, yet firm enough to cut into beautiful layered slices.
- Total Time: 5 hours 58 minutes
- Yield: 1 tall 8-inch cake / about 16 slices
Ingredients
Coffee Cake Layers
- 2½ cups (300 g) all-purpose flour
- 2¼ teaspoons baking powder
- ½ teaspoon baking soda
- ½ teaspoon fine salt
- ¾ cup (170 g) unsalted butter, softened but not melted
- 1¾ cups (350 g) granulated sugar
- 4 large eggs, room temperature
- 1 cup (240 ml) whole milk
- ½ cup (120 g) full-fat sour cream
- 2 tablespoons instant espresso powder
- 2 teaspoons vanilla extract
Mascarpone Coffee Cream
- 16 oz (454 g) mascarpone cheese, cold
- 2 cups (480 ml) heavy whipping cream, very cold
- ¾ cup (90 g) powdered sugar, sifted
- 2 teaspoons instant espresso powder
- 2 teaspoons vanilla extract
- 1 pinch fine salt
Cocoa-Coffee Filling
- 1 cup prepared mascarpone coffee cream, reserved from above
- 2 tablespoons unsweetened cocoa powder, sifted
- 1 teaspoon instant espresso powder
Chocolate Ganache
- 8 oz (225 g) semisweet chocolate, finely chopped
- ¾ cup (180 ml) heavy cream
Coffee-Hazelnut Truffles
- 6 oz (170 g) semisweet chocolate, finely chopped
- ⅓ cup (80 ml) heavy cream
- 1 teaspoon instant espresso powder
- ¾ cup finely chopped toasted hazelnuts
Decoration
- 2 oz (55 g) dark or semisweet chocolate, shaved
- ½ cup chopped toasted hazelnuts
- 5–7 prepared coffee-hazelnut truffles
Instructions
- Preheat the oven to 350°F (175°C). Position a rack in the center of the oven.
- Lightly grease three 8-inch round cake pans. Line the bottoms with parchment circles, then lightly grease the parchment.
- Warm about ¼ cup of the measured whole milk. Stir in 2 tablespoons espresso powder until completely dissolved. Combine it with the remaining milk and allow it to cool close to room temperature.
- Whisk the flour, baking powder, baking soda, and salt together in a medium bowl.
- In a large mixing bowl, beat the softened butter and granulated sugar for 3–4 minutes, until pale and fluffy.
- Add the eggs one at a time, mixing briefly after each addition. Scrape the sides and bottom of the bowl as needed. Mix in the vanilla.
- On low speed, add about one-third of the flour mixture. Add half of the coffee-milk mixture. Repeat, finishing with the remaining flour.
- Fold in the sour cream only until the batter is smooth. Avoid prolonged mixing once the flour has been incorporated.
- Divide the batter evenly among the three pans. For the most even layers, weigh the batter and divide its weight by three.
- Bake for 23–28 minutes, or until the centers spring back gently and a toothpick inserted in the center comes out with a few moist crumbs.
- Let the cakes cool in their pans for 10 minutes. Turn them onto cooling racks, remove the parchment, and cool completely before assembling.
- Prepare the mascarpone cream. Place the cold mascarpone, powdered sugar, espresso powder, vanilla, and salt in a chilled mixing bowl. Mix briefly on low speed until smooth.
- Slowly pour in the cold heavy cream. Increase the mixer speed gradually and whip only until thick, fluffy peaks form. Stop immediately once the cream holds its shape.
- Reserve 1 cup of the mascarpone cream. Fold the sifted cocoa powder and extra teaspoon of espresso powder into this portion to create the darker cocoa-coffee filling.
- Make the truffles. Put 6 oz chopped chocolate and 1 teaspoon espresso powder in a heatproof bowl.
- Heat ⅓ cup cream until steaming and beginning to simmer around the edges. Pour it over the chocolate. Wait 2 minutes, then stir slowly until glossy and smooth.
- Refrigerate the truffle mixture until firm enough to scoop, approximately 1–2 hours.
- Scoop small portions and roll them quickly into balls. Coat each one generously with finely chopped toasted hazelnuts. Refrigerate until needed.
- If necessary, level any pronounced domes from the completely cooled cake layers with a serrated knife.
- Place the first cake layer on a serving plate or cake board. Spread it with mascarpone coffee cream.
- Add irregular streaks of cocoa-coffee cream across the filling without completely mixing the two colors together.
- Add the second cake layer and repeat. Finish with the third layer.
- Spread mascarpone coffee cream over the top and sides. For a cleaner finish, apply a thin crumb coat first and refrigerate for 20–30 minutes, then apply the final coat.
- Refrigerate the frosted cake while preparing the ganache.
- Put 8 oz finely chopped chocolate in a heatproof bowl. Heat ¾ cup heavy cream until steaming and beginning to simmer around the edges.
- Pour the hot cream over the chocolate. Leave untouched for 2 minutes. Stir gently from the center outward until smooth and glossy.
- Let the ganache cool until thick but pourable. Do not pour hot ganache over mascarpone cream. Professional ganache guidance likewise calls for cooling ganache before applying it to a finished cake.
- Test one drip on the back of the chilled cake. It should travel slowly down the side and stop before reaching the bottom.
- Spoon ganache around the edge to produce natural drips of different lengths. Spread the remaining ganache over the top.
- Add chocolate shavings, chopped toasted hazelnuts, and 5–7 coffee-hazelnut truffles in a loose cluster in the center.
- Refrigerate the completed cake for at least 2 hours, preferably about 4 hours, before slicing.
- For clean slices, dip a long sharp knife into hot water, wipe it completely dry, and cut straight downward. Clean and rewarm the knife between slices.
Notes
- Keep mascarpone and heavy cream cold. Warm ingredients make the cream less stable.
- Do not aggressively whip mascarpone. Stop once the cream forms firm enough peaks to hold its shape.
- The cake layers must be completely cool before frosting.
- Sift powdered sugar and cocoa powder to prevent lumps.
- Weighing the batter into three equal portions creates more uniform cake layers.
- Finely chop the chocolate before adding hot cream. Smaller pieces melt more evenly.
- Toast the hazelnuts before chopping them. This improves both aroma and crunch.
- Do not pour hot ganache onto the mascarpone coating.
- Test the ganache on a small hidden area before creating all the drips.
- Chill the completed cake before cutting. This is particularly important for the tall slice shown in the reference image.
- Because this cake contains mascarpone and whipped cream, keep it refrigerated. A mascarpone-containing cake is generally best refrigerated and consumed within roughly 3–4 days.
- Results can vary slightly depending on the fat content of the mascarpone and cream, the cocoa percentage of the chocolate, room temperature, oven calibration, and ingredient brands.
- Prep Time: 1 hour 30 minutes
- Additional/Chilling Time: 4 hours
- Cook Time: 28 minutes
- Category: Dessert
- Method: Baking
- Cuisine: American-inspired
Final Baking Notes
The Coffee Chocolate Truffle Cream Cake looks elaborate because every layer has a purpose. Yet it becomes manageable when you treat it as several small recipes instead of one giant project.
Bake and cool the three espresso layers. Make the truffles while the cakes cool. Whip the cold mascarpone coffee cream. Turn a portion into cocoa-coffee filling. Stack and chill. Then add the cooled chocolate ganache, shavings, toasted hazelnuts, and truffles.
Most importantly, respect the temperatures.
Cold cream. Completely cooled cake. Chilled frosting. Cooled ganache. Final refrigerator rest.
Those details give you a cake that can stand tall and still remain creamy inside.
And when that first slice is lifted away, you get exactly what this dessert promises: soft coffee cake, thick pale mascarpone cream, darker chocolate-coffee layers, glossy ganache, and a crunchy hazelnut finish.
It is a cake made for the moment when coffee and chocolate simply aren’t enough on their own—and you decide to have both.