
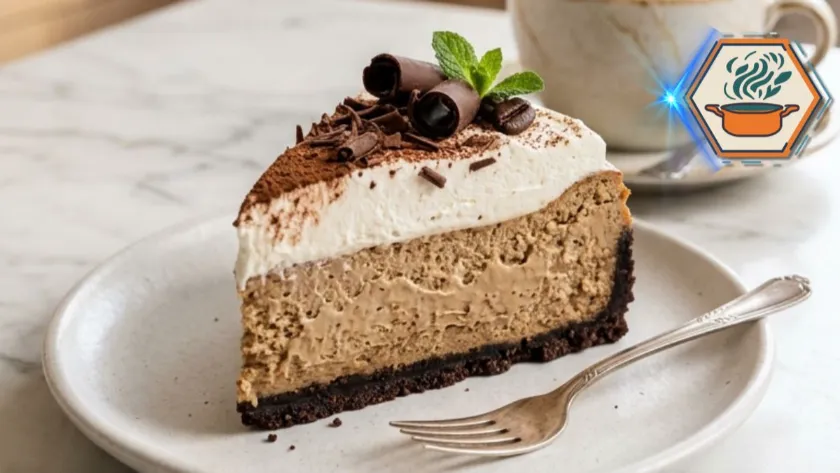
If your perfect afternoon includes a freshly brewed cup of coffee and a creamy slice of cheesecake, this Creamy Coffee Cheesecake will quickly become your favorite homemade dessert. It combines everything coffee lovers enjoy in one elegant treat: a buttery chocolate cookie crust, a silky espresso cheesecake filling, a light coffee cream layer, and fluffy whipped cream on top.
The best part is that this recipe requires no baking. After a few simple steps and enough chilling time, you’ll have a dessert that looks like it came straight from a café display case. Whether you’re preparing it for a birthday, brunch, holiday dinner, or simply to satisfy your coffee craving, this cheesecake always impresses.
If you enjoy creamy desserts, you may also like our guide to What Is Crème Brûlée Made Of? on RecipesMind, where you’ll discover another classic dessert loved for its silky texture.
JUMP TO
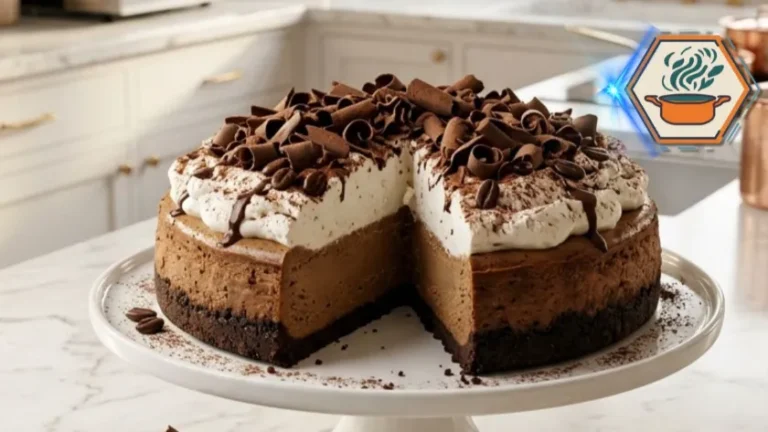
Creamy Coffee Cheesecake
This Creamy Coffee Cheesecake features a buttery chocolate cookie crust, a silky espresso-infused cheesecake filling, a fluffy coffee cream layer, and homemade whipped cream. This elegant no-bake dessert is perfect for coffee lovers and ideal for birthdays, brunches, holidays, or any special occasion.
- Total Time: 6 hours 25 minutes
- Yield: 12 slices
Ingredients
Chocolate Cookie Crust
- 2½ cups (250 g) finely crushed chocolate sandwich cookies
- ½ cup (113 g) unsalted butter, melted
- 1 tbsp granulated sugar (optional)
- ¼ tsp fine salt
Coffee Cheesecake Layer
- 8 oz (226 g) full-fat cream cheese, softened
- 1 cup powdered sugar
- 2 tbsp instant espresso powder
- 1 tbsp hot water
- 1 tsp pure vanilla extract
Coffee Cream Layer
- 1 cup whipped topping
- 1 tbsp instant espresso powder
Whipped Cream Layer
- 2 cups cold heavy whipping cream
- 2 tbsp powdered sugar
- 1 tsp vanilla extract
Decoration
- Chocolate curls
- Cocoa powder
- Whole espresso beans
Instructions
Lightly grease a 9-inch springform pan with butter or non-stick spray.
Step 2
Mix the crushed chocolate cookies, melted butter, sugar, and salt until evenly combined.
Step 3
Firmly press the mixture into the bottom of the pan using the bottom of a measuring cup to create a compact crust.
Step 4
Refrigerate the crust for 20 minutes while preparing the filling.
Step 5
Dissolve the espresso powder in hot water and allow it to cool for 5 minutes.
Step 6
Beat the softened cream cheese on medium speed for about 3 minutes until perfectly smooth.
Step 7
Gradually mix in the powdered sugar.
Step 8
Add the vanilla extract and dissolved espresso mixture.
Continue mixing until silky smooth.
Step 9
Spread the cheesecake filling evenly over the chilled crust.
Smooth the surface using an offset spatula.
Step 10
Mix the whipped topping with espresso powder until fully combined.
Spread gently over the cheesecake layer.
Step 11
Whip the heavy cream with powdered sugar and vanilla until stiff peaks form.
Do not overbeat.
Step 12
Spread the whipped cream over the coffee layer.
Step 13
Decorate with chocolate curls, cocoa powder, and espresso beans.
Step 14
Cover loosely with plastic wrap.
Refrigerate for at least 6 hours or overnight before slicing.
Notes
✔ Use full-fat cream cheese for the creamiest texture.
✔ Always soften the cream cheese before mixing to avoid lumps.
✔ Chill the mixing bowl before whipping the cream.
✔ A full overnight chill provides the best texture and flavor.
✔ For clean slices, dip the knife in hot water and wipe dry between cuts.
✔ High-quality instant espresso powder creates a richer coffeehouse flavor.
- Prep Time: 25 minutes
- Cook Time: 0 minutes
- Category: Dessert
- Method: No-bake
- Cuisine: American
Why You’ll Love This Creamy Coffee Cheesecake
There are countless cheesecake recipes available, but this one stands out because it balances rich coffee flavor with a light and creamy texture.
You’ll love this recipe because:
- No oven is required.
- Rich espresso flavor in every bite.
- Smooth and creamy texture.
- Perfect for beginners.
- Easy to prepare ahead of time.
- Beautiful presentation for any occasion.
- Customizable with different toppings.
Each layer complements the others, creating a dessert that tastes luxurious without being overly complicated.
Ingredients
Chocolate Cookie Crust
- 2½ cups crushed chocolate sandwich cookies
- ½ cup unsalted butter, melted
- 1 tablespoon granulated sugar (optional for extra firmness)
- Pinch of salt
Why add sugar and salt?
Although many recipes skip these ingredients, a small amount of sugar helps the crust hold together while the pinch of salt enhances the chocolate flavor.
Coffee Cheesecake Layer
- 8 ounces full-fat cream cheese, softened
- 1 cup powdered sugar
- 2 tablespoons instant espresso powder
- 1 tablespoon hot water
- 1 teaspoon pure vanilla extract
Coffee Cream Layer
- 1 cup whipped topping
- 1 tablespoon instant espresso powder
Whipped Cream Layer
- 2 cups cold heavy whipping cream
- 2 tablespoons powdered sugar
- 1 teaspoon vanilla extract
Decoration
- Chocolate curls
- Cocoa powder
- Whole espresso beans
Kitchen Equipment
Having the right tools makes the process much easier.
You’ll need:
- 9-inch springform pan
- Electric mixer
- Mixing bowls
- Rubber spatula
- Measuring cups
- Offset spatula
- Fine sieve for cocoa powder
- Food processor or rolling pin for crushing cookies
Step-by-Step Instructions
Step 1: Prepare the Chocolate Crust
Crush the chocolate sandwich cookies until they resemble fine crumbs.
Mix them with the melted butter, sugar, and salt until every crumb is coated.
The texture should resemble wet sand.
Press the mixture firmly into the bottom of a springform pan.
Use the bottom of a measuring cup to compress the crust evenly.
This step is important because a loosely packed crust may crumble when sliced.
Place the pan in the refrigerator for at least 20 minutes.
Step 2: Prepare the Espresso Mixture
Mix the instant espresso powder with one tablespoon of hot water.
Stir until completely dissolved.
Allow it to cool slightly before adding it to the cream cheese mixture.
Using dissolved espresso instead of dry powder creates a smoother filling without small coffee granules.
Step 3: Make the Cheesecake Filling
Beat the softened cream cheese for about three minutes until completely smooth.
Never use cold cream cheese because it creates lumps that are difficult to remove.
Gradually add the powdered sugar.
Pour in the vanilla extract.
Add the cooled espresso mixture.
Continue mixing until the filling becomes silky and creamy.
Scrape down the sides of the bowl several times to ensure everything is evenly combined.
Spread the filling evenly over the chilled cookie crust.
Smooth the top with an offset spatula.
Step 4: Prepare the Coffee Cream Layer
Fold the espresso powder into the whipped topping until fully combined.
Avoid overmixing.
Gently spread this layer over the cheesecake filling.
Working slowly prevents the two layers from mixing together.
Step 5: Whip the Cream
Place the mixing bowl and beaters in the freezer for about 15 minutes before whipping.
Cold equipment helps heavy cream whip faster.
Beat the heavy cream with powdered sugar and vanilla until stiff peaks form.
Be careful not to overwhip, or the cream may become grainy.
Spread the whipped cream over the coffee layer using gentle strokes.
Step 6: Decorate
Finish your cheesecake with:
- Chocolate curls
- A light dusting of cocoa powder
- Whole espresso beans
The decoration gives the dessert its elegant coffeehouse appearance.
Step 7: Chill
Cover the cheesecake loosely.
Refrigerate for at least six hours.
For the best texture, let it chill overnight.
The flavors continue developing during this time, resulting in an even richer dessert.
Tips for Success
Use Full-Fat Cream Cheese
Reduced-fat cream cheese contains more water and produces a softer filling.
Full-fat cream cheese gives the richest texture.
Softened Ingredients Matter
Take the cream cheese out of the refrigerator about one hour before starting.
Soft ingredients blend more smoothly.
Use High-Quality Espresso Powder
Since coffee is the main flavor, choosing a premium instant espresso powder makes a noticeable difference.
It provides a deeper aroma and a more authentic café flavor.
Chill Long Enough
Many people try slicing the cheesecake after only two or three hours.
This often results in messy slices.
Patience rewards you with clean layers and a firmer texture.
Clean Slices Every Time
Dip a sharp knife into hot water.
Dry it before each cut.
Repeat between slices for bakery-quality presentation.
Delicious Variations
This recipe is easy to customize.
Mocha Cheesecake
Add two tablespoons of melted dark chocolate to the filling.
Caramel Coffee Cheesecake
Drizzle salted caramel sauce over the whipped cream.
Chocolate Espresso Version
Mix mini chocolate chips into the cheesecake filling.
Hazelnut Coffee Cheesecake
Spread a thin layer of hazelnut chocolate spread over the crust before adding the filling.
Oreo Coffee Cheesecake
Mix crushed Oreo cookies into the whipped topping for extra crunch.
Storage Tips
Store leftovers covered in the refrigerator for up to four days.
Do not leave the cheesecake at room temperature for longer than two hours.
You can also freeze individual slices.
Wrap each slice tightly in plastic wrap followed by aluminum foil.
Freeze for up to two months.
Thaw overnight in the refrigerator before serving.
Serving Suggestions
This Creamy Coffee Cheesecake pairs beautifully with:
- Fresh espresso
- Cappuccino
- Latte
- Hot chocolate
- Vanilla ice cream
- Chocolate-covered coffee beans
It’s also an excellent centerpiece for:
- Birthday parties
- Christmas dessert tables
- Mother’s Day brunch
- Family gatherings
- Dinner parties
- Afternoon coffee breaks
Frequently Asked Questions
Can I make this cheesecake ahead of time?
Yes. In fact, it’s even better when prepared the day before serving.
Can I use regular instant coffee?
Yes, but instant espresso powder provides a richer and more concentrated coffee flavor.
Why is my cheesecake filling lumpy?
Cold cream cheese is usually the cause. Always allow it to soften completely before mixing.
Can I freeze this cheesecake?
Absolutely. Wrap it well and freeze for up to two months.
Can I use homemade whipped cream instead of whipped topping?
Yes. Homemade whipped cream creates an even fresher flavor and lighter texture.
Final Thoughts
A homemade Creamy Coffee Cheesecake is one of those desserts that feels special from the very first bite. The buttery chocolate crust, smooth espresso filling, fluffy coffee cream, and airy whipped topping come together to create an elegant dessert that looks impressive yet is surprisingly simple to prepare.
With a few quality ingredients, enough chilling time, and the tips shared above, you’ll have a café-style cheesecake that your family and guests will ask for again and again. Whether you’re celebrating a holiday, hosting friends, or simply treating yourself after a long day, this rich coffee dessert is always a delicious choice.