
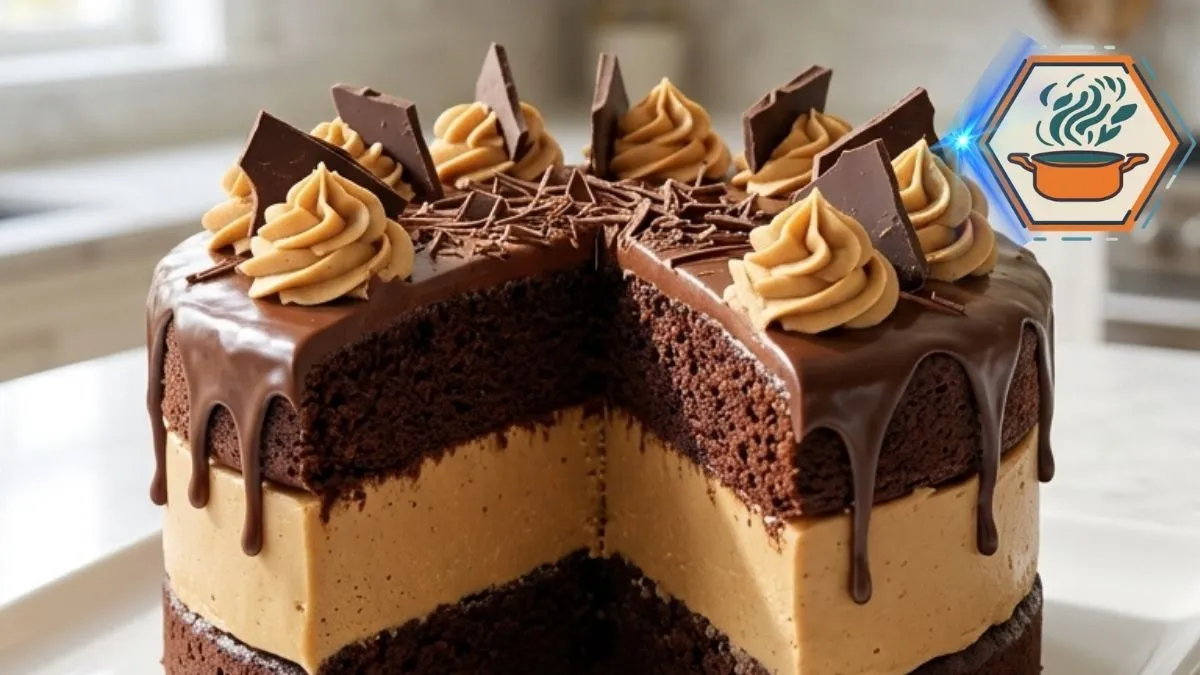
There are cakes you serve after dinner, and then there are cakes that make everyone stop talking when they reach the table. This Chocolate Peanut Butter Fudge Dream Cake belongs to the second group. Its dark chocolate layers frame an unusually thick peanut butter center. Glossy chocolate ganache falls over the square edges, while peanut butter rosettes and jagged dark chocolate pieces finish the top.
The real challenge is not making a chocolate cake. It is getting those dramatic layers to stay neat when you cut into it. The chocolate cakes must be completely cool. The peanut butter fudge filling needs enough structure to support the upper layer. The ganache also needs time to cool before it touches the cake. For more background on cake baking, the King Arthur Baking cake guide is a useful baking reference.
Ganache consistency matters just as much. Chocolate type, the chocolate-to-cream ratio, and temperature all change how quickly a drip runs down a cake. King Arthur Baking’s ganache guide explains these variables in detail. Here, we want ganache that moves slowly rather than disappearing down the sides.
The result is rich, creamy, deeply chocolatey, and unmistakably peanut buttery. More importantly, this version includes the little practical details that can make the difference between a beautiful square cake and one whose center slides out during assembly.
Affiliate disclosure: As an Amazon Associate I earn from qualifying purchases. This article may contain affiliate links to kitchen tools I find useful for preparing this recipe.
JUMP TO
Why This Chocolate Peanut Butter Fudge Dream Cake Works
The defining feature isn’t simply the chocolate-and-peanut-butter combination. It is the architecture.
You have three dominant layers:
- A dark, moist chocolate cake on the bottom
- An extra-thick peanut butter fudge cream in the center
- A second dark chocolate cake layer on top
The center should be far thicker than ordinary cake frosting. Aim for roughly 1 1/2 inches after assembly.
That creates the bold tan band between the two dark layers.
The chocolate cake uses cocoa powder for concentrated flavor. Hot coffee adds liquid while supporting a deeper chocolate profile. Coffee is also commonly used in cocoa-based cakes to deepen their chocolate character.
Oil is used instead of relying solely on butter. It gives the cake a soft crumb that remains pleasant after refrigeration.
The filling combines peanut butter, cream cheese, butter, powdered sugar, and whipped cream. Cream cheese and butter give it body. Whipped cream keeps that substantial center from becoming excessively dense.
Then comes the final contrast: a glossy chocolate coating, soft peanut butter swirls, and crisp dark chocolate shards.
If you enjoy learning why small ingredient choices matter in baking, our guide to using pineapple in baking discusses another example of how moisture can change baked goods.
Ingredients You’ll Need
For the dark chocolate cake:
- 1 3/4 cups (210 g) all-purpose flour
- 3/4 cup (65–75 g) unsweetened cocoa powder
- 1 3/4 cups (350 g) granulated sugar
- 1 1/2 teaspoons baking powder
- 1 1/2 teaspoons baking soda
- 1/2 teaspoon fine salt
- 2 large eggs, room temperature
- 1 cup (240 ml) whole milk, room temperature
- 1/2 cup (120 ml) neutral vegetable oil
- 2 teaspoons vanilla extract
- 3/4 cup (180 ml) hot brewed coffee
For the thick peanut butter fudge cream:
- 1 cup (about 255 g) creamy peanut butter
- 8 ounces (226 g) full-fat block cream cheese, softened
- 1/2 cup (113 g) unsalted butter, softened
- 1 1/2 cups (180 g) powdered sugar
- 1 teaspoon vanilla extract
- 1/4 teaspoon fine salt
- 1/2 cup (120 ml) cold heavy whipping cream
For the peanut butter rosettes:
- 1/2 cup (120 ml) cold heavy whipping cream
- 1/4 cup creamy peanut butter
- 3 tablespoons powdered sugar
- 1/2 teaspoon vanilla extract
For the ganache:
- 7 ounces (198 g) semisweet chocolate, finely chopped
- 1/2 cup (120 ml) heavy cream
- 1 tablespoon unsalted butter
For decorating:
- 3 to 4 ounces dark chocolate
- About 1 ounce dark chocolate for fine shavings
Ingredient note: Use conventional smooth peanut butter rather than a very runny natural peanut butter that separates heavily. A loose peanut butter can make the center softer and less predictable.
Useful Equipment Before You Start
Two matching 8-inch square pans make the process much easier. You will also want parchment paper, a cooling rack, mixing bowls, an electric mixer, and an offset spatula.
A piping bag fitted with a large star tip will give the peanut butter cream its curled rosette appearance.
For cleaner, more repeatable baking, a digital kitchen scale is useful because flour, cocoa, chocolate, and peanut butter can vary significantly when measured by volume.
Here are four natural places where baking tools may help readers. Replace these links with your own Amazon affiliate URLs before publication:
- 8-inch square cake pans on Amazon
- Digital kitchen scales on Amazon
- Offset spatulas on Amazon
- Piping bags and star tips on Amazon
Affiliate disclosure: If affiliate links are added, RecipesMind may earn a commission from qualifying purchases at no extra cost to the reader.
Step 1: Prepare the Square Cake Pans
Preheat your oven to 350°F (175°C).
Grease two 8-inch square cake pans. Line their bottoms with parchment paper, leaving enough parchment to help release the cakes if desired.
Lightly grease the parchment too.
Try to use matching pans. Two pans made from very different materials can bake at different rates.
Place an oven rack near the center of the oven.
Step 2: Make the Dark Chocolate Cake Batter
In a large bowl, whisk together the flour, cocoa powder, granulated sugar, baking powder, baking soda, and salt.
Break up every visible cocoa lump.
In another bowl, whisk the eggs, whole milk, vegetable oil, and vanilla until evenly mixed.
Pour the wet mixture into the dry ingredients.
Stir just until the mixture comes together.
Now slowly pour in the hot coffee while whisking gently.
Do not worry when the batter becomes thin. A relatively fluid batter is expected here.
Avoid aggressively beating it once the flour has been incorporated.
Divide the batter evenly between your prepared pans. A kitchen scale is particularly useful at this stage.
Step 3: Bake Without Drying Out the Cake
Bake for approximately 25 to 30 minutes.
Start checking around 25 minutes because ovens and pans differ.
A toothpick inserted near the center should emerge with a few moist crumbs rather than liquid batter. Other useful signs include a set center and edges beginning to pull slightly from the pan. King Arthur recommends combining several visual and physical signs rather than depending only on internal temperature for cake doneness.
Do not intentionally overbake the layers to make them stronger. Dry cake won’t improve the finished dessert.
Let the cakes cool in their pans for about 10 to 15 minutes. Carefully turn them onto cooling racks.
Then wait.
They must be completely cool before assembly.
A slightly warm cake can soften the peanut butter filling. With such a thick center, that small mistake can cause sliding.
Step 4: Make the Extra-Thick Peanut Butter Fudge Center
This is the signature component of the cake.
Place the softened cream cheese and butter in a mixing bowl. Beat until smooth.
Add the creamy peanut butter. Beat again until no streaks remain.
Add the powdered sugar gradually, followed by vanilla and salt.
The mixture should already be thick.
In a separate cold bowl, whip 1/2 cup heavy whipping cream until it reaches medium peaks.
Do not pour liquid cream directly into the peanut butter mixture.
Instead, gently fold the whipped cream into the peanut butter base in several additions.
This preserves some of the cream’s air while creating a thick filling.
If it feels unusually soft, refrigerate it for about 15 to 20 minutes before assembly.
Step 5: Build That Dramatic Peanut Butter Layer
Place the first completely cooled cake on a flat serving plate or cake board.
If it has developed a noticeable dome, trim only enough to give yourself a level surface.
Spread the peanut butter mixture over the cake.
This is where you should resist making a normal thin filling.
You want a very thick, even center, roughly 1 1/2 inches deep.
Work the mixture carefully toward the square corners with an offset spatula.
Place the second chocolate layer on top.
Do not push down hard.
Apply only enough pressure to settle and level it.
Check the cake from every side. Correct any obvious lean now.
Refrigerate it for at least 1 hour before adding ganache.
This chilling period is part of the recipe, not optional waiting time. The thick filling needs to firm before it supports the finishing steps.
Step 6: Make a Glossy Chocolate Ganache Drip
Finely chop the chocolate and place it in a heatproof bowl.
Heat the heavy cream until steaming and hot, but don’t aggressively boil it.
Pour it over the chocolate.
Let it stand for about two minutes. Then begin stirring slowly from the center until the mixture becomes smooth and glossy.
Add the tablespoon of butter.
Ganache becomes thicker as it cools, which is exactly what we need for controlled drips.
Do not immediately pour piping-hot ganache onto the chilled cake.
Wait until it is thick but still pourable.
Test a little against the edge. It should descend slowly.
If it races toward the bottom, the ganache is too warm or thin. Wait several more minutes.
If it barely moves, warm it very gently.
Spread ganache over the top and guide irregular drips over the sides.
Those varied drip lengths create a more natural finish.
For another detailed sugar-finishing technique, see our guide to caramelizing sugar.
Step 7: Pipe the Peanut Butter Rosettes
Combine the cold heavy cream, peanut butter, powdered sugar, and vanilla.
Whip until the cream becomes firm enough to hold a piped shape.
Stop once you have stable peaks. Excessive mixing can spoil the texture.
Transfer it to a piping bag fitted with a large star tip.
Pipe relaxed rosettes across the top rather than completely covering the ganache.
Leave spaces for the chocolate shards.
Step 8: Add Dark Chocolate Shards and Shavings
Break 3 to 4 ounces of dark chocolate into irregular pieces.
Use different heights and angles.
Insert the shards gently between the rosettes. They should look intentionally irregular rather than perfectly symmetrical.
Finish with finely shaved dark chocolate.
Keep the shavings restrained. You still want the glossy ganache to remain visible.
The final appearance should feature:
- Square sides
- Two dark chocolate cake layers
- One exceptionally thick tan peanut butter center
- Glossy chocolate drips
- Peanut butter rosettes
- Upright dark chocolate shards
- Fine chocolate shavings
How to Cut the Cake Without Ruining the Layers
Refrigerate the completed cake for another 30 minutes before slicing.
Prepare a tall, sharp knife.
Dip the blade in hot water, then wipe it completely dry. Make your first cut.
Clean, warm, and dry the knife again before the next major cut.
This extra effort gives you much cleaner separation between the dark cake and pale peanut butter filling.
Because this is a tall, rich dessert, smaller portions are usually enough.
Storage and Make-Ahead Tips
Because the filling contains cream cheese and whipped cream, keep the assembled cake refrigerated rather than leaving it out for prolonged periods.
For the best eating texture, take the portion you plan to serve from the refrigerator for a short period before eating. The filling will soften and the chocolate flavor will become more apparent.
For make-ahead preparation, bake the chocolate layers first. Cool them completely and wrap them well. Assemble the cake later when you have time to chill the center properly.
Avoid adding the final decorations while the cake is warm.
If chocolate desserts are your thing, our strawberry-filled chocolate cake guide gives you another rich cake idea with a fruit-centered direction.
Common Mistakes and How to Fix Them
The peanut butter filling slides out.
The cakes may have been warm, the filling too soft, or the assembled cake insufficiently chilled. Use fully cooled cake and refrigerate after stacking.
The ganache runs all the way down.
It was probably too warm. Ganache thickens noticeably as it cools.
The ganache looks grainy or separated.
Excessive heat can break a ganache emulsion. Gentle heating and mixing are safer than repeatedly overheating the chocolate.
The cake is dry.
Begin checking it at the early end of the baking window. Don’t wait for the toothpick to become bone-dry.
The center looks too thin.
Use the full quantity of peanut butter filling. The unusually deep center is intentional.
The upper layer leans.
Level noticeably domed cakes and spread the filling at an even depth, including the corners.
Frequently Asked Questions
Can I make Chocolate Peanut Butter Fudge Dream Cake ahead of time?
Yes. In fact, chilling helps this particular cake. You can bake the cake layers ahead, then assemble and refrigerate the finished cake. Keep it well covered so it does not absorb refrigerator odors.
Can I skip the coffee?
Yes. Replace it with hot water if needed. Coffee gives cocoa-based chocolate cake a deeper flavor profile, while water can produce a more straightforward chocolate character.
Why is my peanut butter filling runny?
Runny natural peanut butter, overly warm ingredients, or insufficient chilling can contribute. Use thick creamy peanut butter and make sure the heavy cream is whipped separately before folding it into the filling.
Can I use milk chocolate for the ganache?
You can, but expect different behavior. Milk chocolate contains more sugar and generally produces a softer ganache than darker chocolate at the same cream ratio. For predictable drips in this recipe, semisweet chocolate is the easier choice.
Can I make this cake in round pans?
Yes, but you will lose its characteristic square presentation. Two 8-inch round pans should give you a similar concept, although assembly and decoration will look different.
Why does the cake need so much chilling time?
The center is deliberately much thicker than conventional cake filling. Chilling gives it enough firmness to support the upper cake and ganache.
What makes this different from a regular chocolate peanut butter cake?
The proportions. Instead of hiding a modest amount of peanut butter frosting between multiple layers, this cake makes the thick peanut butter fudge center the visual centerpiece.
Print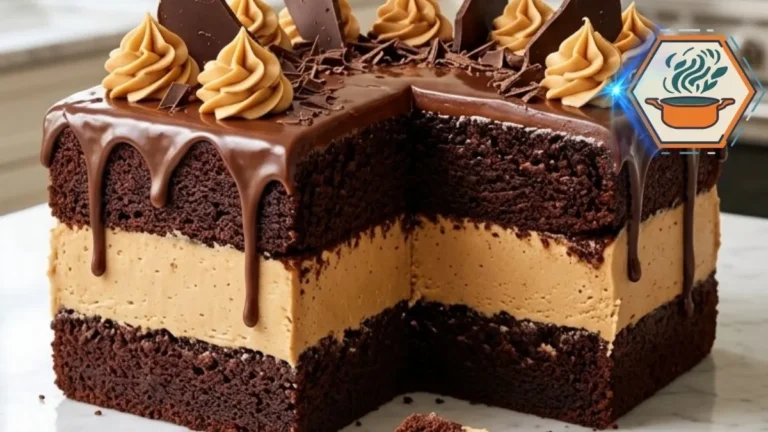
Chocolate Peanut Butter Fudge Dream Cake
A rich square chocolate cake with two moist dark chocolate layers, an extra-thick peanut butter fudge cream center, glossy chocolate ganache drips, peanut butter rosettes, and dark chocolate shards.
- Total Time: 2 hours 45 minutes
- Yield: 16 servings
Ingredients
Dark Chocolate Cake
- 1 3/4 cups (210 g) all-purpose flour
- 3/4 cup (70 g) unsweetened cocoa powder
- 1 3/4 cups (350 g) granulated sugar
- 1 1/2 teaspoons baking powder
- 1 1/2 teaspoons baking soda
- 1/2 teaspoon fine salt
- 2 large eggs, room temperature
- 1 cup (240 ml) whole milk, room temperature
- 1/2 cup (120 ml) neutral vegetable oil
- 2 teaspoons vanilla extract
- 3/4 cup (180 ml) hot brewed coffee
Thick Peanut Butter Fudge Cream
- 1 cup (255 g) conventional creamy peanut butter
- 8 ounces (226 g) full-fat block cream cheese, softened
- 1/2 cup (113 g) unsalted butter, softened
- 1 1/2 cups (180 g) powdered sugar
- 1 teaspoon vanilla extract
- 1/4 teaspoon fine salt
- 1/2 cup (120 ml) cold heavy whipping cream
Peanut Butter Cream Rosettes
- 1/2 cup (120 ml) cold heavy whipping cream
- 1/4 cup (64 g) creamy peanut butter
- 3 tablespoons (23 g) powdered sugar
- 1/2 teaspoon vanilla extract
Chocolate Ganache Drip
- 7 ounces (198 g) semisweet chocolate, finely chopped
- 1/2 cup (120 ml) heavy cream
- 1 tablespoon (14 g) unsalted butter
Chocolate Decoration
- 3–4 ounces (85–113 g) dark chocolate, broken into irregular shards
- 1 ounce (28 g) dark chocolate, finely shaved
Instructions
- Preheat the oven to 350°F (175°C). Grease two 8-inch square cake pans. Line the bottoms with parchment paper and lightly grease the parchment.
- In a large bowl, whisk the flour, cocoa powder, sugar, baking powder, baking soda, and salt until evenly combined and free of cocoa lumps.
- In a second bowl, whisk the eggs, milk, vegetable oil, and vanilla. Add the wet ingredients to the dry ingredients and stir just until combined.
- Slowly pour in the hot coffee while gently whisking. The batter will be relatively thin. Divide it evenly between the two prepared pans.
- Bake for 25–30 minutes. Begin checking at 25 minutes. A tester inserted into the center should come out with a few moist crumbs but no wet batter.
- Cool the cakes in their pans for 10–15 minutes. Turn them onto wire racks and allow them to cool completely before filling.
- For the peanut butter filling, beat the softened cream cheese and butter until smooth. Beat in the peanut butter. Gradually add the powdered sugar, vanilla, and salt.
- In a separate chilled bowl, whip 1/2 cup heavy cream to medium peaks. Gently fold it into the peanut butter mixture. If the filling feels too soft to hold a thick layer, refrigerate it for 15–20 minutes.
- Place one completely cooled cake layer on a flat serving plate or cake board. If necessary, trim a pronounced dome so the surface is level.
- Spread the entire peanut butter filling into a thick, even layer, aiming for approximately 1 1/2 inches of visible filling. Take the filling all the way to the square corners.
- Place the second chocolate cake layer on top. Press only very gently to level it. Refrigerate the assembled cake for at least 1 hour.
- Make the ganache. Put the finely chopped semisweet chocolate in a heatproof bowl. Heat the cream until steaming. Pour it over the chocolate and leave untouched for 2 minutes.
- Stir slowly until smooth, then mix in the butter. Allow the ganache to cool until it is thick but still slowly pourable. Test one drip before coating the whole cake.
- Spread ganache over the top. Carefully encourage irregular drips over the edges rather than completely coating the exposed peanut butter layer.
- For the rosettes, whip the cold heavy cream, peanut butter, powdered sugar, and vanilla until firm enough to hold a piped shape. Transfer to a piping bag fitted with a large star tip.
- Pipe peanut butter cream rosettes over the ganache. Insert irregular dark chocolate shards between them and scatter a small amount of finely shaved chocolate over the top.
- Refrigerate for another 30 minutes before slicing. For clean layers, warm a sharp knife in hot water, wipe it completely dry, cut, and clean the blade between slices.
Notes
- Do not assemble warm cake layers. Even mild residual warmth can soften this unusually thick peanut butter center.
- Use conventional creamy peanut butter for more predictable structure. Very runny natural peanut butter can make the filling too soft.
- Full-fat block cream cheese is preferable to spreadable cream cheese.
- Do not skip the initial one-hour chill after stacking.
- The ganache must cool before application. If a test drip runs immediately to the bottom, wait longer.
- If the peanut butter filling feels soft after mixing, chill it before assembly rather than adding large amounts of extra powdered sugar.
- Do not press heavily on the upper cake layer.
- Keep the finished cake refrigerated because its filling contains cream cheese and whipped cream.
- For the clean visual effect, preserve the very thick tan center, exposed square sides, dark cake layers, chocolate drips, peanut butter rosettes, and irregular chocolate shards.
- Prep Time: 45 minutes
- Additional/Chill Time: 1 hour 30 minutes
- Cook Time: 25–30 minutes
- Category: Dessert
- Method: Baking
- Cuisine: American
The Final Slice
The moment that makes this recipe worthwhile comes with the first clean cut.
You see dark chocolate cake, then an enormous band of creamy peanut butter, followed by another dark layer. Above it sits a glossy chocolate finish with soft peanut butter swirls and crisp chocolate pieces.
That contrast is what the Chocolate Peanut Butter Fudge Dream Cake is all about.
Don’t rush the cooling. Don’t reduce the filling because it seems unusually thick. And don’t pour hot ganache over an unstable cake. Those three details determine whether you simply make a good chocolate peanut butter cake or produce the tall, dramatic dessert this recipe is designed to be.
For more baking ideas and technique-focused recipes, visit RecipesMind.