
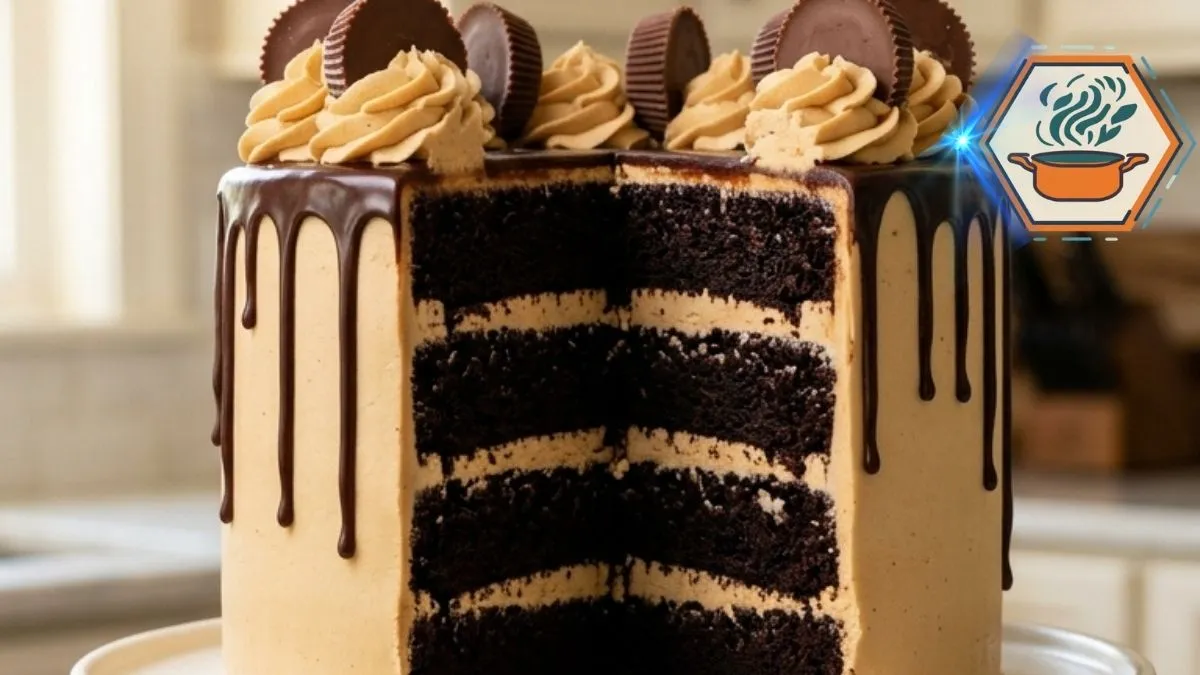
There is a moment when a homemade cake stops looking homemade and starts looking like the centerpiece of a bakery window. For this Chocolate Peanut Butter Cup Drip Cake, that moment comes when the first glossy chocolate drip slowly travels down the cold peanut butter buttercream. Underneath are four dark chocolate cake layers, three creamy peanut butter filling layers, and a soft crumb that makes each tall slice worth the work.
The chocolate-peanut butter combination is familiar, but getting the structure right matters. Cocoa choice can affect both flavor and how a cake rises. King Arthur Baking explains the differences between natural and Dutch-process cocoa and how they interact with chemical leaveners. Because this recipe contains both baking soda and baking powder, I recommend natural unsweetened cocoa powder for predictable results with the formula below.
There is another reason this cake works so well. Oil gives the chocolate layers a tender texture, while the peanut butter frosting has enough body to support a tall cake. Coffee deepens the chocolate character without turning the finished cake into a coffee-flavored dessert. Similar tested chocolate cakes also pair cocoa with oil and brewed coffee or water for a moist crumb. You can read King Arthur Baking’s chocolate cake guidance for more background on this style of batter.
Affiliate disclosure: As an Amazon Associate I earn from qualifying purchases. This article may contain affiliate links to kitchen tools I find useful for preparing this recipe.
JUMP TO
Why This Chocolate Peanut Butter Cup Drip Cake Works
The finished cake looks elaborate, but it is really four simple jobs: bake, frost, chill, and decorate.
The chocolate cake is soft but sturdy enough for stacking. Peanut butter buttercream brings a salty, nutty contrast to the sweet cake. Semisweet chocolate ganache adds a darker chocolate note. Peanut butter cups finish the cake with recognizable chocolate-and-peanut-butter flavor and a slight change in texture.
Most importantly, chilling is built into the process. That small detail makes a major difference.
A cold cake is easier to coat smoothly. Cold buttercream also helps control the ganache drip instead of allowing warm chocolate to race down the sides.
If you enjoy learning why small baking choices matter, our guide to the secret to crunchy cookies covers another example of how ingredients and technique change texture.
Ingredients You’ll Need
For the best results, measure flour and cocoa carefully. A kitchen scale is ideal when available.
Chocolate Cake
- 2½ cups (300 g) all-purpose flour
- ¾ cup (about 64 g) natural unsweetened cocoa powder
- 2 cups (400 g) granulated sugar
- 2 teaspoons baking powder
- 1½ teaspoons baking soda
- ½ teaspoon fine salt
- 3 large eggs, at room temperature
- 1 cup (240 ml) whole milk, at room temperature
- ½ cup (120 ml) neutral vegetable oil
- 2 teaspoons vanilla extract
- 1 cup (240 ml) hot freshly brewed coffee or hot water
Coffee is my first choice. It gives the chocolate more depth. Hot water works if you prefer to avoid coffee.
Peanut Butter Buttercream
- 1½ cups (340 g) unsalted butter, softened
- 1½ cups (about 380 g) conventional creamy peanut butter
- 4½ cups (about 540 g) powdered sugar, sifted if lumpy
- ⅓ to ½ cup (80–120 ml) heavy cream
- 2 teaspoons vanilla extract
- ¼ teaspoon fine salt, or to taste
Use a smooth, shelf-stable creamy peanut butter rather than a natural variety that separates heavily. The separated oil can make the frosting softer and less predictable.
Chocolate Ganache
- 8 oz (225 g) semisweet chocolate, finely chopped
- ¾ cup (180 ml) heavy cream
Decoration
- 10–12 chocolate peanut butter cups
- Reserved peanut butter buttercream for piping
For another useful chocolate technique, see our RecipesMind guide to mastering caramelizing sugar when you’re ready to work on other dessert finishes.
Equipment That Makes the Job Easier
You do not need professional bakery equipment. However, four tools make tall layer cakes much easier to handle.
A pair of sturdy 9-inch square pans helps create even layers. A long offset spatula makes spreading buttercream easier. A rotating cake stand helps when smoothing the sides, while piping bags and a large star tip create the swirls shown on top.
Here are convenient Amazon searches you can later replace with your own affiliate URLs:
- 9-inch square cake pans on Amazon
- offset cake spatula on Amazon
- cake decorating turntable on Amazon
- piping bags and large star tips on Amazon
Affiliate disclosure suggestion for publication: This post may contain affiliate links. If you purchase through these links, RecipesMind may earn a commission at no additional cost to you.
How to Make the Chocolate Cake
Preheat the oven to 350°F (175°C).
Grease two 9-inch square cake pans. Line their bottoms with parchment paper, then lightly grease the parchment. Do not skip this step. These layers are moist, so parchment makes removal much safer.
In a large bowl, whisk the flour, cocoa powder, sugar, baking powder, baking soda, and salt. Break apart every visible cocoa lump.
In another bowl, whisk the eggs, milk, vegetable oil, and vanilla.
Pour the wet mixture into the dry ingredients. Mix on low speed, or whisk gently, just until most dry streaks disappear.
Now slowly pour in the hot coffee.
The batter will become noticeably thin. Do not add extra flour. A loose chocolate batter is normal for this type of cake.
Divide the batter evenly between the prepared pans. A digital scale makes this easy, but you can also use a measuring cup and alternate between pans.
Bake for about 30–35 minutes.
Start checking around 28 minutes because ovens vary. The center should spring back gently when touched, and a toothpick inserted near the middle should come out with a few moist crumbs rather than wet batter.
King Arthur’s tested chocolate layer-cake instructions similarly stress cooling cake completely before frosting and note that layers can be divided horizontally for a four-layer presentation.
Leave the cakes in their pans for about 10–15 minutes. Carefully turn them onto wire racks.
Cool completely before cutting.
Warm cake plus buttercream equals sliding layers.
How to Create Four Even Chocolate Layers
The reference style for this cake has four distinct chocolate layers rather than two very thick ones.
Once completely cool, place one cake on a flat board. Use a long serrated knife to cut horizontally through its center.
Rotate the cake as you cut rather than pushing the knife straight through from one side.
Repeat with the second cake.
You now have four chocolate cake layers.
If the tops are domed, level them before splitting. Flat layers produce a taller, straighter cake.
For beginners, chilling the cakes for 30–45 minutes before splitting can make them easier to handle.
Make the Peanut Butter Buttercream
Beat the softened butter for about 2–3 minutes until creamy and lighter in appearance.
Add the creamy peanut butter and beat until completely combined.
Add powdered sugar gradually. Begin at low speed unless you want your kitchen covered in sugar.
Once incorporated, add vanilla, salt, and about ⅓ cup heavy cream.
Beat for another 2–3 minutes.
Check the consistency.
The frosting should form soft but stable peaks. It needs to spread easily while still holding the weight of the cake above it.
If it feels stiff, add heavy cream 1 tablespoon at a time.
If it becomes too soft, add a little powdered sugar or chill it briefly.
This balance matters because a tall layer cake needs more support than cupcakes.
Stack the Cake Without Sliding Layers
Place your first cake layer on a cake board or serving plate.
Spread an even layer of peanut butter buttercream over it. Aim for roughly ⅓ to ½ inch of frosting.
Add the second chocolate layer and repeat.
Continue until all four cake layers are stacked. You should see three peanut butter filling layers when the cake is sliced.
Look at the cake from every side. Correct leaning now rather than after decorating.
Spread a thin crumb coat over the top and sides. This first coat traps loose chocolate crumbs.
Refrigerate the cake for 30 minutes, or until the exterior feels firm.
Then add the final buttercream coat.
Use an offset spatula and bench scraper to create the smooth beige sides seen in the finished design. For another celebration dessert idea, our Mom’s Day cake ideas can help when planning a larger dessert table.
How to Make a Clean Chocolate Ganache Drip
This is where patience pays off.
Finely chop the semisweet chocolate and place it in a heatproof bowl.
Heat the heavy cream until steaming and hot but not aggressively boiling.
Pour it over the chocolate.
Leave it untouched for 2 minutes.
Then stir slowly from the center outward until glossy and smooth.
Do not immediately pour hot ganache over the cake.
Let it cool until it remains fluid but is no longer hot. Meanwhile, the frosted cake should be well chilled.
Now perform the most important test of the entire decoration process.
Place one small drip on the back of the cake.
Watch it.
If it runs straight to the bottom, the ganache is too warm or thin. Wait a few minutes.
If it barely travels, it is too cool. Warm it very gently.
If it slowly travels partway down the chilled buttercream, you have the right consistency.
Once the test drip behaves correctly, spoon or pipe small amounts around the square edges. Vary the quantity slightly so the drips look natural.
Then spread a thin layer of ganache across the top.
Decorating It Like the Reference Cake
Reserve some peanut butter buttercream before coating the cake.
Fit a piping bag with a large open-star tip. Pipe generous swirls around the top edge.
Cut several peanut butter cups in half. Leave a few pieces larger.
Press them gently between or beside the frosting swirls while keeping the arrangement balanced.
The goal is a tall square cake with:
- four dark chocolate cake layers
- three visible peanut butter filling layers
- smooth light-brown peanut butter buttercream
- dark glossy chocolate drips
- large peanut butter frosting swirls
- chocolate peanut butter cup pieces on top
Do not bury the top under candy. The contrast between the beige frosting, dark ganache, and peanut butter cups is part of what makes this cake striking.
Mistakes That Can Ruin a Drip Cake
Frosting a warm cake: The buttercream can soften and the layers may move.
Adding flour because the batter looks thin: Resist the temptation. The liquid contributes to the cake’s tender crumb.
Using warm ganache on soft buttercream: This can melt the exterior and produce long, messy drips.
Skipping the crumb coat: Dark chocolate crumbs can show through the pale peanut butter frosting.
Making every drip identical: Slight differences in length give the cake a more natural bakery-style finish.
Overmixing after adding flour: Mix only until the batter is combined.
Using the wrong cocoa without considering the leaveners: Natural and Dutch-process cocoa differ in acidity and can behave differently in formulas containing baking soda.
Make-Ahead and Storage Tips
This cake becomes much less stressful when divided across two days.
On day one, bake and cool the chocolate cakes. Wrap each unsplit layer tightly after it is completely cool. Refrigerate overnight.
On day two, split, fill, frost, chill, and decorate.
Once assembled, keep the cake covered in the refrigerator if you are not serving it soon. For the best texture, let individual slices lose some of their refrigerator chill before eating. Butter-based frosting and chocolate cake tend to feel firmer when very cold. King Arthur likewise notes that frosted chocolate layer cake can be refrigerated and that chilling helps make slicing easier.
Use a long, sharp knife for clean portions. Wipe the blade between cuts so each slice reveals those distinct chocolate and peanut butter stripes.
What Does Chocolate Peanut Butter Cup Drip Cake Taste Like?
The first flavor is deep chocolate.
Then comes sweet, slightly salty peanut butter buttercream. The ganache adds another chocolate layer without the extra sweetness of frosting. Finally, the peanut butter cups provide denser, candy-like bites.
The contrast is what keeps the cake interesting.
It is undeniably rich, so smaller slices usually work better than standard birthday-cake portions.
If chocolate cakes are your favorite type of celebration dessert, you may also like our strawberry-filled chocolate cake guide for a fruit-and-chocolate variation.
Print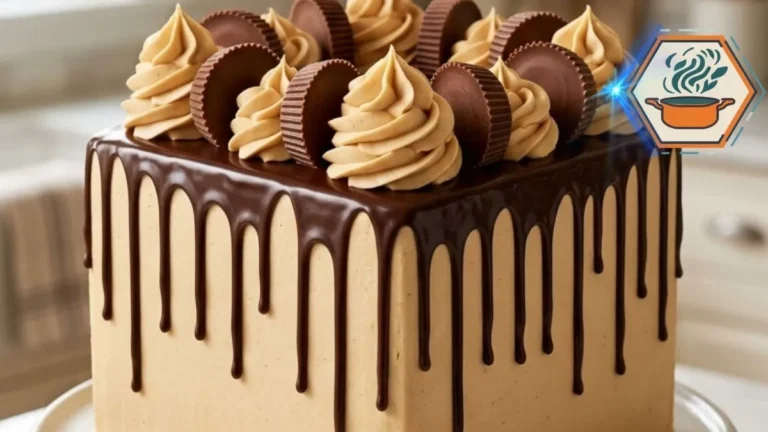
Chocolate Peanut Butter Cup Drip Cake
A tall four-layer chocolate cake filled and frosted with creamy peanut butter buttercream, finished with glossy semisweet chocolate ganache drips, piped peanut butter swirls, and chocolate peanut butter cups.
- Total Time: About 2 hours 50 minutes
- Yield: 16 slices
Ingredients
Chocolate Cake
- 2½ cups (300 g) all-purpose flour
- ¾ cup (about 64 g) natural unsweetened cocoa powder
- 2 cups (400 g) granulated sugar
- 2 teaspoons baking powder
- 1½ teaspoons baking soda
- ½ teaspoon fine salt
- 3 large eggs, room temperature
- 1 cup (240 ml) whole milk, room temperature
- ½ cup (120 ml) neutral vegetable oil
- 2 teaspoons vanilla extract
- 1 cup (240 ml) hot brewed coffee or hot water
Peanut Butter Buttercream
- 1½ cups (340 g) unsalted butter, softened
- 1½ cups (about 380 g) creamy conventional peanut butter
- 4½ cups (about 540 g) powdered sugar
- ⅓ to ½ cup (80–120 ml) heavy cream
- 2 teaspoons vanilla extract
- ¼ teaspoon fine salt
Chocolate Ganache
- 8 oz (225 g) semisweet chocolate, finely chopped
- ¾ cup (180 ml) heavy cream
Decoration
- 10–12 standard chocolate peanut butter cups, some whole and some halved
- Reserved peanut butter buttercream for piping
Instructions
- Prepare the pans. Preheat the oven to 350°F (175°C). Grease two 9-inch square cake pans. Line the bottoms with parchment paper and lightly grease the parchment.
- Mix the dry ingredients. In a large bowl, whisk together flour, cocoa powder, sugar, baking powder, baking soda, and salt. Break up any cocoa lumps.
- Mix the wet ingredients. In a separate bowl, whisk eggs, whole milk, vegetable oil, and vanilla until combined.
- Make the batter. Add the wet ingredients to the dry mixture. Mix on low speed just until combined. Slowly pour in the hot coffee while mixing. The finished batter will be fairly thin. This is normal.
- Bake. Divide the batter evenly between the prepared pans. Bake for 30–35 minutes, checking at about 28–30 minutes. A toothpick inserted near the center should come out without wet batter; a few moist crumbs are fine.
- Cool completely. Leave the cakes in their pans for 10–15 minutes. Turn them carefully onto wire racks and remove the parchment. Let them cool completely before frosting.
- Create four layers. For the tall appearance shown in the finished cake, chill the cooled cakes for about 30 minutes. Level any domed tops. Use a long serrated knife to split each cake horizontally. You should now have four square chocolate layers.
- Make the peanut butter buttercream. Beat softened butter for 2–3 minutes until creamy. Beat in the peanut butter until smooth. Add powdered sugar gradually on low speed. Add ⅓ cup heavy cream, vanilla, and salt. Beat for another 2–3 minutes. Add more cream, 1 tablespoon at a time, only if needed.
- Fill the cake. Place the first cake layer on a cake board or serving plate. Spread an even ⅓- to ½-inch layer of peanut butter buttercream over it. Repeat with the remaining layers to create four chocolate cake layers separated by three peanut butter filling layers.
- Crumb coat and chill. Spread a thin layer of buttercream over the entire cake to trap crumbs. Refrigerate for 30 minutes, or until firm.
- Apply the final frosting. Cover the chilled cake with a thicker, smooth coat of peanut butter buttercream. Reserve enough frosting for the top swirls. Chill again for 20–30 minutes before adding ganache.
- Make the ganache. Put finely chopped semisweet chocolate in a heatproof bowl. Heat the cream until steaming but not vigorously boiling. Pour it over the chocolate. Leave untouched for 2 minutes, then stir slowly until completely smooth and glossy.
- Test the drip. Allow the ganache to cool until fluid but no longer hot. Place one test drip on the back of the cold cake. If it reaches the cake board quickly, wait longer. If it barely moves, warm the ganache very gently.
- Decorate. Once the consistency is right, add ganache around the upper edges, allowing drips of different lengths to form. Spread a thin layer over the top.
- Finish the cake. Pipe generous peanut butter buttercream swirls around the top. Decorate with whole and halved chocolate peanut butter cups.
- Set before slicing. Chill briefly to firm the decoration. For a softer texture, allow the cake to lose some of its refrigerator chill before serving. Cut with a sharp knife and wipe the blade between slices.
Notes
- Cocoa: Use natural unsweetened cocoa powder for the formula as written.
- Coffee: Hot coffee strengthens the perception of chocolate flavor. Hot water can be substituted 1:1.
- Peanut butter: A conventional creamy peanut butter is preferable for predictable frosting consistency. Natural peanut butter that separates can make the buttercream oily or soft.
- Room-temperature ingredients: Bring eggs and milk close to room temperature before mixing.
- Do not add extra flour: This is intentionally a relatively thin chocolate batter.
- Cooling matters: Never split or frost warm cake.
- Straight layers: Chill the cakes before splitting if they feel fragile.
- Crumb coat: Do not skip it. Dark crumbs are especially visible through pale peanut butter frosting.
- Ganache: Always test one drip on the back first.
- Peanut allergy: This recipe contains peanuts and is unsuitable for anyone with a peanut allergy.
- Storage: Keep the decorated cake covered and refrigerated when storing for an extended period. Let slices soften slightly before serving for the best buttercream texture.
- Prep Time: 45 minutes
- Inactive / Chilling Time (+ Time): 1 hour 30 minutes
- Cook Time: 30–35 minutes
- Category: Dessert
- Method: Baking
- Cuisine: American
Frequently Asked Questions
Can I make Chocolate Peanut Butter Cup Drip Cake without coffee?
Yes. Replace the hot coffee with the same amount of hot water. Coffee adds depth to the cocoa flavor, but the recipe still works with water.
Why is my chocolate cake batter so thin?
The cup of hot liquid makes this batter relatively fluid. That is expected. Do not compensate by adding extra flour.
Why did my ganache run down the entire cake?
It was probably too warm, or the cake was not cold enough. Let the ganache cool and test a single drip before decorating the entire cake.
Why won’t my ganache drip?
It may have cooled too much. Warm it in very short intervals and stir well. Test again before proceeding.
Can I use natural peanut butter in the frosting?
A conventional smooth creamy peanut butter is the safer choice here. Natural peanut butter can separate, which may give the buttercream a looser or oily texture.
Can I make this cake one day ahead?
Yes. In fact, making the components ahead can make assembly easier. Keep the finished cake covered and refrigerated, then allow it to soften somewhat before serving.
Can I use round cake pans instead?
Yes, although the result will not match the square presentation shown here. Nine-inch round pans can produce a traditional round drip cake using the same flavor combination.
How do I get four layers from two cakes?
Bake two full cake layers. Once completely cool, use a serrated knife to split each horizontally. This creates four thinner chocolate layers.
How do I get clean slices?
Chill the decorated cake first. Use a sharp knife, then wipe it clean between every cut. Allow the slices to sit briefly before serving so the buttercream softens.
A Cake Worth the Extra Step
The best part of this Chocolate Peanut Butter Cup Drip Cake is not any single ingredient. It is the moment you cut through that smooth peanut butter exterior.
Suddenly, the decoration makes sense.
Behind the glossy chocolate drips are four dark cake layers separated by three bands of creamy peanut butter frosting. Each forkful carries soft chocolate cake, nutty buttercream, semisweet ganache, and a little peanut butter cup.
It looks ambitious, but none of the individual steps requires advanced pastry training. Bake the cakes carefully. Cool them fully. Keep the layers straight. Chill the crumb coat. And never commit to the ganache until that first test drip behaves exactly as you want.
That is how a simple chocolate-and-peanut-butter idea becomes the tall, dramatic cake everyone notices before dessert even reaches the table.