
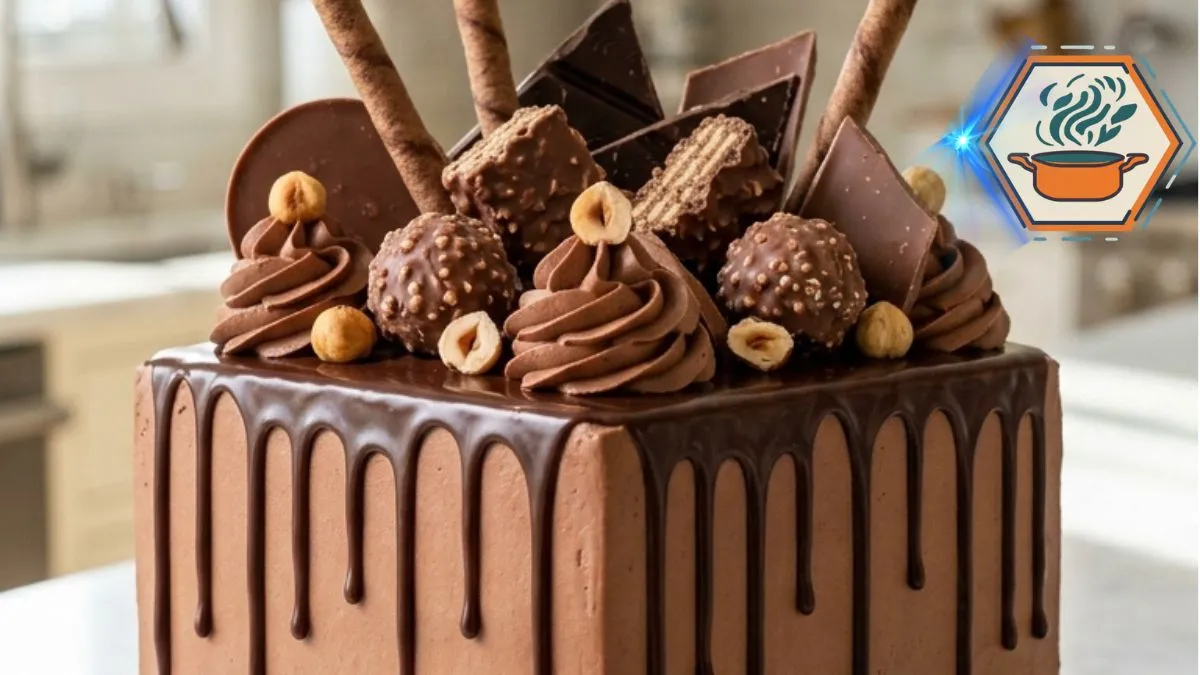
There is a moment every home baker hopes for. You place a cake on the table, people stop talking, and someone immediately asks, “Who made that?” This Chocolate Hazelnut Crunch Celebration Cake is designed for exactly that moment. It has three dark chocolate layers, a creamy chocolate-hazelnut filling, smooth cocoa buttercream, glossy ganache drips, and a crown of crunchy chocolate decorations.
The impressive finish is only half the story. A celebration cake still needs to taste good once you cut it. That means tender cake, balanced sweetness, stable frosting, clean layers, and real crunch. Coffee is especially useful in chocolate cakes, and established baking references such as King Arthur Baking’s chocolate cake recipe also pair cocoa with brewed coffee.
The original idea sounds simple, but tall square cakes expose small mistakes quickly. Uneven batter creates crooked layers. Warm cake melts buttercream. Runny ganache races down the sides. Soft decorations lose their crunch. This guide fills in those missing details so you can reproduce the cake rather than simply admire the photograph.
Affiliate disclosure: As an Amazon Associate I earn from qualifying purchases. This article may contain affiliate links to kitchen tools I find useful for preparing this recipe.
JUMP TO
Why This Chocolate Hazelnut Cake Works
Think of each slice as a combination of three textures.
First comes the moist chocolate cake. Cocoa gives it depth, while buttermilk brings acidity and tenderness. Vegetable oil keeps the crumb soft even after refrigeration. Hot coffee strengthens the chocolate character without turning the finished cake into a coffee-flavored dessert.
Coffee in chocolate cake isn’t unusual. King Arthur also uses brewed coffee or water in several chocolate cake formulas.
Then comes the creamy center. Chocolate-hazelnut spread turns standard cocoa buttercream into a richer filling. Chopped toasted hazelnuts add the crunch that the cake’s name promises.
Finally, there is contrast on top. Crisp wafer sticks, truffles, chocolate discs, hazelnuts, and broken chocolate pieces make the cake look abundant rather than overly neat.
If you enjoy dramatic chocolate desserts, our strawberry-filled chocolate cake guide is another useful idea for special occasions.
Ingredients You Will Need
For three chocolate cake layers
- 2½ cups (300 g) all-purpose flour
- 2 cups (400 g) granulated sugar
- ¾ cup (64 g) unsweetened cocoa powder
- 2 teaspoons baking soda
- 1 teaspoon baking powder
- ½ teaspoon fine salt
- 3 large eggs, preferably at room temperature
- 1 cup (240 ml) buttermilk, room temperature
- ½ cup (120 ml) neutral vegetable oil
- 2 teaspoons vanilla extract
- 1 cup (240 ml) freshly brewed hot coffee
Important: Use three 8-inch square cake pans that are at least 2 inches deep. The square shape matters if you want the same tall, geometric appearance.
A scale is particularly helpful here. Equal batter weight in each pan produces layers that stack far more evenly than portions divided by eye.
For bakers who make layer cakes regularly, a higher-quality digital scale is also a more useful purchase than another decorative gadget. You can compare current options on Amazon’s digital kitchen scale results.
For the chocolate-hazelnut frosting
- 1½ cups (340 g) unsalted butter, softened
- 5 cups (600 g) powdered sugar, sifted
- ½ cup (43 g) unsweetened cocoa powder, sifted
- ¾ cup (225 g) chocolate-hazelnut spread
- ⅓ to ½ cup (80–120 ml) heavy cream
- 2 teaspoons vanilla extract
- Pinch of fine salt
Do not pour in all the cream at once. Begin with ⅓ cup. Add more one tablespoon at a time until the frosting spreads smoothly but still holds a piped peak.
For the ganache
- 8 oz (227 g) semisweet chocolate, finely chopped
- ¾ cup (180 ml) heavy cream
For the crunch and decoration
- ½ to ¾ cup toasted hazelnuts
- Chocolate wafer sticks
- Chocolate-hazelnut truffles
- Chocolate-covered wafer pieces
- Chocolate discs
- Dark chocolate pieces
- Milk chocolate pieces
Here is one detail that matters: toast the hazelnuts first.
Spread them on a baking sheet and toast at 350°F (175°C) for roughly 8–10 minutes, watching closely. Cool them completely before chopping. Toasting creates a stronger nutty aroma and a noticeably crisper bite.
Do not mix warm nuts into buttercream.
Equipment That Makes a Tall Square Cake Easier
You do not need a professional bakery. You do need the right basic tools.
Use three square pans, parchment paper, mixing bowls, a mixer, cooling racks, an offset spatula, a bench scraper, a piping bag, and a small spoon or squeeze bottle for ganache.
A stand mixer becomes worthwhile if you often make tall cakes because several cups of buttercream require prolonged mixing. Rather than recommending the same low-cost accessory in every recipe, this is one of the places where a durable mixer can genuinely save work. See current stand mixers on Amazon.
A rotating cake stand is another practical option. It lets the scraper remain relatively steady while the cake moves beneath it. For this square cake, that control is helpful when forming straight sides and clean corners. You can browse heavy-duty cake turntables on Amazon.
How to Make the Chocolate Cake Layers
Heat your oven to 350°F (175°C). Place a rack near the center.
Grease all three square pans lightly. Cut parchment to fit each bottom, then grease the parchment. This extra step is worth doing because broken corners are especially noticeable on square cakes.
Whisk the flour, sugar, cocoa, baking soda, baking powder, and salt in a large bowl. Break apart every visible cocoa lump.
In another bowl, whisk the eggs, buttermilk, vegetable oil, and vanilla.
Pour the wet mixture into the dry ingredients. Stir at low speed until mostly combined.
Now slowly add the hot coffee.
Do not be alarmed when the batter becomes thin. A relatively fluid batter is normal for this style of chocolate cake; other established chocolate cake formulas using coffee and oil are also relatively loose.
Stop mixing as soon as the batter is smooth. Excess mixing after the flour becomes hydrated can make the crumb less tender.
Divide the batter evenly among the three pans. For maximum precision, weigh the filled pans or weigh the total batter and divide it by three.
Bake for 25–30 minutes, but begin checking at 24–25 minutes.
A wooden pick inserted near the center should emerge clean or with a few moist crumbs rather than liquid batter. King Arthur similarly uses a clean pick or a few moist crumbs as a doneness indicator for chocolate layers.
Let the cakes sit in their pans for about 10 minutes. Carefully turn them onto cooling racks and remove the parchment.
They must become completely cool before frosting.
Make the Chocolate-Hazelnut Buttercream
Beat the softened butter for 3–4 minutes until lighter and fluffy.
Add powdered sugar gradually. Trying to add five cups at once usually creates a sugar cloud and makes it harder to judge consistency.
Add the sifted cocoa.
Beat in the chocolate-hazelnut spread, vanilla, and salt.
Add ⅓ cup heavy cream and beat again. If the buttercream feels too stiff, add cream one tablespoon at a time.
The final frosting should be soft enough to spread yet firm enough to support three cake layers.
If it becomes too soft, refrigerate it for 10–15 minutes. If it is too firm, beat in a small amount of cream.
How to Build the Crunchy Hazelnut Layers
This step turns a regular chocolate cake into a hazelnut crunch cake.
Place the first completely cooled cake layer on a sturdy cake board.
Spread an even layer of chocolate-hazelnut frosting across it. Keep it thick enough to taste, but not so thick that the next cake layer slides.
Scatter a light layer of toasted chopped hazelnuts over the frosting.
Do not cover every inch with nuts. Too many large pieces can make slices difficult to cut and can weaken the grip between the layers.
Add the second cake layer and repeat.
Place the third layer on top.
Check the cake from every side. Correct leaning now, before applying the outer frosting.
The Secret to Sharp Square Corners
Apply a thin crumb coat over the entire cake. Its job is to trap loose crumbs, not to look pretty.
Refrigerate the cake for 20–30 minutes.
This chilling stage is essential for the appearance shown in the inspiration cake. Once firm, add the final layer of cocoa buttercream.
Smooth each side with a bench scraper. Work on one face at a time. Pull excess frosting toward the corners rather than repeatedly scraping the corner away.
A metal scraper with enough height to cover most of the cake side makes this much easier. If layer cakes are frequent content for your kitchen, a professional cake-decorating kit can be more useful than repeatedly buying individual plastic tools. Browse professional cake decorating tools on Amazon.
Chill the finished frosted cake again for around 20 minutes before adding ganache.
Make Glossy Chocolate Ganache Drips
Finely chop the semisweet chocolate and place it in a heatproof bowl.
Heat the heavy cream until steaming and just beginning to simmer. Do not aggressively boil it.
Pour the cream over the chocolate.
Leave it untouched for 2 minutes.
Then stir slowly from the center outward until glossy and smooth. This hot-cream-over-chocolate method is also used in professional-style layer cake recipes.
Now comes the part many recipes skip: do not immediately pour hot ganache over your buttercream.
Let the ganache cool until it remains fluid but is no longer hot.
Test one drip on the back of the chilled cake.
If it races to the bottom, wait several more minutes. If it barely moves, warm the ganache very gently.
Once the test drip looks right, make individual drips around the perimeter. Then spread a thin amount across the top.
Decorating It Like a Celebration Cake
Pipe generous chocolate buttercream swirls across the top.
Now build height.
Insert wafer sticks at different angles. Place truffles near the frosting swirls. Add chocolate discs and irregular broken chocolate pieces. Fill smaller spaces with toasted hazelnuts and chocolate-covered wafer chunks.
Avoid arranging everything symmetrically. Different heights and shapes create the overflowing chocolate-shop appearance seen in the finished cake.
Most importantly, add the crispy pieces close to serving time. Refrigeration and buttercream moisture gradually soften wafers.
For more ideas on getting a crisp texture into desserts, see our guide to the secret to crunchy cookies.
Make-Ahead and Storage Tips
You do not have to make the entire cake in one day.
The cake layers can be baked one day ahead. Once completely cool, wrap each layer tightly. King Arthur notes that unfrosted chocolate cake layers can also be wrapped and frozen for later use.
Buttercream can also be prepared ahead and refrigerated. Bring it back toward room temperature and beat it again before use.
For the best finish, assemble and frost the cake a day before serving, then add the delicate crunchy decorations on the serving day.
Because this finished cake contains heavy cream in the frosting and ganache, keep it refrigerated for longer storage. For the best eating texture, let individual slices lose some of their refrigerator chill before serving.
Common Mistakes to Avoid
The layers are uneven: Measure the batter rather than estimating it.
The frosting slides: The cake is probably still warm, or the buttercream is too soft. Chill both before continuing.
The cake leans: Use even filling layers and press each cake layer into position gently.
The ganache runs to the bottom: It is too warm or thin. Allow it to cool before another test drip.
The ganache barely drips: It has cooled too far. Warm it in very short intervals.
The wafers become soft: Add them shortly before serving.
The cake tears when sliced: Use a sharp knife. Wipe the blade between cuts. A warm, dry knife also gives cleaner chocolate and buttercream edges.
Serving the Cake
This is a rich dessert, so slices do not need to be huge.
For cleaner portions, first remove tall decorations from the area you plan to cut. Use a long sharp knife and clean it between slices.
The best bite includes all three elements: soft chocolate crumb, creamy hazelnut filling, and toasted nut crunch.
If you enjoy working with caramelized toppings as well as chocolate decorations, our guide to mastering caramelized sugar covers another useful dessert technique.
FAQs About Chocolate Hazelnut Crunch Celebration Cake
Can I make this cake without coffee?
Yes. Replace the coffee with hot water. The cake will still work. Coffee mainly adds depth to the cocoa flavor rather than making the cake taste strongly of coffee.
Can I use two cake pans instead of three?
It is safer not to put all this batter into two standard 8-inch square pans unless they are deep enough for the extra batter. Overfilled pans can spill in the oven. For the tall appearance described here, three pans are the better choice.
Why does the recipe use both baking soda and baking powder?
They are chemical leaveners that help the cake rise. Baking soda also works well in a formula containing acidic buttermilk.
How do I stop chocolate cake from drying out?
Measure flour carefully and avoid unnecessary extra baking time. Oil and buttermilk already help this recipe stay tender. Once cool, keep the cake covered rather than leaving cut surfaces exposed.
Can I make the cake without hazelnuts?
Yes. Leave out the chopped hazelnuts and choose nut-free chocolate decorations. Remember that many commercial chocolate-hazelnut spreads contain hazelnuts, so the spread must also be replaced if you need a genuinely nut-free cake.
How do I get clean ganache drips?
Start with a cold frosted cake and ganache that has cooled enough to thicken slightly. Make one test drip before decorating the visible sides.
Can I prepare it for a birthday the day before?
Yes. Bake, fill, crumb-coat, frost, and add ganache the previous day. Keep the cake chilled. Save wafer sticks and the most delicate crunchy pieces for shortly before serving.
Print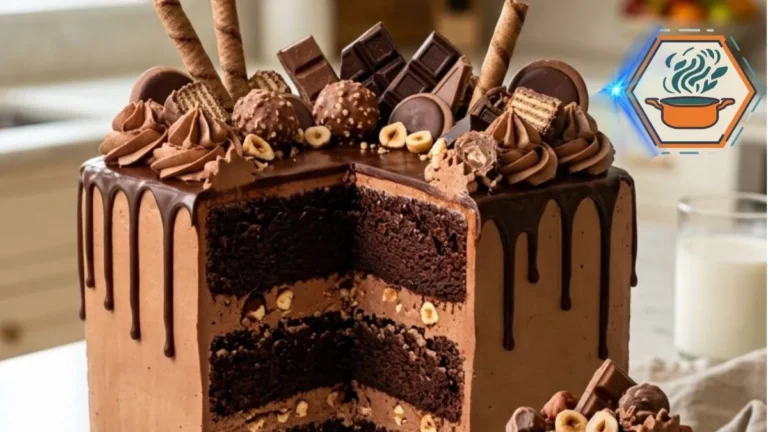
Chocolate Hazelnut Crunch Celebration Cake
A tall three-layer chocolate celebration cake filled with creamy chocolate-hazelnut buttercream and toasted hazelnuts, then finished with silky cocoa frosting, glossy chocolate ganache drips, wafers, truffles, and crunchy chocolate decorations.
- Total Time: 3 hours 20 minutes
- Yield: 16 servings
Ingredients
Chocolate Cake
- 2½ cups (300 g) all-purpose flour
- 2 cups (400 g) granulated sugar
- ¾ cup (64 g) unsweetened cocoa powder
- 2 teaspoons baking soda
- 1 teaspoon baking powder
- ½ teaspoon fine salt
- 3 large eggs, room temperature
- 1 cup (240 ml) buttermilk, room temperature
- ½ cup (120 ml) neutral vegetable oil
- 2 teaspoons vanilla extract
- 1 cup (240 ml) hot brewed coffee
Chocolate-Hazelnut Filling and Frosting
- 1½ cups (340 g) unsalted butter, softened
- 5 cups (600 g) powdered sugar, sifted
- ½ cup (43 g) unsweetened cocoa powder, sifted
- ¾ cup (225 g) chocolate-hazelnut spread
- ⅓–½ cup (80–120 ml) heavy cream
- 2 teaspoons vanilla extract
- Pinch of fine salt
Chocolate Ganache
- 8 oz (227 g) semisweet chocolate, finely chopped
- ¾ cup (180 ml) heavy cream
Hazelnut Crunch and Decoration
- ½–¾ cup toasted hazelnuts, roughly chopped
- Chocolate wafer sticks
- Chocolate-hazelnut truffles
- Chocolate-covered wafer pieces
- Chocolate discs
- Dark chocolate pieces
- Milk chocolate pieces
Instructions
- Preheat the oven to 350°F (175°C). Lightly grease three 8-inch square cake pans. Line the bottoms with parchment paper and grease the parchment.
- Add the flour, sugar, cocoa powder, baking soda, baking powder, and salt to a large bowl. Whisk until evenly combined and no large cocoa lumps remain.
- In another bowl, whisk the eggs, buttermilk, vegetable oil, and vanilla. Pour the wet ingredients into the dry ingredients. Mix just until mostly combined.
- Slowly pour in the hot coffee while mixing on low speed. The batter will be fairly thin. Do not add extra flour to thicken it.
- Divide the batter equally between the three prepared pans. For the most even layers, weigh the batter and divide it into three equal portions.
- Bake for 25–30 minutes. Start checking at 25 minutes. A toothpick inserted near the center should come out clean or with a few moist crumbs.
- Cool in the pans for about 10 minutes. Turn the cakes onto wire racks, remove the parchment, and allow them to cool completely before frosting.
- While the oven is still at 350°F, spread the hazelnuts on a baking sheet. Toast for about 8–10 minutes, watching carefully. Cool completely before roughly chopping.
- For the frosting, beat the softened butter for 3–4 minutes until pale and fluffy. Gradually beat in the powdered sugar and cocoa powder.
- Add the chocolate-hazelnut spread, vanilla, and salt. Beat until combined. Start with ⅓ cup heavy cream. Add more cream one tablespoon at a time if needed. The frosting should spread easily but remain firm enough to support the layers.
- Place the first cake layer on a sturdy cake board. Spread an even layer of frosting over it. Sprinkle lightly with toasted chopped hazelnuts.
- Add the second layer. Repeat with frosting and hazelnuts. Position the final cake layer on top.
- Cover the cake with a thin crumb coat. Refrigerate for 20–30 minutes, until the frosting feels firm.
- Apply the remaining chocolate-hazelnut frosting. Smooth the four sides and top with an offset spatula and metal cake scraper. Work carefully around the corners to create the tall square finish.
- Refrigerate the frosted cake for another 20 minutes before adding the ganache.
- Put the finely chopped semisweet chocolate in a heatproof bowl. Heat the heavy cream until steaming and just beginning to simmer.
- Pour the hot cream over the chocolate. Leave untouched for 2 minutes. Stir slowly from the center outward until completely smooth and glossy.
- Allow the ganache to cool until fluid but no longer hot. Test one drip on the back of the chilled cake. If it runs straight to the bottom, let the ganache cool longer.
- Create individual ganache drips around the cake. Spread a thin layer of ganache across the top.
- Pipe chocolate frosting swirls over the top. Decorate with wafer sticks, chocolate-hazelnut truffles, wafer pieces, chocolate discs, dark and milk chocolate pieces, and toasted hazelnuts.
- Add the crispy wafer decorations as close to serving as practical so they remain crunchy.
Notes
- Do not frost warm cake layers.
- Room-temperature eggs and buttermilk mix more evenly into the batter.
- Hot coffee deepens the cocoa flavor. Hot water can be substituted if needed.
- The cake batter is supposed to be relatively thin.
- Toasting the hazelnuts gives the filling a much stronger crunch and nutty flavor.
- Cool toasted hazelnuts completely before putting them onto buttercream.
- Do not make the filling excessively thick. Tall layers can slide when too much soft buttercream is placed between them.
- Chill the crumb-coated cake for 20–30 minutes before the final frosting coat. This makes straight sides and square corners much easier.
- Always make one test ganache drip before decorating the entire cake.
- Add wafers shortly before serving because moisture gradually softens them.
- For clean slices, use a sharp knife and wipe it between cuts.
- Decoration quantities can be adjusted depending on the exact appearance desired.
- Prep Time: 1 hour 20 minutes
- Chilling/Cooling Time: 1 hour 30 minutes
- Cook Time: 30 minutes
- Category: Dessert
- Method: Baking
- Cuisine: American-inspired
A Celebration Cake Worth the Extra Steps
The beauty of this Chocolate Hazelnut Crunch Celebration Cake is not one secret ingredient. It comes from controlling every small stage.
Bake even layers. Cool them fully. Toast the hazelnuts. Keep the filling stable. Chill the crumb coat. Test the ganache before committing to the drips. Add the fragile crunch last.
Follow those details and you get much more than a tall chocolate cake. You get dark, tender layers against creamy hazelnut frosting, roasted nut crunch, silky ganache, and crisp chocolate decorations.
And when that first square slice comes away and reveals the three chocolate layers inside, the cake finally delivers the moment it promised when you placed it on the table.