
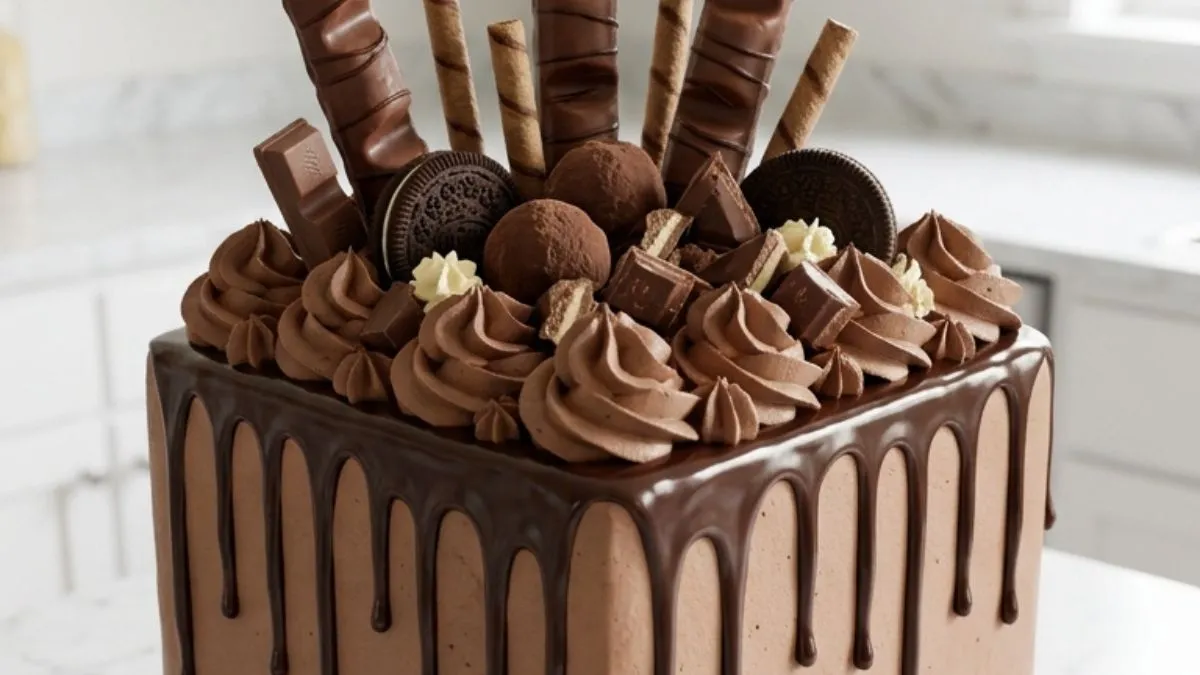
Some cakes are meant to look perfect. This one is meant to make people stop talking when it reaches the table.
The Chocolate Celebration Overload Cake is a tall, square chocolate layer cake covered in soft milk-chocolate buttercream. Dark ganache falls down the sides in uneven drips. On top, chocolate rosettes support a deliberately crowded collection of wafer bars, cookies, truffles, chocolate sticks, and broken chocolate pieces.
The secret is not making every detail perfectly symmetrical. The slightly irregular finish gives this cake its homemade celebration character. Under all that decoration, however, the structure needs to be carefully planned.
The cake itself uses cocoa, buttermilk, oil, and hot coffee. Coffee is especially useful in chocolate cakes because it can deepen the cocoa character without making the finished cake taste like a cup of coffee. King Arthur Baking also uses brewed coffee or water in several chocolate-cake formulas.
If you enjoy learning why chocolate desserts behave the way they do, our guide to mastering caramelized sugar covers another useful dessert technique.
Affiliate disclosure: As an Amazon Associate I earn from qualifying purchases. This article may contain affiliate links to kitchen tools I find useful for preparing this recipe.
JUMP TO
Why This Chocolate Celebration Cake Works
There are three jobs happening at once.
First, the cake needs enough moisture to stay tender after chilling.
Second, the buttercream must be soft enough to spread but firm enough to hold the tall decorations.
Third, the ganache needs the correct temperature. Too warm and it runs to the bottom. Too cold and it sits on the edge in thick blobs.
That balance is what turns a pile of chocolate ingredients into a stable celebration cake.
The oil helps the crumb remain soft. Buttermilk brings moisture and acidity. Cocoa provides the base chocolate flavor, while coffee strengthens its darker notes.
The result should be moist rather than wet and tender rather than crumbly.
Recipe at a Glance
- Prep time: About 1 hour 20 minutes
- Bake time: About 27–32 minutes
- Cooling and chilling: About 1 hour
- Total time: Approximately 3 hours
- Yield: 16–20 servings
- Pan size: Three 8-inch square cake pans
- Oven: 350°F (175°C)
- Difficulty: Intermediate
- Best occasion: Birthdays and celebrations
One warning: don’t rush the cooling period. Warm cake and buttercream are a terrible partnership.
Ingredients
Chocolate Cake
- 2½ cups all-purpose flour
- ¾ cup unsweetened cocoa powder
- 2 cups granulated sugar
- 2 teaspoons baking soda
- 1 teaspoon baking powder
- ½ teaspoon fine salt
- 3 large eggs, preferably room temperature
- 1¼ cups buttermilk
- ¾ cup neutral vegetable oil
- 2 teaspoons vanilla extract
- 1 cup hot brewed coffee
Chocolate Buttercream
- 2 cups unsalted butter, softened but not greasy
- 6 cups powdered sugar, sifted if lumpy
- ¾ cup unsweetened cocoa powder
- 6 ounces milk chocolate, melted and cooled
- Up to ½ cup heavy cream
- 2 teaspoons vanilla extract
- Pinch of salt
Dark Chocolate Ganache
- 8 ounces semisweet chocolate, finely chopped
- ¾ cup heavy cream
Vanilla Cream Accents
- ½ cup cold heavy whipping cream
- 2 tablespoons powdered sugar
- ½ teaspoon vanilla extract
Chocolate Crown
Use generic or unbranded chocolate pieces so you can adapt the design:
- 4–5 long chocolate-covered wafer bars
- 5–6 thin chocolate wafer sticks
- 5–6 chocolate sandwich-cookie halves
- 8–10 small chocolate truffles
- 4–5 irregular broken chocolate pieces
- Extra chocolate buttercream for rosettes
Four Tools That Are Actually Worth Having
This is where I would spend money rather than recommending another cheap baking gadget that sits in a drawer.
A stand mixer becomes genuinely useful here. There is a large amount of buttercream, and it needs prolonged mixing. A quality stand mixer is also useful for bread dough, cookies, whipped cream, meringue, and many future recipes. Search Amazon for a 5–7 quart stand mixer with a paddle and whisk attachment.
A set of heavy-gauge 8-inch square aluminum cake pans is another sensible purchase. Three matching pans help the layers bake at a similar rate and give you the straight geometry needed for the reference look.
A fast digital instant-read thermometer is surprisingly helpful. You can use it for cake, ganache, caramel, bread, meat, frying, and many other recipes. For chocolate cake, temperature can provide another clue alongside the traditional skewer test. King Arthur, for example, specifies an internal temperature of at least 205°F for one of its chocolate Bundt cakes.
Finally, a heavy rotating cake turntable makes the square frosting stage far easier. Choose a stable model with a smooth bearing rather than a tiny lightweight plastic version.
How to Make the Chocolate Cake Layers
Heat the oven to 350°F (175°C). Put a rack near the center.
Grease three 8-inch square pans. Line each bottom with parchment, then lightly grease the parchment.
Do not skip this step. A tall celebration cake becomes much harder to assemble when one layer loses a corner while leaving the pan.
In a large bowl, whisk together:
- Flour
- Cocoa
- Sugar
- Baking soda
- Baking powder
- Salt
Break apart every visible cocoa lump.
In another bowl, whisk the eggs, buttermilk, vegetable oil, and vanilla.
Pour the wet mixture into the dry ingredients. Mix only until mostly incorporated.
Now slowly pour in the hot coffee while whisking.
The batter will become much thinner. That is expected. Chocolate cake recipes using coffee can produce relatively fluid batter.
Divide the batter as evenly as possible among the three prepared pans.
This is one place where a digital kitchen scale pays for itself. Weigh the filled pans rather than judging by eye. Equal quantities mean more even layers and less trimming later.
Bake for approximately 27–32 minutes.
Start checking before the full time has passed. Oven calibration, pan material, and actual batter depth can change the timing.
The cakes are ready when the centers spring back gently and a wooden pick inserted near the center comes out with a few moist crumbs or clean rather than coated in raw batter.
Cool the cakes in their pans for about 10–15 minutes. Carefully turn them onto racks, remove the parchment, and cool completely.
Do not frost warm layers.
Make a Stable Chocolate Buttercream
Beat the softened butter for 3–4 minutes until creamy and lighter.
Add the powdered sugar gradually. Don’t dump six cups into a running mixer unless you want your kitchen to look like a snowstorm.
Add the cocoa in stages.
Pour in the melted but cooled milk chocolate.
That word matters.
Hot melted chocolate can soften the butter too much. Allow the chocolate to cool until it remains fluid but no longer feels hot.
Add vanilla and salt.
Finally, add heavy cream a tablespoon or two at a time until the frosting reaches the correct consistency.
You may not need the entire ½ cup.
The finished buttercream should spread easily while still holding a piped peak. Since the top decorations are heavy, an overly soft frosting can cause wafer bars and chocolate pieces to lean.
Build a Tall, Straight Square Cake
Place the first completely cooled cake layer on a sturdy cake board or serving plate.
Spread an even layer of chocolate buttercream over it.
Add the second cake layer. Check it from the front and sides before adding more frosting.
Repeat with the third layer.
Now inspect the cake.
If the layers have prominent domes, trimming them before assembly gives a more stable structure. Don’t remove more cake than necessary.
Spread a very thin coating of buttercream over the top and all four sides. This is your crumb coat.
Refrigerate for about 20 minutes.
The chilled crumb coat traps loose crumbs so they don’t contaminate the final frosting.
For more cake-texture ideas, see our guide on the difference between butter cake styles.
Create the Homemade Square Finish
Apply a thicker final layer of chocolate buttercream.
Smooth each side with a bench scraper or large icing smoother.
But don’t chase perfection.
The reference cake has clean square geometry while still looking homemade. Slight spatula marks and tiny imperfections give it character.
Work on one face at a time.
Sharpen the upper corners reasonably well, then stop before the frosting becomes overworked.
Chill the frosted cake for another 15–20 minutes before adding ganache.
This cold surface gives you far more control over the drips.
Getting the Ganache Drips Right
Finely chop the semisweet chocolate and place it in a heatproof bowl.
Heat the cream until steaming and close to a simmer.
Pour it over the chocolate.
Leave it alone for approximately two minutes.
Then stir gently from the center outward until glossy.
Now comes the step that recipes often fail to explain:
Do not immediately pour hot ganache over your cake.
Let it cool and thicken first.
Test a single drip on the back edge of the chilled cake. If it races to the bottom, the ganache is still too warm or thin.
Wait.
If it barely moves, warm it very slightly.
Once the consistency is right, add drips individually around the upper perimeter. Make some short and others long.
That irregularity matters.
The cake in the reference image does not have a mathematically identical drip every inch. Its variation is part of the design.
Build the Chocolate Crown
This stage transforms the cake.
Transfer some chocolate buttercream into a piping bag fitted with a large star tip.
Pipe a dense ring of rosettes and generous swirls across the top perimeter and toward the center.
Don’t make a thin decorative border.
You need enough buttercream to support the toppings.
Whip the cold heavy cream with powdered sugar and vanilla until firm peaks form. Pipe or spoon a few small pale accents between the chocolate elements.
Use them sparingly. The cake should remain overwhelmingly chocolate.
Now add the tallest pieces first.
Push the long chocolate-covered wafer bars vertically or at slight angles into the central area.
Add thin wafer sticks between them.
Then fill the lower spaces with:
- Chocolate sandwich-cookie halves
- Truffles
- Broken chocolate slabs
- Short wafer pieces
- Extra buttercream rosettes
Think in terms of height variation.
The center should contain the tallest pieces. Shorter decorations fill the spaces around them.
Avoid arranging everything at identical angles. The reference cake looks abundant because the chocolate rises in different directions.
The Stability Trick Most Recipes Forget
Chocolate decorations have weight.
If you place all of them into very soft room-temperature frosting, gravity eventually wins.
Use chilled cake and stable buttercream.
Insert heavier pieces far enough into the buttercream to anchor them without pushing them deep into the cake layers.
If a particularly tall chocolate bar keeps leaning, place it closer to the center where surrounding decorations can give it visual and physical support.
Once decorated, chill the finished cake for about 30 minutes.
That short refrigeration period firms the buttercream and ganache before presentation.
How to Get the Same Visual Character as the Reference Cake
The recognizable look comes from several details working together.
Keep the cake square and tall. Use chocolate frosting from top to bottom. Let dark ganache contrast with the lighter milk-chocolate buttercream.
Most importantly, don’t spread the decorations evenly over the whole surface.
Concentrate them into a thick, crowded upper crown.
You want the eye to move upward from the long dark ganache drips to the buttercream swirls and finally to the forest of chocolate pieces.
For another dramatic dessert technique, our crème brûlée caramelization guide explains how to create a caramelized finish without a blowtorch.
Common Mistakes to Avoid
Adding ganache while it is hot: It can melt the buttercream and run straight down the cake.
Using warm cake layers: Even slightly warm cake can soften the filling and cause layers to slide.
Adding all the cream to buttercream immediately: Humidity and ingredient temperature affect consistency. Add cream gradually.
Making every ganache drip identical: The reference design depends on natural variation.
Under-supporting the chocolate crown: Pipe generous buttercream swirls before inserting heavy decorations.
Overfilling between layers: Too much soft frosting can make a tall cake unstable.
Skipping the crumb coat: Dark cake crumbs become very visible in milk-chocolate frosting.
Cutting immediately after decorating: Give the assembled cake time to chill and settle.
Serving and Storage
Remove the cake from the refrigerator before serving so the buttercream has time to soften slightly. Butter-based frosting can feel very firm when eaten refrigerator-cold.
For clean slices, use a long sharp knife.
Dip it in hot water, wipe it dry, then make a cut. Clean the blade between portions.
Because the cake is tall and rich, start with modest pieces. You should get roughly 16–20 servings.
If the room is warm, don’t leave the decorated cake sitting out for long periods, especially because the design contains whipped-cream accents.
For longer storage, refrigerate it covered so the cut surfaces do not dry out.
Can You Make It Ahead?
Yes, and that is actually easier.
Bake the layers one day before decorating. Once completely cool, wrap them carefully.
You can also prepare the buttercream ahead and refrigerate it. Bring it back toward a workable temperature and beat it again before frosting.
The chocolate decorations can be sorted beforehand.
Then, on celebration day, you only need to stack, frost, drip, and decorate.
For anyone building their confidence with homemade cakes, RecipesMind also has a collection of practical baking ideas on the RecipesMind homepage.
FAQs About Chocolate Celebration Overload Cake
Can I make this cake without coffee?
Yes. Replace the coffee with hot water. The cake will still work. Coffee is included mainly to deepen the chocolate profile. King Arthur also lists coffee or water as alternatives in chocolate cake recipes.
Why is my chocolate cake batter so thin?
The hot coffee adds a substantial amount of liquid, so this batter should be thinner than many traditional butter cakes. Don’t add extra flour simply because it looks fluid.
Why did my ganache run to the bottom?
It was probably too warm or too fluid when applied. Chill the frosted cake and allow the ganache to cool before testing one drip.
How do I stop the cake layers from sliding?
Use fully cooled cake, stable buttercream, moderate filling layers, and chill the assembled cake before applying the final frosting.
Can I use round pans?
Technically, yes, but you will lose one of the defining features of this particular design. For a result close to the reference photo, use three matching 8-inch square pans.
Can I use dark chocolate instead of milk chocolate in the buttercream?
Yes, but the flavor and color will change. The milk chocolate gives the frosting its softer brown tone and sweeter character, while semisweet chocolate creates the darker ganache contrast.
How far ahead can I decorate it?
The cake itself can be assembled ahead, but for the best-looking crown, add crisp cookies and wafer decorations closer to serving. Refrigeration and moisture can gradually soften them.
What gives this cake its “overload” appearance?
Layering different chocolate shapes at different heights. Long wafer bars create height, rosettes create volume, truffles fill gaps, cookies add round shapes, and broken chocolate adds irregular edges.
Print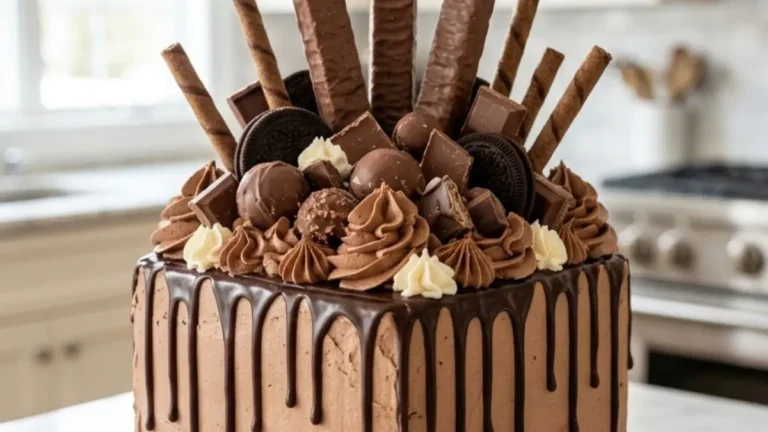
Chocolate Celebration Overload Cake
A tall square chocolate celebration cake with moist cocoa layers, creamy chocolate buttercream, dark ganache drips, and a dramatic crown of wafers, cookies, truffles, and chocolate pieces.
- Total Time: 3 hours
- Yield: 16–20 servings
Ingredients
Chocolate Cake
- 2½ cups (313 g) all-purpose flour
- ¾ cup (64 g) unsweetened cocoa powder
- 2 cups (400 g) granulated sugar
- 2 teaspoons baking soda
- 1 teaspoon baking powder
- ½ teaspoon fine salt
- 3 large eggs, room temperature
- 1¼ cups (300 ml) buttermilk, room temperature
- ¾ cup (180 ml) neutral vegetable oil
- 2 teaspoons vanilla extract
- 1 cup (240 ml) hot brewed coffee
Chocolate Buttercream
- 2 cups (454 g) unsalted butter, softened
- 6 cups (720 g) powdered sugar
- ¾ cup (64 g) unsweetened cocoa powder
- 6 oz (170 g) milk chocolate, melted and cooled
- Up to ½ cup (120 ml) heavy cream
- 2 teaspoons vanilla extract
- Pinch of fine salt
Dark Chocolate Ganache
- 8 oz (227 g) semisweet chocolate, finely chopped
- ¾ cup (180 ml) heavy cream
Vanilla Cream Accents
- ½ cup (120 ml) cold heavy whipping cream
- 2 tablespoons powdered sugar
- ½ teaspoon vanilla extract
Chocolate Topping
- 4–5 long chocolate-covered wafer bars
- 5–6 thin chocolate wafer sticks
- 5–6 chocolate sandwich-cookie halves
- 8–10 small chocolate truffles or balls
- 4–5 irregular pieces of chocolate
- Chocolate buttercream rosettes from the buttercream above
Instructions
- Heat the oven to 350°F (175°C). Grease three 8-inch square cake pans. Line the bottoms with parchment paper and lightly grease the parchment.
- Whisk the flour, cocoa powder, sugar, baking soda, baking powder, and salt in a large bowl. Break up any cocoa lumps.
- In a separate bowl, whisk the eggs, buttermilk, oil, and vanilla until combined.
- Add the wet mixture to the dry ingredients. Mix just until mostly combined. Slowly stir in the hot coffee. The finished batter will be relatively thin; this is normal.
- Divide the batter evenly among the three pans. For the most even layers, use a kitchen scale to divide the batter by weight.
- Bake for 27–32 minutes. Begin checking early. The cakes are ready when the centers spring back lightly and a toothpick inserted in the center comes out clean or with a few moist crumbs, but no wet batter.
- Cool in the pans for 10–15 minutes. Carefully turn the layers onto wire racks, remove the parchment, and cool completely before frosting.
- For the buttercream, beat the softened butter for 3–4 minutes until creamy. Gradually beat in the powdered sugar and cocoa powder.
- Add the melted chocolate only after it has cooled enough that it is no longer hot. Beat in the vanilla and salt. Add heavy cream 1 tablespoon at a time until the frosting spreads easily but can still hold a firm piped peak. You may not need the full ½ cup.
- If necessary, trim prominent domes from the completely cooled cake layers. Place one layer on a sturdy cake board. Spread with buttercream. Repeat with the second and third layers.
- Cover the entire cake with a thin crumb coat. Refrigerate for 20 minutes.
- Apply the final buttercream layer. Keep the four sides fairly straight while retaining a slightly homemade texture. Chill for another 15–20 minutes.
- Make the ganache. Place the finely chopped semisweet chocolate in a heatproof bowl. Heat the cream until steaming and just approaching a simmer. Pour it over the chocolate and leave for 2 minutes. Stir slowly until smooth.
- Allow the ganache to cool and thicken. Test one drip on the back of the cold cake. If it races downward, wait longer. Once ready, create irregular drips around the top edge, leaving some longer than others.
- Pipe a thick crown of chocolate buttercream rosettes and swirls over the top.
- Beat the cold heavy cream, powdered sugar, and vanilla until firm peaks form. Add a few small vanilla cream accents between the chocolate swirls.
- Insert the longest chocolate-covered wafer bars and sticks first. Position them vertically and diagonally through the center. Add cookie halves, truffles, broken chocolate, and shorter wafer pieces around them.
- Refrigerate the decorated cake for about 30 minutes to firm the frosting and stabilize the chocolate crown. Allow the buttercream to soften slightly before serving.
Notes
- Do not add extra flour because the chocolate batter appears thin.
- All cake layers must be completely cool before assembly.
- Room-temperature eggs and buttermilk mix into the batter more evenly.
- Add the heavy cream to the buttercream gradually. The full amount may make it too soft in a warm kitchen.
- The melted milk chocolate must be cooled before entering the buttercream.
- Always test the ganache on one inconspicuous area before making all the drips.
- Chill the frosted cake before adding ganache.
- Add crisp wafers and cookies closer to serving when possible, since prolonged refrigeration can soften them.
- The finished design should not be perfectly symmetrical. Different drip lengths and chocolate heights reproduce the crowded homemade celebration look.
- Nutrition varies significantly according to the chocolates, wafers, cookies, truffles, and portion size used.
- Prep Time: 1 hour 20 minutes
- Additional Time:: 1 hour 10 minutes
- Cook Time: 30 minutes
- Category: Cooking Tips & Techniques
- Method: Baking
- Cuisine: American
Final Baking Notes
The Chocolate Celebration Overload Cake looks chaotic, but its construction should be anything but chaotic.
Bake three even layers. Cool them fully. Make a buttercream strong enough to support the decorations. Chill the crumb coat. Test the ganache before committing to the drips. Finally, build the chocolate crown from the tallest pieces down to the smallest fillers.
And resist the temptation to make it too perfect.
A few different drip lengths, slightly varied buttercream swirls, uneven pieces of chocolate, and tall wafers leaning in different directions are what give this cake its celebration personality.
When it is finished, you should have a tall square cake with soft milk-chocolate sides, dramatic dark drips and an almost excessive crown of chocolate rising from the top.
That is exactly the point.