
There is a moment when a chocolate cake stops being just dessert.
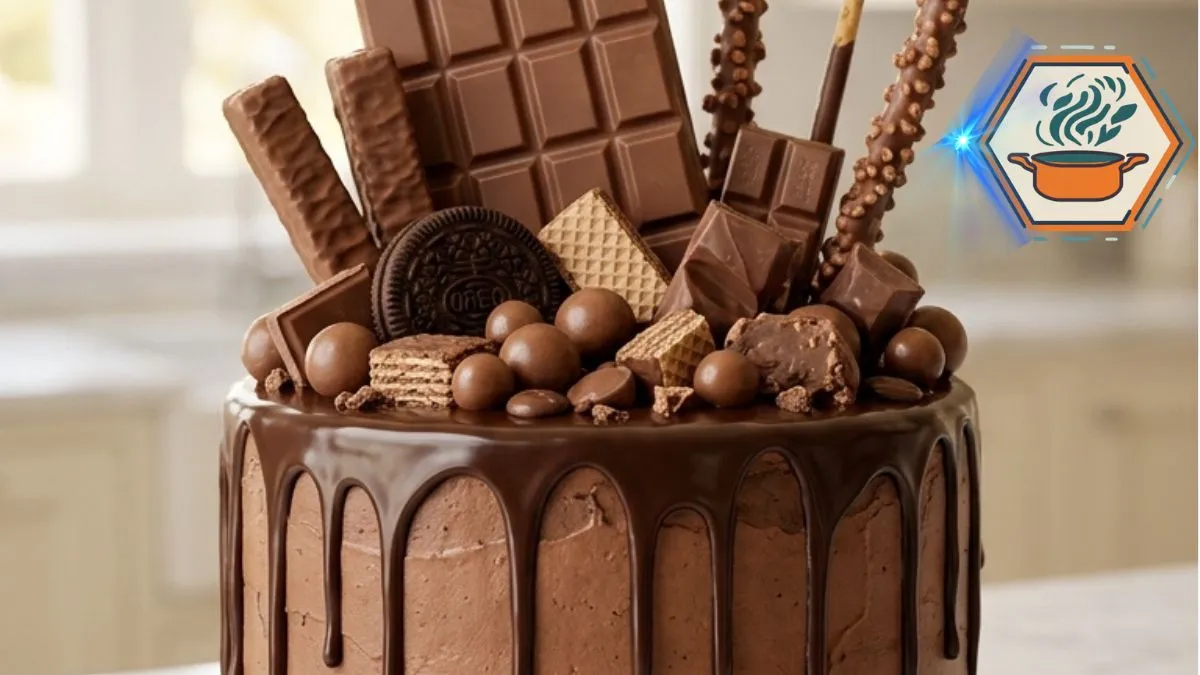
It happens when you carry it into the room and conversations slow down. People look at the glossy ganache running down the sides. Then they notice the chocolate bars standing tall on top, the cookies tucked between them, and the little chocolate candies scattered around the base.
That is exactly the feeling behind this Ultimate Chocolate Overload Cake.
It looks extravagant, but the method is surprisingly manageable. Under all that chocolate is a soft, moist two-layer cake covered with cocoa frosting and a controlled semi-sweet chocolate drip. The decorations do most of the visual work.
The important part is getting the foundation right.
For additional cake-baking guidance, King Arthur Baking’s cake guide is a useful resource covering mixing, layer cakes, frosting, and decorating. Their chocolate cake recipes also use familiar ingredients such as cocoa, oil, milk, eggs, and brewed coffee or water.
If you enjoy learning the small details that make homemade desserts better, you can also browse more baking ideas at RecipesMind.
Affiliate disclosure: As an Amazon Associate I earn from qualifying purchases. This article may contain affiliate links to kitchen tools I find useful for preparing this recipe.
jump to
Why This Ultimate Chocolate Overload Cake Works
A heavily decorated cake needs more than good looks.
The cake layers must stay moist while being firm enough to support frosting, ganache, cookies, chocolate bars, and candies. A cake that is extremely delicate can become difficult to stack.
Oil helps the crumb stay soft. Cocoa gives the cake its chocolate base. Hot coffee adds liquid while supporting a deeper chocolate character.
Coffee is not there to turn this into a coffee cake. King Arthur Baking also uses brewed coffee or water in several chocolate cake formulas.
The frosting has another job. It acts almost like the structure holding the finished cake together.
Then comes the ganache. It creates those thick, glossy drips that give the cake its dramatic finish.
Finally, different chocolate textures make the top look abundant rather than flat.
Ingredients You’ll Need
Chocolate Cake
For two 8-inch layers:
- 2 cups (240 g) all-purpose flour
- 3/4 cup (about 64 g) unsweetened cocoa powder
- 1 3/4 cups (350 g) granulated sugar
- 2 teaspoons baking powder
- 1 1/2 teaspoons baking soda
- 1/2 teaspoon fine salt
- 2 large eggs, preferably at room temperature
- 1 cup (240 ml) whole milk, preferably at room temperature
- 1/2 cup (120 ml) neutral vegetable oil
- 2 teaspoons vanilla extract
- 1 cup (240 ml) hot brewed coffee or hot water
Chocolate Frosting
- 1 cup (226 g) unsalted butter, softened
- 3 1/2 cups (420 g) powdered sugar
- 3/4 cup (64 g) unsweetened cocoa powder
- 1/3 cup (80 ml) heavy cream, plus a little more if needed
- 2 teaspoons vanilla extract
- Pinch of salt
Chocolate Ganache
- 6 oz (170 g) semi-sweet chocolate, finely chopped
- 1/2 cup (120 ml) heavy cream
Chocolate Decorations
This is where you can create the piled-high appearance shown in the photo.
Use a mixture of:
- Large milk chocolate bar sections
- Chocolate-covered wafer fingers
- Chocolate sandwich cookies
- Chocolate-covered crunchy bars
- Chocolate malt balls
- Mini chocolate candies
- Broken chocolate chunks
Choose different heights, widths, and textures. That variation matters more than buying one particular candy brand.
Four Tools That Are Actually Useful for This Cake
For frequent bakers, a stand mixer is one of the higher-value purchases that makes sense beyond this single recipe. It can handle buttercream and many other baking jobs. If you are comparing models, you can browse stand mixers on Amazon.
A digital kitchen scale is less glamorous but extremely useful. Flour and cocoa can vary when measured by volume. Weighing ingredients gives you better consistency from one cake to the next. You can compare digital baking scales on Amazon.
For bakers who make cakes, bread, caramel, meat, and other temperature-sensitive recipes, an instant-read thermometer has much wider use than a cake-only gadget. You can see instant-read kitchen thermometers on Amazon.
Finally, a rotating cake turntable makes frosting the tall sides much easier. It also helps when applying the ganache drip around the perimeter. You can browse rotating cake turntables on Amazon.
How to Make Ultimate Chocolate Overload Cake
1. Prepare the pans properly
Preheat the oven to 350°F (175°C).
Grease two 8-inch round cake pans. Place a parchment circle on the bottom of each pan, then lightly grease the parchment.
Do not rely on butter alone for a cake this important. The parchment makes releasing the layers much safer.
Place an oven rack near the center.
2. Combine the dry ingredients
In a large bowl, whisk together:
- Flour
- Cocoa powder
- Sugar
- Baking powder
- Baking soda
- Salt
If your cocoa contains lumps, sift it first.
This small step prevents dry cocoa pockets from appearing in the finished crumb.
3. Add the wet ingredients
Add the eggs, milk, oil, and vanilla.
Mix on low speed at first. Once the dry ingredients are moistened, mix just until the batter looks even.
Do not keep beating unnecessarily.
4. Add the hot coffee
Slowly pour in the hot coffee while mixing on low speed.
The batter will become quite thin.
Do not add extra flour because the batter looks thinner than a traditional butter cake. Thin chocolate batter is normal for this style of recipe.
Scrape the bottom and sides of the bowl with a flexible spatula.
5. Divide the batter accurately
Divide the batter evenly between the prepared pans.
A kitchen scale makes this easy: weigh the filled pans and adjust until both contain roughly the same amount of batter.
Equal layers bake more evenly and make the final cake look taller and cleaner.
6. Bake
Bake for approximately 28–34 minutes.
Start checking around 28 minutes.
Insert a toothpick into the center. You want it to emerge without wet batter. A few soft crumbs are fine.
Do not judge the cake only by time. Ovens vary.
7. Cool completely
Let the layers rest in their pans for about 10–15 minutes.
Run a thin knife around the edge if necessary. Turn the cakes onto cooling racks and remove the parchment.
Allow them to cool completely before frosting.
This detail cannot be skipped.
Warm cake melts buttercream.
If time allows, wrap the completely cooled layers and chill them for 30–60 minutes. Firmer layers are easier to stack and frost.
Make the Chocolate Frosting
Beat the softened butter for about 2–3 minutes until creamy.
Sift the powdered sugar and cocoa if either is lumpy.
Add them gradually rather than dumping everything into the bowl at once.
Pour in the vanilla, salt, and most of the heavy cream.
Beat until fluffy.
Check the texture.
The frosting should hold its shape but spread without tearing the cake. If it is too stiff, add heavy cream one teaspoon at a time.
If it becomes too loose, add a small amount of powdered sugar.
For another baking lesson where moisture makes a major difference, see our guide to keeping madeleines moist.
Build a Stable Layer Cake
If the cake layers have domed significantly, trim the tops with a long serrated knife.
Place the first layer on a cake board or serving plate.
Spread a generous, even layer of chocolate frosting over it.
Add the second cake layer.
Check the cake from several angles. It should sit straight before you continue.
Apply a thin crumb coat over the entire cake. This catches loose crumbs.
Chill for 20–30 minutes.
Now apply the final coat of frosting.
For the homemade appearance in the reference cake, don’t polish the sides until they look machine-made. Smooth them enough to create a tall rectangular-looking profile from the viewing angle while retaining subtle spatula marks.
The Secret to Thick Ganache Drips
This is where many otherwise beautiful chocolate cakes go wrong.
The ganache cannot be piping hot.
Finely chop the semi-sweet chocolate and place it in a heatproof bowl.
Heat the heavy cream until it is steaming and close to a simmer. Do not let it aggressively boil.
Pour it over the chocolate.
Leave it untouched for 2–3 minutes.
Then stir slowly from the center outward until the mixture becomes smooth and glossy.
Now wait.
The ganache needs to cool until it is thick enough to travel slowly down a chilled cake.
Test one drip on the back of the cake first.
If it races to the cake board, the ganache is too warm or thin. Wait several minutes and test again.
If it barely moves, gently warm it for a few seconds.
Once the consistency is right, create individual drips around the upper edge. Vary their lengths naturally.
Spread a thin layer of remaining ganache over the top.
How to Recreate the Chocolate-Loaded Look
The decorating order is important.
Start with your tallest pieces.
Place a large rectangular milk chocolate bar toward the back of the cake. Position it almost vertically but with a slight angle.
Add tall chocolate wafer fingers beside it.
Next, place:
- Chocolate-covered crunchy sticks
- Sandwich cookies
- Shorter chocolate bar pieces
- Broken wafer pieces
- Malted chocolate balls
Work from back to front.
The tallest decorations belong toward the rear. Medium pieces fill the middle. Small candies cover gaps near the front.
Do not create perfect symmetry.
The reference look depends on controlled randomness.
Then repeat a smaller version around the base. Lean cookies and chocolate pieces against the cake and scatter a few round chocolate candies nearby.
You want abundance without hiding the ganache.
The Details That Make This Recipe More Reliable
A beautiful recipe photo means very little if followers cannot reproduce the cake.
Keep these details in mind:
- Weigh the flour when possible. Too much flour produces a drier cake.
- Use fresh baking powder and baking soda. Old leaveners can reduce the rise.
- Line the pans with parchment.
- Do not overmix after the flour is hydrated.
- Cool every layer fully before frosting.
- Chill the crumb-coated cake before the final finish.
- Chill the frosted cake before testing the ganache.
- Test one ganache drip before committing to the whole cake.
- Add heavy decorations carefully. Push tall bars slightly into the frosting so they have support.
- Keep the largest pieces toward the center/back rather than balancing all the weight on the outer edge.
If you’re interested in another chocolate-centered dessert, our kunafa chocolate guide explains what goes into that popular combination.
Can You Make It Without Coffee?
Absolutely.
Replace the coffee with the same quantity of hot water.
The cake will still work.
Coffee is useful because its roasted notes complement cocoa, but it should not dominate the finished flavor.
King Arthur Baking likewise lists coffee or water as alternatives in multiple chocolate cake recipes.
How to Store the Cake
Because this cake carries a large amount of chocolate decoration, storage takes a little planning.
For short-term storage, keep the finished cake covered in a cool room when conditions and ingredients permit. If your kitchen is hot, refrigeration is safer for maintaining the frosting and ganache structure.
For longer storage, refrigerate the cake in a cake carrier.
Before serving, allow chilled slices some time to lose their refrigerator chill. Butter-based frosting becomes firmer when cold, and the cake’s texture is generally more pleasant once it has warmed somewhat.
You can also freeze undecorated cake layers. Wrap completely cooled layers tightly before freezing.
Serving the Cake Without Destroying the Decorations
Remove some of the tall chocolates before cutting.
Use a long, sharp knife.
For cleaner portions, wipe the blade between cuts.
Because this cake is rich, slices do not need to be huge. Narrow portions are usually enough, especially after a full meal.
A cup of coffee or cold milk pairs naturally with the deep chocolate flavor.
If you enjoy rich celebration desserts, you may also like our Milk Bar pie guide or these ideas for Mother’s Day cakes.
Frequently Asked Questions
What makes chocolate cake more moist?
Oil, sufficient liquid, accurate flour measurement, and careful baking all matter. Overbaking is one of the easiest ways to lose moisture. Remove the layers once the center is properly baked rather than leaving them in the oven for extra color.
Why put hot coffee in chocolate cake?
Coffee contributes liquid and roasted flavor notes that pair naturally with cocoa. If you do not want to use it, hot water is a straightforward substitute.
Can I make this chocolate cake one day ahead?
Yes. In fact, making the layers ahead can make assembly easier. Cool them completely, wrap them well, and store them appropriately until you are ready to decorate.
How do I stop chocolate ganache from running down the whole cake?
Let it cool before applying it and put it onto a chilled frosted cake. Always make one test drip first. If it moves too quickly, wait until the ganache thickens.
Why is my chocolate cake dry?
Common causes include too much flour, overbaking, inaccurate oven temperature, or changing the ingredient ratios. Measuring flour by weight can reduce one major source of inconsistency.
Can I use Dutch-process cocoa?
Cocoa choice matters when baking soda is involved because natural and Dutch-process cocoa differ in acidity. Since this formula uses both baking soda and baking powder, I would not casually swap cocoa types without testing the recipe first. For the most repeatable result, use the same type of unsweetened cocoa each time.
How do I keep the chocolate bars standing on top?
Insert the bottom of each tall piece slightly into the frosting or ganache. Start with the largest pieces toward the back and build smaller decorations around them for added support.
How long should I chill the cake before adding ganache?
Around 20–30 minutes is a useful starting point. The frosting should feel firm enough that a test drip does not melt or drag it.
Print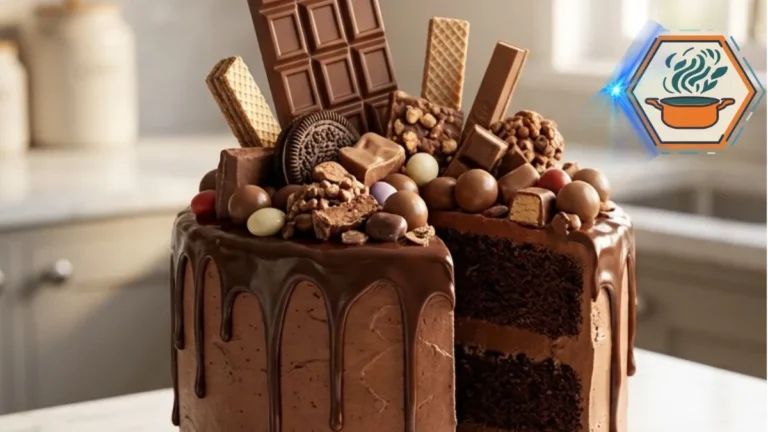
Ultimate Chocolate Overload Cake
A tall, moist chocolate layer cake covered with silky chocolate frosting and glossy ganache drips, then piled high with chocolate bars, wafers, sandwich cookies, malt balls, and chocolate candies.
- Total Time: 2 hours 45 minutes
- Yield: 12 servings
Ingredients
Chocolate Cake
- 2 cups (240 g) all-purpose flour
- 3/4 cup (64 g) unsweetened natural cocoa powder
- 1 3/4 cups (350 g) granulated sugar
- 2 teaspoons baking powder
- 1 1/2 teaspoons baking soda
- 1/2 teaspoon fine salt
- 2 large eggs, room temperature
- 1 cup (240 ml) whole milk, room temperature
- 1/2 cup (120 ml) neutral vegetable oil
- 2 teaspoons vanilla extract
- 1 cup (240 ml) hot brewed coffee or hot water
Chocolate Frosting
- 1 cup (226 g) unsalted butter, softened
- 3 1/2 cups (420 g) powdered sugar
- 3/4 cup (64 g) unsweetened cocoa powder
- 1/3 cup (80 ml) heavy cream, plus more only if needed
- 2 teaspoons vanilla extract
- Pinch of fine salt
Chocolate Ganache
- 6 oz (170 g) semi-sweet chocolate, finely chopped
- 1/2 cup (120 ml) heavy cream
Chocolate Topping
Because the original recipe does not give exact weights for the decorations, I recommend standardizing them for your followers. Otherwise, two people can make cakes with very different weight, cost, appearance, and nutrition.
Use approximately:
- 1 large milk chocolate bar, about 4 oz (113 g), broken into sections
- 4 chocolate-covered wafer fingers, about 2 oz (55 g)
- 4 chocolate sandwich cookies
- 2 chocolate-covered crunchy bars, cut or broken into pieces
- 1/2 cup (85 g) chocolate malt balls
- 1/3 cup (60 g) mini chocolate candies
- 2 oz (55 g) assorted chocolate chunks
This quantity creates the heavily loaded appearance without putting an unreasonable amount of weight on the cake.
Instructions
- Prepare the pans. Preheat the oven to 350°F (175°C). Grease two 8-inch round cake pans. Line the bottoms with parchment paper and lightly grease the parchment.
- Mix the dry ingredients. In a large mixing bowl, whisk the flour, cocoa powder, granulated sugar, baking powder, baking soda, and salt until evenly combined. Break up or sift out any cocoa lumps.
- Add the wet ingredients. Add the eggs, whole milk, vegetable oil, and vanilla. Mix on low speed until combined. Scrape the bottom and sides of the bowl.
- Add the hot liquid. Slowly pour in the hot coffee while mixing on low. Continue only until the batter is smooth. The batter will be relatively thin; do not add extra flour.
- Fill the pans. Divide the batter evenly between the two prepared pans. For equally sized layers, weigh the filled pans and adjust the batter if needed.
- Bake. Bake on the center rack for 28–34 minutes. Begin checking at 28 minutes. The cakes are ready when a toothpick inserted near the center comes out without wet batter; a few moist crumbs are fine.
- Cool. Leave the cakes in their pans for 10–15 minutes. Turn them onto wire racks, remove the parchment, and cool completely. For easier decorating, chill the cooled layers for about 30 minutes.
- Make the frosting. Beat the softened butter for 2–3 minutes until creamy. Gradually beat in the sifted powdered sugar and cocoa. Add the heavy cream, vanilla, and salt. Beat until fluffy and spreadable. Add extra cream one teaspoon at a time only if the frosting is too stiff.
- Assemble the layers. Level pronounced domes with a serrated knife if necessary. Place one cake layer on a cake board or serving plate. Spread an even layer of frosting over it. Add the second layer.
- Crumb coat. Cover the cake with a thin layer of frosting to trap loose crumbs. Refrigerate for 20–30 minutes.
- Apply the final frosting. Cover the top and sides with the remaining chocolate frosting. Smooth the surface while leaving a few subtle spatula marks for the homemade appearance shown in the reference.
- Make the ganache. Put the finely chopped semi-sweet chocolate in a heatproof bowl. Heat the cream until steaming and just approaching a simmer. Pour it over the chocolate. Leave for 2–3 minutes, then stir slowly until smooth and glossy.
- Test the ganache. Allow the ganache to cool until thick but still pourable. Test one drip on the back of the chilled cake. If it runs quickly to the bottom, wait a few more minutes.
- Create the drip. Add controlled ganache drips around the upper edge. Let some drips remain short and others travel farther down the cake. Spread a thin layer of ganache over the top.
- Decorate. Position the largest chocolate bar sections vertically toward the back. Add tall wafer fingers and crunchy bars. Build forward with sandwich cookies, smaller chocolate pieces, malt balls, and candies.
- Finish the base. Place a few cookies, chocolate chunks, wafer pieces, and malt balls around the bottom edge to reproduce the abundant look.
- Set and serve. Chill briefly until the frosting, ganache, and decorations are stable. Bring the cake closer to room temperature before serving for a softer crumb and frosting.
Notes
- Measure flour by weight when possible.
- Use natural unsweetened cocoa powder for the most repeatable version of this formula.
- Hot coffee deepens the chocolate character but should not make the finished cake taste strongly of coffee. Hot water can replace it 1:1.
- The batter is supposed to be thin. Do not compensate with extra flour.
- Cake layers must be completely cool before frosting.
- A short chilling period makes the layers easier to stack.
- Test the ganache on the back of the cake before adding all the drips.
- If the ganache runs too quickly, let it cool longer. If it barely moves, warm it very gently.
- Tall chocolate decorations should be pushed slightly into the frosting or ganache for support.
- Put the heaviest decorations closer to the center rather than balancing them on the edge.
- Exact nutrition changes substantially with the brands and amount of chocolate used for decoration.
- Remove some of the tallest decorations before slicing for cleaner portions.
- Prep Time: 45 minutes
- Additional Time: 1 hour 30 minutes cooling and chilling
- Cook Time: 30 minutes
- Category: Dessert
- Method: Baking
- Cuisine: American
A Cake Designed for the Chocolate Lover
The best part of an Ultimate Chocolate Overload Cake is the contrast.
You cut through crunchy chocolate bars first. Then comes glossy ganache, creamy cocoa frosting, and finally the soft chocolate crumb underneath.
Yet the dramatic appearance does not require professional decorating skills.
Get the cake layers right. Let them cool. Build a stable frosting coat. Control the ganache temperature. Then decorate from the tallest chocolate pieces down to the smallest candies.
Those small decisions are what turn a pile of chocolate into a centerpiece.
And when you finally carry it to the table, give everyone a few seconds before cutting it.
This is one of those cakes people eat with their eyes first.