
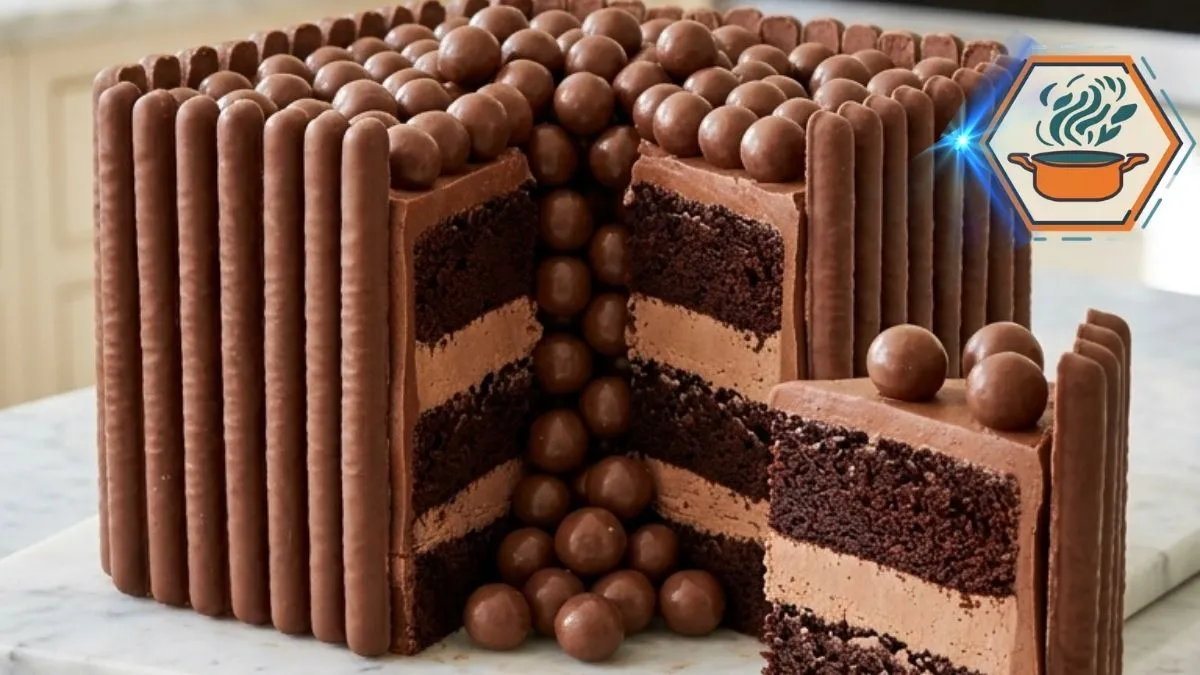
Some cakes are made for an ordinary Sunday afternoon. Others are meant to stop everyone in the room. This Chocolate Malt Ball Celebration Cake belongs firmly in the second group. Three dark cocoa cake layers hide beneath creamy milk chocolate filling. Chocolate wafer fingers form neat walls around the square cake, while glossy malt balls cover the top and appear to tumble through an opening at the front.
The finished cake looks elaborate, but its success comes down to a few practical details. The cake layers must be completely cool. The filling needs enough body to support three layers. And the assembled cake needs chilling time before the final decoration. For more baking inspiration, visit Recipes Mind. For another chocolate-malt approach, King Arthur Baking’s chocolate malt cake is also a useful reference; its bakers likewise emphasize properly chilled filling before assembly.
There is another detail worth knowing before you begin. This cake contains cream cheese and whipped cream, so treat the finished dessert as perishable. The FDA’s refrigerator guidance recommends keeping refrigerators at or below 40°F (4°C).
The reward for that little extra care is a cake with real contrast: tender cocoa crumb, cool chocolate cream, smooth frosting, crisp wafer bars, and crunchy malt centers.
Affiliate disclosure: As an Amazon Associate I earn from qualifying purchases. This article may contain affiliate links to kitchen tools I find useful for preparing this recipe.
JUMP TO
Why This Chocolate Malt Ball Celebration Cake Works
The appeal is not simply “more chocolate.” Each part has a different job.
The cocoa layers provide a soft but sufficiently sturdy base. Sour cream contributes moisture and richness. Hot coffee intensifies the cocoa flavor without making the finished cake taste strongly of coffee.
The filling is intentionally different from ordinary whipped cream. Milk chocolate first combines with hot cream to form a ganache-like base. Cream cheese gives it more structure. Whipped cream then makes it lighter.
That structure matters. A very loose mousse may taste wonderful in a bowl but can squeeze out when placed between heavy cake layers.
Finally, the exterior creates texture. Chocolate-covered wafer fingers give the sides a clean geometric appearance. Malt balls bring crunch and create the dramatic cascade.
If you enjoy understanding why cake ingredients behave differently, our guide to the difference between butter cake and other cakes is another useful read.
Ingredients You’ll Need
Chocolate Cake Layers
- 2½ cups (300 g) all-purpose flour
- ¾ cup (65–75 g) unsweetened cocoa powder
- 2 teaspoons baking powder
- 1½ teaspoons baking soda
- ½ teaspoon fine salt
- ¾ cup (170 g) unsalted butter, softened
- 1¾ cups (350 g) granulated sugar
- 4 large eggs, at room temperature
- 2 teaspoons vanilla extract
- 1 cup (240 ml) whole milk, room temperature
- ½ cup (120 g) full-fat sour cream, room temperature
- ½ cup (120 ml) hot coffee or hot water
Milk Chocolate Cream Filling
- 10 oz (285 g) milk chocolate, finely chopped
- 1 cup (240 ml) heavy whipping cream, for the chocolate
- 8 oz (225 g) full-fat block cream cheese, softened
- ½ cup (60 g) powdered sugar
- 1 teaspoon vanilla extract
- 1 cup (240 ml) cold heavy whipping cream
Use block-style full-fat cream cheese, rather than a soft spread from a tub. A firmer cheese makes the filling easier to stack.
Chocolate Frosting
- 1½ cups (340 g) unsalted butter, softened
- 4½ cups (540 g) powdered sugar, sifted if lumpy
- ¾ cup (65–75 g) unsweetened cocoa powder
- ½ cup (120 ml) heavy cream, plus a little extra if needed
- 2 teaspoons vanilla extract
- ¼ teaspoon salt
Decoration
- 35–45 chocolate-covered wafer fingers or slim chocolate wafer bars
- 5–6 cups chocolate-covered malt balls
- A few tablespoons of chocolate frosting reserved for securing decorations
The exact quantity depends on the dimensions of your wafer bars and malt balls.
Equipment That Makes the Job Easier
You can make this cake without professional bakery equipment. Still, a few tools make a noticeable difference.
You will need three 8-inch square cake pans, parchment paper, mixing bowls, an electric mixer, a cooling rack, an offset spatula, a piping bag, and a long sharp knife.
A digital kitchen scale is particularly useful because three layers of similar weight bake more evenly.
Step 1: Prepare the Square Cake Pans
Preheat the oven to 350°F (175°C).
Grease three 8-inch square pans. Line each bottom with parchment paper, then lightly grease the parchment.
Don’t skip the parchment. These layers are moist, and clean removal is important if you want the sharp square shape shown in the finished cake.
If your oven has hot spots, position the pans with a little space between them. Avoid pressing pans directly against the oven walls.
Step 2: Make the Chocolate Cake Batter
Whisk the flour, cocoa powder, baking powder, baking soda, and salt in a medium bowl.
In a large bowl, beat softened butter and sugar for about 3–4 minutes. The mixture should become paler and fluffy.
Add the eggs one at a time. Beat briefly after each egg. Scrape the bowl as needed, then mix in the vanilla.
Combine the milk and sour cream separately.
Add the flour mixture and dairy mixture to the butter mixture in alternating additions. Begin and finish with the dry ingredients.
Mix only until the flour disappears.
Finally, slowly pour in the hot coffee while mixing on low speed.
The batter may become thinner at this point. That is expected.
Coffee is not essential. Hot water works too. However, coffee can deepen the perception of chocolate flavor. Other established chocolate-malt recipes also combine cocoa with coffee or water, though formulations vary considerably.
Step 3: Bake Even, Moist Layers
Divide the batter evenly among the three pans. A kitchen scale is the easiest way to get similar layers.
Bake for approximately 24–30 minutes.
Start checking at 24 minutes rather than relying only on the clock. Insert a wooden pick into the center. It should emerge with a few moist crumbs rather than wet batter.
Avoid baking until the cake is dry.
Cool the layers in their pans for about 10 minutes. Carefully turn them onto cooling racks and remove the parchment.
Now comes one of the most important rules in this recipe:
Do not fill warm cake.
Even slightly warm layers can soften the chocolate cream. Allow them to cool completely.
If necessary, wrap the cool layers and refrigerate them briefly before assembly. Cold layers are easier to handle and trim.
Step 4: Make the Milk Chocolate Cream
Place the finely chopped milk chocolate in a heatproof bowl.
Heat 1 cup heavy cream until steaming. It should be hot, but there is no need for a vigorous boil.
Pour the cream over the chocolate.
Leave it untouched for about 2 minutes. Then stir gently from the center outward until smooth.
Allow this chocolate mixture to cool to room temperature. It should no longer feel warm.
Meanwhile, beat the softened cream cheese with powdered sugar and vanilla until smooth.
Beat in the cooled chocolate mixture.
In another clean bowl, whip the remaining 1 cup cold heavy cream until it forms stiff peaks. Stop once it holds its shape. Overwhipped cream can become grainy.
Fold the whipped cream gently into the chocolate mixture in several additions.
You want a filling that is creamy but can hold a mound on a spatula.
If your filling looks too soft, do not assemble the cake yet. Refrigerate it for 15–20 minutes and check again.
This small pause can be the difference between clean layers and filling that escapes from the sides.
Step 5: Build a Stable Three-Layer Cake
Place the first cake layer on a sturdy cake board or flat serving plate.
Transfer some chocolate frosting to a piping bag. Pipe a thick border around the perimeter of the cake.
This is your frosting dam.
It holds the softer milk chocolate filling inside.
Spread a generous but controlled layer of filling inside the dam. Keep it level.
Add the second cake layer and repeat.
Place the third layer on top.
Check the cake from every side. If it is leaning, gently correct it now.
Refrigerate the stacked cake for 30–45 minutes.
That chilling period makes the next stage much easier.
Step 6: Make the Chocolate Frosting
Beat the softened butter until creamy.
Add powdered sugar and cocoa gradually, mixing at low speed initially so the dry ingredients stay in the bowl.
Add vanilla and salt.
Pour in the heavy cream gradually until the frosting reaches a thick, spreadable consistency.
Don’t automatically add extra cream.
For this design, slightly firm frosting is better than loose frosting because it must support dozens of wafer fingers and malt balls.
For more fundamentals on working with cakes and chocolate, see our guide to mastering caramelizing sugar when planning other celebration desserts.
Step 7: Crumb Coat Before Decorating
Apply a thin layer of frosting over the top and sides.
This first layer is called a crumb coat. Its job is to trap loose cake crumbs.
Refrigerate for about 15 minutes.
Then add the final chocolate frosting layer. Smooth the top and sides, but don’t obsess over perfectly polished sides. Most of them will soon be covered with chocolate fingers.
Keep the frosting slightly tacky for the next step.
Step 8: Create the Chocolate Wafer Walls
Press the chocolate-covered wafer fingers vertically against the cake.
Place them close together around the exterior.
The goal is the tall, almost architectural appearance of the reference cake. Tiny spacing differences are fine.
However, do not completely close the front.
Leave an opening approximately 3–4 inches wide in the center of the front face.
This opening is crucial. It creates the illusion that the malt balls inside the cake are spilling outward.
Step 9: Make the Signature Malt Ball Cascade
Cover the entire top generously with chocolate-covered malt balls.
Then build the front cascade.
Here is the trick: the malt balls are not actually pouring from a hollow cake.
The effect is decorative.
Start at the bottom and work upward. Dab small amounts of reserved chocolate frosting onto malt balls as edible adhesive. Build a stable pile on the cake board first.
Continue upward through the open section until the lower cascade visually connects with the malt balls covering the top.
Avoid simply pouring malt balls onto the cake. They will roll away and the effect will look random.
Strategic placement produces the controlled “overflow” appearance.
How to Get the Clean Slice Shown in the Cake
Once decorated, refrigerate the cake for approximately 1 hour.
This firms the filling and frosting.
Use a long, sharp knife. Run the blade under hot water, wipe it completely dry, and make one firm downward cut.
Clean and warm the blade between cuts.
The slice should reveal three dark cocoa layers separated by two thick bands of milk chocolate cream.
For a neat plated presentation, add two or three malt balls to the top of the slice.
Storage and Make-Ahead Instructions
Because this cake contains whipped cream and cream cheese, keep it refrigerated. FDA guidance says refrigerators should remain at 40°F (4°C) or below. Perishable foods also should not be left at room temperature for more than two hours, or one hour when ambient temperature exceeds 90°F (32°C).
For best texture, cover the cake so exposed cut surfaces do not dry out.
You can also divide the work:
- Day 1: Bake and cool the cake layers.
- Day 2: Prepare filling, stack, frost, and decorate.
- Serving day: Chill, slice, and serve.
The wafers and malt balls will generally have their best crunch closer to assembly time, so decoration is best done relatively near serving.
Common Mistakes to Avoid
The filling squeezes out.
It was probably too warm or too soft. Chill it before stacking and use a frosting dam.
The layers slide.
Too much filling, warm components, or skipping the chilling stage can cause movement.
The cake is dry.
Measure flour carefully and start checking before the maximum baking time.
The malt balls fall off.
Build the cascade from the bottom upward and use small dots of frosting as adhesive.
The wafer fingers won’t stick.
Attach them before the final frosting layer becomes firm.
The slice looks messy.
Chill the completed cake and clean your knife between cuts.
Serving Ideas for a Celebration
This is already a rich dessert, so simple accompaniments work best.
Serve small slices with coffee, cold milk, or fresh berries. You can also add a small amount of unsweetened whipped cream to balance the chocolate.
The cake is particularly well suited to birthdays, anniversaries, family celebrations, chocolate-themed parties, and holiday dessert tables.
If you’re building a larger dessert menu, our star-shaped cookies guide can provide a smaller treat alongside the centerpiece cake.
Chocolate Malt Ball Celebration Cake FAQs
Can I make this cake the day before?
Yes. In fact, chilling helps stabilize the layers. Assemble the cake the day before, keep it covered in the refrigerator, and consider adding the crunchy exterior decorations closer to serving if you want their best texture.
Can I use hot water instead of coffee?
Yes. Use the same amount of hot water. Coffee gives the cocoa flavor more depth, but the recipe still works without it.
Why does my chocolate filling become runny?
The chocolate mixture may have been too warm when it was combined with the cream cheese and whipped cream. Allow the chocolate mixture to cool first. If the completed filling is soft, refrigerate it for 15–20 minutes before assembling.
Can I make this cake round instead of square?
You can, although it will no longer have exactly the same look. The square shape creates straight wafer walls and makes the front cascade especially dramatic.
Do I need three cake pans?
Three pans are the simplest option. If you have only one or two pans, bake in batches. Do not leave filled pans sitting for an unnecessarily long time because chemical leaveners begin working once the batter is mixed.
What can I substitute for chocolate-covered malt balls?
Chocolate-covered crispy cereal balls or similarly sized chocolate candies can create a comparable appearance. However, you will lose the characteristic malt flavor.
How do I stop the chocolate fingers from falling off?
Press them into freshly applied frosting. If one feels loose, place a small amount of frosting on its back before attaching it.
Does Chocolate Malt Ball Celebration Cake need refrigeration?
Yes. This version contains both whipped cream and cream cheese. Keep it covered and refrigerated at 40°F (4°C) or below.
Print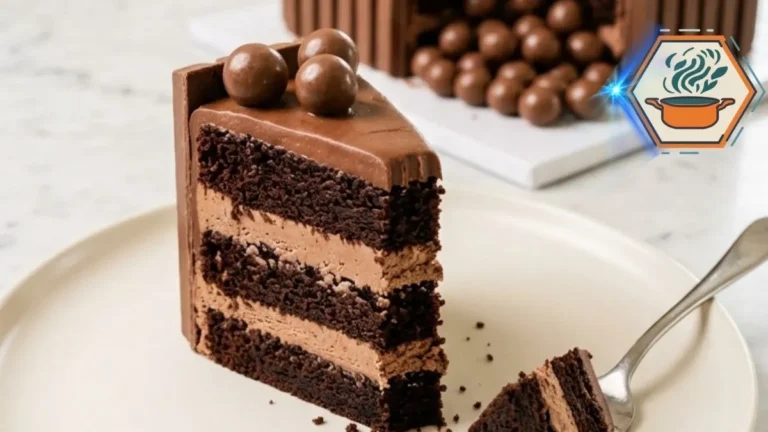
Chocolate Malt Ball Celebration Cake
A showstopping three-layer chocolate cake filled with silky milk chocolate cream, covered in chocolate frosting and crisp wafer fingers, then topped with chocolate-covered malt balls arranged in a dramatic cascading effect.
- Total Time: About 4 hours
- Yield: 16 servings
Ingredients
Chocolate Cake Layers
- 2½ cups (300 g) all-purpose flour
- ¾ cup (about 65–75 g) unsweetened cocoa powder
- 2 teaspoons baking powder
- 1½ teaspoons baking soda
- ½ teaspoon fine salt
- ¾ cup (170 g) unsalted butter, softened
- 1¾ cups (350 g) granulated sugar
- 4 large eggs, room temperature
- 2 teaspoons vanilla extract
- 1 cup (240 ml) whole milk, room temperature
- ½ cup (120 g) full-fat sour cream, room temperature
- ½ cup (120 ml) hot coffee or hot water
Milk Chocolate Cream Filling
- 10 oz (285 g) milk chocolate, finely chopped
- 1 cup (240 ml) heavy whipping cream, for the chocolate mixture
- 8 oz (225 g) full-fat block cream cheese, softened
- ½ cup (60 g) powdered sugar
- 1 teaspoon vanilla extract
- 1 cup (240 ml) cold heavy whipping cream
Chocolate Frosting
- 1½ cups (340 g) unsalted butter, softened
- 4½ cups (540 g) powdered sugar
- ¾ cup (about 65–75 g) unsweetened cocoa powder
- ½ cup (120 ml) heavy cream, plus 1–2 tablespoons if required
- 2 teaspoons vanilla extract
- ¼ teaspoon fine salt
Decoration
- 35–45 chocolate-covered wafer fingers or slim chocolate wafer bars
- 5–6 cups chocolate-covered malt balls
- Reserved chocolate frosting, as needed for attaching the malt balls
Instructions
- Preheat the oven to 350°F (175°C). Grease three 8-inch square cake pans. Line the bottoms with parchment paper and lightly grease the parchment.
- Whisk together the flour, cocoa powder, baking powder, baking soda, and salt.
- In a large mixing bowl, beat the softened butter and granulated sugar for 3–4 minutes, until lighter and fluffy.
- Add the eggs one at a time. Beat briefly after each addition. Mix in the vanilla.
- Stir the milk and sour cream together in a separate container.
- Add the dry ingredients and milk mixture alternately to the butter mixture. Begin and finish with the dry ingredients. Mix only until combined.
- Slowly add the hot coffee or hot water on low speed. Scrape the bowl and mix just until the batter is uniform.
- Divide the batter evenly among the three prepared pans.
- Bake for 24–30 minutes, or until a toothpick inserted into the center comes out with a few moist crumbs but no raw batter.
- Cool in the pans for 10 minutes. Turn the cakes onto wire racks, remove the parchment, and allow them to cool completely.
- For the filling, place the finely chopped milk chocolate in a heatproof bowl.
- Heat 1 cup of heavy cream until steaming but not vigorously boiling. Pour it over the chocolate. Leave for 2 minutes, then stir until smooth.
- Allow the chocolate mixture to cool to room temperature. Do not combine it with the other filling ingredients while it is hot.
- Beat the cream cheese, powdered sugar, and vanilla until smooth. Beat in the cooled chocolate mixture.
- In a separate chilled bowl, whip the remaining 1 cup cold heavy cream to stiff peaks.
- Gently fold the whipped cream into the chocolate mixture. If the filling does not hold its shape, refrigerate for 15–20 minutes before using.
- Make the frosting by beating the softened butter until creamy. Gradually add the powdered sugar and cocoa. Add vanilla, salt, and heavy cream. Beat until thick and spreadable.
- Place the first cake layer on a cake board. Pipe a thick frosting dam around the outer edge. Spread chocolate cream inside the dam.
- Add the second layer and repeat. Place the third cake layer on top.
- Refrigerate the assembled cake for 30–45 minutes.
- Cover the cake with a thin crumb coat. Chill for 15 minutes.
- Apply the final layer of chocolate frosting.
- Press the chocolate wafer fingers vertically around the cake while the frosting remains tacky. Leave a 3–4-inch-wide opening at the center front.
- Cover the top generously with chocolate-covered malt balls.
- Build the front malt-ball cascade from the bottom upward. Use small dots of chocolate frosting as edible adhesive when needed. The balls are decoratively arranged rather than actually pouring from inside the cake.
- Refrigerate the finished cake for approximately 1 hour before slicing.
- For cleaner slices, warm a long sharp knife under hot water, wipe it completely dry, and cut straight through the chilled cake. Clean the knife between slices.
Notes
- All cake layers must be completely cool before filling.
- Use full-fat block cream cheese, not whipped or tub-style spread.
- The chocolate mixture for the filling must cool before being mixed with the cream cheese.
- If the filling feels loose, refrigerate it for 15–20 minutes.
- A frosting dam helps prevent the filling from squeezing out.
- Do not skip the chilling stages. They are important for the tall cake structure.
- Build the malt ball cascade manually. Do not simply pour the candy down the front.
- The exact number of wafer fingers and malt balls depends on their dimensions.
- Keep the finished cake refrigerated because the filling contains cream cheese and whipped cream.
- For best texture, let an individual refrigerated slice sit briefly before eating rather than leaving the entire cake at room temperature for a long period.
- Prep Time: 1 hour 30 minutes
- Additional/Chill Time: 2 hours
- Cook Time: 24–30 minutes
- Category: Dessert
- Method: Baking
- Cuisine: American-inspired
Final Baking Notes
The secret to this Chocolate Malt Ball Celebration Cake is not a complicated decorating technique. It is patience.
Let the cakes cool. Let the chocolate mixture cool. Chill a soft filling instead of hoping it will hold. Refrigerate the stacked layers before frosting. And build the malt ball cascade instead of pouring the candies over the cake.
Those small decisions create the dramatic result: three moist cocoa layers, two visible bands of silky milk chocolate cream, a smooth chocolate exterior, crisp wafer walls, and a generous crown of malt balls that seems to spill straight through the front.
It is rich, playful, and deliberately over-the-top—the kind of chocolate cake that becomes part of the celebration before anyone even cuts the first slice.