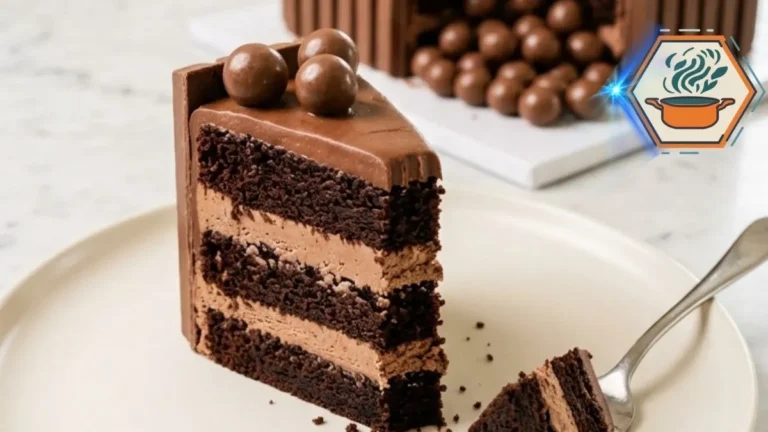
Ingredients
Scale
Chocolate Cake Layers
- 2½ cups (300 g) all-purpose flour
- ¾ cup (about 65–75 g) unsweetened cocoa powder
- 2 teaspoons baking powder
- 1½ teaspoons baking soda
- ½ teaspoon fine salt
- ¾ cup (170 g) unsalted butter, softened
- 1¾ cups (350 g) granulated sugar
- 4 large eggs, room temperature
- 2 teaspoons vanilla extract
- 1 cup (240 ml) whole milk, room temperature
- ½ cup (120 g) full-fat sour cream, room temperature
- ½ cup (120 ml) hot coffee or hot water
Milk Chocolate Cream Filling
- 10 oz (285 g) milk chocolate, finely chopped
- 1 cup (240 ml) heavy whipping cream, for the chocolate mixture
- 8 oz (225 g) full-fat block cream cheese, softened
- ½ cup (60 g) powdered sugar
- 1 teaspoon vanilla extract
- 1 cup (240 ml) cold heavy whipping cream
Chocolate Frosting
- 1½ cups (340 g) unsalted butter, softened
- 4½ cups (540 g) powdered sugar
- ¾ cup (about 65–75 g) unsweetened cocoa powder
- ½ cup (120 ml) heavy cream, plus 1–2 tablespoons if required
- 2 teaspoons vanilla extract
- ¼ teaspoon fine salt
Decoration
- 35–45 chocolate-covered wafer fingers or slim chocolate wafer bars
- 5–6 cups chocolate-covered malt balls
- Reserved chocolate frosting, as needed for attaching the malt balls
Instructions
- Preheat the oven to 350°F (175°C). Grease three 8-inch square cake pans. Line the bottoms with parchment paper and lightly grease the parchment.
- Whisk together the flour, cocoa powder, baking powder, baking soda, and salt.
- In a large mixing bowl, beat the softened butter and granulated sugar for 3–4 minutes, until lighter and fluffy.
- Add the eggs one at a time. Beat briefly after each addition. Mix in the vanilla.
- Stir the milk and sour cream together in a separate container.
- Add the dry ingredients and milk mixture alternately to the butter mixture. Begin and finish with the dry ingredients. Mix only until combined.
- Slowly add the hot coffee or hot water on low speed. Scrape the bowl and mix just until the batter is uniform.
- Divide the batter evenly among the three prepared pans.
- Bake for 24–30 minutes, or until a toothpick inserted into the center comes out with a few moist crumbs but no raw batter.
- Cool in the pans for 10 minutes. Turn the cakes onto wire racks, remove the parchment, and allow them to cool completely.
- For the filling, place the finely chopped milk chocolate in a heatproof bowl.
- Heat 1 cup of heavy cream until steaming but not vigorously boiling. Pour it over the chocolate. Leave for 2 minutes, then stir until smooth.
- Allow the chocolate mixture to cool to room temperature. Do not combine it with the other filling ingredients while it is hot.
- Beat the cream cheese, powdered sugar, and vanilla until smooth. Beat in the cooled chocolate mixture.
- In a separate chilled bowl, whip the remaining 1 cup cold heavy cream to stiff peaks.
- Gently fold the whipped cream into the chocolate mixture. If the filling does not hold its shape, refrigerate for 15–20 minutes before using.
- Make the frosting by beating the softened butter until creamy. Gradually add the powdered sugar and cocoa. Add vanilla, salt, and heavy cream. Beat until thick and spreadable.
- Place the first cake layer on a cake board. Pipe a thick frosting dam around the outer edge. Spread chocolate cream inside the dam.
- Add the second layer and repeat. Place the third cake layer on top.
- Refrigerate the assembled cake for 30–45 minutes.
- Cover the cake with a thin crumb coat. Chill for 15 minutes.
- Apply the final layer of chocolate frosting.
- Press the chocolate wafer fingers vertically around the cake while the frosting remains tacky. Leave a 3–4-inch-wide opening at the center front.
- Cover the top generously with chocolate-covered malt balls.
- Build the front malt-ball cascade from the bottom upward. Use small dots of chocolate frosting as edible adhesive when needed. The balls are decoratively arranged rather than actually pouring from inside the cake.
- Refrigerate the finished cake for approximately 1 hour before slicing.
- For cleaner slices, warm a long sharp knife under hot water, wipe it completely dry, and cut straight through the chilled cake. Clean the knife between slices.
Notes
- All cake layers must be completely cool before filling.
- Use full-fat block cream cheese, not whipped or tub-style spread.
- The chocolate mixture for the filling must cool before being mixed with the cream cheese.
- If the filling feels loose, refrigerate it for 15–20 minutes.
- A frosting dam helps prevent the filling from squeezing out.
- Do not skip the chilling stages. They are important for the tall cake structure.
- Build the malt ball cascade manually. Do not simply pour the candy down the front.
- The exact number of wafer fingers and malt balls depends on their dimensions.
- Keep the finished cake refrigerated because the filling contains cream cheese and whipped cream.
- For best texture, let an individual refrigerated slice sit briefly before eating rather than leaving the entire cake at room temperature for a long period.
- Prep Time: 1 hour 30 minutes
- Additional/Chill Time: 2 hours
- Cook Time: 24–30 minutes
- Category: Dessert
- Method: Baking
- Cuisine: American-inspired