
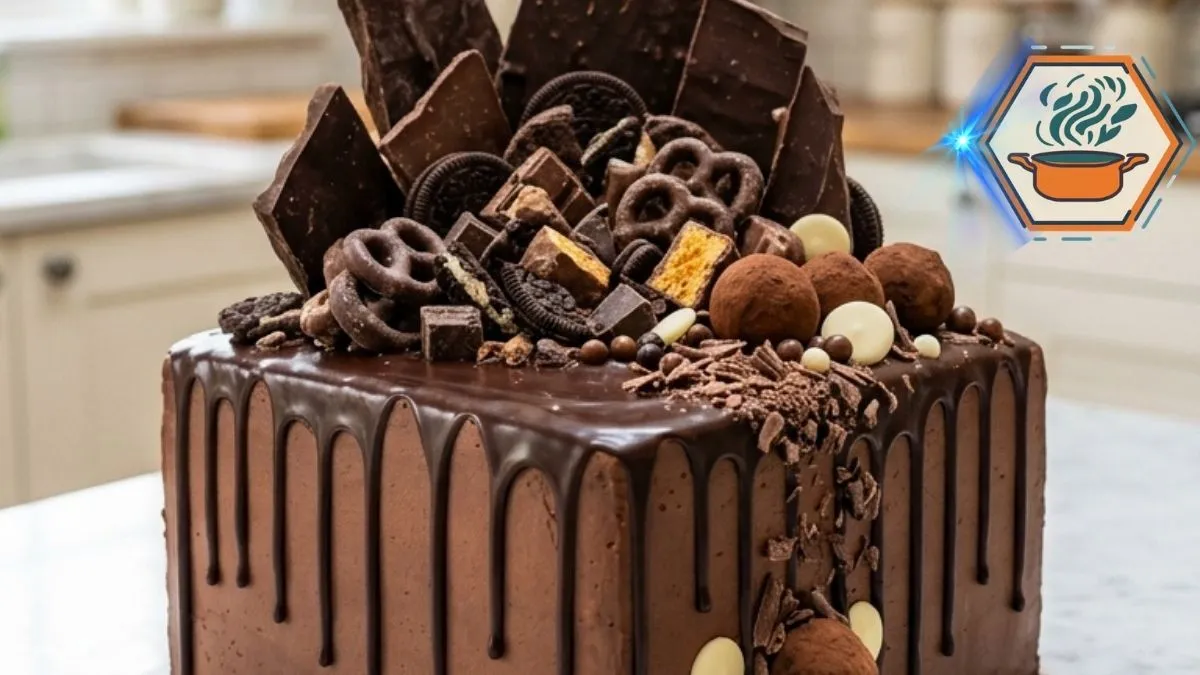
There are chocolate cakes, and then there is Chocolate Avalanche Crunch Cake. This is the cake I would make when a normal chocolate layer cake simply does not feel festive enough. Beneath that dramatic mountain of chocolate bars and crunchy wafers sits a soft cocoa cake, creamy chocolate buttercream, and a glossy ganache drip. Every slice brings several textures at once: tender cake, smooth frosting, melting chocolate, and crisp wafer pieces.
The first time you look at a cake like this, the decoration may seem harder than the baking. It is actually the opposite. The secret is not placing every chocolate perfectly. It is building a stable cake first, then arranging the toppings by size. Good measurements matter too. A digital scale can make baking more repeatable; Bon Appétit, for example, continues to recommend weighing equipment in its kitchen-scale testing. If you need one, you can browse digital kitchen scales on Amazon.
Ganache consistency is another important detail. Too hot and it races down the sides. Too cold and it refuses to drip. King Arthur Baking notes that ganache becomes thicker as it cools and that its texture also depends on the chocolate-to-cream ratio. That simple principle is particularly useful for this cake because we want thick, glossy drips rather than a thin chocolate coating.
Affiliate disclosure: As an Amazon Associate I earn from qualifying purchases. This article may contain affiliate links to kitchen tools I find useful for preparing this recipe.
JUMP TO
Why This Chocolate Avalanche Crunch Cake Works
The finished cake looks extravagant, but its structure is quite logical.
The chocolate cake provides the soft base. Cocoa gives it a deep flavor, while vegetable oil helps the crumb stay tender after refrigeration. Hot coffee intensifies the cocoa character without making the finished cake taste strongly of coffee.
Then comes the buttercream. It has two jobs. It adds sweetness and creaminess, but it also forms a stable surface for the ganache and decorations.
The ganache adds a darker chocolate note and gives the cake its glossy drip effect. Finally, wafers, chocolate bars, truffles, sticks, and shards create the avalanche.
Most importantly, those crunchy elements should be added late. Leaving wafers against moist frosting for too long can soften them.
Ingredients You Will Need
For the chocolate cake
- 3 cups (360 g) all-purpose flour
- 1 cup (85 g) unsweetened cocoa powder
- 2 1/2 cups (500 g) granulated sugar
- 2 1/2 teaspoons baking soda
- 1 1/2 teaspoons baking powder
- 1 teaspoon fine salt
- 4 large eggs, preferably room temperature
- 1 1/2 cups (360 ml) whole milk, room temperature
- 3/4 cup (180 ml) neutral vegetable oil
- 2 teaspoons vanilla extract
- 1 1/2 cups (360 ml) hot brewed coffee
Hot water can replace the coffee, although coffee gives the chocolate flavor more depth.
For the chocolate buttercream
- 2 cups (454 g) unsalted butter, softened
- 6 cups (680–720 g) powdered sugar, sifted
- 3/4 cup (64 g) unsweetened cocoa powder, sifted
- 1/2 cup (120 ml) heavy cream, plus a little extra if required
- 2 teaspoons vanilla extract
- 1/4 teaspoon fine salt
For the chocolate ganache
- 12 oz (340 g) semisweet chocolate, finely chopped
- 1 cup (240 ml) heavy cream
This produces a relatively fluid ganache. If your chocolate behaves differently and the ganache seems too thin for controlled drips, allow it to cool longer before using it. Chocolate type, temperature, and ratio all change the final consistency.
For the chocolate avalanche
Use a varied combination of:
- Large milk chocolate bars
- Dark chocolate slabs
- Chocolate-covered wafer fingers
- Chocolate wafer sticks
- Chocolate truffles
- White-chocolate discs
- Chocolate curls
- Broken wafer bars
- Chopped chocolate
- Wafer crumbs
You do not need one particular candy brand. Variation in height, color, and shape creates the dramatic finish.
Equipment That Makes the Recipe Easier
You will need two 9-inch square cake pans. Square pans are important if you want the same tall, angular presentation.
You will also want parchment paper, mixing bowls, an electric mixer, cooling racks, a saucepan, and a cake board or flat serving plate.
For the smooth sides shown in this style of cake, an offset spatula is especially useful. Food Network identifies an offset icing spatula as one of the key tools for spreading and smoothing cake frosting. You can compare offset icing spatulas on Amazon.
A cake scraper also helps create those straight square edges. Browse cake scrapers on Amazon if you do not already have one.
How to Make the Chocolate Cake
Preheat the oven to 350°F (175°C).
Grease two 9-inch square pans. Line the bottoms with parchment paper, then lightly grease the parchment.
Do not skip this step. This cake is soft, so parchment makes removing the layers much safer.
In a large bowl, whisk together:
- Flour
- Cocoa powder
- Sugar
- Baking soda
- Baking powder
- Salt
Break up every visible cocoa lump.
In another bowl, whisk the eggs, milk, oil, and vanilla.
Pour the wet mixture into the dry ingredients. Mix on low speed just until mostly combined.
Now slowly pour in the hot coffee.
The batter will become noticeably thin. That is normal. Do not add extra flour to correct it.
Divide the batter as evenly as possible between the two prepared pans. A kitchen scale is useful here because equal amounts of batter produce layers of similar height.
Bake for approximately 30–35 minutes.
Start checking around 30 minutes. Insert a wooden pick into the center. It should emerge with a few moist crumbs rather than liquid batter.
Do not keep baking until the cake appears completely dry. Overbaking can turn a rich chocolate layer into a crumbly one.
Let the cakes sit in their pans for about 10–15 minutes. Carefully turn them onto cooling racks.
Cool completely before frosting.
For this particular cake, I prefer chilling the cooled layers for 30–60 minutes. Cold layers are firmer and easier to stack without breaking.
Make the Silky Cocoa Buttercream
Beat the softened butter for about 3–4 minutes until pale and creamy.
Add the powdered sugar gradually rather than dumping all six cups into the bowl.
Sift in the cocoa powder.
Add vanilla and salt.
Slowly beat in the heavy cream.
Continue beating for another 2–3 minutes until the frosting looks light and smooth.
If it is very stiff, add cream one tablespoon at a time. If it becomes too soft, add a small amount of powdered sugar.
The goal is spreadable frosting that can still hold the weight of the cake above it.
Build a Stable Square Cake
Place the first cake layer on a cake board or serving plate.
Spread a generous, even layer of chocolate buttercream over it. Keep the filling level, especially around the edges.
Place the second layer on top.
Check the cake from every side. Correct any leaning now.
Apply a very thin layer of buttercream over the entire cake. This is your crumb coat. It traps loose crumbs so they do not appear in the final frosting.
Refrigerate for 20–30 minutes.
Apply the remaining buttercream. Smooth the top and four sides with your spatula and scraper.
The cake does not need to look factory-perfect. Once the avalanche is added, tiny imperfections disappear into the overall design.
Chill the frosted cake for another 20–30 minutes.
This chilling stage is one of the most important details in the entire recipe.
Make the Glossy Chocolate Ganache
Finely chop the semisweet chocolate and place it in a heatproof bowl.
Heat the cream until it is steaming and just beginning to simmer around the edges. Do not aggressively boil it.
Pour it over the chopped chocolate.
Leave the bowl untouched for about 2–3 minutes.
Then stir slowly from the center outward until the ganache becomes smooth and glossy.
Now wait.
Pouring immediately is a common mistake. Fresh ganache may be hot enough to soften the buttercream and run straight down the cake.
Let it cool until it remains fluid but has developed some body.
Test one drip on the back of the chilled cake. If it races to the bottom, the ganache is still too warm or thin. Wait several minutes and test again.
If it barely moves, warm it very gently.
This small test can save the entire finish.
Create the Chocolate Drip
Use a spoon or squeeze bottle to place small amounts of ganache around the upper edge.
Allow gravity to create different drip lengths.
Some should be short. Others can travel farther down the cake. Irregular drips make the finish look natural.
Once you are happy with the sides, spread ganache over the top.
Do not flood the cake. You still need enough stability to support the chocolate decorations.
How to Build the Chocolate Avalanche
This is where the cake gets its personality.
Do not simply dump chocolates onto the center.
Think in three height zones.
Start with the largest chocolate slabs at the back. Press them carefully into the frosting or set ganache. Angle some pieces slightly rather than keeping everything perfectly vertical.
Next, add medium-height pieces through the middle:
- Wafer fingers
- Narrow chocolate bars
- Chocolate sticks
- Broken chocolate slabs
Then fill the front with smaller elements:
- Truffles
- White-chocolate discs
- Short wafer pieces
- Chocolate squares
- Curls
The visual trick is simple: tall at the back, medium in the middle, small at the front.
That arrangement gives the cake the overflowing appearance without hiding every detail.
If you make heavily decorated cakes regularly, a rotating stand can make frosting the four sides easier. You can browse cake decorating turntables on Amazon.
The Crunch Detail You Should Not Skip
The original concept relies heavily on chocolate pieces, but crunch should also be noticeable when you eat the cake.
Crush several wafer pieces into irregular crumbs.
Keep some pieces around pea size and others much finer. Mix them with chopped chocolate.
Scatter this mixture across the center and around the base of the larger decorations.
For even more texture, you can reserve a small bowl of fresh wafer crumbs and sprinkle them over individual slices immediately before serving.
This prevents every crunchy element from absorbing moisture in the refrigerator.
How to Keep the Decorations From Falling
Large chocolate bars are heavier than they look.
Do not balance a very heavy slab on soft ganache alone. Push the lower edge gently into the buttercream so it has support.
For very tall pieces, position them closer to the center rather than directly beside the edge.
Add the largest decorations first. They establish the structure. Smaller chocolates then fill empty spaces and hide attachment points.
Common Mistakes to Avoid
Frosting warm cake: Buttercream can melt, slide, and pull crumbs from the surface.
Using hot ganache: It may melt your frosting and create uncontrolled drips.
Overbaking the layers: A few extra minutes can matter with chocolate cake.
Adding flour because the batter seems thin: This batter is supposed to be fluid after adding hot coffee.
Making every drip identical: Different lengths create a much more attractive finish.
Starting with small decorations: Large slabs need space and should determine the rest of the arrangement.
Decorating too far ahead: Wafers gradually lose their crispness when exposed to frosting and refrigerator moisture.
Can You Make Chocolate Avalanche Crunch Cake Ahead?
Yes, but assemble it in stages.
Bake the cake layers one day ahead. Once completely cool, wrap them tightly.
The buttercream can also be prepared ahead and refrigerated. Let it soften before whipping it briefly again.
For the best texture, add the crunchy avalanche decorations closer to serving time.
The decorated cake can be refrigerated, but bring it out before serving so the buttercream has time to soften. A very cold butter-based frosting tastes firmer and less creamy.
How to Cut Such a Heavily Decorated Cake
Do not try to force a knife directly through the chocolate mountain.
First remove several large chocolate bars and wafers from the section you want to cut.
Use a long, sharp knife. Dip it in hot water, wipe it completely dry, then make the cut.
Clean the blade between slices.
This gives you cleaner layers and prevents the knife from dragging frosting and crumbs through every serving.
Serve each slice with some of the removed chocolates on the side.
Chocolate Avalanche Crunch Cake FAQs
What is a Chocolate Avalanche Crunch Cake?
It is a rich chocolate layer cake covered with chocolate buttercream and ganache, then decorated with an abundant mixture of chocolate bars, wafers, truffles, sticks, shards, and crumbs.
Why add hot coffee to chocolate cake?
Coffee can deepen the perception of cocoa flavor. The finished cake should still taste primarily of chocolate. If you prefer not to use coffee, replace it with the same quantity of hot water.
Why is my chocolate ganache running down the whole cake?
It is probably too warm or too fluid. Let it cool and thicken before trying again. Ganache becomes thicker as its temperature drops.
How do I get thick ganache drips?
Start with a well-chilled frosted cake. Allow the ganache to cool until slightly thickened. Test a single drip on the back before decorating the visible sides.
Can I use milk chocolate for the ganache?
Yes, but you should not automatically use the same ratio. Milk chocolate behaves differently from semisweet or bittersweet chocolate and generally needs proportionally less cream for a firmer ganache. King Arthur’s ganache testing specifically recommends different ratios according to chocolate type.
What makes this cake crunchy?
Chocolate-covered wafers, wafer sticks, chocolate shards, chopped chocolate, and fresh wafer crumbs create the crunchy contrast.
How do I stop the wafers from becoming soft?
Add them as close to serving time as practical. Keep extra crushed wafers separate and scatter them over slices just before eating.
Can I make this cake without coffee?
Absolutely. Use 1 1/2 cups of hot water instead.
Can I use round pans?
Technically, yes. The flavor will remain the same, but you will lose the distinctive tall square presentation. For the intended visual, two 9-inch square pans are the better choice.
Print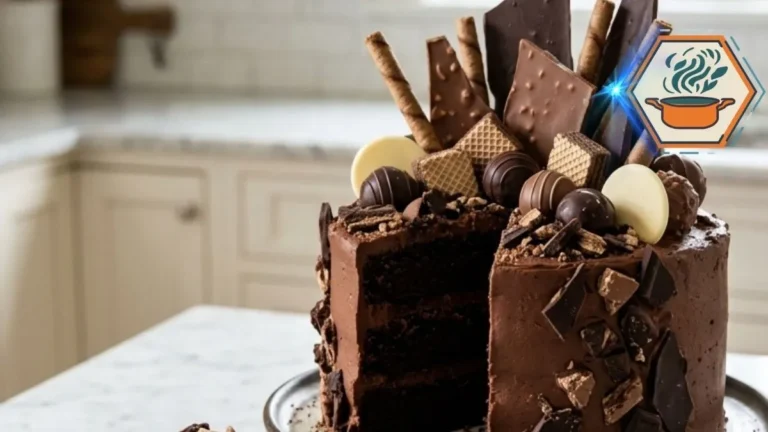
Chocolate Avalanche Crunch Cake
A towering chocolate layer cake with moist cocoa cake, silky chocolate buttercream, glossy ganache, crisp wafers, truffles, chocolate bars, and crunchy chocolate pieces.
- Total Time: 2 hours 45 minutes
- Yield: 16 servings
Ingredients
Chocolate Cake
- 3 cups (360 g) all-purpose flour
- 1 cup (85 g) unsweetened cocoa powder
- 2 1/2 cups (500 g) granulated sugar
- 2 1/2 teaspoons baking soda
- 1 1/2 teaspoons baking powder
- 1 teaspoon fine salt
- 4 large eggs, at room temperature
- 1 1/2 cups (360 ml) whole milk, at room temperature
- 3/4 cup (180 ml) neutral vegetable oil
- 2 teaspoons vanilla extract
- 1 1/2 cups (360 ml) hot brewed coffee or hot water
Chocolate Buttercream
- 2 cups (454 g) unsalted butter, softened
- 6 cups (about 720 g) powdered sugar, sifted
- 3/4 cup (64 g) unsweetened cocoa powder, sifted
- 1/2 cup (120 ml) heavy cream
- 2 teaspoons vanilla extract
- 1/4 teaspoon fine salt
Chocolate Ganache
- 12 oz (340 g) semisweet chocolate, finely chopped
- 1 cup (240 ml) heavy cream
Chocolate Avalanche Topping
Because the original concept says “assorted” chocolates, I recommend standardizing the topping for a reproducible recipe:
- 6 oz (170 g) assorted milk and dark chocolate bars
- 4 oz (115 g) chocolate-covered wafer fingers
- 2 oz (55 g) chocolate wafer sticks
- 4 chocolate truffles
- 2 oz (55 g) white chocolate discs
- 2 oz (55 g) chocolate shards or curls
- 1/2 cup crushed chocolate wafers and chocolate crumbs
This quantified version is much better for followers who actually want to reproduce the cake.
Instructions
- Preheat the oven to 350°F (175°C). Grease two 9-inch square cake pans. Line the bottoms with parchment paper and lightly grease the paper.
- In a large bowl, whisk the flour, cocoa powder, sugar, baking soda, baking powder, and salt until evenly combined.
- In another bowl, whisk the eggs, milk, vegetable oil, and vanilla. Pour the wet mixture into the dry ingredients and mix on low speed just until combined.
- Slowly pour in the hot coffee while mixing on low. The batter will be thin. This is expected.
- Divide the batter evenly between the prepared pans. Bake for 30–35 minutes, or until a toothpick inserted into the center comes out without wet batter. A few moist crumbs are fine.
- Cool the cakes in their pans for 10–15 minutes. Turn them onto wire racks and cool completely. For easier assembly, chill the cooled layers for about 30 minutes.
- Make the buttercream. Beat softened butter for 3–4 minutes. Gradually add powdered sugar and cocoa. Add the cream, vanilla, and salt. Beat for another 2–3 minutes until fluffy. If necessary, adjust the consistency with cream, one tablespoon at a time.
- Place one cake layer on a cake board. Spread an even layer of buttercream over it. Add the second cake layer. Apply a thin crumb coat over the top and sides. Refrigerate for 20–30 minutes.
- Cover the chilled cake with the remaining chocolate buttercream. Smooth the four sides and top. Refrigerate again for 20–30 minutes.
- For the ganache, put the finely chopped semisweet chocolate in a heatproof bowl. Heat the heavy cream until steaming and just beginning to simmer around the edges. Pour it over the chocolate and leave undisturbed for 2–3 minutes.
- Stir slowly until completely smooth and glossy. Let the ganache cool until fluid but no longer hot. Test one drip on the back of the cold cake. It should slowly travel down the side without immediately reaching the bottom.
- Spoon or pipe ganache around the upper edge to create irregular drips. Spread a thin layer of the remaining ganache across the top.
- Build the avalanche while the top remains slightly tacky. Place the largest chocolate slabs toward the back. Add medium-size wafer fingers and chocolate sticks through the center. Place truffles, white chocolate discs, smaller chocolate pieces, and broken wafers toward the front.
- Scatter crushed wafers and chocolate crumbs across the center. Keep some wafer crumbs aside and add them to individual slices immediately before serving for the strongest crunch.
- Chill briefly if needed to set the decorations. Before serving, remove the cake from the refrigerator long enough for the buttercream to lose its hard refrigerated texture. Remove very large decorations before slicing.
Notes
- Do not frost warm cake. The buttercream may soften and slide.
- The batter is intentionally thin after the hot coffee is added.
- Coffee can deepen the cocoa flavor. Hot water works as a caffeine-free alternative.
- Chill the frosted cake before applying ganache.
- Always perform a test drip before adding ganache around the whole cake.
- If the ganache races down the cake, let it cool longer.
- If it barely moves, warm it very gently.
- Add wafers relatively close to serving time. Moisture gradually softens them.
- Large chocolate pieces should be pushed gently into the buttercream rather than balanced only on the ganache.
- For clean slices, temporarily remove large decorations and cut with a sharp knife warmed in hot water and wiped dry.
- Prep Time: 1 hour
- Additional Time: 1 hour 10 minutes
- Cook Time: 35 minutes
- Category: Dessert
- Method: Baking
- Cuisine: American
Final Kitchen Note
The spectacular part of this Chocolate Avalanche Crunch Cake is not how much chocolate you can pile onto it. It is the contrast.
You want soft cake against crisp wafers. Smooth cocoa buttercream against firm chocolate pieces. Dark glossy ganache against pale white-chocolate discs. Large slabs at the back should create height, while truffles, broken wafers, and crumbs fill the foreground.
Most of all, give yourself time between stages. Cool the cake completely. Chill after the crumb coat. Chill again before the ganache. Test one drip before covering the cake. Add the tallest chocolate pieces before the smaller ones.
Follow that order and the apparently chaotic avalanche becomes surprisingly manageable.
When the knife finally passes through the glossy ganache and reaches those soft chocolate layers underneath, the cake delivers exactly what its appearance promised: chocolate in almost every possible texture.