
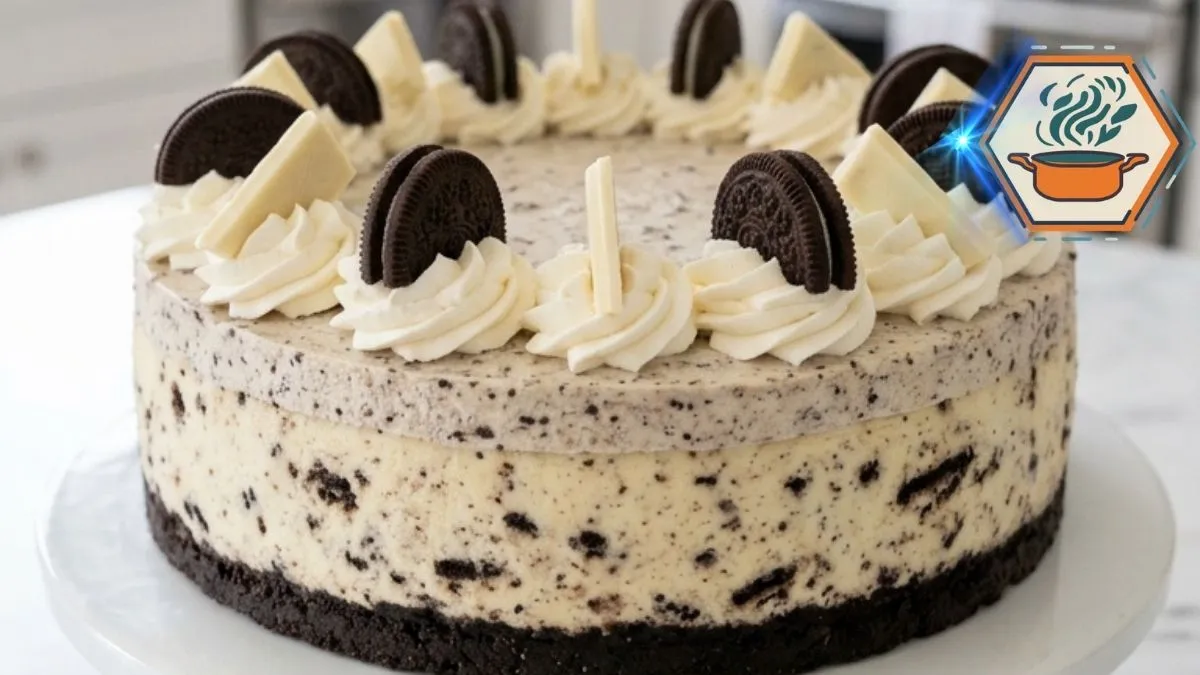
There is a moment every baker hopes for when a cheesecake is placed on the table. Everyone stops talking for a second. That is exactly the reaction this Cookies & Cream Cloud Cheesecake is made for. It is tall and creamy, with a dark chocolate cookie crust, plenty of cookie pieces, a pale cookie-speckled topping, and generous whipped cream swirls. Cut through the center, and you get those dramatic black-and-cream layers in every slice.
The first version of this recipe looked simple on paper. Crush cookies. Make cheesecake. Bake. Chill. Yet a few small details can separate a beautiful cheesecake from one with a soft crust, lumpy filling, or cracked center. A reliable baked cheesecake needs more than a list of ingredients. Temperature, mixing speed, crust preparation, baking, and cooling all matter. King Arthur Baking recommends room-temperature ingredients and low-speed mixing to limit excess air, while a gentle bake helps prevent cracking.
This version fills in those missing details. We pre-bake the cookie crust rather than simply pouring the filling over raw crumbs. We also use a water bath and gradual cooling. A water bath creates a humid baking environment and helps a cheesecake cook more evenly. If you enjoy learning the small details that make home baking more reliable, you can also read our guide to keeping madeleines moist and our guide to fixing dry madeleines.
Affiliate disclosure: As an Amazon Associate I earn from qualifying purchases. This article may contain affiliate links to kitchen tools I find useful for preparing this recipe.
JUMP TO
Why This Cookies & Cream Cheesecake Works
This dessert is about contrast.
The bottom is dark, compact, and chocolatey. The cheesecake above it is pale and thick, but scattered with small pieces of chocolate sandwich cookies. Then comes a silky cream-cheese topping with fine dark crumbs.
Finally, whipped cream rosettes and cookie halves create the loaded bakery-style finish shown in the inspiration.
The texture matters just as much as the appearance. One forkful should give you:
- A firm, crunchy chocolate cookie crust
- Thick and creamy vanilla cheesecake
- Small crunchy cookie pieces
- Soft cookie cream topping
- Light whipped cream
- A stronger chocolate note from the decoration
One particularly important change from a very basic version is pre-baking the crust. Pressing cookie crumbs and melted butter into the pan is not quite enough when you want a clean, stable base under such a heavy filling.
Pre-baking helps the crust hold together and reduces the chance of a soggy bottom. This approach is also recommended for maintaining a crunchier cheesecake crust.
Ingredients You Will Need
For the chocolate cookie crust
- 28 chocolate sandwich cookies, including the cream filling
- 5 tablespoons (70 g) unsalted butter, melted
- 1 tablespoon granulated sugar
- 1 small pinch fine salt
The sugar is a small addition, but it helps bind and lightly caramelize the crust. Salt balances the sweetness.
Crush the cookies very finely. Large chunks create weak points and can make neat slices difficult.
For the cookies and cream cheesecake
- 32 oz (907 g) full-fat block cream cheese, room temperature
- 1 cup (200 g) granulated sugar
- 1 cup (240 g) full-fat sour cream, room temperature
- 4 large eggs, room temperature
- 2 teaspoons pure vanilla extract
- 1 cup roughly crushed chocolate sandwich cookies
- 1/4 teaspoon fine salt
Use block cream cheese, not whipped cream cheese sold in tubs. The filling needs the structure of full-fat block-style cheese.
Room temperature matters, too. Cold cream cheese is harder to blend smoothly and encourages you to beat the batter longer. That can add too much air.
For the cookie cream topping
- 8 oz (226 g) full-fat cream cheese, softened
- 1/2 cup (60 g) powdered sugar
- 3/4 cup (180 ml) cold heavy whipping cream
- 1 teaspoon vanilla extract
- 1/2 cup finely crushed chocolate sandwich cookies
For decoration
- 1 1/2 cups stabilized or freshly whipped cream
- Chocolate sandwich cookie halves
- Extra finely crushed cookies
- Small white chocolate pieces
If the cheesecake will sit out for a while before serving, stabilized whipped cream is preferable because the decorative swirls hold their shape longer.
Useful Equipment Before You Begin
A 9-inch springform pan is important here. The removable ring lets you reveal the tall sides without turning the cheesecake upside down.
For this recipe, four pieces of equipment are particularly useful. These are standard Amazon links that you can replace with your own affiliate URLs before publishing:
- Shop 9-inch springform pans on Amazon
- Shop roasting pans for a cheesecake water bath on Amazon
- Shop instant-read kitchen thermometers on Amazon
- Shop offset spatulas on Amazon
You will also need heavy-duty aluminum foil, mixing bowls, an electric mixer, a rubber spatula, measuring cups or a kitchen scale, and a piping bag with a large star tip.
How to Make Cookies & Cream Cloud Cheesecake
1. Bring the ingredients to room temperature
Take the cream cheese, sour cream, and eggs out of the refrigerator before mixing.
The ingredients should no longer feel refrigerator-cold. This makes it easier to create a smooth batter without aggressive mixing.
Do not leave perishable ingredients sitting out unnecessarily. You only need them warm enough to blend smoothly.
2. Prepare the springform pan
Preheat the oven to 325°F (163°C).
Lightly grease the inside of a 9-inch springform pan. Place parchment paper on the bottom if you want easier transfer later.
Wrap the outside bottom and sides of the pan tightly with two layers of heavy-duty aluminum foil. The foil helps protect the crust when the pan goes into the water bath.
3. Build a crust that actually holds together
Process the 28 sandwich cookies into very fine crumbs.
Combine them with:
- Melted butter
- Sugar
- Pinch of salt
The finished mixture should resemble damp sand.
Pour it into the springform pan. Use the flat bottom of a measuring cup to press it down firmly and evenly.
This compacting step is easy to underestimate. A loosely packed crust can crumble when you cut the cheesecake.
Bake for 8–10 minutes at 325°F.
Remove it from the oven and let it cool while you prepare the filling.
Pre-baking is one of the small details that gives the finished cheesecake the dark, defined base seen in the inspiration.
Make the Creamy Cookie Filling
Place the softened cream cheese in a large bowl.
Beat on low to medium-low speed until smooth. Scrape the bottom and sides of the bowl.
Add the sugar and salt. Mix just until incorporated.
Add the sour cream and vanilla. Mix again at low speed.
Now add the eggs one at a time.
This is where restraint matters.
Once eggs enter cheesecake batter, excessive beating can incorporate extra air. During baking, that air expands. The cheesecake can then rise too much, fall, and crack as it cools. King Arthur Baking specifically identifies vigorous mixing as one cause of cheesecake cracking.
Stop the mixer once each egg disappears into the batter.
Finally, fold in the cup of crushed sandwich cookies by hand with a rubber spatula.
Keep these pieces somewhat irregular. You want visible dark flecks and small cookie pockets inside each slice rather than completely black batter.
Bake It Gently
Pour the filling over the pre-baked crust.
Smooth the surface with an offset spatula.
Place the foil-wrapped springform pan inside a large roasting pan. Carefully add hot water to the roasting pan until it reaches roughly 1 inch up the outside of the springform pan.
Do not pour water onto the cheesecake.
Bake at 325°F for about 60–70 minutes.
Avoid repeatedly opening the oven.
The cheesecake is ready when the outside looks set but the center still has a controlled wobble. It should move slightly as one section rather than ripple like liquid batter.
Do not wait for the entire center to become rigid.
For bakers who prefer a more objective test, King Arthur Baking notes that a super-creamy cheesecake can measure about 150–155°F in the center, with a reading of roughly 165–170°F closer to the edge. The cake continues cooking from retained heat after baking.
The Cooling Step You Should Not Skip
A cheesecake does not go directly from a hot oven to the refrigerator.
Turn the oven off.
Crack the oven door slightly and leave the cheesecake inside for about 1 hour.
This gradual temperature change reduces stress on the cheesecake as it contracts. Slow cooling is a common technique for reducing cracking.
After an hour, remove the cheesecake from the water bath.
Take away the foil and place the pan on a cooling rack.
Allow it to finish cooling before refrigerating.
Then cover and chill for at least 6 hours. Overnight is even better.
This overnight rest is one of the secrets behind the dense yet creamy slice in the photo. The filling becomes firm enough to cut while remaining soft on the tongue.
Make the Cookie Cream Topping
Once the cheesecake is thoroughly chilled, make the top layer.
Beat the softened cream cheese with powdered sugar until smooth.
Add vanilla.
With the mixer running at a lower speed, slowly add the cold heavy cream. Increase the speed and beat until the mixture becomes thick enough to spread.
Fold in the finely crushed sandwich cookies.
The crumbs need to be fine for this layer. The goal is a pale cream with tiny dark speckles rather than a chunky second cheesecake layer.
Spread a generous layer over the chilled cheesecake.
Use an offset spatula to take the topping close to the edges. A few natural waves are fine. The visual should remain soft and creamy rather than perfectly polished.
If you enjoy working with creamy dessert finishes, our guide to caramelizing crème brûlée covers another useful dessert technique.
How to Recreate the Loaded Look
Now comes the fun part.
The finished Cookies & Cream Cloud Cheesecake should remain fairly simple in the center. Most of the visual weight belongs around the outer edge.
Pipe large vanilla whipped cream swirls around the perimeter.
Space them evenly.
Place a chocolate sandwich cookie half between or against selected swirls. Keep some cookies upright so their dark surfaces contrast with the white cream.
Add a few small white chocolate pieces.
Finish with finely scattered dark cookie crumbs.
Do not cover the entire center with cookies. Leaving some of the speckled topping visible gives the cake its distinctive cream-and-black appearance.
For another dessert where the final appearance matters as much as flavor, see our star-shaped cookies basics.
How to Get Those Clean Bakery-Style Slices
A beautiful cheesecake can still look messy when cut incorrectly.
Use a long, sharp knife.
Fill a tall container with hot water. Dip the blade into the water, then dry it completely with a clean towel.
Make one cut.
Clean the knife.
Repeat for every cut.
Do not drag a crumb-covered knife repeatedly through the cheesecake. The dark cookie crust will smear across the pale filling.
For the neatest result, cut the cheesecake when it is fully chilled.
Then allow individual slices to sit briefly before eating if you prefer a softer, creamier mouthfeel.
Common Mistakes and How to Avoid Them
Using cold cream cheese: Cold cheese can leave tiny lumps. Let it soften before mixing.
Overbeating the eggs: Use low speed and stop as soon as each egg is incorporated.
Skipping the crust bake: A short pre-bake gives the cookie base better structure.
Leaving large crust pieces: Fine crumbs pack more tightly and cut more cleanly.
Baking until the center looks completely firm: The cheesecake can become dry or crack. A slight central wobble is expected.
Cooling too quickly: Sudden temperature changes can contribute to cracks.
Decorating a warm cheesecake: The topping and whipped cream can soften or melt. Chill the cake completely first.
Cutting too early: Six hours is a practical minimum here. Overnight chilling gives the best presentation.
Storage and Make-Ahead Tips
This is an excellent make-ahead dessert because chilling is part of the recipe rather than an inconvenience.
Make the baked cheesecake one day before serving. Let it chill overnight. Add the cookie topping and decoration the following day.
Keep the finished cake refrigerated.
For food-safety guidance, USDA storage information lists refrigerated cheesecake at up to 7 days, although this recipe’s whipped decoration and cookie texture are at their best earlier.
For serving guests, I would aim to prepare and eat it within about 3–4 days for the best texture.
Keep leftovers covered so the cheesecake does not absorb refrigerator odors.
What Does Cookies & Cream Cloud Cheesecake Taste Like?
Imagine the familiar flavor of a chocolate sandwich cookie, but with far more creaminess.
The crust delivers concentrated cocoa flavor. The cheesecake filling is tangy, sweet, and vanilla-forward. Sour cream prevents it from tasting one-dimensional.
Then small cookie pieces interrupt that smooth filling with chocolate flavor and subtle crunch.
The topping changes the texture once again. It is softer and lighter than the baked layer beneath it.
That contrast is why the dessert works. It is not simply cheesecake with cookies sprinkled on top. Cookies become part of every major layer.
Frequently Asked Questions
Can I make Cookies & Cream Cloud Cheesecake without a water bath?
Yes, but the result may differ. A water bath provides moisture and gentler heat, which can reduce browning and cracking. If you are worried about leaks, an alternative is to place a pan of hot water on the rack below the cheesecake to add steam without putting the springform pan directly into water.
Why did my cheesecake crack?
The most common causes include overbaking, incorporating too much air during mixing, and cooling the cake too quickly. Mix gently once the eggs are added and remove the cheesecake while the center still has a slight wobble.
Do I remove the cream from the sandwich cookies?
No. For this recipe, crush the sandwich cookies with their cream filling intact. That applies to both the crust and the cookie pieces in the cheesecake.
Can I use low-fat cream cheese?
Full-fat block cream cheese is the better choice. It provides the rich texture and structure this tall cheesecake needs.
How long should cheesecake chill before cutting?
Give it at least 6 hours, but overnight is preferable. The cheesecake firms as it cools, making cleaner slices much easier.
Can I freeze it?
Yes. For the cleanest result, freeze the baked and chilled cheesecake before adding the whipped decoration. Wrap it well. Thaw it in the refrigerator, then add the final topping and decorations.
Print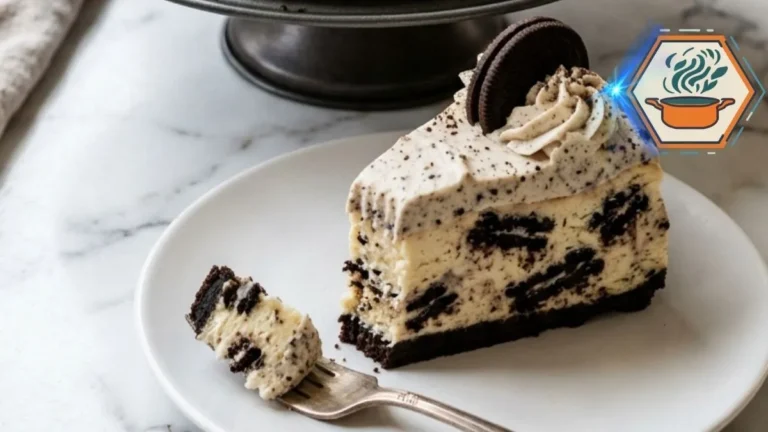
Cookies & Cream Cloud Cheesecake
A tall and ultra-creamy Cookies & Cream Cloud Cheesecake with a crisp chocolate sandwich cookie crust, cookie-packed vanilla cheesecake filling, silky cookie cream topping, whipped cream swirls, and chocolate cookie pieces.
- Total Time: 8 hours 50 minutes
- Yield: 12 slices
Ingredients
Chocolate Cookie Crust
- 28 chocolate sandwich cookies, cream filling included, finely crushed
- 5 tablespoons (70 g) unsalted butter, melted
- 1 tablespoon granulated sugar
- 1 small pinch fine salt
Cookies & Cream Cheesecake Filling
- 32 oz (907 g) full-fat block cream cheese, softened to room temperature
- 1 cup (200 g) granulated sugar
- 1 cup (240 g) full-fat sour cream, room temperature
- 4 large eggs, room temperature
- 2 teaspoons pure vanilla extract
- 1/4 teaspoon fine salt
- 1 cup roughly crushed chocolate sandwich cookies
Cookie Cream Topping
- 8 oz (226 g) full-fat block cream cheese, softened
- 1/2 cup (60 g) powdered sugar
- 3/4 cup (180 ml) cold heavy whipping cream
- 1 teaspoon pure vanilla extract
- 1/2 cup finely crushed chocolate sandwich cookies
Decoration
- 1 1/2 cups whipped cream
- Chocolate sandwich cookie halves
- Extra finely crushed chocolate sandwich cookies
- Small white chocolate pieces
Instructions
- Preheat the oven to 325°F (163°C). Lightly grease a 9-inch springform pan. Line the bottom with parchment paper if desired.
- Wrap the outside of the springform pan securely with two layers of heavy-duty aluminum foil to help keep water from entering during the water bath.
- Finely crush 28 chocolate sandwich cookies, including their cream filling. Mix with melted butter, sugar, and salt until the crumbs resemble damp sand.
- Transfer the mixture to the pan. Press it firmly and evenly over the bottom using the flat base of a measuring cup.
- Bake the crust for 8–10 minutes. Remove from the oven and let it cool slightly while preparing the filling. Keep the oven at 325°F.
- Beat the room-temperature cream cheese on low to medium-low speed until smooth. Add the granulated sugar and salt and mix just until combined.
- Add the sour cream and vanilla. Mix on low speed until smooth, scraping the sides and bottom of the bowl as needed.
- Add the eggs one at a time, mixing on low only until each egg disappears into the batter. Do not beat the batter aggressively after adding the eggs.
- Fold the roughly crushed chocolate sandwich cookies into the batter by hand.
- Pour the cheesecake filling over the pre-baked crust. Smooth the top gently with an offset spatula.
- Place the wrapped springform pan inside a larger roasting pan. Carefully pour hot water into the roasting pan until it reaches approximately 1 inch up the outside of the springform pan.
- Bake for 60–70 minutes. The outer portion should look set while the center should still have a slight, controlled wobble.
- Turn off the oven. Crack the oven door and leave the cheesecake inside for approximately 1 hour.
- Remove it from the water bath. Remove the foil and allow the cheesecake to finish cooling.
- Cover and refrigerate for at least 6 hours, preferably overnight.
- For the topping, beat softened cream cheese and powdered sugar until smooth. Add vanilla. Slowly add the cold heavy cream and beat until the mixture becomes thick and spreadable.
- Fold in the finely crushed cookies. Spread the topping over the completely chilled cheesecake.
- Pipe whipped cream swirls around the outer edge. Decorate with cookie halves, white chocolate pieces, and fine cookie crumbs while leaving part of the speckled center visible.
- For clean slices, dip a sharp knife in hot water, wipe it completely dry, make one cut, then clean and repeat
Notes
- Use full-fat block cream cheese, not whipped cream cheese from a tub.
- Cream cheese, sour cream, and eggs should be near room temperature before making the filling.
- Keep the heavy cream cold for the topping.
- Crush the crust cookies very finely so the base packs firmly.
- Keep larger, irregular cookie pieces for the cheesecake filling.
- Do not remove the sandwich-cookie cream filling.
- Pre-baking the crust helps create the firm dark base needed for this cheesecake.
- Avoid high-speed mixing after adding the eggs.
- Do not bake until the center becomes completely rigid.
- Chill overnight when possible for cleaner slices.
- Add the whipped cream and decorative cookies after the cheesecake is fully chilled.
- Keep the finished cheesecake refrigerated at 40°F (4.4°C) or below. USDA recommends 40°F or below for perishable refrigerated foods.
- For best quality, I recommend eating this homemade decorated cheesecake within 3–4 days. USDA’s general guidance for cooked leftovers is also 3–4 refrigerated days
- Prep Time: 40 minutes
- Chilling/Cooling Time: 7 hours
- Cook Time: 1 hour 10 minutes
- Category: Dessert
- Method: Baking
- Cuisine: American
Final Kitchen Notes
The dramatic appearance of this Cookies & Cream Cloud Cheesecake comes from several small decisions rather than one difficult technique.
Pack the crust firmly. Pre-bake it. Start with room-temperature filling ingredients. Mix the eggs gently. Use a water bath. Do not bake away the center wobble. Cool gradually. Most importantly, give the cheesecake enough refrigerator time before decorating and cutting.
Follow those details and the payoff is worth the wait: a tall dark crust, thick cookie-studded cheesecake, creamy speckled top, white whipped swirls, and chocolate cookie pieces around the edge.
It is the kind of dessert that looks impressive before the first cut.
Then the first slice comes out, revealing all those cookies hidden inside.
That is when everyone reaches for a plate.