
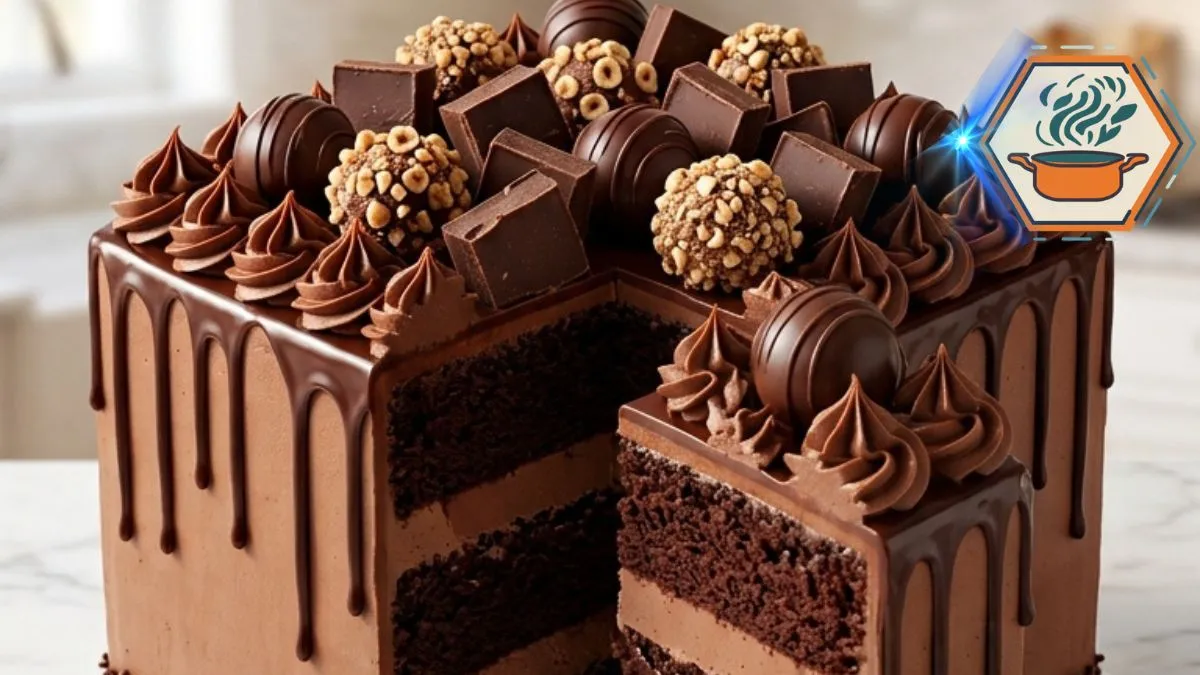
The first thing people notice about a Chocolate Truffle Overload Layer Cake is not a single ingredient. It is the height. Then come the glossy chocolate drips, piped swirls, hazelnut-covered truffles, and chunky pieces of chocolate standing across the top. Cut into the cake, and the real surprise appears: three dark, moist cake layers separated by two thick bands of airy chocolate cream.
This is the kind of cake that can turn a birthday table into a celebration before anyone takes a bite. Yet the dramatic appearance comes from familiar baking techniques rather than complicated pastry work. The cake uses cocoa, oil, milk, and hot coffee for a tender crumb. According to King Arthur Baking, careful measuring and proper baking technique can make a major difference in the consistency of home-baked cakes.
The chocolate finish is built in stages rather than poured on all at once. A stable frosting supports the tall square shape, while a separate ganache creates the glossy drip. Ganache itself is simply a mixture built around chocolate and cream, but temperature and consistency matter greatly when it is used on a layer cake. Food Network also features layer-cake methods where the cake is chilled after its crumb coat before ganache is added.
Affiliate disclosure: As an Amazon Associate I earn from qualifying purchases. This article may contain affiliate links to kitchen tools I find useful for preparing this recipe.
JUMP TO
Why This Chocolate Truffle Overload Layer Cake Works
This cake is designed around contrast.
The sponge is dark and tender. The filling is lighter and creamier. The outer frosting is firm enough to support the layers. The ganache brings a smooth, glossy finish. Finally, toasted hazelnuts, truffles, sprinkles, and chocolate pieces add texture.
Hot coffee is particularly useful in a cocoa-based cake. It brings liquid to the batter while supporting a deeper chocolate flavor. If you do not want to use coffee, the same amount of hot water can be used.
Vegetable oil is another important ingredient. Butter tastes wonderful in cakes, but oil stays fluid when cool. That helps this particular cake retain a soft texture after refrigeration.
The batter will look thinner than a traditional butter cake batter. Do not add extra flour to thicken it. The thin consistency is intentional.
For more baking ideas, see our guide to keeping cakes and baked desserts tender and our tips for boosting banana flavor in baking.
Ingredients You Will Need
Chocolate Cake
- 2½ cups (about 300 g) all-purpose flour
- 2½ cups (500 g) granulated sugar
- 1 cup (85–100 g, depending on brand) unsweetened cocoa powder
- 2½ teaspoons baking powder
- 2 teaspoons baking soda
- ¾ teaspoon fine salt
- 3 large eggs, at room temperature
- 1½ cups (360 ml) whole milk, at room temperature
- ¾ cup (180 ml) neutral vegetable oil
- 1 tablespoon vanilla extract
- 1½ cups (360 ml) hot coffee or hot water
Use natural unsweetened cocoa unless the cocoa you buy is specifically designed to work with the leavening in your recipe. Cocoa types are not always interchangeable.
Whipped Chocolate Filling
- 8 oz (226 g) full-fat block cream cheese, softened
- ½ cup unsweetened cocoa powder
- 1 cup powdered sugar
- 1 teaspoon vanilla extract
- Pinch of salt
- 1½ cups cold heavy whipping cream
Use block cream cheese, not spreadable cream cheese from a tub. The latter contains more moisture and can make the filling too loose for such a tall cake.
Chocolate Frosting
- 1½ cups (340 g) unsalted butter, softened
- ¾ cup unsweetened cocoa powder
- 4½ cups powdered sugar
- 2 teaspoons vanilla extract
- ½ teaspoon salt
- About ½ cup heavy cream
Add the cream gradually. You may not need every drop.
Chocolate Ganache
- 8 oz (226 g) semisweet chocolate, finely chopped
- ¾ cup (180 ml) heavy cream
Choose real chocolate bars when possible rather than candy coating. Finely chopping the chocolate helps the hot cream melt it evenly.
Chocolate-Hazelnut Truffles
- 6 oz (170 g) semisweet chocolate, finely chopped
- ⅓ cup (80 ml) heavy cream
- ½ cup finely chopped toasted hazelnuts
Decoration
- 4 oz chocolate, broken into irregular pieces
- Chocolate frosting for piping
- ½ cup chocolate sprinkles, optional
The final cake should have the same visual character throughout: square shape, three dark cake layers, two visible chocolate-cream layers, milk-chocolate frosting, irregular ganache drips, piped swirls, hazelnut truffles, chunky chocolate pieces, and chocolate sprinkles around the bottom edge.
Equipment That Makes the Recipe Easier
Three matching 8-inch square pans give the cleanest layers. Baking the batter in three separate pans also avoids the difficult job of cutting one very thick square cake into equal layers.
A useful option is a set of 8-inch square cake pans on Amazon. Choose light-colored metal pans when possible. Very dark pans can brown the edges faster.
You will also need mixing bowls, parchment paper, a whisk, electric mixer, cooling racks, offset spatula, cake scraper, piping bag, and a sturdy square cake board.
For the smooth sides and controlled chocolate drip shown in this style of cake, an offset icing spatula on Amazon is particularly useful.
How to Make the Chocolate Cake Layers
Heat the oven to 350°F (175°C).
Grease three 8-inch square cake pans lightly. Line their bottoms with parchment. Grease the parchment as well.
Do not skip the parchment. Moist chocolate cakes can stick even to a well-greased pan.
In a large bowl, whisk together the flour, sugar, cocoa, baking powder, baking soda, and salt. Break apart every visible cocoa lump.
In another bowl, combine the eggs, milk, oil, and vanilla.
Pour the wet mixture into the dry ingredients. Mix on low speed just until most dry streaks disappear.
Now slowly pour in the hot coffee while mixing at low speed.
The batter will become thin and glossy. This is normal.
Divide it equally among the three pans. For the most even layers, place each pan on a digital scale and distribute the batter by weight.
Bake for approximately 24 to 29 minutes.
Start checking at 24 minutes. A toothpick inserted near the center should emerge with a few moist crumbs but no raw batter. Avoid baking until the toothpick is completely dry, since that can lead to dry layers.
Let the cakes sit in their pans for about 10 minutes. Carefully turn them onto cooling racks and remove the parchment.
The layers must become completely cool before filling.
Warm cake will soften both cream filling and frosting.
Make a Thick Chocolate Cream Filling
The filling has an important job. It needs to taste light while carrying the weight of two cake layers above it.
Beat softened cream cheese until smooth.
Sift in the cocoa and powdered sugar. Add vanilla and salt. Beat until the mixture is uniform.
In a separate chilled bowl, whip very cold heavy cream until it reaches stiff peaks.
Do not continue beating once the cream holds its shape.
Fold approximately one-third of the whipped cream into the cream cheese mixture to loosen it. Then gently fold in the remainder.
The finished filling should hold a mound on a spatula.
If your kitchen is warm and the filling feels soft, refrigerate it for 15–20 minutes before assembly.
Prepare the Chocolate Frosting
Beat the softened butter for about 2–3 minutes until creamy.
Sift the cocoa and powdered sugar. Add them gradually to the butter on low speed.
Add vanilla and salt.
Pour in heavy cream one tablespoon at a time until the frosting becomes smooth and spreadable.
For a tall cake, slightly firm frosting is better than loose frosting. It forms a supportive outer shell around the softer filling.
A metal cake scraper on Amazon can help create straight square sides while still leaving the subtle handmade finish seen on this cake.
Make the Homemade Chocolate-Hazelnut Truffles
Place 6 oz finely chopped semisweet chocolate in a heatproof bowl.
Heat ⅓ cup heavy cream until steaming and just beginning to simmer around the edge. Do not vigorously boil it.
Pour the cream over the chocolate.
Wait two minutes.
Stir slowly from the center outward until the mixture becomes dark and glossy. If small pieces remain, let the residual heat melt them before adding more heat.
Cover and refrigerate until firm enough to scoop. Depending on your refrigerator and chocolate, this can take roughly 1–2 hours.
Toast the hazelnuts before chopping them. Toasting gives them a stronger aroma and a crisp texture.
Scoop small portions of chilled ganache and quickly roll them into balls. Coat each truffle with chopped hazelnuts.
Return them to the refrigerator.
How to Assemble a Stable Three-Layer Cake
If any cake has a noticeable dome, trim it with a long serrated knife.
Place the first layer on a sturdy square cake board.
Pipe a narrow border of chocolate frosting around its upper edge. This frosting “dam” is an important addition for a tall cake. It helps keep the softer whipped filling from squeezing out when the layers are stacked.
Spread half the chocolate cream inside the border.
Add the second cake layer.
Repeat the frosting dam and filling.
Place the final layer on top, preferably bottom-side up. The naturally flat bottom gives you a cleaner top surface.
Check the cake from every side. Correct any leaning now.
Refrigerate for about 20–30 minutes.
Apply a very thin layer of chocolate frosting over the top and sides. This is the crumb coat. It traps loose crumbs so they do not appear in the final frosting.
Chill again for about 20 minutes.
Cover the cake with the remaining frosting. Smooth the sides while keeping a few gentle spatula marks for a homemade finish.
If you make tall cakes regularly, a rotating cake turntable on Amazon makes frosting each side much easier.
How to Get the Glossy Chocolate Drip Right
Place 8 oz finely chopped semisweet chocolate in a bowl.
Heat ¾ cup heavy cream until steaming.
Pour it over the chocolate and wait two minutes. Stir gently until glossy.
Now comes one of the most important details in the recipe:
Do not pour hot ganache directly onto the frosted cake.
It can melt the frosting and race down the sides.
Allow the ganache to cool until it is still fluid but noticeably thicker. Meanwhile, chill the frosted cake.
Test one drip on the back edge.
If it runs straight to the bottom, wait a few more minutes.
If it barely moves, the ganache is too cool. Warm it very briefly.
Once the consistency is right, create individual irregular drips around the perimeter. Then add ganache to the center and gently spread it toward the edges.
The goal is not to cover the entire side. The frosting should remain clearly visible beneath the drips.
Decorating the Cake Like the Photo
Pipe generous chocolate frosting swirls around the upper perimeter.
Alternate hazelnut truffles and irregular chocolate pieces between the swirls. Vary their angles instead of arranging every piece identically.
Press chocolate sprinkles around the lower portion of the cake.
This gives the finished dessert its recognizable appearance: a tall square chocolate cake with a smooth milk-chocolate exterior, dark glossy drips, a dense decorative crown, and a textured sprinkle border.
Chill the completed cake for 1–2 hours before slicing.
How to Cut a Clean, Dramatic Slice
Tall layer cakes look best when cut cold.
Fill a tall container with hot water. Dip a long sharp knife into it, then wipe the blade completely dry.
Cut straight down through the cake.
Clean and warm the knife again before every major cut.
This little step keeps frosting, cream, and crumbs from smearing across the layers.
For another dramatic homemade dessert, our strawberry-filled chocolate cake offers a fruit-filled variation on the chocolate celebration-cake theme.
Storage and Make-Ahead Tips
Because the filling contains cream cheese and whipped cream, keep the assembled cake refrigerated.
For the best workflow, bake the cake layers one day ahead. Once completely cool, wrap each layer well and store it for assembly the following day.
The truffle centers can also be prepared ahead and chilled.
For serving, take the cake from the refrigerator shortly before you plan to cut it. A brief rest takes some of the chill off the frosting while the filling remains stable.
Do not leave a cream-filled cake sitting in a warm room for an extended period.
Common Mistakes to Avoid
- Assembling warm layers: The filling can soften and slide.
- Using tub cream cheese: It can produce a looser filling.
- Adding all the frosting cream at once: Your frosting may become too soft.
- Skipping the frosting dam: The whipped filling may squeeze from between the layers.
- Skipping the crumb coat: Dark crumbs can become trapped in the final frosting.
- Pouring hot ganache over buttercream: The frosting may melt.
- Making the ganache drip too thin: It can run all the way down the cake.
- Overbaking the sponge: Check early rather than relying only on the stated baking time.
- Decorating before chilling: A cold, stable cake is much easier to finish.
- Cutting with a cold dirty knife: It smears the beautiful layers you worked to create.
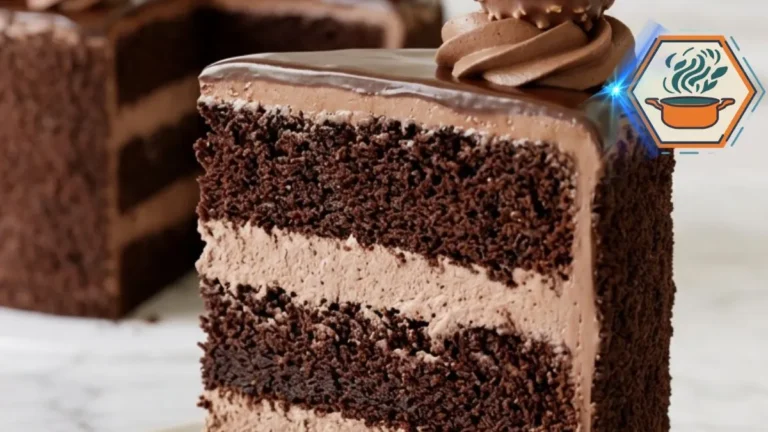
Chocolate Truffle Overload Layer Cake
A tall three-layer chocolate cake filled with whipped chocolate cream and covered with chocolate frosting, glossy ganache drips, homemade chocolate-hazelnut truffles, chocolate pieces, and sprinkles.
- Total Time: About 4 hours 15 minutes, including cooling/chilling
- Yield: 16 servings
Ingredients
Chocolate Cake
- 2½ cups (300 g) all-purpose flour
- 2½ cups (500 g) granulated sugar
- 1 cup (about 90 g) unsweetened cocoa powder
- 2½ teaspoons baking powder
- 2 teaspoons baking soda
- ¾ teaspoon fine salt
- 3 large eggs, room temperature
- 1½ cups (360 ml) whole milk, room temperature
- ¾ cup (180 ml) neutral vegetable oil
- 1 tablespoon vanilla extract
- 1½ cups (360 ml) hot coffee or hot water
Whipped Chocolate Filling
- 8 oz (226 g) full-fat block cream cheese, softened
- ½ cup unsweetened cocoa powder
- 1 cup powdered sugar
- 1 teaspoon vanilla extract
- Pinch of salt
- 1½ cups cold heavy whipping cream
Chocolate Frosting
- 1½ cups (340 g) unsalted butter, softened
- ¾ cup unsweetened cocoa powder
- 4½ cups powdered sugar
- 2 teaspoons vanilla extract
- ½ teaspoon salt
- Up to ½ cup heavy cream, added gradually
Chocolate Ganache
- 8 oz (226 g) semisweet chocolate, finely chopped
- ¾ cup (180 ml) heavy cream
Chocolate-Hazelnut Truffles
- 6 oz (170 g) semisweet chocolate, finely chopped
- ⅓ cup (80 ml) heavy cream
- ½ cup finely chopped toasted hazelnuts
Decoration
- 4 oz chocolate, broken into irregular pieces
- Extra chocolate frosting for piping
- ½ cup chocolate sprinkles, optional
Instructions
- Heat the oven to 350°F (175°C). Lightly grease three 8-inch square cake pans. Line the bottoms with parchment paper and grease the parchment.
- Whisk flour, sugar, cocoa powder, baking powder, baking soda, and salt until evenly combined.
- In another bowl, whisk eggs, milk, oil, and vanilla. Add to the dry ingredients and mix only until combined.
- Slowly mix in the hot coffee or hot water. The batter should be thin.
- Divide the batter equally between the three pans. Bake for 24–29 minutes, or until a toothpick inserted near the center comes out with a few moist crumbs.
- Cool in the pans for 10 minutes. Turn onto racks, remove parchment, and cool completely.
- For the filling, beat cream cheese until smooth. Beat in cocoa, powdered sugar, vanilla, and salt. In a separate chilled bowl, whip the heavy cream to stiff peaks. Gently fold it into the chocolate mixture.
- For the frosting, beat butter until creamy. Gradually beat in cocoa and powdered sugar. Add vanilla and salt. Add heavy cream one tablespoon at a time until smooth but firm enough to support the cake.
- For the truffles, pour hot cream over 6 oz chopped chocolate. Wait 2 minutes and stir until smooth. Chill for 1–2 hours or until scoopable. Roll into small balls and coat with toasted chopped hazelnuts. Refrigerate.
- Level the cooled cake layers if necessary. Place the first layer on a sturdy square cake board. Pipe a frosting dam around its edge and spread half the filling inside.
- Add the second layer and repeat. Add the third layer, preferably bottom-side up. Chill the stacked cake for 20–30 minutes.
- Apply a thin crumb coat. Refrigerate for about 20 minutes. Cover with the remaining chocolate frosting.
- For the drip ganache, pour hot cream over 8 oz chopped chocolate. Wait 2 minutes, then stir until glossy. Let it cool until thick but still pourable.
- Test one drip on the chilled cake. If it runs too quickly, allow the ganache to cool longer. Add irregular drips around the perimeter and spread ganache over the top.
- Pipe chocolate frosting swirls around the top. Add hazelnut truffles and irregular chocolate pieces between them. Press sprinkles around the bottom edge if desired.
- Refrigerate for 1–2 hours before slicing. Use a long knife warmed in hot water and wiped dry for clean layers.
Notes
- All three cake layers must be completely cool before assembly.
- Use full-fat block cream cheese, not spreadable tub cream cheese.
- The chocolate batter is intentionally thin. Do not add extra flour.
- Weighing the batter between the three pans gives more even layers.
- Keep the whipped filling cold.
- A frosting dam around each filling layer helps prevent the cream from squeezing out.
- Chill the cake before the crumb coat, after the crumb coat, and before adding ganache.
- Always test one ganache drip before covering the visible sides.
- Do not pour hot ganache over the frosting.
- For neat slices, cut the cake cold with a warm, dry knife.
- Because the filling contains cream cheese and whipped cream, refrigerate the finished cake.
- Prep Time: 1 hour 15 minutes
- Additional/Chilling Time: 2 hours 30 minutes
- Cook Time: 24–29 minutes
- Category: Dessert
- Method: Baking
- Cuisine: American-inspired
Chocolate Truffle Overload Layer Cake FAQs
Can I make this cake without coffee?
Yes. Replace the coffee with the same amount of hot water. Coffee contributes depth to the chocolate profile, but the cake does not depend on coffee for its structure.
Why is my chocolate cake batter so thin?
That is expected. The recipe contains a generous amount of liquid, including hot coffee or water. Do not compensate by adding extra flour.
Why is my chocolate filling runny?
The cream may have been too warm, under-whipped, or folded too aggressively. Tub-style cream cheese can also make the mixture softer. Use cold heavy cream and full-fat block cream cheese.
How do I stop a tall layer cake from sliding?
Cool every cake layer completely. Use thick filling, add a frosting dam around each filling layer, keep the layers level, and chill the stacked cake before final frosting.
Can I make the Chocolate Truffle Overload Layer Cake ahead of time?
Yes. Making the components in stages can actually make assembly easier. Bake the layers first, prepare the truffles separately, then make the filling and frosting before assembly.
How do I keep ganache from running down the whole cake?
Temperature matters. Chill the frosted cake and let the ganache cool until slightly thick. Test one drip before decorating the visible sides. Similar ganache methods commonly call for allowing ganache to cool before it is spread or dripped onto a cake.
Can I use round cake pans instead?
Yes. Three 8-inch round pans should work with similar baking principles, although baking time can vary. You will lose the distinctive square presentation.
What chocolate works best for the truffles and drip?
A good semisweet chocolate gives the cake a balanced flavor and dependable ganache texture. Finely chop bars before pouring the hot cream over them. Chocolate chips can behave differently because formulations vary by brand.
A Celebration Cake Worth the Extra Steps
A Chocolate Truffle Overload Layer Cake looks complicated because several chocolate elements appear in one finished dessert. In practice, each component is manageable when prepared separately.
Bake three moist layers. Cool them fully. Make a stable whipped chocolate filling. Build the cake with frosting dams. Chill it. Add the crumb coat and final frosting. Then finish with controlled ganache drips, chocolate swirls, hazelnut truffles, and broken chocolate pieces.
That order matters.
Once sliced, the cake reveals exactly what its decorated exterior promises: dark chocolate sponge, thick creamy filling, rich frosting, and multiple chocolate textures in every serving.
For more homemade baking ideas and practical kitchen guides, visit RecipesMind.