
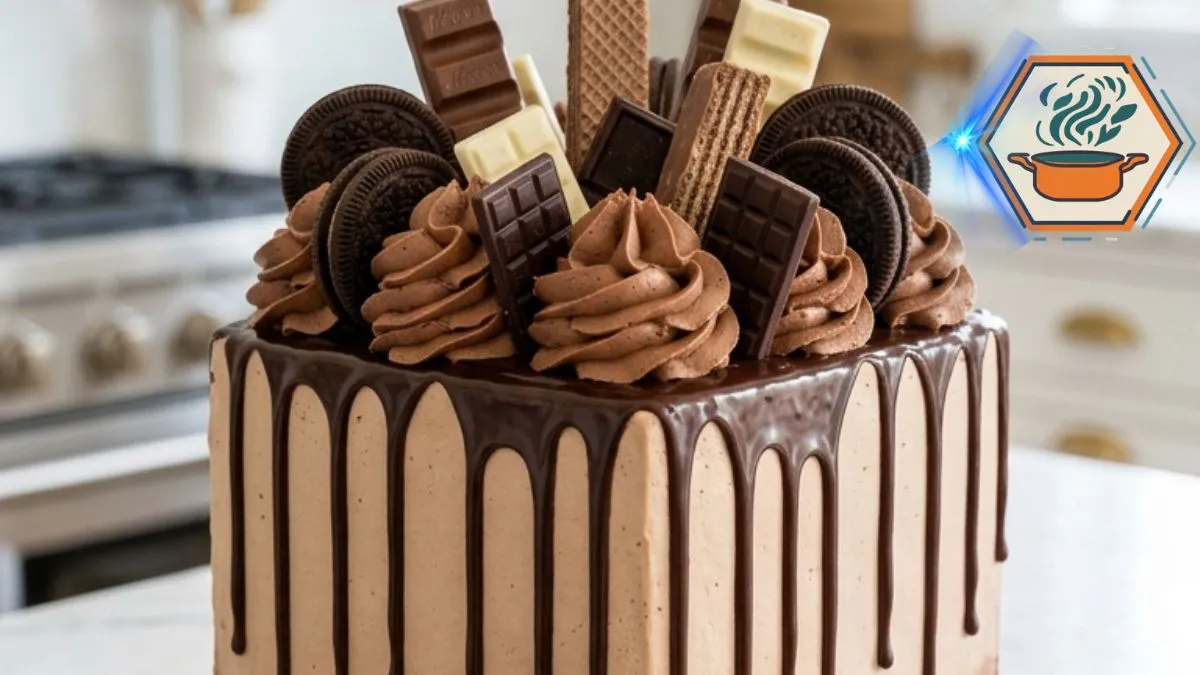
There is a special moment when a celebration cake reaches the table and everyone stops talking. This Ultimate Chocolate Cookie Drip Cake is designed for exactly that moment. It is tall, square, rich with chocolate, and covered with glossy ganache drips. Chocolate sandwich cookies, wafers, dark and milk chocolate pieces, white chocolate squares, and soft buttercream swirls crowd the top. Yet the real surprise comes after the first slice. Inside, you get moist chocolate cake with a creamy chocolate filling in every bite.
A dramatic cake still needs to taste as good as it looks. That starts with the cake itself. Cocoa gives it its deep flavor, while oil helps the crumb stay tender. Hot coffee makes the chocolate taste richer without turning the finished dessert into a coffee cake. Similar chocolate cake formulas also use brewed coffee or water with cocoa, eggs, milk, and oil or butter. You can see how these ingredients work together in this chocolate cake reference from King Arthur Baking.
The glossy finish also needs the right technique. Ganache changes considerably as it cools, so timing matters more than simply pouring chocolate over the cake. King Arthur Baking’s ganache guide explains how both temperature and the chocolate-to-cream ratio affect its consistency. For our tall cake, the ganache needs to flow slowly enough to form distinct drips instead of running all the way down the sides.
Affiliate disclosure: As an Amazon Associate I earn from qualifying purchases. This article may contain affiliate links to kitchen tools I find useful for preparing this recipe.
JUMP TO
Ultimate Chocolate Cookie Drip Cake
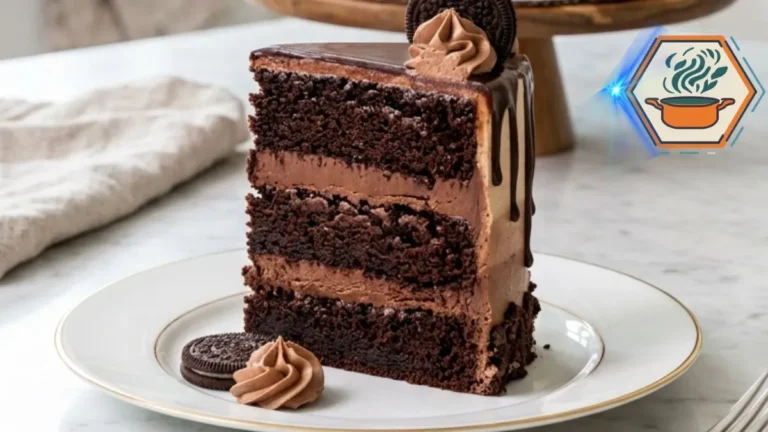
A tall, moist chocolate layer cake filled with chocolate cream and covered with two-tone chocolate buttercream, glossy ganache drips, chocolate sandwich cookies, wafers, and assorted chocolate pieces.
- Total Time: 3 hours 5 minutes
- Yield: 16 servings
Ingredients
Chocolate Cake
- 2 1/2 cups all-purpose flour
- 2 1/2 cups granulated sugar
- 1 cup unsweetened cocoa powder
- 2 1/2 teaspoons baking soda
- 1 teaspoon baking powder
- 1/2 teaspoon fine salt
- 4 large eggs, room temperature
- 1 1/4 cups whole milk, room temperature
- 3/4 cup neutral vegetable oil
- 2 teaspoons vanilla extract
- 1 1/4 cups hot brewed coffee or hot water
Chocolate Cream Filling
- 8 ounces full-fat block cream cheese, softened
- 1 cup unsalted butter, softened
- 3/4 cup unsweetened cocoa powder
- 4 cups powdered sugar, sifted
- 1/3 to 1/2 cup heavy cream
- 1 teaspoon vanilla extract
- Pinch of salt
Chocolate Ganache Drip
- 8 ounces semisweet chocolate, finely chopped
- 3/4 cup heavy cream
Chocolate Buttercream Swirls and Ombré Finish
- 1/2 cup unsalted butter, softened
- 2 cups powdered sugar, sifted
- 1/4 cup unsweetened cocoa powder
- 3–4 tablespoons heavy cream
- 1 teaspoon vanilla extract
- Pinch of salt
Decoration
- Chocolate sandwich cookies, as needed
- Mini chocolate sandwich cookies, optional
- Milk chocolate pieces, as needed
- Dark chocolate squares, as needed
- White chocolate pieces, as needed
- Chocolate wafer pieces, as needed
- Broken cookie pieces, as needed
Instructions
- Preheat the oven to 350°F (175°C). Grease square cake pans and line the bottoms with parchment paper.
- In a large bowl, whisk together the flour, sugar, cocoa powder, baking soda, baking powder, and salt. Break up any cocoa lumps.
- In a separate bowl, whisk the eggs, whole milk, vegetable oil, and vanilla. Add the wet ingredients to the dry mixture and mix just until combined.
- Slowly pour in the hot coffee or hot water while mixing on low. The batter will be relatively thin. Do not overmix.
- Divide the batter evenly among the prepared pans. Bake for 28–35 minutes, or until a toothpick inserted in the center comes out clean or with a few moist crumbs.
- Let the cakes cool in their pans for 10–15 minutes. Turn them onto wire racks and cool completely. For easier assembly, wrap and chill the cooled layers for 30–60 minutes.
- Make the filling. Beat the softened cream cheese and butter until smooth. Beat in the cocoa, followed gradually by the powdered sugar. Add vanilla, salt, and heavy cream a tablespoon at a time until thick, smooth, and spreadable.
- Level any domed cake layers. Put the first layer on a sturdy cake board. Pipe a frosting dam around the edge and spread chocolate filling inside. Repeat with the remaining layers.
- Apply a thin crumb coat to the top and sides. Refrigerate for 20–30 minutes, until firm.
- For the ombré finish, divide the chocolate buttercream into different shades. Apply darker chocolate frosting near the bottom, medium chocolate through the center, and lighter mocha frosting toward the top. Smooth with a cake scraper while leaving a visible color transition.
- Chill the frosted cake for at least 30 minutes before adding ganache.
- Place finely chopped semisweet chocolate in a heatproof bowl. Heat the cream until steaming and just beginning to simmer around the edges. Pour it over the chocolate. Wait 2–3 minutes, then gently stir until glossy.
- Let the ganache cool until fluid but no longer hot. Test one drip on the back of the chilled cake. If it runs straight to the bottom, wait longer. If it barely moves, gently warm the ganache.
- Add varied drips around the upper edges. Spread a thin layer of ganache across the top.
- Let the ganache settle. Pipe generous chocolate buttercream swirls over the top.
- Insert sandwich cookies, chocolate bars, dark and white chocolate squares, and wafer pieces into the swirls. Place the tallest pieces toward the center and back. Add smaller cookie pieces around the sides.
- Refrigerate the decorated cake for 30–45 minutes before cutting. For a softer eating texture, let individual servings lose some of their refrigerator chill before eating.
Notes
- Do not decorate warm cake. Even slightly warm layers can soften the filling and frosting.
- Use room-temperature eggs and milk for a more uniform batter.
- Hot coffee deepens the cocoa flavor. Hot water can be substituted 1:1.
- Chill the layers before stacking if they feel fragile.
- Level domed layers before assembly.
- Keep the chocolate filling fairly firm. A loose filling can squeeze from between tall layers.
- A crumb coat is important for the clean exterior shown in the finished cake.
- Chill the final buttercream before applying ganache.
- Always perform one test drip before covering the whole cake.
- Add heavy cookies and chocolate pieces after the ganache begins to set.
- Push large decorations into buttercream rather than relying on ganache to hold them.
- Because the filling contains cream cheese and other dairy ingredients, keep the cake refrigerated. USDA guidance recommends keeping perishable foods at 40°F (4.4°C) or below
- Prep Time: 1 hour 15 minutes
- Additional/Chill Time: 1 hour 15 minutes
- Cook Time: 35 minutes
- Category: Dessert
- Method: Baking
- Cuisine: American
Why This Ultimate Chocolate Cookie Drip Cake Works
A tall decorated cake has three jobs.
It needs to taste good. It needs to stand straight. And it needs to survive decorating.
That last point is easy to overlook.
A very soft chocolate cake can taste wonderful but become difficult to stack. A loose filling can squeeze out under the weight of the upper layers. Warm ganache can melt the frosting. Heavy chocolate bars can lean and fall.
This recipe addresses those problems through temperature and structure.
The cake layers are completely cooled before assembly. The filling is thick enough to hold the layers. The assembled cake is chilled before the drip goes on. Finally, the cookies and chocolate pieces are inserted into firm buttercream swirls rather than simply balanced on the surface.
The result is the tall, loaded appearance you want without sacrificing the cake underneath.
For another rich chocolate dessert idea, see our strawberry-filled chocolate cake.
Ingredients You Will Need
Chocolate Cake
- 2 1/2 cups all-purpose flour
- 2 1/2 cups granulated sugar
- 1 cup unsweetened cocoa powder
- 2 1/2 teaspoons baking soda
- 1 teaspoon baking powder
- 1/2 teaspoon fine salt
- 4 large eggs, at room temperature
- 1 1/4 cups whole milk, at room temperature
- 3/4 cup neutral vegetable oil
- 2 teaspoons vanilla extract
- 1 1/4 cups hot brewed coffee or hot water
Coffee is optional. Hot water works if you prefer not to use it. However, coffee pairs particularly well with cocoa and gives the cake a deeper chocolate character.
Chocolate Cream Filling
- 8 ounces full-fat block cream cheese, softened
- 1 cup unsalted butter, softened
- 3/4 cup unsweetened cocoa powder
- 4 cups powdered sugar, sifted
- 1/3 to 1/2 cup heavy cream
- 1 teaspoon vanilla extract
- Pinch of salt
Add the cream gradually. You may not need the entire 1/2 cup. For a tall cake, the filling should be creamy but firm enough to stay in place when you lift a spoon from the bowl.
Chocolate Ganache Drip
- 8 ounces semisweet chocolate, finely chopped
- 3/4 cup heavy cream
Use real chopped chocolate rather than candy coating. Finely chopping it also helps the hot cream melt the chocolate evenly.
Chocolate Buttercream for Decorating
- 1/2 cup unsalted butter, softened
- 2 cups powdered sugar, sifted
- 1/4 cup cocoa powder
- 3 to 4 tablespoons heavy cream
- 1 teaspoon vanilla extract
- Pinch of salt
For the lighter mocha portion of the outside frosting, reserve part of the buttercream and use less cocoa. For the darker lower section, mix a little additional sifted cocoa into another portion.
Chocolate and Cookie Decorations
Use a mixture rather than one single topping.
- Chocolate sandwich cookies
- Mini chocolate sandwich cookies
- Milk chocolate bars
- Dark chocolate squares
- White chocolate squares
- Chocolate-covered wafer pieces
- Broken cookie pieces
- Extra chocolate buttercream for piping
Choose pieces with different heights and shapes. This creates the irregular chocolate-loaded crown seen on bakery-style drip cakes.
Equipment for a Tall Square Cake
Square pans give this cake its striking shape. Straight-sided pans are particularly useful because they make stacking and frosting easier.
You will also want:
- Square cake pans
- Parchment paper
- Digital kitchen scale
- Large mixing bowls
- Electric or stand mixer
- Offset spatula
- Bench scraper or cake scraper
- Wire cooling racks
- Piping bag
- Large star piping tip
- Small spoon or squeeze bottle for ganache
- Sturdy cake board
For similar equipment, you can browse square cake pans on Amazon.
A rotating cake stand is not essential, but it makes smoothing tall sides much easier. You can also browse cake decorating turntables on Amazon.
How to Make the Chocolate Cake Layers
Preheat your oven to 350°F (175°C).
Grease the pans lightly. Cut parchment to fit the bottoms, then line them. For a cake this tall, parchment is worth the extra minute because clean layers are much easier to stack.
Whisk the flour, sugar, cocoa, baking soda, baking powder, and salt in a large bowl.
Break up every visible cocoa lump.
In another bowl, whisk the eggs, milk, vegetable oil, and vanilla.
Pour the wet mixture into the dry ingredients. Mix on low speed just until most of the dry ingredients disappear.
Now slowly pour in the hot coffee.
The batter will become thin. That is expected.
Do not keep beating it once everything is smooth. Too much mixing after the flour becomes wet can give the cake a less tender texture.
Divide the batter evenly between your prepared pans. A digital scale is the easiest way to create equal layers.
Bake for about 28 to 35 minutes.
Start checking early rather than automatically leaving the cake in for 35 minutes. Oven temperatures and pan dimensions can change the baking time.
Insert a toothpick into the center. It should come out clean or with a few moist crumbs rather than liquid batter. The edges may also begin pulling slightly away from the pan when the cake is done, which is one of several useful signs for judging cake doneness.
Cool the cakes in their pans for about 10 to 15 minutes. Carefully turn them onto wire racks.
They must cool completely before frosting.
A Small Step That Makes Stacking Much Easier
Warm cake is fragile.
For a tall cake, cooling is not always enough. Once the layers reach room temperature, wrap them and chill them for about 30 to 60 minutes.
Cold layers are easier to trim and move. They also shed fewer crumbs into the frosting.
If a cake has formed a noticeable dome, level it with a serrated knife. A flat surface matters when several layers are stacked.
Do not try to correct an uneven layer by adding a huge amount of filling underneath one side. That can make the finished cake unstable.
Make the Chocolate Cream Filling
Beat the softened butter and cream cheese until smooth.
Add the sifted cocoa.
Mix on low speed before increasing the speed. This prevents cocoa from covering your kitchen.
Gradually beat in the powdered sugar.
Add vanilla and a pinch of salt. Then add heavy cream one tablespoon at a time until the filling is smooth and pipeable.
Do not make it runny.
Because this filling contains cream cheese, the finished cake should be refrigerated rather than treated like a plain shelf-stable cake. USDA food-safety guidance distinguishes ordinary cakes from cakes with cream cheese frosting or cream fillings when discussing foods that can safely remain unrefrigerated.
Stack the Cake Without Sliding Layers
Put a small dab of frosting in the center of a sturdy cake board.
Place your first cold cake layer on top.
Pipe a thick buttercream border around its outside edge. This acts as a dam.
Spread chocolate cream filling inside the border.
Add the next layer and repeat.
Press each layer down gently. Do not push hard enough to force the filling from the sides.
Once stacked, look at the cake from every direction. Correct any leaning now.
Apply a thin crumb coat over the top and sides. Chill the cake for about 20 to 30 minutes, or until the coating feels firm.
This short chilling period makes the final finish far easier.
Create the Two-Tone Ombré Chocolate Finish
The outside of the cake is one of its signature features.
The bottom should be a darker chocolate brown. The color gradually becomes a lighter mocha toward the top.
Divide your buttercream into two or three portions.
Keep one portion light. Add cocoa to the second. Add a little more cocoa to the third for a darker shade.
Spread the darkest frosting around the lower third of the cake.
Add the medium shade through the center.
Finish with lighter chocolate buttercream near the top.
Use a scraper to smooth the sides while gently blending the borders between colors.
Do not blend them completely. You still want a visible transition from dark chocolate at the base to light mocha above.
A metal scraper with a straight edge helps produce clean square sides. Browse cake scrapers and icing smoothers on Amazon if you need one.
Chill the frosted cake for at least 30 minutes before adding ganache.
How to Get Glossy Chocolate Drips
Place the finely chopped semisweet chocolate in a heatproof bowl.
Heat the heavy cream until steaming and just beginning to simmer around the edges. Do not aggressively boil it.
Pour it over the chocolate.
Leave it untouched for about 2 to 3 minutes.
Then stir slowly from the center outward until glossy and smooth.
Ganache becomes thicker as it cools, so applying it immediately while very hot is a common drip-cake mistake.
Allow it to cool until it is still fluid but no longer hot.
Now perform the one-drip test.
Put a small amount on the back edge of the chilled cake.
Watch it.
If it races to the bottom, stop. The ganache is too warm or thin.
If it barely moves, it is too thick. Warm it very gently.
The ideal drip travels slowly down part of the cake’s side and stops.
Once you have the right consistency, make drips around the perimeter. Vary the amount slightly so every drip does not end at exactly the same height.
Then spread a thin layer of ganache over the top.
A small squeeze bottle gives you more control. Browse cake decorating squeeze bottles on Amazon.
Build the Chocolate-Loaded Top
Wait until the ganache has settled before adding heavy decorations.
Pipe generous chocolate buttercream swirls across the top.
Now work from the largest pieces to the smallest.
Insert chocolate bars and squares vertically or at slight angles. Add sandwich cookies between them. Follow with white chocolate, wafer pieces, and broken cookies.
The goal is abundance without perfect symmetry.
Place taller chocolate pieces toward the center and back. Use smaller cookies and broken pieces to fill gaps near the front.
Push every large piece far enough into the buttercream that it feels stable.
Do not rely on ganache alone to hold a heavy chocolate bar upright.
Finish with a few cookies and small piped stars along the lower sides of the cake. Keep these decorations irregular. That detail makes the cake look rich and handmade rather than overly uniform.
If cookies are your favorite part, our guide to the secret of crunchy cookies explains more about texture and crispness.
Chill Before Cutting
The finished cake is tall and heavy.
Refrigerate it for at least 30 to 45 minutes before serving. This gives the filling and frosting time to firm.
For the best eating texture, remove it from the refrigerator roughly 20 to 30 minutes before serving, depending on room temperature. The buttercream will soften and the chocolate flavor will become more noticeable.
Use a long, sharp knife.
Warm the blade in hot water and wipe it completely dry before slicing. Clean the knife between cuts if you want neat layers.
Common Problems and How to Fix Them
The cake layers slide.
The filling is probably too soft, the layers are warm, or too much filling was added. Chill the cake before continuing.
The ganache reaches the bottom immediately.
It is too warm or too fluid. Wait several minutes and test again.
The ganache does not drip.
It has cooled too far. Warm it briefly and stir before testing again.
The frosting contains crumbs.
Use a crumb coat and chill it before applying the final buttercream.
The cake leans.
Check that every layer is level. Use moderate amounts of filling and chill during assembly.
The chocolate decorations fall over.
Insert them into firm piped buttercream. Large pieces need more support than ganache can provide.
The cake seems dry.
Check it before the maximum baking time. Chocolate cake can be difficult to judge by color, so use several doneness clues rather than waiting for a darker surface.
Make-Ahead Tips
You do not need to make every component on the same day.
Bake the layers first. Cool them completely, wrap them well, and refrigerate them before assembly.
You can also prepare the frosting ahead and refrigerate it. Bring it back toward a workable temperature and beat briefly before decorating.
For the cleanest finish, make the ganache when the frosted cake is already cold and ready for its drip.
Save the final cookie decorations for later in the process. Cookies exposed to moisture for a long period gradually lose some of their crisp texture.
More Baking Ideas
Once you become comfortable with chocolate drips, the same temperature-control principle can help with other caramel and sugar finishes. Our guide to mastering caramelized sugar covers another useful finishing technique.
For another impressive dessert, read about how to caramelize crème brûlée without a blowtorch.
You can also visit RecipesMind for more recipes, baking guides, and kitchen ideas.
Frequently Asked Questions
Can I make an Ultimate Chocolate Cookie Drip Cake ahead of time?
Yes. Baking the layers ahead can actually make assembly easier. Cool them completely, wrap them carefully, and chill them. Assemble and decorate closer to the time you plan to serve the cake.
Can I use water instead of coffee?
Yes. Replace the hot coffee with the same amount of hot water. Coffee gives the chocolate flavor more depth, but the cake will still work without it.
Why does my chocolate drip run all the way down the cake?
Your ganache may be too warm or too thin. Chill the frosted cake and allow the ganache to cool before applying it. Always test one drip first.
Why is my ganache grainy?
Excessive heat can cause trouble with ganache, and its balance of chocolate and liquid also affects the emulsion. Gentle heating and gradual stirring are safer than repeatedly overheating the mixture.
Can I use chocolate chips for the ganache?
You can, but chopped semisweet baking chocolate usually gives you better control. Different chocolates contain different amounts of sugar and cocoa solids, which can change the final consistency of ganache.
How do I stop a tall cake from leaning?
Start with level, completely cooled layers. Keep the filling firm, avoid overfilling, and chill the cake after stacking. A solid cake board also makes moving it safer.
Should this chocolate cake be refrigerated?
Yes. This version uses a cream cheese-based chocolate filling, so keep the finished cake refrigerated.
How do I get the same dramatic bakery-style appearance?
Focus on four visual details: a tall square silhouette, a dark-to-light chocolate ombré coating, uneven glossy drips, and a dense crown of cookies and different chocolate pieces. Vary the heights of the decorations rather than lining them up evenly.
Final Baking Notes
The secret to this cake is not adding more chocolate at every opportunity. It is controlling each stage.
Bake the layers only until they are done. Cool them completely. Keep the filling thick enough to support the stack. Chill the crumb coat. Smooth the ombré frosting before adding the drip. Then test the ganache before committing to the whole cake.
Finally, use the buttercream swirls as anchors for your cookies, wafers, and chocolate bars.
Those small choices turn a difficult-looking Ultimate Chocolate Cookie Drip Cake into a dessert you can actually reproduce at home.
When you cut the first slice, you should see a tall, moist chocolate interior held together by creamy filling. Outside, the lighter mocha frosting contrasts with dark ganache. On top, every slice gets a slightly different combination of cookie, chocolate, frosting, and cake.
That is what makes this cake memorable before and after the first bite.