
![[Window Title] Orbita-Browser [Main Instruction] Orbita-Browser a cessé de fonctionner [Content] Un problème a fait que le programme a cessé de fonctionner correctement. Windows va fermer ce programme et vous indiquer si une solution est disponible. [Fermer le programme]](https://recipesmind.com/wp-content/uploads/2026/08/Ultimate-Chocolate-Candy-Drip-Cake-Recipe.webp "Ultimate Chocolate Candy Drip Cake Recipe 2")
The first time you bring an Ultimate Chocolate Candy Drip Cake to the table, there is usually a short moment of silence. Everyone looks at the tall chocolate layers, glossy ganache running down the sides, and the pile of cookies, wafer bars, and chocolate candies on top. Then the questions start. Who gets the piece with the cookie? Is that wafer bar part of the cake? And, most importantly, when can we cut it?
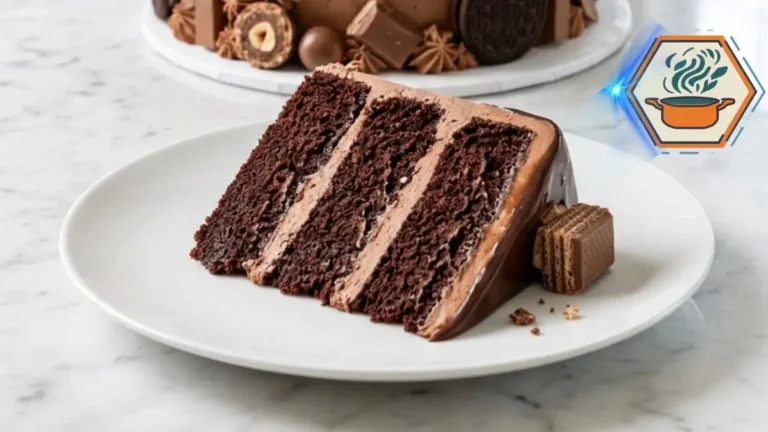
This cake looks like something made for a bakery window, but its dramatic appearance comes from simple details done in the right order. Under all those chocolate decorations is a soft, moist chocolate cake covered with fluffy cocoa buttercream. A chilled exterior gives the ganache a clean surface to drip over. The final candy arrangement creates the tall, abundant finish.
The technique matters as much as the ingredients. According to King Arthur Baking’s guidance on cocoa, natural and Dutch-process cocoa behave differently because of their acidity. This recipe contains baking soda, so natural unsweetened cocoa is the simplest choice for consistent results.
Pan preparation matters too. King Arthur Baking’s pan-preparation testing found parchment combined with nonstick spray to be particularly reliable for releasing cakes cleanly. That small step is worth doing when you need three neat layers for a tall celebration cake.
Affiliate disclosure: As an Amazon Associate I earn from qualifying purchases. This article may contain affiliate links to kitchen tools I find useful for preparing this recipe.
JUMP TO
Ultimate Chocolate Candy Drip Cake
A tall, moist chocolate layer cake filled with silky chocolate buttercream, finished with glossy ganache drips, chocolate sandwich cookies, wafer bars, crunchy chocolate-hazelnut bites, malt balls, and assorted chocolate candies. A rich celebration cake with contrasting soft, creamy, crisp, and crunchy textures.
- Total Time: Approximately 3 hours 15 minutes
- Yield: 16 servings
Ingredients
Chocolate Cake
- 2 cups (240 g) all-purpose flour
- 3/4 cup (64 g) natural unsweetened cocoa powder
- 1 3/4 cups (350 g) granulated sugar
- 2 teaspoons baking powder
- 1 1/2 teaspoons baking soda
- 1/2 teaspoon fine salt
- 2 large eggs, room temperature
- 1 cup (240 ml) whole milk, room temperature
- 1/2 cup (120 ml) neutral vegetable oil
- 2 teaspoons vanilla extract
- 1 cup (240 ml) hot brewed coffee or hot water
Chocolate Buttercream
- 1 1/2 cups (340 g) unsalted butter, softened
- 4 1/2 cups (540 g) powdered sugar
- 3/4 cup (64 g) unsweetened cocoa powder
- 1/2 cup (120 ml) heavy cream, added gradually
- 2 teaspoons vanilla extract
- 1/4 teaspoon fine salt
Chocolate Ganache
- 8 oz (226 g) semi-sweet chocolate, finely chopped
- 3/4 cup (180 ml) heavy cream
Decoration
- 6 chocolate sandwich cookies
- 5 chocolate-covered wafer bars
- 6 chocolate-hazelnut wafer bites
- 8 chocolate malt balls
- 4 oz (113 g) assorted plain milk or semi-sweet chocolate pieces
- Extra chocolate buttercream for small decorative swirls
Important: These decoration quantities standardize the recipe for repeatability. You can slightly adjust the arrangement while keeping approximately the same total quantity.
Instructions
1. Prepare the pans.
Preheat the oven to 350°F (175°C). Grease three 8-inch round cake pans. Line the bottoms with parchment circles, then lightly grease the parchment.
2. Mix the dry ingredients.
Whisk flour, cocoa powder, sugar, baking powder, baking soda, and salt in a large bowl until evenly combined.
3. Mix the wet ingredients.
In a separate bowl, whisk the eggs, whole milk, vegetable oil, and vanilla extract.
4. Make the batter.
Add the wet ingredients to the dry mixture. Mix on low speed until mostly combined. Slowly pour in the hot coffee or hot water. Mix only until smooth. The batter will be thin.
5. Divide the batter.
Divide evenly among the three prepared pans. For layers of similar thickness, weigh the filled pans or divide the batter by weight.
6. Bake.
Bake for 25–30 minutes. Begin checking at 24–25 minutes. The cakes are done when the centers spring back gently and a toothpick comes out with a few moist crumbs but no wet batter.
7. Cool completely.
Leave the cakes in their pans for about 10–15 minutes. Turn onto wire racks, remove the parchment, and cool completely before frosting.
8. Make the chocolate buttercream.
Beat softened butter for 3–4 minutes until creamy. Gradually add sifted powdered sugar and cocoa powder on low speed. Add vanilla and salt. Add heavy cream one tablespoon at a time until the frosting is smooth and spreadable. Beat for another 2–3 minutes until fluffy.
9. Level the cakes if necessary.
Once completely cool, trim noticeable domes with a long serrated knife. Do not trim unnecessarily if the layers are already flat.
10. Fill and stack.
Place the first layer on a cake board or serving plate. Spread an even layer of chocolate buttercream over it. Add the second layer and repeat. Finish with the third layer.
11. Apply the crumb coat.
Cover the top and sides with a thin layer of buttercream. Refrigerate for about 20 minutes, or until firm.
12. Apply the final buttercream coat.
Cover the chilled cake with a thicker layer of chocolate buttercream. Smooth the sides while keeping a slightly natural texture similar to the reference cake. Refrigerate for another 20–30 minutes.
13. Make the ganache.
Put the finely chopped semi-sweet chocolate in a heatproof bowl. Heat the heavy cream until steaming and just beginning to simmer around the edges. Pour it over the chocolate. Leave untouched for 2–3 minutes, then gently stir until completely smooth and glossy.
14. Test the ganache.
Allow the ganache to cool until fluid but no longer hot. Test one drip on the back of the cold cake. If it runs immediately to the bottom, wait longer. If it barely moves, warm it very gently.
15. Create the chocolate drips.
Add controlled ganache drips around the top edge. Vary their lengths naturally. Spread the remaining ganache over the top.
16. Decorate.
While the ganache is still slightly soft, arrange tall wafer bars toward the center and back. Add sandwich cookies, shorter wafer pieces, chocolate-hazelnut bites, malt balls, and assorted chocolates at different heights.
17. Finish the base.
Add a few cookies, wafer pieces, chocolate bites, malt balls, and small buttercream swirls around the bottom edge. Keep the arrangement irregular rather than perfectly symmetrical.
18. Set and serve.
Allow the decorations to set. If refrigerated, let the cake lose some of its refrigerator chill before serving for a softer cake and buttercream texture.
Notes
- Do not add extra flour because the batter looks thin. A fluid batter is expected.
- Use natural unsweetened cocoa powder for the formula as written.
- Room-temperature eggs and milk mix more evenly into the batter.
- Hot coffee deepens the chocolate flavor. Hot water can be used instead.
- Completely cool the layers before frosting.
- Chill the crumb-coated cake before adding the final buttercream.
- Chill again before adding ganache.
- Always make one test drip on the back of the cake.
- The cake should be cold when the ganache is applied.
- Do not pour very hot ganache onto buttercream.
- Different decoration heights create the abundant look of the reference cake.
- Add crunchy cookies and wafers relatively close to serving if you want them to stay crisp.
- For clean slices, use a long sharp knife and wipe it between cuts
- Prep Time: 1 hour 15 minutes
- Cooling & Chilling Time: 1 hour 30 minutes
- Cook Time: 25–30 minutes
- Category: Dessert
- Method: Baking
- Cuisine: American
Why This Ultimate Chocolate Candy Drip Cake Works
There is more to this cake than piling candy on chocolate frosting.
The cake itself needs enough structure to support three layers. At the same time, it should remain tender after chilling. Vegetable oil helps give the crumb a soft texture, while milk adds richness.
Hot coffee is another useful ingredient. It gives the cocoa mixture a deeper flavor without making the finished cake taste like a cup of coffee. Hot water works too if you prefer to avoid coffee.
The finished cake has several contrasting textures:
- Soft chocolate cake
- Creamy chocolate buttercream
- Smooth ganache
- Crisp sandwich cookies
- Crunchy wafer bars
- Chocolate-hazelnut bites
- Round chocolate candies
That contrast is what makes every slice interesting.
If you enjoy rich celebration desserts, you may also like our strawberry-filled chocolate cake. For more baking ideas, visit RecipesMind.
Ingredients You Will Need
Chocolate Cake
- 2 cups (240 g) all-purpose flour
- 3/4 cup (64 g) natural unsweetened cocoa powder
- 1 3/4 cups (350 g) granulated sugar
- 2 teaspoons baking powder
- 1 1/2 teaspoons baking soda
- 1/2 teaspoon fine salt
- 2 large eggs, at room temperature
- 1 cup (240 ml) whole milk, at room temperature
- 1/2 cup (120 ml) neutral vegetable oil
- 2 teaspoons vanilla extract
- 1 cup (240 ml) hot brewed coffee or hot water
Chocolate Buttercream
- 1 1/2 cups (340 g) unsalted butter, softened
- 4 1/2 cups (540 g) powdered sugar
- 3/4 cup (64 g) unsweetened cocoa powder
- 1/2 cup (120 ml) heavy cream, added gradually
- 2 teaspoons vanilla extract
- 1/4 teaspoon fine salt
Chocolate Ganache
- 8 oz (226 g) semi-sweet chocolate, finely chopped
- 3/4 cup (180 ml) heavy cream
Chocolate Candy Decoration
Use a combination rather than one type of candy. Different heights are important for creating the full look.
- Chocolate sandwich cookies
- Chocolate-covered wafer bars
- Chocolate-hazelnut wafer bites
- Chocolate malt balls
- Plain chocolate pieces
- Extra buttercream for small decorative swirls
You do not need to use a specific candy brand. Choose pieces with similar shapes, colors, and textures if you want the cake to have the same chocolate-heavy appearance.
Equipment That Makes the Job Easier
You can make the cake with ordinary baking tools, but a few pieces of equipment make tall layer cakes much easier to assemble.
You will need three 8-inch round cake pans. Using pans of the same size helps the layers bake at a similar rate. If you need a set, this 8-inch round cake pan search on Amazon is a useful starting point.
You will also want:
- Parchment paper
- Large mixing bowls
- Whisk
- Electric hand mixer or stand mixer
- Wire cooling racks
- Cake board or serving plate
- Offset spatula
- Bench scraper or cake scraper
- Piping bag
- Small spoon or squeeze bottle for ganache
A rotating stand can make coating the sides much easier. Here is an Amazon cake turntable search that you can replace with your preferred affiliate product link.
How to Make the Chocolate Cake Layers
Preheat the oven to 350°F (175°C). Position a rack near the center.
Grease three 8-inch round cake pans. Place parchment circles on the bottoms, then lightly grease the parchment and sides.
This is one detail worth keeping. A tall cake becomes much harder to assemble when one layer breaks while leaving the pan.
In a large bowl, whisk together the flour, cocoa powder, sugar, baking powder, baking soda, and salt.
Spend about 30 seconds whisking. You do not want a concentrated pocket of baking soda hiding in the mixture.
In another bowl, whisk the eggs, milk, vegetable oil, and vanilla.
Add the wet mixture to the dry ingredients. Stir on low speed until mostly combined.
Now slowly pour in the hot coffee.
The batter will become quite thin. That is normal. Do not add extra flour.
Thin chocolate cake batter can produce a beautifully moist crumb. King Arthur also uses relatively fluid batters containing milk and coffee or water in its chocolate cake formulas.
Divide the batter evenly among the three pans. A kitchen scale is useful here. Equal amounts of batter create layers of similar height.
Bake for approximately 25 to 30 minutes.
Start checking around 24 minutes because ovens and cake pans vary.
The cakes are ready when the centers spring back gently and a toothpick inserted near the middle comes out clean or with a few moist crumbs rather than wet batter. Similar 8-inch chocolate layers may bake in roughly this range, though the exact formula and oven always matter.
Allow the cakes to rest in their pans for about 10 to 15 minutes. Carefully turn them onto wire racks and remove the parchment.
Cool them completely before adding buttercream.
Warm cake and buttercream do not mix well. The frosting can soften, slide, and pull crumbs from the surface.
A Small Detail for a Better Cake Edge
You mentioned wanting the overlooked details that can change the final result. Pan preparation is one of them.
If you like a very slight caramelized edge, a thin dusting of granulated sugar can be applied to a greased pan. King Arthur reports that sugar over pan spray can create a lightly crunchy cake crust.
For this particular layer cake, however, keep that coating thin. The goal is a subtle edge, not a thick crust. A softer exterior is easier to cover neatly with buttercream.
Make Silky Chocolate Buttercream
Place the softened butter in a large mixing bowl.
Beat it for 3 to 4 minutes until lighter and creamy. Starting with properly softened butter is important. Cold butter leaves lumps. Melted butter makes loose frosting.
Sift the powdered sugar and cocoa if either looks lumpy.
Add them gradually while mixing at low speed. Adding everything at once can cover the kitchen in cocoa and powdered sugar.
Add the vanilla and salt.
Pour in the heavy cream one tablespoon at a time until the buttercream reaches a smooth, spreadable consistency. You may not need every drop.
Then beat for another 2 to 3 minutes.
The finished buttercream should hold a soft peak. It needs to spread easily but remain firm enough to support stacked cake layers.
If you make layer cakes regularly, an offset cake spatula on Amazon can make both filling and smoothing much easier.
Build a Tall, Straight Cake
If the cakes have noticeable domes, trim them with a long serrated knife after they are completely cool.
Place the first cake layer on a cake board.
Spread an even layer of chocolate buttercream across the top. Keep the filling thick enough to taste but not so thick that the next cake slides.
Add the second cake and repeat.
Place the third layer on top. Look at the cake from several directions. Correct any leaning now.
Apply a thin crumb coat over the entire cake.
A crumb coat catches loose crumbs so they do not appear in the final frosting.
Refrigerate the cake for about 20 minutes, until the exterior feels firm.
Apply a second, thicker layer of buttercream. Smooth the sides with a scraper while turning the cake.
The finish does not have to look perfectly machine-made. A soft, natural texture works beautifully under chocolate ganache.
Return the cake to the refrigerator for another 20 to 30 minutes.
This chilling period is one of the most important parts of the recipe.
How to Make Glossy Chocolate Ganache
Finely chop 8 ounces of semi-sweet chocolate and place it in a heatproof bowl.
Heat the heavy cream until steaming and just beginning to simmer around the edges. Do not let it boil aggressively.
Pour the cream over the chocolate.
Leave it untouched for 2 to 3 minutes.
Then stir gently from the center outward until the ganache becomes dark, smooth, and glossy.
Now comes the part that determines whether you get beautiful drips or a chocolate waterfall.
Do not immediately pour hot ganache onto the cake.
Let it cool until it remains fluid but no longer feels hot.
The cake should be cold. The ganache should be fluid and slightly cooled.
Test a single drip on the back of the cake.
If it races straight to the cake board, the ganache is too warm or thin. Wait several minutes.
If it barely moves, gently warm the ganache for a few seconds.
Once the test drip looks right, continue around the cake.
A small squeeze bottle offers extra control. You can find suitable options through this Amazon ganache squeeze bottle search.
After making the drips, spread a thin layer of ganache over the top.
How to Get the Candy-Packed Look
This is where the cake gets its personality.
Do not arrange every chocolate at the same height.
Start with the tallest wafer bars. Insert several vertically near the back and center. Vary their heights slightly.
Next add whole chocolate sandwich cookies.
Place medium-height wafer pieces around them. Add chocolate-hazelnut bites lower down.
Fill empty spaces with malt balls and smaller chocolate pieces.
Think in layers:
- Tall bars create height.
- Cookies create wide, dark circles.
- Cut wafers reveal pale, crunchy interiors.
- Round chocolates soften the angular shapes.
- Small buttercream swirls fill awkward gaps.
Do not create a perfectly symmetrical row. Slight irregularity makes the decoration look richer and more natural.
Add a few chocolates and broken wafer pieces around the bottom edge of the cake. Keep these more restrained than the top decoration.
The result should look abundant without hiding the ganache drips.
Common Mistakes and How to Fix Them
Ganache runs to the bottom: It is probably too warm. Allow it to cool before trying another drip.
Ganache does not drip: It has cooled too much. Warm it very gently.
Cake layers slide: The cake or buttercream may be too warm. Chill the assembled cake before continuing.
Cake is dry: Too much flour, excessive baking, or inaccurate oven temperature may be responsible. Weighing flour is more reliable than packing it into a measuring cup.
Buttercream is too stiff: Add heavy cream one tablespoon at a time.
Buttercream is too soft: Chill it briefly. If necessary, beat in a small amount of sifted powdered sugar.
Cake sticks to the pan: Use parchment on the bottom and grease the pan carefully. This gives you far more protection than hoping a bare nonstick pan releases cleanly.
Can You Make It Ahead?
Yes. In fact, splitting the work across two days can make this cake much less stressful.
Bake the layers one day ahead. Once completely cool, wrap each layer well and keep it at cool room temperature overnight or refrigerate it.
The buttercream can also be prepared ahead and refrigerated. Bring it back toward room temperature and beat it again before using.
For the freshest appearance, add the final candy decorations after the cake has been frosted and covered with ganache.
Crunchy cookies and wafers gradually soften when exposed to moisture, so they look and taste best when added closer to serving.
How to Store the Finished Cake
Because the finished cake contains buttercream and ganache made with dairy, keep it covered and refrigerated when storing it for an extended period.
For the best eating texture, allow chilled slices to lose some of their refrigerator chill before serving. Butter-based frosting becomes firmer when cold.
Keep basic food safety in mind as well. USDA guidance recommends keeping perishable foods properly refrigerated and keeping refrigerators at 40°F (4.4°C) or below.
Use clean utensils when preparing the batter after handling raw eggs. USDA also advises washing utensils, equipment, and work areas with hot, soapy water after contact with raw eggs.
More Baking Ideas from RecipesMind
Once you have mastered this cake, many of the same skills carry into other desserts.
Learning how sugar behaves under heat is useful for everything from ganache decorations to custard toppings. Our guide to mastering caramelized sugar covers another useful dessert technique.
For cookies to serve beside your cake, read our guide to the secret to crunchy cookies.
You can also try star-shaped cookies for birthdays and themed dessert tables.
If you want another tall, rich dessert for a special event, the Milk Bar pie guide offers a very different style of indulgent baking.
Frequently Asked Questions
Can I make an Ultimate Chocolate Candy Drip Cake the day before?
Yes. You can assemble and frost the cake the day before serving. Keep it covered and refrigerated. For the best crunch, consider adding cookies and wafer decorations closer to serving time.
Why does my chocolate ganache run down the entire cake?
The ganache is usually too warm, the cake is not cold enough, or both. Chill the frosted cake and test one drip before decorating the visible sides.
Can I use water instead of coffee?
Yes. Replace the coffee with the same amount of hot water. Coffee gives the chocolate flavor more depth, but it is not required.
What cocoa powder should I use?
Natural unsweetened cocoa is a dependable choice for this formula because the batter contains baking soda. Cocoa acidity can affect how chemical leaveners behave, which is why natural and Dutch-process cocoa are not automatically interchangeable in every cake recipe.
Why is my chocolate cake batter so thin?
That is expected. Do not try to correct it by adding extra flour. The liquid helps create the moist crumb intended for this style of chocolate cake.
How do I stop a tall layer cake from leaning?
Start with level, fully cooled layers. Use even amounts of filling. Check the cake after placing each layer, then chill it after the crumb coat before adding the final frosting.
What chocolates are best for decorating a drip cake?
Use different shapes and textures. Sandwich cookies, wafer bars, chocolate-hazelnut bites, malt balls, and plain chocolates work well together. Tall pieces should go toward the center or back, while smaller chocolates fill gaps.
Can I freeze the chocolate cake layers?
Yes. Freeze the completely cooled, undecorated layers tightly wrapped. Thaw them while still wrapped so condensation forms mainly on the wrapping rather than directly on the cake.
Final Baking Notes
The dramatic appearance of this cake comes from three simple ideas: height, contrast, and controlled ganache.
Do not rush the cooling stages. A completely cooled cake supports the buttercream. A chilled buttercream coating helps control the ganache. Slightly cooled ganache creates defined drips instead of a puddle.
Then let the chocolate decorations look abundant rather than perfectly lined up.
When the knife finally cuts through the candy-covered top, you get crisp wafers, creamy frosting, glossy ganache, and tender chocolate cake in the same slice.
That is exactly what an Ultimate Chocolate Candy Drip Cake should deliver.