
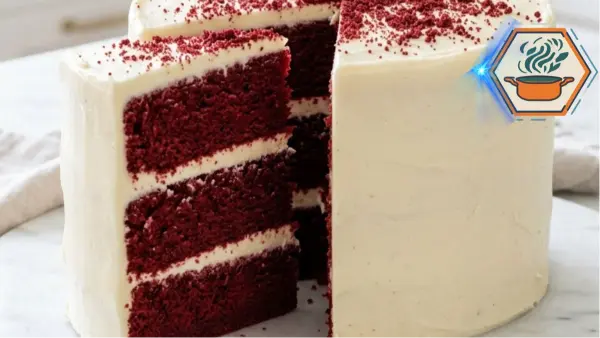
There is something special about cutting into a red velvet cake for the first time. From the outside, you see a tall cake covered in smooth, creamy white frosting. Then the knife passes through the frosting and reveals those striking deep-red layers. That contrast alone can turn a simple dessert into the centerpiece of a birthday table. This Red Velvet Cake Recipe gives you that classic look, but appearance is only part of the story. Inside, the cake is tender, moist, lightly flavored with cocoa, and balanced by a tangy cream cheese frosting.
Red velvet is sometimes described as a red chocolate cake, but that does not tell the whole story. A classic version uses much less cocoa than a chocolate layer cake. Buttermilk also plays an important role. According to King Arthur Baking’s red velvet cake guide, red velvet traditionally combines cocoa with acidic ingredients such as buttermilk and vinegar. That combination helps create its characteristic flavor and tender texture. The cake should taste lightly chocolatey, slightly tangy, sweet, and rich without becoming heavy.
The chemistry matters too. Buttermilk provides acidity and contributes to a softer crumb. It also works with baking soda during baking. King Arthur Baking’s guide to velvet cakes explains that acidic buttermilk reacts with baking soda, producing carbon dioxide that helps give velvet cakes lift. This is one reason you should not casually remove the buttermilk, vinegar, or baking soda from this recipe.
Affiliate disclosure: As an Amazon Associate I earn from qualifying purchases. This article may contain affiliate links to kitchen tools I find useful for preparing this recipe.
JUMP TO
Red Velvet Cake Recipe
A classic red velvet cake with moist, tender cocoa-buttermilk layers and rich cream cheese frosting. This easy layer cake has a deep red crumb and creamy white finish, making it perfect for birthdays, Valentine’s Day, and special occasions.
- Total Time: About 2 hours 35 minutes
- Yield: 12 slices
Ingredients
Red Velvet Cake Layers
- 2 ½ cups (315g) all-purpose flour
- 1 ½ cups (300g) granulated sugar
- 1 teaspoon baking soda
- 1 teaspoon fine salt
- 1 tablespoon unsweetened natural cocoa powder
- 1 ½ cups (360ml) neutral vegetable oil
- 1 cup (240ml) buttermilk, room temperature
- 2 large eggs, room temperature
- 2 tablespoons red gel food coloring
- 1 teaspoon vanilla extract
- 1 teaspoon white vinegar
Cream Cheese Frosting
- 1 cup (225g) unsalted butter, softened but not melted
- 16 oz (450g) full-fat block cream cheese, softened
- 5–6 cups (600–720g) powdered sugar, sifted
- 2 teaspoons vanilla extract
- Pinch of fine salt
Decoration
- Red velvet cake crumbs, optional
Instructions
1. Prepare the oven and pans.
Preheat the oven to 350°F (175°C). Position a rack in the center. Grease two or three 8-inch round cake pans. Line the bottoms with parchment paper and lightly grease the parchment.
2. Mix the dry ingredients.
In a large bowl, whisk the flour, granulated sugar, baking soda, salt, and cocoa powder until evenly combined and free of visible lumps.
3. Mix the wet ingredients.
In a separate bowl, whisk the vegetable oil, room-temperature buttermilk, eggs, red gel food coloring, vanilla, and vinegar until smooth and evenly colored.
4. Make the batter.
Pour the wet mixture into the dry ingredients. Whisk gently until the flour disappears. Scrape the bottom and sides with a spatula. Stop mixing as soon as the batter is smooth. Do not overmix.
5. Divide the batter.
Divide evenly between the prepared pans. For layers of equal thickness, weigh the filled pans with a kitchen scale.
6. Bake.
Bake for approximately 25–30 minutes. Begin checking around 24–25 minutes. The centers should spring back gently when touched, and a toothpick inserted in the center should come out clean or with a few moist crumbs.
7. Cool.
Cool the cakes in their pans for about 10 minutes. Carefully turn them onto wire racks, remove the parchment, and allow them to cool completely.
8. Make the cream cheese frosting.
Beat the softened butter until smooth and creamy, about 2 minutes. Add the cream cheese and mix just until smooth. Gradually add 5 cups of sifted powdered sugar. Add vanilla and salt. Add more powdered sugar as needed until the frosting is thick enough for a layer cake.
9. Level the cakes.
Once completely cool, trim domed tops with a serrated knife if necessary. Save the red cake scraps and crumble them for decoration.
10. Assemble.
Place one cake layer on a serving plate or cake board. Spread an even layer of cream cheese frosting over it. Add the next cake layer and repeat. Finish with the final cake layer.
11. Crumb coat.
Cover the entire cake with a very thin layer of frosting. Refrigerate for 20–30 minutes, or until the crumb coat feels firm.
12. Finish the cake.
Cover the chilled cake with the remaining cream cheese frosting. Smooth the top and sides. Decorate with reserved red velvet crumbs if desired.
13. Chill before slicing.
Refrigerate the assembled cake for at least 1 hour. For clean slices, use a sharp knife warmed with hot water and wiped dry between cuts.
Notes
- Use natural unsweetened cocoa powder for this formulation.
- Use red gel food coloring, not a large quantity of liquid coloring.
- Room-temperature eggs and buttermilk mix more evenly into the batter.
- Do not pack flour into measuring cups. For the most repeatable result, use 315g.
- Do not overmix after adding the wet ingredients.
- Baking time varies by oven and by whether you use two or three pans.
- Start checking before 30 minutes rather than baking strictly by the clock.
- Cake layers must be completely cool before frosting.
- Use full-fat block cream cheese, not whipped or spreadable tub cream cheese, for a firmer frosting.
- If the frosting becomes too soft, refrigerate it briefly before assembling.
- The crumb coat is important because bright red crumbs are very visible against white frosting.
- Keep the finished cake covered in the refrigerator for up to 5 days.
- For the clean red-and-white appearance shown in the article, keep the frosting between the layers even rather than excessively thick.
- Prep Time: 35 minutes
- Additional/Chilling Time: 1 hour 30 minutes
- Cook Time: 25–30 minutes
- Category: Dessert
- Method: Baking
- Cuisine: American
Why This Red Velvet Cake Recipe Works
A good red velvet cake needs more than red food coloring.
The goal is a soft, fine crumb that stays moist after cooling. You also want enough structure for clean layers. The cake must hold cream cheese frosting without becoming dense or greasy.
Several ingredients work together to produce that result.
Vegetable oil supplies moisture and stays liquid at room temperature. This helps the cake remain soft even after refrigeration.
Buttermilk gives the batter gentle acidity and a subtle tang. It also contributes to the tender texture associated with velvet cakes.
Cocoa powder adds a mild chocolate background rather than turning the cake into a full chocolate cake.
White vinegar adds acidity and works alongside the buttermilk and baking soda.
Finally, red gel food coloring gives the cake its dramatic deep-red appearance. Gel coloring is useful because a relatively small amount can provide strong color without adding much extra liquid.
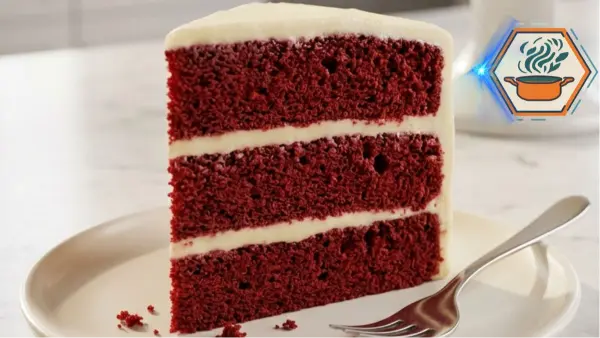
The result should be a vivid red cake with thin, even layers of pale cream cheese frosting, similar to the classic bakery-style red velvet cake.
Ingredients You’ll Need
For the Red Velvet Cake Layers
- 2 ½ cups (315g) all-purpose flour
- 1 ½ cups (300g) granulated sugar
- 1 teaspoon baking soda
- 1 teaspoon fine salt
- 1 tablespoon unsweetened cocoa powder
- 1 ½ cups (360ml) neutral vegetable oil
- 1 cup (240ml) buttermilk, at room temperature
- 2 large eggs, at room temperature
- 2 tablespoons red gel food coloring
- 1 teaspoon vanilla extract
- 1 teaspoon white vinegar
For the cocoa, unsweetened natural cocoa powder is a good choice. Cocoa types can behave differently because their acidity differs. King Arthur notes that natural cocoa is acidic, while Dutch-process cocoa has been alkalized.
For the Cream Cheese Frosting
- 1 cup (225g) unsalted butter, softened
- 16 ounces (450g) full-fat block cream cheese
- 5 to 6 cups (600–720g) powdered sugar, sifted
- 2 teaspoons vanilla extract
- Pinch of fine salt
Use block-style full-fat cream cheese rather than a soft cream cheese spread from a tub. The block version gives the frosting better body for stacking and covering a layer cake.
For Decoration
- Red velvet cake crumbs
- Extra frosting, if desired
The crumbs are optional, but they create the recognizable red-and-white finish seen on many classic red velvet cakes.
Equipment
You do not need professional bakery equipment, but a few tools make the process easier:
- Two or three 8-inch round cake pans
- Parchment paper
- Large mixing bowls
- Whisk
- Silicone spatula
- Electric hand mixer or stand mixer
- Wire cooling rack
- Offset spatula
- Serrated knife or cake leveler
- Kitchen scale, preferably
A scale is especially useful for dividing the batter evenly. Equal amounts of batter mean layers that bake at roughly the same speed and create a cleaner finished cake.
How to Make Red Velvet Cake
Start by bringing your buttermilk and eggs to room temperature.
This small detail matters. Very cold ingredients can make a batter harder to combine evenly.
Preheat the oven to 350°F (175°C). Place a rack near the center.
Grease two or three 8-inch round cake pans. Place a circle of parchment paper on the bottom of each pan, then lightly grease the parchment.
Do not skip the parchment if you want clean layers. A soft red velvet cake can stick to the bottom of a pan.
In a large bowl, whisk together the flour, sugar, baking soda, salt, and cocoa powder. Break apart any cocoa lumps before adding the liquids.
In another bowl, whisk the vegetable oil, buttermilk, eggs, red gel coloring, vanilla, and vinegar.
The mixture should become evenly red.
Pour the wet ingredients into the dry mixture.
Whisk gently until no obvious streaks of dry flour remain. Scrape the bottom and sides of the bowl with a spatula.
Stop mixing once the batter is smooth.
This is important.
Too much mixing after flour becomes hydrated can encourage excess gluten development. That can work against the soft texture you want.
Divide the Batter Evenly
Pour the batter into your prepared pans.
For the neat layered appearance shown in a classic red velvet cake, weigh the batter before dividing it between the pans. A reliable digital kitchen scale makes this much easier and also gives you more accurate flour measurements.
Tap each pan gently on the counter once or twice to release large air pockets.
Do not repeatedly slam the pans down.
Place them on the center oven rack with a little space between each pan so hot air can circulate.
Bake for approximately 25 to 30 minutes.
King Arthur also uses a 25-to-30-minute range at 350°F for its two-layer 8-inch red velvet cake, though exact baking time always depends on the recipe, oven, and pan.
Start checking early rather than waiting until the final minute.
The cake is ready when:
- The center looks set.
- The surface springs back lightly when touched.
- A toothpick inserted near the center comes out clean or with a few moist crumbs.
- The cake does not wobble in the center.
Do not wait for the edges to become hard or deeply browned. That can leave you with dry cake.
Cooling Without Breaking the Layers
Leave the cakes in their pans for about 10 minutes after baking.
Then carefully run a thin knife around the edges if needed. Turn each layer onto a cooling rack and remove the parchment.
Let the cakes cool completely.
Never put cream cheese frosting on a warm layer.
Even a slightly warm cake can soften the butter and cream cheese. The frosting may begin sliding between the layers.
For cleaner assembly, you can wrap completely cooled layers and refrigerate them for about 30 to 60 minutes before leveling and frosting.
Cold cake is usually easier to trim and stack.
If you enjoy learning why small baking choices matter, our guide to the secret to crunchy cookies covers another example of how ingredients and technique affect final texture.
How to Make Thick Cream Cheese Frosting
The frosting provides the contrast that makes red velvet so memorable.
Beat the softened butter first for about 2 minutes, until creamy.
Add the cream cheese and beat only until the mixture is smooth and combined.
Add 5 cups of sifted powdered sugar gradually, mixing at low speed at first. Add the vanilla and salt.
Once incorporated, beat briefly until creamy.
Check the consistency.
If the frosting is too soft for stacking, add more powdered sugar a little at a time. You can also refrigerate it briefly before assembling the cake.
Avoid beating cream cheese frosting for much longer than necessary. Cream cheese contains considerable moisture, and an overly soft frosting can become troublesome when you build a tall cake.
The finished frosting should spread easily while still holding its shape.
How to Assemble a Red Velvet Layer Cake
Make sure every cake layer is completely cool.
If the cakes have domed tops, use a long serrated knife to carefully trim them level.
Do not throw those pieces away.
Crumble the trimmed red cake and save the crumbs for decoration.
Place the first cake layer on your serving plate or cake board.
Add a layer of cream cheese frosting. Spread it evenly, stopping close to the edge.
Add the next red velvet layer and repeat.
Place the final layer on top.
Check the cake from every side. If it leans, gently adjust the layers now rather than after the final frosting is applied.
The Crumb Coat Makes a Big Difference
Apply a very thin layer of frosting over the top and sides.
This is called a crumb coat. Its job is to catch loose red crumbs before you add the clean outer layer of white frosting.
Refrigerate the crumb-coated cake for about 20 to 30 minutes.
The frosting should feel firm before you continue.
Now spread the remaining cream cheese frosting around the cake. A long angled icing spatula makes it easier to spread the frosting without dragging your fingers through the surface. Smooth the top and sides gently before adding the red velvet crumbs.
For the classic appearance, keep the exterior mostly white and add red velvet crumbs around the top edge or center.
That strong contrast makes each slice stand out.
How to Get a Moist Red Velvet Cake
The biggest mistake is often overbaking.
A few extra minutes can make a noticeable difference in a cake with a soft crumb.
Use the baking time as a guide rather than an absolute rule. Ovens can run hotter or cooler than their settings suggest.
Also measure flour carefully.
If you use cups, loosen the flour, spoon it into the measuring cup, and level the top rather than packing flour firmly into the cup.
Better still, use the gram measurement.
The oil in this recipe is another important part of its moist texture. Do not reduce it dramatically in an attempt to make the cake lighter.
For another moisture-focused baking guide, see our tips for keeping madeleines moist.
Common Red Velvet Cake Mistakes
Using too much cocoa: Red velvet should have a gentle cocoa flavor. Adding large amounts changes both its flavor and color.
Overmixing the batter: Mix only until the flour disappears and the batter becomes uniform.
Overbaking: Begin testing before the maximum baking time.
Frosting warm cake: Warm layers can melt cream cheese frosting.
Skipping the crumb coat: Red crumbs easily become trapped in white frosting.
Using very soft frosting: Chill it briefly before assembly if your kitchen is warm.
Cutting immediately after frosting: A chilled cake is much easier to slice cleanly.
These small steps separate a messy homemade layer cake from one with clear red-and-white layers.
How to Chill and Slice the Cake
Once decorated, refrigerate the cake for at least 1 hour.
This gives the frosting time to firm and helps stabilize the layers.
For a clean slice, use a long sharp knife. Dip the blade in warm water, wipe it dry, then make your cut.
Clean the knife between slices.
This produces the sharp contrast between deep-red cake and pale frosting that makes red velvet so attractive.
Storage
Because this version contains cream cheese frosting, keep the finished cake covered in the refrigerator.
It can be stored for up to about 5 days, although its texture is usually at its best during the first few days.
Keep cut surfaces covered so the refrigerator air does not dry the exposed crumb.
For serving, you can take individual slices from the refrigerator a little before eating. The cake and frosting become softer as they lose their refrigerator chill.
What Does Red Velvet Cake Taste Like?
Red velvet occupies an interesting space between vanilla and chocolate cake.
You taste cocoa, but chocolate should not dominate.
Then comes vanilla, sweetness, and the light tang from buttermilk and vinegar. Cream cheese frosting adds richness and another tangy note.
The balance is the point.
A good red velvet cake should not taste like ordinary vanilla cake dyed red. Nor should it taste like a dark chocolate cake.
Its character comes from all those flavors working together.
Serving Ideas
This cake fits naturally into celebrations because the red-and-white color makes a strong visual statement.
Serve it for:
- Birthdays
- Valentine’s Day
- Christmas
- Anniversaries
- Mother’s Day
- Family celebrations
- Dinner parties
If you are planning a special dessert table, you can also find inspiration in our Mother’s Day cake ideas or browse more recipes on RecipesMind.
Frequently Asked Questions
What makes red velvet cake different from chocolate cake?
Red velvet normally contains much less cocoa than a standard chocolate cake. It also commonly contains acidic ingredients such as buttermilk and vinegar. The result is a mild cocoa flavor with a tender crumb and subtle tang.
Why do you put vinegar in red velvet cake?
Vinegar supplies acidity. In this recipe, the acidic environment works with baking soda and contributes to the cake’s rise and texture. The small amount should not make the finished cake taste strongly of vinegar.
Is red velvet just chocolate cake with red food coloring?
No. Cocoa is part of the flavor, but red velvet has its own ingredient balance. Buttermilk, vinegar, vanilla, cocoa, and the frosting all contribute to its identity.
Why is my red velvet cake dry?
The most common causes include too much flour and excessive baking. Weigh the flour when possible and start checking the cake before the end of the suggested baking range.
Can I make red velvet cake without buttermilk?
You can use substitutes in some recipes, but real cultured buttermilk is the preferred choice here because its acidity and flavor are part of the intended result.
Why did my cake turn brown instead of bright red?
Cocoa naturally darkens the batter. Too much cocoa or too little food coloring can produce a brownish-red cake. Use the listed quantity of cocoa and a concentrated red gel coloring for a deeper red result.
Can I make this cake ahead of time?
Yes. Bake the layers, let them cool completely, wrap them well, and refrigerate them before assembly. You can also assemble the cake ahead and keep it refrigerated.
How long should red velvet cake cool before frosting?
It must be completely cool. Depending on your room temperature and the thickness of the layers, this can take an hour or longer. Refrigerating cooled layers briefly can make assembly easier.
What frosting is best for red velvet cake?
Cream cheese frosting is one of today’s most popular choices because its tang balances the sweet cake. Historically, red velvet has also been paired with other frostings, so cream cheese is popular rather than the only possible choice. King Arthur notes that both cooked-style frostings and cream cheese frosting have been associated with red velvet.
A Cake Worth Cutting Into
The best part of this Red Velvet Cake Recipe arrives when you finally cut the first slice.
The plain white exterior opens to reveal vivid red layers separated by ribbons of cream cheese frosting. But the cake should deliver more than a beautiful photograph. Each bite should be soft and moist, with gentle cocoa, vanilla, buttermilk tang, and rich frosting.
Pay attention to the details that quick recipes often leave out. Use room-temperature ingredients. Weigh the flour when possible. Prepare the pans with parchment. Do not overmix. Start checking the cake before it becomes dry. Cool every layer completely. Chill the crumb coat before applying the final frosting.
Those few extra minutes of care make the finished cake easier to assemble, easier to slice, and much closer to the tall, striking red velvet cake you imagined when you started.