
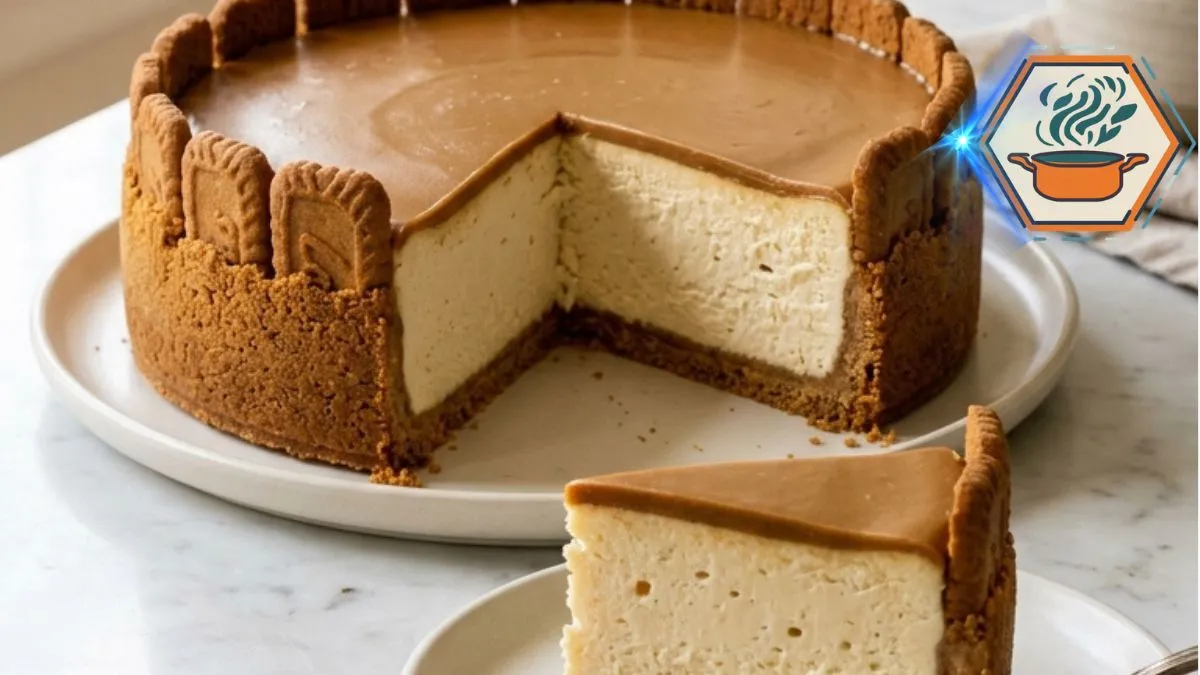
The first slice of a cheesecake tells you almost everything about it. With this Golden Cookie Butter Velvet Cheesecake, the knife passes through a glossy caramel-brown topping, then a thick vanilla filling, and finally a crisp spiced cookie crust. The result is a dessert with three clear textures in every forkful: creamy, smooth, and crunchy.
That contrast is the reason this recipe works so well. It is not simply cheesecake with cookie butter spread on top. The crust is baked first so it stays firm. The filling is mixed gently to keep it dense and creamy. The topping is added only after chilling, which gives it that smooth finish without baking the cookie butter into the filling.
Cheesecake can be unforgiving when it is baked too aggressively. King Arthur Baking’s cheesecake tests found that a hot-water bath is a particularly reliable way to limit overbaking and cracking because it creates gentler, more even heat around the pan. You can read their cheesecake cracking and water-bath guide before baking if this is your first homemade cheesecake.
The finished cake also needs refrigeration. USDA food-safety guidance treats cheesecake as a perishable refrigerated food, and its storage guidance lists about seven days under refrigeration for cheesecake. See the USDA food-safety guidance for additional storage information.
Affiliate disclosure: As an Amazon Associate I earn from qualifying purchases. This article may contain affiliate links to kitchen tools I find useful for preparing this recipe.v
jump to
Why You’ll Love This Golden Cookie Butter Velvet Cheesecake
Imagine serving the cake after dinner.
From the outside, it looks almost like a crown. Small rectangular spiced cookies stand vertically around the edge. The top is flat and glossy, with a warm caramel color.
Then you remove the first slice.
That is when the layers become visible.
At the bottom sits a dark golden cookie crust. Above it is a generous layer of pale vanilla cheesecake. A thinner cookie butter topping finishes the slice.
The balance matters. Too much topping can overpower the vanilla filling. Too little crust removes the crunch that makes the dessert interesting.
This version is designed around that balance.
The cheesecake filling uses sour cream for a softer texture and gentle tang. Cornstarch gives the filling a little extra structure. Eggs bind everything together. Vanilla keeps the center aromatic without competing with the spiced cookie flavor.
If you enjoy learning why ingredients change the texture of baked desserts, our guide to the difference between butter cakes is another useful read.
Ingredients
For best results, weigh ingredients when possible and bring the refrigerated filling ingredients close to room temperature before mixing.
For the thick spiced cookie crust
- 2 cups (about 220 g) finely crushed spiced caramelized cookies
- 6 tablespoons (85 g) unsalted butter, melted
- 1 tablespoon packed brown sugar
- 1/4 teaspoon fine salt
- 1/4 teaspoon ground cinnamon, optional
The added salt is small but important. It keeps the crust from tasting flat against the sweet topping.
Brown sugar also helps create a deeper caramel note.
For the vanilla cheesecake filling
- 24 oz (680 g) full-fat block cream cheese, softened
- 3/4 cup (150 g) granulated sugar
- 3/4 cup (180 g) full-fat sour cream, room temperature
- 3 large eggs, room temperature
- 2 teaspoons vanilla extract
- 2 tablespoons (16 g) cornstarch
- 1/4 teaspoon fine salt
Use block-style cream cheese, not whipped cream cheese from a tub. The water content and texture can differ, which may change how the cheesecake sets.
For the glossy cookie butter topping
- 1 cup (about 240 g) smooth cookie butter spread
- 2 tablespoons (30 ml) heavy cream
For the cookie border
- About 18 to 22 small rectangular spiced cookies
The exact number depends on the dimensions of your cookies and whether you use an 8- or 9-inch pan.
Equipment You’ll Need
You do not need a professional pastry kitchen. Still, a few pieces of equipment make this recipe much easier.
- 8- or 9-inch springform pan
- Large roasting pan
- Heavy-duty aluminum foil
- Parchment paper
- Electric hand or stand mixer
- Silicone spatula
- Mixing bowls
- Measuring cups or kitchen scale
- Fine cookie crumb processor or rolling pin
- Sharp knife
A springform pan is especially useful because its removable outer ring lets you release a delicate cheesecake without turning it upside down.
Amazon option: 9-inch springform cheesecake pans on Amazon
A digital kitchen scale is also useful for repeatable baking.
Amazon option: digital kitchen scales on Amazon
How to Make a Better Cookie Crust
A disappointing cheesecake crust is often either loose and crumbly or greasy.
We want neither.
Preheat your oven to 325°F (163°C). Place a rack near the center.
Line the bottom of the springform pan with parchment. Lightly grease the inner side of the pan.
Crush the cookies into fine, even crumbs. Large pieces can create weak spots that break when you cut the cheesecake.
Combine the crumbs with melted butter, brown sugar, salt, and cinnamon.
The finished mixture should resemble damp sand. When squeezed in your hand, it should hold together.
If it remains very dry because your particular cookies absorb more fat, add 1 teaspoon of melted butter at a time. Do not pour in a large amount at once.
Transfer the crumbs to the pan.
Press them firmly into a flat layer with the bottom of a measuring cup or glass. Pay particular attention to the outer edge.
Bake for 8 to 10 minutes.
The crust should smell toasted and look slightly darker. Remove it and let it cool while preparing the filling.
This short prebake is worth the extra few minutes. It gives the base a stronger structure before the wet cheesecake batter goes on top.
For another example of how small ingredient choices can affect baking, see our 3-ingredient banana bread guide.
Prepare the Pan for Gentle Baking
For a particularly creamy center, this version uses a water bath.
Once the crust has cooled slightly, wrap the outside of the springform pan in two large layers of heavy-duty foil. Keep the foil high around the sides.
Do not put water inside the cheesecake pan.
The wrapped springform pan will later sit inside a larger roasting pan filled with hot water.
King Arthur’s testing found a water bath to be highly effective for reducing overbaking and cracking.
Amazon option: large roasting pans for a cheesecake water bath on Amazon
Make the Creamy Vanilla Filling
Here is where patience matters.
Place the softened cream cheese in a large bowl. Beat on low to medium-low speed until smooth.
Add the granulated sugar.
Mix only until the sugar is incorporated and the mixture looks creamy. Scrape the sides and bottom of the bowl.
Add sour cream, vanilla, cornstarch, and salt.
Mix again on low speed.
Now add the eggs one at a time.
After each egg, mix only until you can no longer see streaks of egg.
Do not whip the batter.
This detail is easy to ignore, but it makes a real difference. Vigorous mixing can incorporate excess air. Those air pockets expand during baking and can contribute to rising, sinking, and cracking. King Arthur likewise recommends slow mixing and room-temperature ingredients when trying to prevent cheesecake cracks.
Scrape the bowl one final time with a spatula.
The batter should be smooth and fairly thick.
Bake the Cheesecake Without Drying the Center
Pour the filling over the prebaked crust.
Smooth the surface gently.
Place the wrapped springform pan inside the roasting pan. Transfer it carefully to the oven.
Pour very hot water into the roasting pan until it reaches roughly halfway up the outside of the springform pan. King Arthur describes this approach as a way to promote a slower, more even bake.
Bake at 325°F for approximately 55 to 70 minutes.
Do not rely on time alone.
Ovens and pan sizes vary. An 8-inch cake is deeper than the same quantity baked in a 9-inch pan and may require additional time.
Look at the cheesecake instead.
The outer section should appear set. The center should still have a gentle wobble when you carefully move the pan. It should jiggle as one soft area rather than look liquid.
For an additional check, King Arthur notes that cheesecake around 160°F to 165°F at the center can be done, depending on the recipe and desired texture.
A digital instant-read thermometer can remove much of the guesswork.
Amazon option: instant-read digital food thermometers on Amazon
The Cooling Step You Shouldn’t Rush
A beautiful cheesecake can crack after it has finished baking.
Sudden temperature changes are one reason.
Turn off the oven.
Open the oven door slightly and leave the cheesecake inside for about 45 minutes.
Then remove the cheesecake from the water bath and take off the foil.
Let it cool on a rack until it is no longer warm.
Once cooled, cover it and refrigerate for at least 6 hours.
Overnight is better.
This waiting period allows the cheesecake to firm and makes the first slice far cleaner.
Do not add the decorative cookies before the overnight chill. Refrigerator moisture can soften them.
Make the Glossy Cookie Butter Topping
The topping is deliberately simple.
Place 1 cup of smooth cookie butter and 2 tablespoons of heavy cream in a microwave-safe bowl or small saucepan.
Warm gently.
If using a microwave, start with about 10 to 15 seconds, stir, and repeat only if needed.
You are not trying to make it hot.
You only want it fluid enough to spread without dragging across the chilled cheesecake.
Stir until glossy.
Remove the chilled cheesecake from the refrigerator. Release the springform ring carefully.
Pour the topping onto the center.
Use an offset spatula or the back of a spoon to spread it into a thin, even layer.
Avoid making the topping excessively thick. A thinner layer gives you the caramelized cookie flavor without hiding the creamy vanilla center.
Refrigerate briefly if the topping needs to firm.
How to Get the Cookie-Covered Sides
This is the visual detail that makes the cake stand out.
Shortly before serving, arrange the rectangular spiced cookies vertically around the outer edge.
Place them side by side.
If they do not adhere naturally, use a tiny dab of softened cookie butter on the back of each cookie as edible “glue.”
Press very gently.
Do not push the cookies deep into the cheesecake.
Add them as late as practical. This keeps them crisper and gives the finished Golden Cookie Butter Velvet Cheesecake its distinctive bakery-style border.
How to Cut Perfect Cheesecake Slices
You waited overnight. Don’t ruin the presentation with a dull knife.
Fill a tall container with hot water.
Dip a long, sharp knife into the water. Wipe it completely dry.
Make one clean downward cut.
Lift the knife out.
Wash or wipe away the cheesecake, warm the blade again, dry it, and make the next cut.
Repeat for every slice.
King Arthur also recommends the hot-water-and-dry-knife technique when serving cheesecake.
You should see three distinct layers: the crunchy brown base, thick pale filling, and smooth caramel-colored topping.
If you enjoy mastering caramel flavors, our guide to caramelizing sugar covers another useful dessert technique.
Common Cheesecake Mistakes to Avoid
Using cold cream cheese: Cold blocks can leave small lumps in the filling.
Whipping the eggs: High-speed mixing adds unwanted air. Once the eggs enter the bowl, stay on low speed.
Skipping the crust prebake: The base will usually be softer and may crumble more easily.
Adding too much butter to the crumbs: More butter does not automatically mean a stronger crust. Too much can make it greasy.
Baking until the center looks completely rigid: Cheesecake continues to settle as it cools. Waiting for a hard center can leave the filling overbaked.
Cooling too quickly: Moving a hot cheesecake directly into a cold environment can contribute to cracking.
Adding the topping while the cake is warm: The cookie butter can sink, melt excessively, or mix with the surface.
Decorating with cookies too early: They absorb moisture and lose their crisp bite.
Storage and Make-Ahead Instructions
This is an excellent make-ahead dessert because chilling is already part of the recipe.
Make the cheesecake the day before serving. Bake it, cool it, and refrigerate it overnight.
Add the cookie butter topping after the cake is thoroughly chilled. Add the vertical cookies close to serving time.
Keep cheesecake refrigerated. USDA guidance lists cheesecake for about 7 days refrigerated, although quality is generally best earlier.
For the best texture, keep it covered so the filling does not absorb refrigerator odors.
If the cookies around the edge become soft during storage, remove them and add fresh ones before serving.
Serving Ideas
This cheesecake is already rich, so it needs very little beside it.
Try it with:
- Fresh strawberries or raspberries
- Unsweetened coffee
- Espresso
- A small spoonful of lightly whipped cream
- A few crushed spiced cookies
- A very light pinch of flaky salt over the cookie butter
Avoid pouring a heavy caramel sauce over the entire cake. The cookie butter topping already provides sweetness and caramel notes.
For another dessert where texture matters, read our guide to keeping madeleines moist.
Frequently Asked Questions
Can I make Golden Cookie Butter Velvet Cheesecake without a water bath?
Yes. Cheesecake can be baked successfully without one. However, direct oven heat gives you less protection against overbaking. King Arthur’s comparative testing found a water bath was the most reliable of the tested methods for preventing cracks.
Why did my cheesecake crack?
Common causes include overbaking, vigorous mixing, and sudden temperature changes during cooling. A crack does not necessarily mean the cheesecake tastes bad, and this recipe’s cookie butter layer can cover small surface imperfections.
Why is my cookie crust falling apart?
The crumbs may be too coarse, the mixture may not have enough butter for the particular cookies used, or the crust may not have been pressed firmly enough. Grind the cookies finely, check that the mixture holds when squeezed, compact it firmly, and prebake it.
Can I use an 8-inch pan instead of a 9-inch pan?
Yes, provided the pan is deep enough. The cheesecake will be taller and can take longer to bake. Watch the center and edges rather than assuming the same baking time.
When should I add the cookies around the sides?
As close to serving as practical. The refrigerator contains moisture, and long refrigeration can soften crisp cookies.
How do I know when cheesecake is done?
The outer area should look set while the center still gently jiggles. King Arthur describes a set outer area with a small central zone that jiggles like gelatin as a visual cue.
Can I make this cheesecake the night before?
Yes. In fact, that is the preferred schedule. An overnight chill gives the filling time to set completely and makes cleaner slicing much easier.
What makes this cheesecake so creamy?
Full-fat cream cheese, sour cream, gentle mixing, moderate oven heat, and careful baking all contribute. The goal is to set the egg-based filling without baking it until it becomes dry or grainy.
Print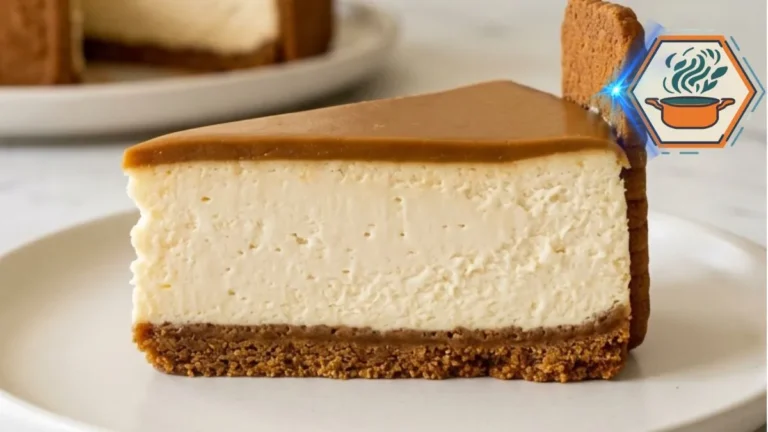
Golden Cookie Butter Velvet Cheesecake
A rich and creamy vanilla cheesecake with a thick spiced cookie crust, smooth cookie butter topping, and crisp caramelized cookies around the sides. The filling stays soft and velvety while the baked crust adds a satisfying crunch.
- Total Time: 8 hours 40 minutes
- Yield: 12 slices
Ingredients
For the Spiced Cookie Crust
- 2 cups (about 220 g) finely crushed spiced caramelized cookies
- 6 tablespoons (85 g) unsalted butter, melted
- 1 tablespoon packed brown sugar
- 1/4 teaspoon fine salt
- 1/4 teaspoon ground cinnamon, optional
For the Cheesecake Filling
- 24 oz (680 g) full-fat block cream cheese, softened to room temperature
- 3/4 cup (150 g) granulated sugar
- 3/4 cup (180 g) full-fat sour cream, room temperature
- 3 large eggs, room temperature
- 2 teaspoons vanilla extract
- 2 tablespoons (16 g) cornstarch
- 1/4 teaspoon fine salt
For the Cookie Butter Topping
- 1 cup (about 240 g) smooth cookie butter spread
- 2 tablespoons (30 ml) heavy cream
For the Cookie Sides
- 18–22 small rectangular spiced caramelized cookies
- 1–2 tablespoons cookie butter, optional, for attaching the cookies
Instructions
- Preheat the oven to 325°F (163°C). Position a rack in the center of the oven.
- Line the bottom of an 8- or 9-inch springform pan with parchment paper. Lightly grease the inside edge.
- Combine the finely crushed cookies, melted butter, brown sugar, salt, and optional cinnamon. Stir until the crumbs resemble damp sand and hold together when pressed.
- Transfer the mixture to the pan. Use the flat bottom of a measuring cup to compact it firmly and evenly.
- Bake the crust for 8–10 minutes. Remove it from the oven and allow it to cool slightly.
- Wrap the outside and bottom of the springform pan tightly with two layers of heavy-duty aluminum foil to help prevent water from entering during the water bath.
- Beat the softened cream cheese and granulated sugar on low to medium-low speed until smooth. Scrape the bowl.
- Add the sour cream, vanilla, cornstarch, and salt. Mix on low speed just until combined.
- Add the eggs one at a time. Mix on low speed only until each egg disappears into the batter. Do not whip the mixture.
- Pour the cheesecake batter over the prebaked crust. Smooth the surface gently.
- Place the wrapped springform pan inside a larger roasting pan.
- Place the roasting pan in the oven. Carefully pour hot water into the outer roasting pan until it reaches approximately halfway up the sides of the springform pan.
- Bake at 325°F (163°C) for approximately 55–70 minutes. The edges should look set while the center should still have a gentle wobble. Do not wait until the entire cheesecake becomes firm.
- Turn off the oven. Crack the oven door open and leave the cheesecake inside for approximately 45 minutes.
- Remove the cheesecake from the water bath. Remove the foil and place the pan on a cooling rack.
- Allow it to cool toward room temperature, then cover and refrigerate for at least 6 hours, preferably overnight.
- Once thoroughly chilled, gently warm the cookie butter and heavy cream together. Stir until smooth and pourable. Do not overheat.
- Spread a thin, even layer over the chilled cheesecake.
- Return the cheesecake briefly to the refrigerator if necessary to set the topping.
- Shortly before serving, arrange 18–22 rectangular spiced cookies vertically around the outside. If needed, place a small dab of cookie butter behind each cookie to help it stick.
- For clean slices, warm a sharp knife in hot water and wipe it completely dry. Cut one slice, clean the knife, and repeat.
Notes
- Use full-fat block cream cheese, rather than whipped cream cheese.
- Room-temperature cream cheese reduces the risk of lumps.
- Once the eggs are added, keep the mixer on low.
- Finely ground cookie crumbs produce a stronger crust than coarse pieces.
- Compact the crust firmly before prebaking.
- Do not skip the 8–10 minute crust prebake if you want the defined crunchy layer shown in the finished dessert.
- The cheesecake is ready when the outer portion is set but the center still gently wobbles.
- Chill for at least 6 hours. Overnight chilling gives cleaner slices.
- Add the decorative cookies shortly before serving so they remain crisp.
- Keep the cheesecake refrigerated at 40°F/4.4°C or below. USDA recommends this temperature or colder for perishable foods.
- Do not leave the finished cheesecake at room temperature for more than 2 hours; USDA identifies 40°F–140°F as the food-safety “Danger Zone.”
- Prep Time: 30 minutes
- Additional/Chill Time: 7 hours minimum
- Cook Time: 1 hour 10 minutes
- Category: Dessert
- Method: Baking
- Cuisine: American-inspired
A Cheesecake Worth Waiting Overnight For
The hardest part of this recipe may simply be waiting for it to chill.
But that wait changes everything.
By the next day, the crust is firm enough to support a clean slice. The vanilla center is cool, dense, and creamy. The cookie butter sits on top as a smooth caramel-colored layer. Add those crisp rectangular cookies around the outside, and the simple cheesecake becomes a centerpiece.
The real secret to Golden Cookie Butter Velvet Cheesecake is not one unusual ingredient. It is controlling each texture separately: bake the crust, gently mix and bake the filling, chill it completely, then finish with the topping and crisp cookie border.
That sequence gives you the contrast this dessert needs—and the clean first slice that makes all that waiting worthwhile.