
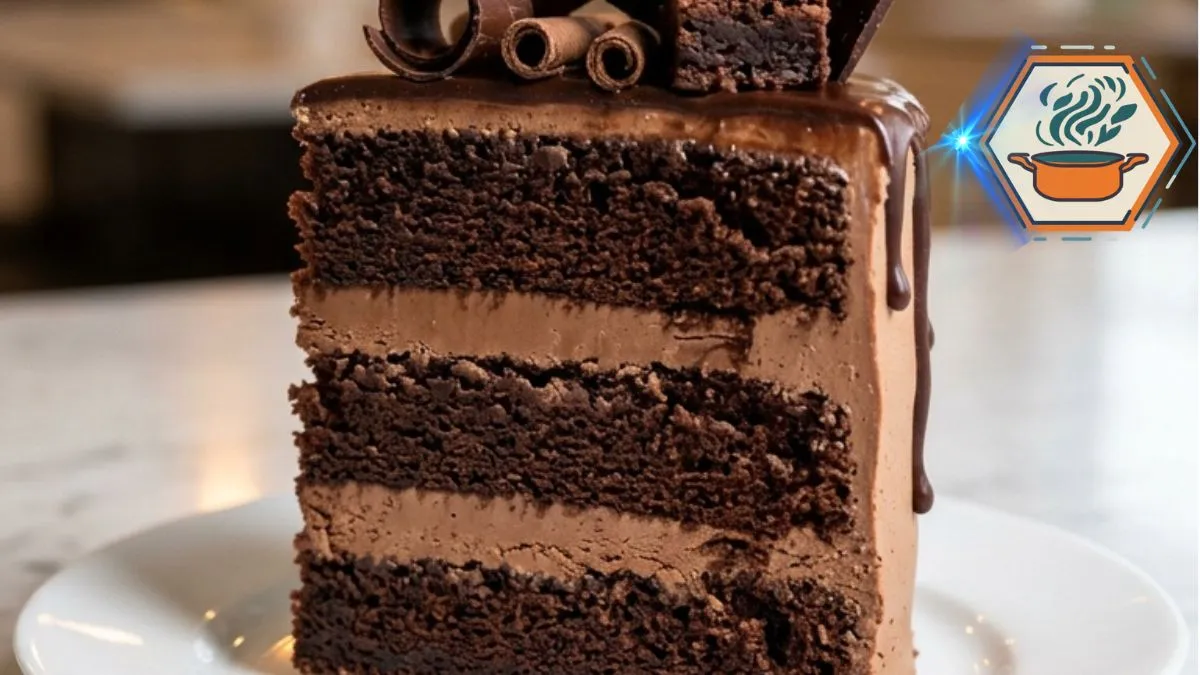
Some birthday cakes disappear from the table one polite slice at a time. Others make everyone stop before the candles are even lit. This Chocolate Overload Birthday Cake belongs to the second group. With three dark, moist layers, soft chocolate cream between them, a thick chocolate frosting, glossy ganache drips, and curls piled across the top, it turns a familiar Classic American Celebration Dessert into a true centerpiece.
The goal here is not only to make a cake that looks impressive. It needs to taste as good as it looks and, more importantly, be realistic for a home baker to reproduce. The thin chocolate batter is intentional. Hot coffee helps build a deeper cocoa character, a technique also seen in professional chocolate cake formulas. King Arthur Baking notes that coffee can deepen chocolate flavor rather than simply making a cake taste like coffee. You can read their chocolate cake baking guide for more useful layer-cake techniques.
The second secret is patience. Warm cake and chocolate cream are a bad combination. The layers must cool completely before assembly. The assembled cake also needs time in the refrigerator before the ganache goes on. Those small pauses make the difference between clean layers and a cake that slides apart.
Affiliate disclosure: As an Amazon Associate I earn from qualifying purchases. This article may contain affiliate links to kitchen tools I find useful for preparing this recipe.v
JUMP TO
Why This Chocolate Overload Cake Works
A tall chocolate cake can easily become too sweet, too dry, or too heavy. This recipe balances those problems by giving each component a different job.
The cake layers use vegetable oil rather than relying only on butter. Oil contributes to a soft crumb even after refrigeration. Cocoa supplies the main chocolate flavor, while hot coffee gives the cocoa more depth.
The filling is lighter than the outer frosting. Heavy whipping cream is folded into a cream cheese and cocoa base. That gives each slice a soft, creamy center without making the whole cake feel like buttercream.
Then comes the exterior. A cocoa-butter frosting is sturdy enough to support three layers. A semi-sweet chocolate ganache creates the dark drips seen around the top edge.
Finally, chocolate curls, shards, chunks, and brownie pieces create the overloaded appearance.
The result is intentionally dramatic.
Ingredients for a Classic American Celebration Dessert
For the chocolate cake layers, you will need:
- 2½ cups (300 g) all-purpose flour
- ¾ cup (about 64 g) unsweetened cocoa powder
- 2 cups (400 g) granulated sugar
- 2 teaspoons baking powder
- 1½ teaspoons baking soda
- ½ teaspoon fine salt
- 3 large eggs, preferably at room temperature
- 1 cup (240 ml) whole milk, at room temperature
- ½ cup (120 ml) neutral vegetable oil
- 2 teaspoons vanilla extract
- 1 cup (240 ml) hot brewed coffee
For the chocolate cream filling:
- 1½ cups (360 ml) cold heavy whipping cream
- 8 oz (226 g) full-fat block cream cheese, softened
- ¾ cup (90 g) powdered sugar
- ½ cup (about 42 g) unsweetened cocoa powder
- 1 teaspoon vanilla extract
For the chocolate frosting:
- 1 cup (226 g) unsalted butter, softened
- 1 cup (about 85 g) unsweetened cocoa powder
- 3½ cups (420 g) powdered sugar
- Up to ½ cup (120 ml) heavy cream
- 1 teaspoon vanilla extract
- Pinch of fine salt
For the chocolate drip:
- 1 cup (170 g) finely chopped semi-sweet chocolate
- ½ cup (120 ml) heavy cream
For decoration:
- Chocolate curls
- Brownie cubes or fudgy brownie pieces
- Chocolate shards
- Small chocolate chunks
- A little cocoa powder
If you enjoy rich chocolate baking, you may also like this strawberry-filled chocolate cake for another celebration idea.
Equipment That Makes the Recipe Easier
You do not need professional bakery equipment. A few basic tools, however, make a tall layer cake much easier to control.
Three matching 8-inch pans are particularly useful. Baking all three layers at the same time gives them similar thickness and texture.
8-inch round cake pans on Amazon
You will also want an offset spatula for spreading filling and frosting without digging into the crumb.
offset cake spatulas on Amazon
A rotating cake stand is optional, but it makes smoothing the sides much easier.
cake decorating turntables on Amazon
Finally, a flexible silicone spatula is useful for folding whipped cream into the filling without knocking out too much air.
silicone baking spatulas on Amazon
How to Make Moist Chocolate Cake Layers
Heat the oven to 350°F (175°C). Place a rack near the center.
Grease three 8-inch round pans. Add parchment circles to the bottoms, then lightly grease the parchment. This extra step matters with soft chocolate cake because the layers can stick easily.
In a large bowl, whisk the flour, cocoa, sugar, baking powder, baking soda, and salt. Break up every visible cocoa lump.
In another bowl or large measuring jug, combine the eggs, milk, vegetable oil, and vanilla.
Pour the wet mixture into the dry ingredients. Mix only until the batter becomes even.
Now slowly add the hot coffee.
Do not panic when the batter becomes quite thin. A loose batter is normal for this style of chocolate cake. Similar cocoa-based cake formulas also produce thin batter and use brewed coffee or water as part of the liquid.
Divide the batter evenly among the three pans. For the most even result, weigh the filled pans or weigh the batter as you divide it.
Bake for approximately 30–35 minutes.
Start checking a little earlier because ovens and pans vary. A toothpick inserted near the center should emerge without raw batter. A few soft crumbs are fine. The center should also spring back when touched gently.
King Arthur Baking likewise recommends checking chocolate layer cakes for a set center and using a toothpick or thin knife to judge doneness.
Leave the layers in their pans for about 10–15 minutes. Carefully turn them onto wire racks.
Then wait.
They must be completely cool before filling.
How to Make the Creamy Chocolate Filling
This filling is what gives the cake its striking layered cross-section.
First, make sure the heavy cream is very cold. Cold cream whips more reliably.
Beat the softened cream cheese with the powdered sugar until smooth. Scrape the bowl. Add the cocoa and vanilla, then beat again at low speed until incorporated.
In a clean separate bowl, whip the cold heavy cream to medium peaks. It should hold its shape but still look creamy rather than grainy.
Fold about one-third of the whipped cream into the chocolate mixture to loosen it.
Add the rest in two additions.
Use broad, gentle strokes with your spatula. Stop once the mixture is evenly chocolate-colored.
Do not keep stirring.
Overworking whipped cream can make the filling lose volume.
Building a Tall Cake Without Sliding Layers
If the cake tops are noticeably domed, trim them with a long serrated knife. Flat layers make a tall cake much more stable.
Put the first cake layer onto a cake board or serving plate.
Spread an even layer of chocolate cream over it, leaving roughly ½ inch around the outer edge. Avoid making the filling excessively thick. Too much soft filling can squeeze outward once the other layers are added.
Place the second layer on top.
Add another even coating of filling.
Finish with the third layer, preferably placing its flatter side upward.
Look at the cake from eye level. If it leans, gently correct it now.
Chill for about 20 minutes before applying the exterior frosting.
Make the Rich Chocolate Frosting
Beat the softened butter for 2–3 minutes until creamy.
Sift the cocoa and powdered sugar if either contains lumps.
Add the cocoa gradually. Follow with the powdered sugar in several additions. Keep the mixer on low at first unless you want your kitchen covered in cocoa.
Add vanilla and salt.
Now add the heavy cream gradually rather than automatically pouring in the full ½ cup.
This is one of the important practical details missing from many frosting instructions.
Butter temperature, cocoa brand, humidity, and powdered sugar can all affect consistency. Start with several tablespoons of cream. Add more only until the frosting spreads smoothly while still holding its shape.
If it becomes too soft, add a little powdered sugar.
If it is too stiff, add cream one teaspoon at a time.
For more general baking ideas and techniques, visit RecipesMind.
Frosting the Cake for a Clean Finish
Start with a thin crumb coat.
Spread a small amount of frosting over the top and sides. This first layer traps loose cake crumbs.
Refrigerate for 20–30 minutes.
Then apply the remaining frosting more generously. Smooth the top with an offset spatula. Smooth the sides with a cake scraper or spatula while slowly turning the cake.
It does not need to look factory-perfect. The final chocolate decorations will give the cake a rich, textured finish.
Chill the frosted cake for another 30 minutes before making the drip.
This step is essential.
Warm ganache on soft butter frosting can run all the way down the cake.
How to Get the Glossy Chocolate Drip Right
Finely chop the semi-sweet chocolate and put it in a heatproof bowl.
Heat the heavy cream until it is steaming and hot but not aggressively boiling.
Pour it over the chocolate.
Leave it untouched for 2–3 minutes.
Then stir gently from the center outward until the mixture becomes smooth and glossy.
Here comes another detail that matters: do not immediately pour hot ganache onto the cake.
Allow it to cool until it is fluid but no longer hot. Test one drip on the back or least visible side of the chilled cake.
If it races to the bottom, wait a little longer.
If it barely moves, the ganache has become too cool. Warm it very briefly.
Once the consistency looks right, use a teaspoon or squeeze bottle to form individual drips around the rim. Then spread a thin layer of ganache across the top.
This gives you much more control than pouring everything over the cake at once.
Creating the Chocolate Overload Finish
Now comes the fun part.
Arrange brownie pieces toward the center and back of the cake. Add curled chocolate pieces at different angles. Tuck small chunks between them.
For height and contrast, insert a few thin chocolate shards vertically.
The decoration should look abundant without hiding the entire top.
Finish with a very light dusting of cocoa.
For homemade chocolate curls, slightly warm the surface of a chocolate bar with your hands and drag a vegetable peeler along the edge. Different pressure creates tighter or wider curls.
This decoration style works because it repeats chocolate in different forms: creamy, fudgy, glossy, crisp, and curled.
Kitchen Notes That Can Save Your Cake
A few small decisions can prevent most layer-cake problems:
- Measure flour carefully. Too much flour can make chocolate cake dry. A kitchen scale gives the most consistent result.
- Do not overmix after adding flour. Mix only as much as needed.
- Use room-temperature eggs and milk. They combine more evenly with the batter.
- Cool every layer completely. Even slightly warm cake can soften the filling.
- Keep whipping cream cold. This helps it hold volume.
- Use block cream cheese. Spreadable cream cheese generally contains more moisture and may produce a softer filling.
- Chill before the drip. A cold frosting surface slows the ganache.
- Test one drip first. It can save the whole finish.
- Decorate brownie pieces shortly before serving if you want them to retain their best texture.
Can You Make This Cake Ahead?
Yes. In fact, splitting the work across two days can make the process much easier.
Bake the cake layers the day before assembly. Once completely cool, wrap each layer tightly. Keep them protected so they do not dry out.
The next day, prepare the filling, frosting, and ganache.
You can also assemble and decorate the entire cake ahead of the celebration. Because the filling contains whipped cream and cream cheese, keep the finished cake refrigerated rather than leaving it out for extended periods.
The FDA advises refrigerating foods that require chilling within two hours at room temperature, or within one hour when temperatures are above 90°F.
For clean slices, chill the assembled cake first. Use a large sharp knife and wipe the blade between cuts.
What If You Don’t Want Coffee in the Cake?
Replace the hot coffee with the same quantity of hot water.
You will still have a chocolate cake.
Coffee is present mainly to deepen the cocoa profile. King Arthur’s baking guidance specifically notes that water gives a purer chocolate profile while coffee contributes a more complex chocolate character.
So the substitution does not ruin the recipe. It simply changes the flavor slightly.
Why This Cake Fits an American Birthday Table
The appeal of this Classic American Celebration Dessert is familiar: a tall layer cake, generous frosting, and a finish designed for a special occasion.
Yet the inside keeps it interesting.
Instead of putting dense frosting between every layer, the softer chocolate cream creates contrast. You get tender cake, airy cream, fudgy frosting, silky ganache, and solid chocolate decorations in the same forkful.
It is intentionally indulgent.
That is exactly what a birthday cake can be.
Frequently Asked Questions
What makes chocolate cake moist?
A combination of liquid, fat, correct flour measurement, and proper baking time matters. In this recipe, vegetable oil helps create a tender crumb. Avoid adding extra flour and do not bake the layers longer than needed.
Why add coffee to chocolate cake?
Coffee can deepen the perceived chocolate character. It is a common pairing in chocolate baking, and baking references describe coffee as a natural partner for cocoa.
Will this birthday cake taste strongly of coffee?
Not necessarily. Cocoa and chocolate remain the dominant flavors. If you dislike coffee altogether, substitute hot water in equal volume.
Why did my chocolate drip run down the entire cake?
The ganache was probably too warm, the frosting was too warm, or both. Chill the frosted cake for about 30 minutes and let the ganache cool before decorating. Always test one drip first.
Can I bake the cake in two pans instead of three?
It is better to use the specified three 8-inch pans for this formula and presentation. Filling pans too deeply changes baking time and can lead to an overbaked exterior before the center is done.
How do I get neat layers like a bakery cake?
Use equal amounts of batter in each pan. Level domed cakes if needed. Apply filling evenly, chill during assembly, and use a thin crumb coat before the final frosting.
Can children eat this cake if it contains coffee?
The baked cake still contains some caffeine when regular coffee is used. If caffeine is a concern, use decaffeinated coffee or hot water instead.
How should I store Chocolate Overload Birthday Cake?
Keep it covered in the refrigerator because its filling contains cream cheese and whipped cream. For the best texture, avoid leaving it exposed in the refrigerator, where cut cake can dry quickly.
A Celebration Cake Worth the Extra Steps
Print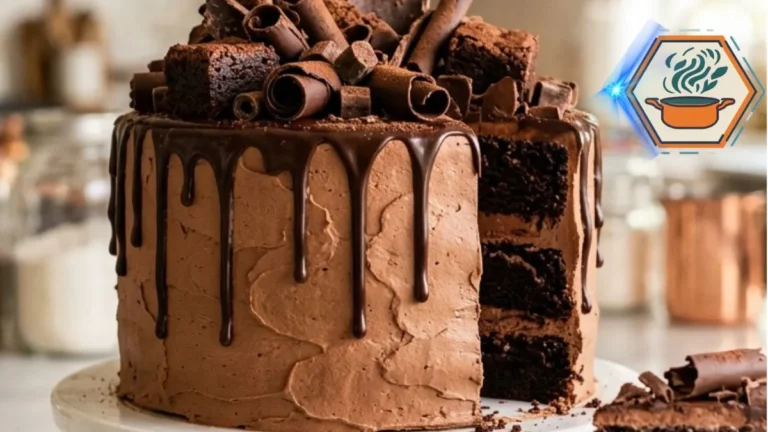
Chocolate Overload Birthday Cake
A tall, rich Chocolate Overload Birthday Cake with three moist chocolate cake layers, creamy chocolate filling, cocoa frosting, glossy chocolate ganache drips, brownie pieces, chocolate curls, chunks, and shards. A dramatic Classic American Celebration Dessert made for birthdays and special occasions.
- Total Time: About 2 hours 50 minutes
- Yield: 12–14 slices
Ingredients
Chocolate Cake Layers
- 2½ cups (300 g) all-purpose flour
- ¾ cup (64 g) unsweetened cocoa powder
- 2 cups (400 g) granulated sugar
- 2 teaspoons baking powder
- 1½ teaspoons baking soda
- ½ teaspoon fine salt
- 3 large eggs, room temperature
- 1 cup (240 ml) whole milk, room temperature
- ½ cup (120 ml) neutral vegetable oil
- 2 teaspoons vanilla extract
- 1 cup (240 ml) hot brewed coffee
Chocolate Cream Filling
- 1½ cups (360 ml) cold heavy whipping cream
- 8 oz (226 g) full-fat block cream cheese, softened
- ¾ cup (90 g) powdered sugar
- ½ cup (42 g) unsweetened cocoa powder
- 1 teaspoon vanilla extract
Chocolate Frosting
- 1 cup (226 g) unsalted butter, softened
- 1 cup (85 g) unsweetened cocoa powder
- 3½ cups (420 g) powdered sugar
- ¼–½ cup (60–120 ml) heavy cream, added as needed
- 1 teaspoon vanilla extract
- Pinch of fine salt
Chocolate Drip
- 1 cup (170 g) semi-sweet chocolate, finely chopped
- ½ cup (120 ml) heavy cream
Decoration
- Chocolate curls, as needed
- Fudgy brownie pieces, as needed
- Small semi-sweet or dark chocolate chunks, as needed
- Chocolate shards, as needed
- Unsweetened cocoa powder, for a light dusting
Instructions
- Preheat the oven to 350°F (175°C). Position a rack in the center.
- Grease three 8-inch round cake pans. Line the bottoms with parchment circles and lightly grease the parchment.
- In a large bowl, whisk together flour, cocoa powder, sugar, baking powder, baking soda, and salt. Break apart any cocoa lumps.
- In a separate bowl, whisk eggs, milk, oil, and vanilla.
- Pour the wet ingredients into the dry ingredients. Mix just until combined.
- Slowly pour in the hot coffee while mixing on low. The batter will be thin. This is expected.
- Divide the batter equally among the three prepared pans. Using a kitchen scale gives the most even layers.
- Bake for 30–35 minutes, checking near the 30-minute mark. The centers should spring back lightly and a toothpick should come out with a few moist crumbs but no raw batter.
- Cool in the pans for 10–15 minutes. Turn the layers onto wire racks and cool completely before filling.
- Make the filling. Beat softened cream cheese and powdered sugar until smooth. Mix in cocoa and vanilla.
- In a separate cold bowl, whip the cold heavy cream until medium peaks form.
- Fold about one-third of the whipped cream into the chocolate cream cheese mixture. Fold in the remainder in two additions. Do not overmix.
- If necessary, level completely cooled cake layers with a serrated knife.
- Place the first layer on a cake board or serving plate. Spread an even layer of chocolate cream over it, stopping about ½ inch from the edge.
- Add the second cake layer and repeat with the filling. Place the third cake layer on top. Chill for about 20 minutes.
- Make the frosting. Beat softened butter for 2–3 minutes. Gradually mix in cocoa and powdered sugar.
- Add vanilla, salt, and a few tablespoons of heavy cream. Continue adding cream gradually until the frosting is smooth and spreadable but firm enough to hold its shape.
- Apply a thin crumb coat over the cake. Refrigerate for 20–30 minutes.
- Apply the remaining frosting. Smooth the top and sides. Refrigerate the cake for another 30 minutes before adding the drip.
- Put finely chopped semi-sweet chocolate in a heatproof bowl. Heat ½ cup heavy cream until steaming but not vigorously boiling.
- Pour the hot cream over the chocolate. Leave undisturbed for 2–3 minutes, then gently stir until glossy and smooth.
- Let the ganache cool until fluid but no longer hot. Test one drip on the back of the cold cake. If it runs immediately to the bottom, let the ganache cool longer.
- Spoon controlled drips around the top edge. Spread a thin coating of ganache across the top.
- Arrange brownie pieces, chocolate curls, chunks, and shards on top. Add several curls and pieces around the lower side for the same overloaded appearance.
- Finish with a very light cocoa dusting. Refrigerate until ready to serve.
- For cleaner slices, chill the cake before cutting. Use a sharp knife and wipe it clean between slices.
Notes
- Do not omit the parchment. The soft chocolate layers can stick.
- Do not add extra flour because the batter looks thin. Thin batter is normal.
- Use full-fat block cream cheese, not spreadable tub cream cheese.
- Heavy whipping cream should be cold when making the filling.
- Cake layers must be completely cool before assembly.
- Add the frosting’s heavy cream gradually. You may not need the entire ½ cup.
- Chill the crumb-coated cake before applying the final frosting.
- The frosted cake should be cold before adding ganache.
- Test a single chocolate drip before decorating the entire cake.
- Hot ganache can melt the frosting.
- If the ganache is too thick, warm it very briefly. If too thin, allow it to cool.
- For the photographed look, keep the frosting naturally textured rather than perfectly white-smooth or mirror-like.
- The cake should remain refrigerated because the filling contains cream cheese and whipped cream.
- Hot coffee can be replaced 1:1 with hot water or hot decaffeinated coffee.
- Prep Time: 45 minutes
- Time: Cooling & Assembly Time: 1 hour 30 minutes
- Cook Time: 30–35 minutes
- Category: Dessert
- Method: Baking
There is a moment after the first slice comes out when all the work suddenly makes sense.
You see three dark cake layers separated by smooth bands of chocolate cream. Above them sits a rich frosting, glossy drip, brownie pieces, shards, chunks, and curls.
That is the real charm of this Classic American Celebration Dessert. It does not depend on one complicated bakery trick. Its appearance comes from several simple steps done in the right order.
Bake the layers until just done. Cool them fully. Keep the filling light. Build the cake level. Chill before frosting. Chill again before adding the ganache. Then add the chocolate decorations with a little controlled chaos.
The result is a moist Chocolate Overload Birthday Cake built for the moment when the candles are lit, everyone gathers around the table, and an ordinary chocolate cake simply would not be enough.