
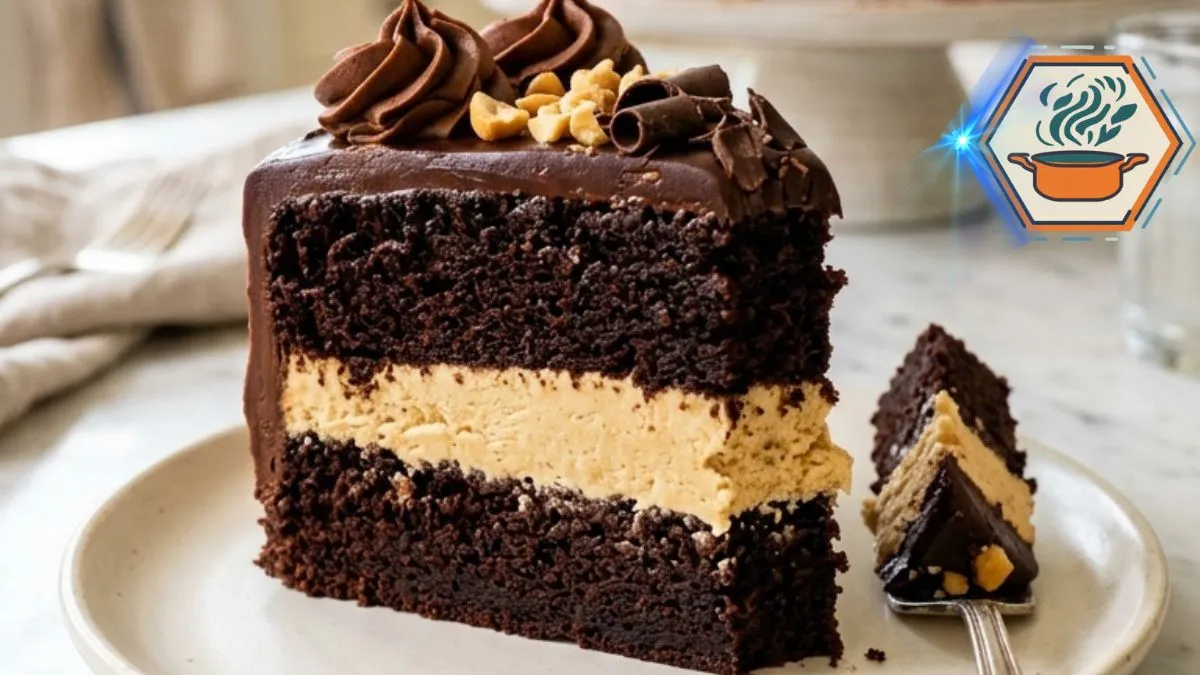
There is a special moment when you cut into a tall chocolate cake and reveal a thick, pale peanut butter center. That first slice tells you almost everything. The dark chocolate crumb should look moist. The peanut butter cream should stay thick and fluffy. The frosting should hold its shape, while glossy ganache and roasted peanuts make the top look inviting rather than overly polished. This Chocolate Peanut Butter Cream Layer Cake brings all of those details together in one homemade dessert.
The idea behind this cake is simple: chocolate and peanut butter. Getting the texture right takes a little more care. A thin cake batter is normal here. Hot coffee deepens the cocoa flavor without making the finished cake taste strongly of coffee. Proper cooling is just as important as baking because even slightly warm layers can soften the filling. For more baking inspiration, visit RecipesMind.
The finished cake is designed to look generous and homemade, with two deep chocolate layers, a substantial peanut butter cream center, chocolate frosting, a thin ganache top, piped swirls, chocolate curls, and chopped roasted peanuts. If you enjoy desserts built around chocolate and fruit too, our strawberry-filled chocolate cake guide offers another way to work with rich chocolate layers.
Affiliate disclosure: As an Amazon Associate I earn from qualifying purchases. This article may contain affiliate links to kitchen tools I find useful for preparing this recipe.
JUMP TO
Why This Chocolate Peanut Butter Cake Works
The best part of this recipe is contrast.
The cake layers are dark, soft, and deeply chocolatey. The center is lighter in color and texture. Cream cheese gives the peanut butter filling body and a slight tang, while whipped cream makes it softer and airier.
Then comes another contrast on top. Silky chocolate frosting provides structure. Ganache adds shine. Roasted peanuts add crunch. Chocolate curls make the cake look finished without requiring complicated decorating skills.
You get:
- Moist chocolate cake
- A thick peanut butter cream filling
- Rich cocoa frosting
- Glossy chocolate ganache
- Crunchy roasted peanuts
- Chocolate curls and frosting swirls
- A tall, dramatic cross-section
The recipe makes one two-layer, 9-inch cake and serves about 12 to 14 people, depending on slice size.
Prep time: 45 minutes
Bake time: 28–32 minutes
Cooling and assembly: about 2 hours
Chilling time: 1–2 hours
Total time: about 4 hours
Oven: 350°F / 175°C
Ingredients
Chocolate Cake Layers
- 1¾ cups (about 210 g) all-purpose flour
- 1¾ cups (350 g) granulated sugar
- ¾ cup (about 64 g) unsweetened cocoa powder
- 1½ teaspoons baking powder
- 1½ teaspoons baking soda
- ½ teaspoon fine salt
- 2 large eggs, at room temperature
- 1 cup (240 ml) whole milk, at room temperature
- ½ cup (120 ml) neutral vegetable oil
- 2 teaspoons vanilla extract
- 1 cup (240 ml) hot freshly brewed coffee or hot water
For layers with an even shape, two sturdy 9-inch round cake pans on Amazon are useful. Line the bottoms with parchment even when using nonstick pans.
Peanut Butter Cream Filling
- 8 oz (226 g) full-fat block cream cheese, softened
- ¾ cup (190 g) regular creamy peanut butter
- ¾ cup (90 g) powdered sugar, sifted
- 1 teaspoon vanilla extract
- 1 cup (240 ml) cold heavy whipping cream
Important: use standard creamy peanut butter rather than a very loose natural variety. Oil separation can make the filling too soft to support the upper cake layer.
Chocolate Frosting
- 1½ cups (340 g) unsalted butter, softened
- ¾ cup (64 g) unsweetened cocoa powder, sifted
- 4 cups (480 g) powdered sugar, sifted
- ½ cup (120 ml) heavy cream, plus a little more if necessary
- 2 teaspoons vanilla extract
- Pinch of fine salt
Chocolate Ganache
- 6 oz (170 g) semi-sweet chocolate, finely chopped
- ½ cup (120 ml) heavy cream
Decoration
- ½ cup roasted unsalted peanuts, roughly chopped
- 2 oz semi-sweet chocolate for curls or shavings
- Reserved chocolate frosting for swirls
Before You Start: Details That Matter
A layer cake can fail because of small details that seem unimportant on paper.
First, bring the eggs and milk close to room temperature. They combine more readily with the other cake ingredients. The heavy cream used for the filling is different: keep it very cold. A chilled bowl also helps it whip properly.
The cream cheese should be softened enough to beat smoothly, but it should not be warm or almost melted.
Measure the flour carefully. Packing too much flour into a measuring cup can produce a dry, heavy crumb. If you own a kitchen scale, use the gram measurements.
Your oven should also be fully preheated before the pans go inside. An instant-read digital thermometer on Amazon can be useful in a baking kitchen, although visual and texture cues remain important when judging cake doneness.
Finally, do not assemble warm cake. This is one of the most important rules in this recipe.
Step 1: Prepare the Cake Pans
Preheat the oven to 350°F (175°C).
Grease two 9-inch round pans. Place a circle of parchment paper across the bottom of each pan. Lightly grease the parchment.
This extra step makes releasing the delicate chocolate layers much easier.
Position an oven rack near the center. If possible, bake both pans on the same rack with a little space between them.
Step 2: Mix the Dry Ingredients
In a large bowl, whisk together:
- Flour
- Sugar
- Cocoa powder
- Baking powder
- Baking soda
- Salt
Break up any visible cocoa lumps.
Sifting the cocoa is worth the extra minute if it is particularly lumpy. Small dry cocoa pockets can remain in a wet batter.
Step 3: Add the Wet Ingredients
Add the eggs, whole milk, vegetable oil, and vanilla.
Mix on low speed first, then mix just until the batter looks uniform. Scrape the bottom and sides of the bowl with a flexible spatula.
Do not spend several minutes beating the batter.
Now slowly pour in the hot coffee while mixing at low speed.
The mixture will become noticeably thin.
That is expected.
Do not add extra flour because the batter appears loose. The high liquid content contributes to the moist texture of the finished chocolate layers.
Coffee gives cocoa a deeper roasted character. If you prefer not to use it, substitute the same amount of hot water.
Step 4: Bake the Chocolate Layers
Divide the batter evenly between the prepared pans.
For the most even layers, weigh the filled pans or weigh the batter before dividing it.
Bake for 28–32 minutes.
Start checking at about 27 minutes because ovens and pans behave differently.
The cakes are ready when:
- The center springs back gently when touched.
- The surface looks set rather than wet.
- The edges begin to pull very slightly from the pan.
- A toothpick inserted near the center comes out with a few moist crumbs but no liquid batter.
Avoid baking several extra minutes simply to get a completely dry toothpick. Overbaking is one of the fastest ways to lose the soft crumb we want.
Let the cakes rest in their pans for 10 minutes.
Run a thin knife around the edges if needed. Turn them onto wire racks, remove the parchment, and let them cool completely.
A wire cooling rack on Amazon gives air access underneath the layers and makes this stage easier.
Step 5: Make a Stable Peanut Butter Cream
This filling creates the thick pale center visible in every slice.
Beat the softened cream cheese and creamy peanut butter until completely smooth. Scrape the bowl several times.
Add the sifted powdered sugar and vanilla. Beat until combined.
In a separate cold bowl, pour in the cold heavy whipping cream.
Whip until it forms stiff peaks. Stop once the cream can hold a defined peak. Do not continue until it becomes grainy.
Fold about one-third of the whipped cream into the peanut butter mixture to lighten it.
Then gently fold in the remaining whipped cream.
Do not aggressively beat the final mixture. Folding keeps more air in the filling and gives it the thick yet fluffy texture seen in the finished slice.
If the filling feels unusually soft, refrigerate it for 15–20 minutes before assembly.
Step 6: Make the Chocolate Frosting
Beat the softened butter for 2–3 minutes until creamy.
Add the sifted cocoa powder.
Gradually add the powdered sugar, mixing at low speed so it does not fly out of the bowl.
Add the vanilla, salt, and most of the heavy cream.
Beat until smooth.
Add the remaining cream a tablespoon at a time if the frosting is too stiff.
The final frosting should spread easily but still hold a piped swirl. If it slides from a spatula like a sauce, it is too loose.
Reserve some frosting for decorating the top.
Step 7: Build the Peanut Butter Center
Place the first cake layer on a serving plate or cake board.
If it has a large dome, level it carefully with a serrated knife. Do not remove more cake than necessary.
Here is one small detail that makes assembly far more reliable: pipe a ring of chocolate frosting around the outer edge of the bottom layer.
Think of it as a dam.
It helps keep the softer peanut butter cream in the center when the second layer is added.
Spoon the peanut butter filling inside this ring. Spread it into a generous, even layer.
Do not push the filling beyond the frosting border.
Set the second chocolate layer on top. Press very gently.
If the filling begins moving outward, stop and refrigerate the cake for 20–30 minutes before continuing.
Step 8: Frost the Cake
Apply a very thin layer of chocolate frosting over the entire cake first.
This catches loose crumbs.
Chill for about 15–20 minutes, then add the main coat of frosting.
For the homemade appearance shown in this style of cake, there is no need to polish every surface until perfectly flat. Gentle spatula marks give the sides character.
An offset icing spatula on Amazon is particularly useful for spreading frosting without dragging your fingers through it.
Step 9: Make Glossy Ganache
Place the finely chopped chocolate in a heatproof bowl.
Heat the cream until steaming and just beginning to simmer around the edges. Do not aggressively boil it.
Pour the hot cream over the chocolate.
Leave it untouched for 2 minutes.
Then stir slowly from the center outward until the mixture becomes dark, smooth, and glossy.
Now comes an often-missed detail: do not pour very hot ganache directly onto the buttercream.
Let it cool until slightly thickened but still fluid.
Test a small drip first. It should travel partway down the side rather than racing to the plate.
Spread a thin layer across the top and create only a few natural drips around the edge.
Step 10: Match the Finished Look
Pipe several chocolate frosting swirls around the top.
Scatter roughly chopped roasted peanuts between the swirls. Keep some pieces larger than others. That irregular shape gives the topping more texture.
Add curled or shaved semi-sweet chocolate.
The final cake should have:
- Dark chocolate sides
- A glossy ganache top
- Defined chocolate frosting swirls
- Visible roasted peanut pieces
- Irregular chocolate curls
- A thick peanut butter center when sliced
Avoid covering the whole top with peanuts. Chocolate should remain the main visual element.
The Secret to a Clean, Dramatic Slice
Do not cut the cake immediately after decorating it.
Refrigerate it for 1–2 hours first.
The cold helps the peanut butter filling become stable enough to hold its shape when sliced.
When ready, place a sharp knife in hot water. Dry it completely. Cut straight down through the cake.
Wipe the blade clean.
Warm and dry it again before making the next cut.
This little routine produces much cleaner chocolate and peanut butter layers.
For another useful dessert technique, see our guide to mastering caramelized sugar.
Common Mistakes to Avoid
The peanut butter filling is runny
The heavy cream may not have been cold enough, or the peanut butter may have contained too much separated oil.
Use regular creamy peanut butter and cold whipping cream. Chill a soft filling before assembling the cake.
The cake is dry
Too much flour or too much baking time can cause this.
Measure flour by weight when possible and begin checking the layers before the maximum baking time.
The filling squeezes out
This usually happens when the cake layers are warm, the filling is too soft, or too much pressure is placed on the upper layer.
Use the chocolate frosting dam and chill the cake when necessary.
The ganache melts the frosting
The ganache was probably applied while too hot.
Allow it to cool and thicken before adding it to the cake.
The layers slide
Chill the assembled cake before finishing the outside if your kitchen is warm. A cold cake is much easier to frost.
Storage and Make-Ahead Tips
Because the center contains cream cheese and whipped cream, treat this as a refrigerated cake.
Keep it covered in the refrigerator.
For the best texture, take a slice from the refrigerator and give it a little time to lose its refrigerator chill before eating. The chocolate cake and butter-based frosting will feel softer as they warm slightly.
You can also make the chocolate layers one day ahead. Cool them completely, wrap them well, and keep them protected until assembly.
The finished cake is best during the first few days, when the crumb remains moist and the peanut butter center tastes fresh.
Can You Freeze It?
The unfrosted chocolate layers freeze very well.
Wrap each completely cooled layer tightly, then place it in a freezer-safe container or bag.
You can also freeze individual slices of the finished cake. The decoration may not look quite as fresh after thawing, so freezing separate cake layers is the better choice when appearance matters.
Flavor Variations
Once you have made the original version, small changes can give it a different personality.
Try:
- Dark chocolate instead of semi-sweet chocolate in the ganache.
- A small amount of espresso powder in the cake.
- Salted roasted peanuts for stronger sweet-salty contrast.
- Mini chocolate curls instead of large curls.
- A thin scattering of finely chopped peanuts around the lower edge.
Keep the main structure unchanged if you want the same tall chocolate-and-peanut-butter cross-section.
Print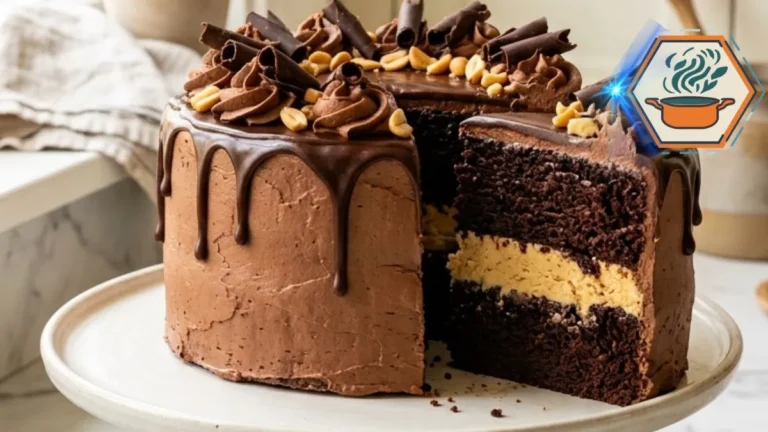
Chocolate Peanut Butter Cream Layer Cake
A tall two-layer chocolate cake with a moist cocoa crumb, thick and fluffy peanut butter cream filling, silky chocolate frosting, glossy ganache, roasted peanuts, and chocolate curls. Chilling before slicing helps create the clean chocolate-and-peanut-butter layers.
- Total Time: 3 hours 45 minutes
- Yield: 14 slices
Ingredients
Chocolate Cake
- 1¾ cups (210 g) all-purpose flour
- 1¾ cups (350 g) granulated sugar
- ¾ cup (64 g) unsweetened cocoa powder
- 1½ teaspoons baking powder
- 1½ teaspoons baking soda
- ½ teaspoon fine salt
- 2 large eggs, room temperature
- 1 cup (240 ml) whole milk, room temperature
- ½ cup (120 ml) neutral vegetable oil
- 2 teaspoons vanilla extract
- 1 cup (240 ml) hot coffee or hot water
Peanut Butter Cream Filling
- 8 oz (226 g) full-fat block cream cheese, softened
- ¾ cup (190 g) regular creamy peanut butter
- ¾ cup (90 g) powdered sugar, sifted
- 1 teaspoon vanilla extract
- 1 cup (240 ml) cold heavy whipping cream
Chocolate Frosting
- 1½ cups (340 g) unsalted butter, softened
- ¾ cup (64 g) unsweetened cocoa powder, sifted
- 4 cups (480 g) powdered sugar, sifted
- ½ cup (120 ml) heavy cream, plus more only if needed
- 2 teaspoons vanilla extract
- Pinch of fine salt
Chocolate Ganache
- 6 oz (170 g) semi-sweet chocolate, finely chopped
- ½ cup (120 ml) heavy cream
Decoration
- ½ cup (about 70 g) roasted unsalted peanuts, roughly chopped
- 2 oz (57 g) semi-sweet chocolate, shaved or curled
- Reserved chocolate frosting for piping
Instructions
- Prepare the pans. Preheat the oven to 350°F (175°C). Grease two 9-inch round cake pans. Line the bottoms with parchment paper and lightly grease the parchment.
- Combine the dry ingredients. Whisk flour, sugar, cocoa powder, baking powder, baking soda, and salt in a large bowl. Break up all cocoa lumps.
- Make the batter. Add eggs, milk, oil, and vanilla. Mix only until combined. Slowly pour in the hot coffee while mixing on low. The batter will be thin; this is normal.
- Bake. Divide the batter evenly between the pans. Bake for 28–32 minutes. Begin checking at 27–28 minutes. The cakes are ready when the centers spring back lightly and a toothpick comes out with a few moist crumbs rather than wet batter.
- Cool completely. Leave the cakes in their pans for 10 minutes. Turn them onto wire racks, remove the parchment, and cool completely before filling. Do not assemble warm layers.
- Prepare the peanut butter filling. Beat softened cream cheese and creamy peanut butter until smooth. Add powdered sugar and vanilla. In a separate chilled bowl, whip the cold heavy cream to stiff peaks. Fold one-third into the peanut butter mixture, then gently fold in the remainder. Chill for 15–20 minutes if the filling seems too soft.
- Make the chocolate frosting. Beat the butter until creamy. Mix in cocoa. Gradually add powdered sugar. Add vanilla, salt, and enough heavy cream to create a smooth frosting that spreads easily but still holds a piped swirl.
- Fill the cake. Place the first cooled layer on a cake plate. Pipe a ring of chocolate frosting around its outer edge to form a dam. Spread the peanut butter cream inside the dam. Add the second layer and press very gently.
- Crumb coat. Cover the cake with a thin coat of chocolate frosting. Refrigerate for 15–20 minutes.
- Finish frosting. Apply the remaining frosting over the top and sides. Leave subtle spatula marks for a natural homemade finish.
- Make the ganache. Place chopped chocolate in a bowl. Heat the cream until steaming. Pour it over the chocolate and leave for 2 minutes. Stir until glossy. Let the ganache cool until slightly thickened before adding it to the cake.
- Decorate. Spread ganache across the top and create a few controlled drips. Pipe chocolate frosting swirls around the top. Add chopped roasted peanuts and irregular chocolate curls.
- Chill before slicing. Refrigerate the completed cake for 1–2 hours. For clean slices, warm a sharp knife, dry it, cut straight down, and wipe the blade between cuts.
Notes
- Use regular creamy peanut butter, not very runny natural peanut butter.
- Full-fat block cream cheese gives the filling better structure.
- Heavy whipping cream must be cold before whipping.
- Cake layers must be completely cool before assembly.
- The chocolate frosting dam helps stop the peanut butter filling from squeezing out.
- Do not add extra flour because the chocolate batter looks thin.
- Do not pour hot ganache over the buttercream. Let it cool until it is fluid but no longer hot.
- If the assembled cake feels unstable, chill it before applying the final frosting.
- For the clean cross-section shown in the finished cake, chill for at least 1 hour before slicing.
- Contains peanuts, dairy, eggs, wheat, and potentially soy, depending on the chocolate and peanut butter brands used.
- Prep Time: 45 minutes
- Additional Time / Chill & Cooling Time:: 2 hours 30 minutes
- Cook Time: 30 minutes
- Category: Dessert
- Method: Baking
- Cuisine: American
Frequently Asked Questions
Can I use natural peanut butter?
A very runny natural peanut butter is not the best choice here. Its separated oil can loosen the filling. Regular creamy peanut butter gives more predictable results.
Can I replace the coffee with water?
Yes. Use the same quantity of hot water. Coffee adds depth to the cocoa flavor, but the cake still works without it.
Why is my chocolate cake batter so thin?
That is normal for this recipe. The hot liquid creates a loose batter. Do not try to correct it by adding extra flour.
Can I make the cake the day before?
Yes. In fact, making it ahead can make serving easier. Assemble and refrigerate it, then finish or refresh the decoration before serving if desired.
How do I stop the peanut butter filling from coming out the sides?
Cool the cake layers completely, use thick filling, and pipe a chocolate frosting border around the first layer before adding the peanut butter cream.
Why did my ganache run all the way down the cake?
It was probably too warm or too fluid. Allow it to cool until it moves slowly from a spoon. Test one drip before covering the top.
How do I get clean layers when slicing?
Chill the cake for 1–2 hours. Use a warm, sharp knife and clean the blade after every cut.
Final Baking Notes
This Chocolate Peanut Butter Cream Layer Cake does not depend on complicated pastry techniques. Its success comes from getting a series of small details right.
Let the chocolate layers cool completely. Keep the whipping cream cold. Choose thick creamy peanut butter. Build a frosting border around the filling. Chill the cake when it feels soft. Let the ganache cool before pouring it. Then chill the finished cake before making that first dramatic cut.
The reward is exactly what a chocolate and peanut butter layer cake should offer: a moist dark crumb, a generous creamy center, rich chocolate frosting, glossy ganache, crunchy roasted peanuts, and chocolate curls on top.
Most importantly, the inside should look every bit as tempting as the outside.