
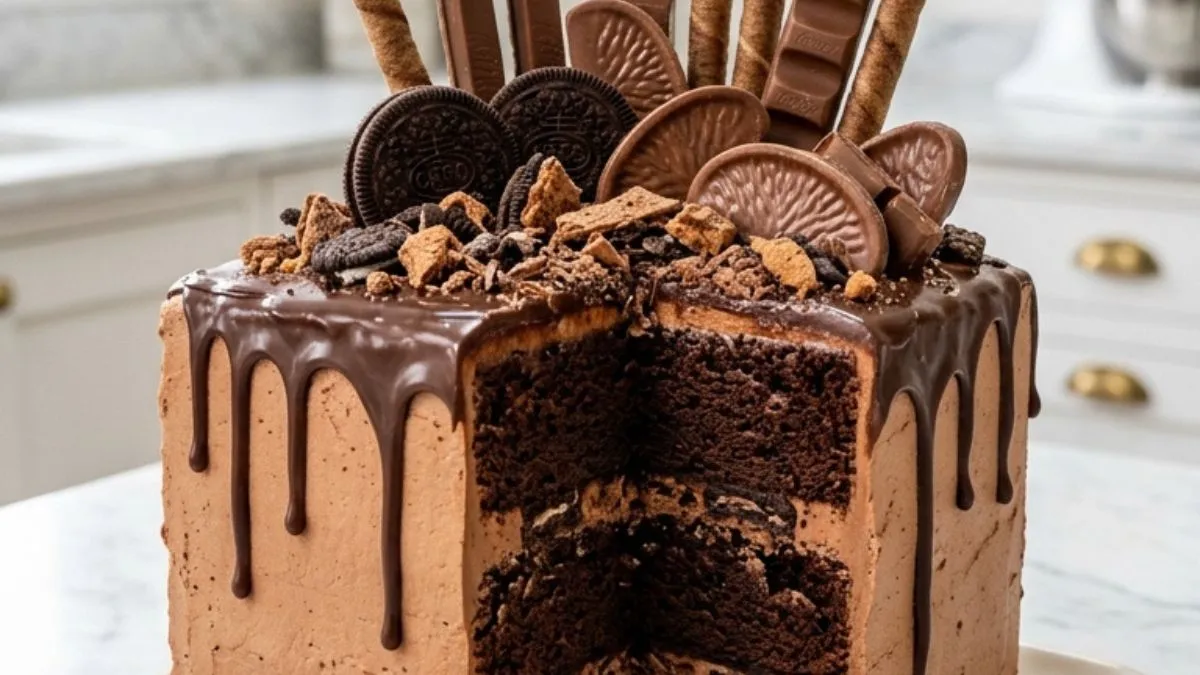
There is a moment at every celebration when conversation suddenly slows down. The cake has entered the room.
This Chocolate Orange Cookie Crunch Drip Cake was made for exactly that moment. It is tall, square, dark, glossy, and deliberately dramatic. Cut through it and you find moist chocolate cake, chocolate-orange buttercream, and crisp cookie crunch tucked between the layers.
Chocolate and fresh orange also work especially well because the citrus brings brightness to an otherwise intensely chocolate dessert. The goal here is not simply to pile candy onto a chocolate cake. Each part has a job. For more baking inspiration, visit RecipesMind.
The ganache deserves particular attention. Its chocolate-to-cream ratio changes how firmly it sets. A higher proportion of chocolate produces a thicker ganache, which is useful when controlled drips matter. King Arthur Baking explains this relationship in its chocolate ganache guide. That small detail can make the difference between attractive drips and chocolate running straight onto your cake board.
Affiliate disclosure: As an Amazon Associate I earn from qualifying purchases. This article may contain affiliate links to kitchen tools I find useful for preparing this recipe.
JUMP TO
Why This Chocolate Orange Cake Works
The first bite should not taste like one flat wall of chocolate.
Instead, you get several textures. The cake is tender and moist. Buttercream is soft and creamy. Cookie crumbs bring a noticeable crunch. Ganache adds a darker chocolate finish. Fresh orange zest cuts through all that richness.
Coffee is another important ingredient. The finished cake does not need to taste strongly of coffee. It supports the cocoa’s deeper roasted notes while adding liquid to the batter.
Most importantly, the recipe has been designed as a structural cake.
Tall cakes carrying cookies, chocolate bars, wafer fingers, and other decorations need support. Soft cake and warm frosting are a bad combination here. Chilling between stages is therefore part of the method, not wasted waiting time.
Ingredients You’ll Need
Chocolate Cake
- 2½ cups (300 g) all-purpose flour
- ¾ cup (65–75 g) unsweetened cocoa powder
- 2 cups (400 g) granulated sugar
- 2 teaspoons baking powder
- 1½ teaspoons baking soda
- ½ teaspoon fine salt
- 3 large eggs, at room temperature
- 1 cup (240 ml) buttermilk, at room temperature
- ½ cup (120 ml) neutral vegetable oil
- 2 teaspoons vanilla extract
- 1 tablespoon finely grated orange zest
- 1 cup (240 ml) freshly brewed hot coffee
Use Heavy-Gauge 8-Inch Square Cake Pan Set, preferably about 2 inches deep. The square shape is important because it creates the strong corners seen in the finished design.
If you make tall celebration cakes regularly, this is one place where better equipment genuinely matters. Heavy pans tend to give more predictable results than thin pans that heat aggressively.
Chocolate-Orange Buttercream
- 2 cups (454 g) unsalted butter, softened
- 6 cups (about 720 g) powdered sugar, sifted
- ¾ cup (about 65 g) unsweetened cocoa powder, sifted
- ½ cup (120 ml) heavy cream, added gradually
- 2 teaspoons vanilla
- 2 tablespoons fresh orange juice
- 2 teaspoons finely grated orange zest
- Pinch of salt
The butter should be soft enough to indent with a finger, but it should not look greasy or partially melted.
Chocolate Cookie Crunch
- 1½ cups crushed chocolate sandwich cookies
- ¾ cup crushed chocolate wafer cookies
- 4 tablespoons (57 g) unsalted butter, melted
- ½ cup mini semi-sweet chocolate chips
- Small pinch of fine salt
That final pinch of salt is worth adding. The original formula is extremely sweet once frosting, cookies, chocolate pieces, and ganache come together.
Dark Chocolate Ganache
- 10 oz (283 g) semi-sweet chocolate, finely chopped
- ¾ cup (180 ml) heavy cream
- 1 tablespoon (14 g) unsalted butter
Chocolate Topping
- 6–8 chocolate-orange style segments
- 5–6 chocolate sandwich cookies
- 4 chocolate-coated wafer fingers
- 5–6 irregular pieces of milk chocolate
- 3–4 chocolate wafer rolls
- ½ cup chocolate-cookie crumbs
- Fresh orange zest, optional
Use different heights. That is one of the secrets behind the dramatic top shown in the reference style.
The Equipment That Actually Helps
You do not need a kitchen full of specialist tools. A tall square drip cake does, however, become much easier with accurate equipment.
A digital kitchen scale is particularly useful. Flour packed into measuring cups can vary considerably. Weight measurements also let you divide batter evenly between three pans.
For someone who bakes frequently, a quality stand mixer is a more meaningful purchase than another collection of tiny cake gadgets. It handles large batches of buttercream far more comfortably.
You will also want parchment paper, cooling racks, a long offset spatula, scraper, serrated knife, piping bag, and sturdy cake board.
Bake the Chocolate-Orange Cake Layers
Preheat the oven to 350°F (175°C). Give the oven enough time to reach temperature before the cakes go inside.
Grease three 8-inch square pans lightly. Line their bottoms with parchment. Grease the parchment too.
In a large bowl, whisk flour, cocoa, sugar, baking powder, baking soda, and salt. Break up every visible cocoa lump.
In another bowl, whisk the eggs, buttermilk, oil, vanilla, and orange zest.
Pour the wet ingredients into the dry mixture. Mix only until mostly incorporated.
Now slowly add the hot coffee.
Do not panic when the batter becomes relatively thin. That is expected.
Divide it evenly among the three prepared pans. A scale makes this particularly easy.
Bake for 25–30 minutes, but begin checking around 24 minutes because ovens and pans differ.
The cakes are ready when the centers spring back lightly and a tester comes out with a few moist crumbs rather than raw batter.
Cool them in their pans for about 10–15 minutes. Carefully turn them onto racks and cool completely.
Never frost warm layers.
For the cleanest tall cake, wrap the cooled layers and chill them for 30–60 minutes before assembly. Cold cake is easier to trim and considerably less fragile.
Make a Cookie Crunch That Stays Crunchy
This step deserves more attention than simply crushing cookies and putting them inside frosting.
Heat the oven to 350°F.
Crush both types of cookies into coarse crumbs. Do not turn everything into powder. You need small pieces for texture.
Mix the crumbs with melted butter and a tiny pinch of salt.
Spread the mixture onto a parchment-lined baking sheet. Bake for approximately 7–8 minutes.
Allow it to cool completely.
Only then fold in the mini chocolate chips.
Why wait?
Adding chocolate chips while the crumbs are warm can partially melt them. More importantly, trapping warm crunch inside buttercream can soften the filling.
The baked crumb-and-butter mixture creates a much more distinct texture than loose cookie crumbs alone.
Make Silky Chocolate-Orange Buttercream
Beat softened butter for 3–4 minutes until lighter and creamy.
Add powdered sugar gradually. Start the mixer on low so your kitchen does not disappear under a sugar cloud.
Add sifted cocoa.
Mix in vanilla, orange juice, zest, salt, and about half the cream. Beat until smooth. Add more cream gradually until the buttercream spreads without becoming loose.
Taste it.
Orange flavor should be clearly present but should not overwhelm the chocolate.
For an even stronger aroma, rub the fresh zest into a spoonful of the sugar before adding it. This helps release the fragrant oils from the peel.
Avoid the bitter white pith beneath the orange skin.
Build the Cake Without Losing the Square Shape
Place the first chilled cake layer on a sturdy cake board.
If necessary, trim its top flat with a serrated knife.
Spread a layer of chocolate-orange buttercream across the cake. Pipe a slightly thicker buttercream border around the perimeter.
Scatter cookie crunch inside that border.
Do not take the crunch all the way to the edge.
That frosting dam helps prevent crumbs from breaking through the exterior finish.
Add the second cake layer and repeat. Place the final layer on top, ideally upside down so its flat bottom becomes the top of your cake.
Check the cake from every side.
It should be straight before you continue.
Apply a very thin crumb coat. Chill for 20–30 minutes, or until firm.
Then add the final buttercream layer.
Work on one side at a time with a scraper. Keep the corners distinct rather than rounding them heavily.
A rotating cake stand makes this stage far easier even with a square cake. For readers who bake layer cakes often, a stable metal model is more useful than a lightweight decorative stand.
Refrigerate the finished buttercream-coated cake for another 30–45 minutes.
This second chill is essential for the drip.
Get the Chocolate Drip Right
Place the finely chopped chocolate in a heat-safe bowl.
Heat the heavy cream until steaming and just beginning to simmer around the edges. Do not aggressively boil it.
Pour it over the chocolate.
Wait two minutes.
Then stir slowly from the center outward until glossy. Add the butter and stir until incorporated.
A classic ganache can be made from chocolate and cream, and increasing the chocolate proportion makes the finished mixture firmer. That principle is particularly helpful for drip cakes.
Now comes the part people often rush: let the ganache cool.
Never pour very hot ganache over cold buttercream.
Test one drip on the back of the cake first. If it races to the bottom, the ganache is too warm or thin. Wait several minutes and test again. If it barely moves, gently warm a small portion.
Once the test drip behaves correctly, create irregular drips around the perimeter. Then spread a thin layer of ganache over the top.
A fast-read thermometer can make repeated baking projects more predictable, particularly when you’re learning how your preferred chocolate behaves.
Create the Dramatic Chocolate Top
This is where the cake gets its recognizable personality.
Do not place every decoration at the same height.
Start with the tallest pieces toward the back and center. Insert wafer fingers, chocolate bars, and wafer rolls vertically or at slight angles.
Next add cookies and chocolate-orange segments.
Fill smaller spaces with broken chocolate pieces.
Finish with cookie crumbs and, if desired, tiny touches of fresh orange zest.
The final arrangement should look abundant without becoming shapeless.
One useful rule is tall at the back, medium through the center, short toward the front.
Keep some ganache visible. Otherwise all your careful drip work disappears beneath the candy.
For particularly heavy chocolate bars, do not rely on soft buttercream alone. Insert them only after the cake is thoroughly chilled, and avoid oversized pieces that could destabilize the top layer.
How to Get the Exposed-Slice Look
The reference presentation becomes especially striking once a corner portion is removed.
For a clean cut, chill the completed cake first.
Use a long, sharp knife. Warm the blade under hot water, wipe it completely dry, then cut straight down. Clean and warm the knife again between cuts.
Remove the slice carefully.
You should now see three dark cake layers separated by chocolate-orange filling and crunchy cookie centers.
That contrast between the polished exterior and exposed interior is part of what makes this cake such a strong celebration centerpiece.
Mistakes That Can Ruin the Cake
Your layers sink: Avoid opening the oven too early. Measure leaveners carefully and bake until the center is actually set.
The cake slides sideways: Your layers or buttercream were probably too warm. Chill during assembly.
Cookie crunch disappears into the frosting: Bake the crumb mixture and let it become completely cold before assembly.
Buttercream is too loose: Stop adding cream. Chill briefly if necessary.
The ganache runs onto the board: It is probably too warm. Always make one test drip first.
The ganache refuses to drip: It has cooled too far. Warm it gently rather than adding lots of cream immediately.
Corners look rounded: Apply buttercream slightly beyond each corner before pulling excess frosting away with your scraper.
Storage and Make-Ahead Instructions
You can bake the cake layers a day ahead. Cool completely, wrap them tightly, and refrigerate.
The cookie crunch can also be prepared ahead and kept airtight once completely cool.
The assembled cake is best protected in a cake box or covered container in the refrigerator. King Arthur also recommends refrigerating frosted chocolate cake leftovers and notes that chilling a layer cake can help the frosting set and make slicing easier.
Because this recipe contains dairy-rich frosting and ganache, don’t leave it sitting indefinitely at room temperature. FDA guidance recommends keeping refrigerators at 40°F (4°C) or below and refrigerating foods requiring refrigeration promptly; its general rule is no more than two hours at room temperature, or one hour when temperatures exceed 90°F/32°C.
For the nicest texture, remove the portion you plan to serve from the refrigerator shortly before eating rather than serving the buttercream rock-hard.
Frequently Asked Questions
Can I make this chocolate orange cake without coffee?
Yes. Replace the coffee with the same quantity of hot water. The cake will still work, although coffee contributes extra depth to the cocoa flavor.
Why is my chocolate drip running too far?
The ganache is probably too warm or the cake is not cold enough. Chill the frosted cake thoroughly and always perform one test drip before covering the visible sides.
Can I use round cake pans instead?
Yes, but the appearance will change considerably. The square profile and sharp vertical corners are central to this particular design.
Can I make the cake ahead of a party?
Yes. In fact, spreading the work across two days makes this recipe easier. Bake the layers and prepare the crunch first. Assemble and decorate later.
How do I keep cookie crunch crispy inside cake?
Bake the butter-coated crumbs briefly, cool them fully, and keep them away from the exterior edge. Assemble reasonably close to serving rather than leaving the crunchy filling in contact with moist frosting for several days.
Can I use Dutch-process cocoa?
It can work in chocolate cakes, but cocoa chemistry varies by recipe. King Arthur notes that both natural and Dutch-process cocoa work in its tested chocolate cake formula, with Dutch cocoa producing a darker, slightly less-sweet result. Because this recipe uses both baking soda and baking powder, the most predictable choice for the formula as written is natural unsweetened cocoa unless you have tested your preferred Dutch cocoa in it.
Print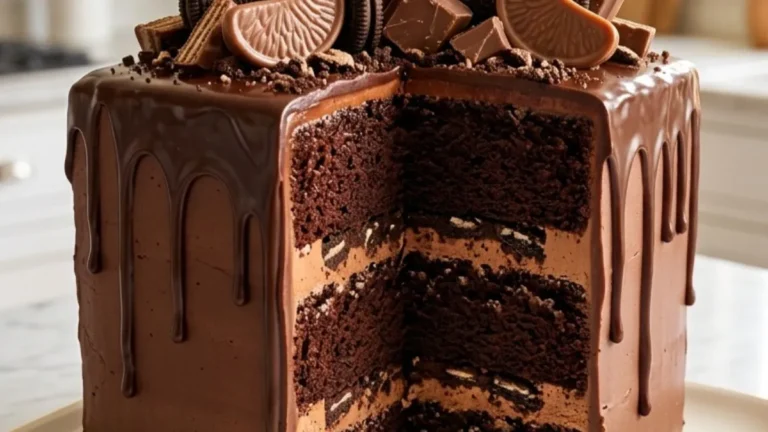
Chocolate Orange Cookie Crunch Drip Cake
A tall chocolate orange celebration cake with three moist cocoa layers, silky chocolate-orange buttercream, crisp chocolate cookie crunch, glossy dark chocolate ganache, and a dramatic chocolate topping.
- Total Time: 3 hours 45 minutes (includes cooling, assembly and chilling; don’t use the Tasty default of prep + cook here because that would hide essential cooling/chilling time)
- Yield: 16 generous slices
Ingredients
Chocolate Cake
- 2½ cups (300 g) all-purpose flour
- ¾ cup (70 g) unsweetened natural cocoa powder
- 2 cups (400 g) granulated sugar
- 2 teaspoons baking powder
- 1½ teaspoons baking soda
- ½ teaspoon fine salt
- 3 large eggs, room temperature
- 1 cup (240 ml) buttermilk, room temperature
- ½ cup (120 ml) vegetable oil
- 2 teaspoons vanilla extract
- 1 tablespoon finely grated orange zest
- 1 cup (240 ml) hot freshly brewed coffee
Chocolate Orange Buttercream
- 2 cups (454 g) unsalted butter, softened
- 6 cups (720 g) powdered sugar, sifted
- ¾ cup (70 g) unsweetened cocoa powder, sifted
- Up to ½ cup (120 ml) heavy cream
- 2 teaspoons vanilla extract
- 2 tablespoons fresh orange juice
- 2 teaspoons finely grated orange zest
- ¼ teaspoon fine salt
Chocolate Cookie Crunch
- 1½ cups crushed chocolate sandwich cookies
- ¾ cup crushed chocolate wafer cookies
- 4 tablespoons (57 g) unsalted butter, melted
- ½ cup mini semi-sweet chocolate chips
- Pinch of fine salt
Dark Chocolate Ganache
- 10 oz (283 g) semi-sweet chocolate, finely chopped
- ¾ cup (180 ml) heavy cream
- 1 tablespoon (14 g) unsalted butter
Chocolate Orange Finish
- 6–8 chocolate-orange style segments
- 5–6 chocolate sandwich cookies
- 4 chocolate-coated wafer fingers
- 5–6 irregular milk chocolate pieces
- 3–4 chocolate wafer rolls
- ½ cup chocolate-cookie crumbs
- Finely grated orange zest, optional
Instructions
- Preheat the oven to 350°F (175°C). Lightly grease three 8-inch square cake pans. Line the bottoms with parchment paper and grease the parchment.
- Whisk the flour, cocoa powder, sugar, baking powder, baking soda, and salt in a large bowl. Break up any cocoa lumps.
- In a second bowl, whisk the eggs, buttermilk, vegetable oil, vanilla, and orange zest.
- Add the wet mixture to the dry ingredients. Mix on low just until mostly combined. Slowly pour in the hot coffee. Continue mixing only until the batter is smooth. The batter should be fairly thin.
- Divide the batter equally among the three pans. Bake for 25–30 minutes. Begin checking at 24–25 minutes. A toothpick should come out with a few moist crumbs but no wet batter.
- Cool the cakes in their pans for 10–15 minutes. Turn them onto wire racks and cool completely. For easier assembly, wrap and chill the layers for about 30–60 minutes.
- Make the cookie crunch. Combine both crushed cookies, melted butter, and a pinch of salt. Spread on a parchment-lined baking sheet. Bake at 350°F for 7–8 minutes. Cool completely before stirring in the mini chocolate chips.
- Make the buttercream. Beat softened butter for 3–4 minutes until creamy. Gradually beat in the powdered sugar and cocoa powder on low speed.
- Add vanilla, orange juice, orange zest, salt, and approximately half of the heavy cream. Beat until smooth. Add additional cream 1 tablespoon at a time only as needed. The finished frosting should be creamy but firm enough to support a tall cake.
- Level the chilled cake layers if necessary. Place the first layer on a sturdy cake board. Spread with buttercream, then pipe a slightly raised buttercream dam around the perimeter.
- Add cookie crunch inside the buttercream dam. Keep the crunchy filling about ½ inch from the outer edge. Add the second cake layer and repeat. Finish with the third layer.
- Apply a thin crumb coat over the entire cake. Refrigerate for 20–30 minutes until firm.
- Apply the final buttercream coat. Use a bench scraper to create straight sides and defined square corners. Refrigerate again for 30–45 minutes.
- Make the ganache. Place finely chopped chocolate in a heatproof bowl. Heat the cream until steaming with tiny bubbles around the perimeter. Pour it over the chocolate and leave untouched for 2 minutes.
- Stir slowly until smooth and glossy. Stir in the butter. Allow the ganache to cool until thick but still pourable.
- Test one drip on the back of the cold cake. If it runs immediately to the board, wait for the ganache to cool further. If it barely moves, warm it very gently.
- Once the consistency is correct, create irregular drips around the cake. Spread a thin layer of ganache across the top.
- Arrange the tallest wafer fingers, chocolate bars, and wafer rolls toward the back and center. Add cookies and chocolate-orange segments at different heights. Fill smaller gaps with chocolate pieces and cookie crumbs.
- Chill until stable. For clean slices, warm a sharp knife under hot water, dry it thoroughly, make one cut, then clean and repeat.
Notes
- Do not frost warm cake. Even slightly warm layers can soften the buttercream and cause this tall cake to slide.
- Use room-temperature eggs and buttermilk for more even mixing.
- Hot coffee makes the batter thin. This is intentional.
- Do not pulverize all the cookies into dust. Coarse crumbs give the filling its crunch.
- Bake the cookie crunch before assembly and let it become completely cold.
- Keep cookie crunch away from the outer edges so crumbs do not break through the frosting.
- Add heavy toppings only to a thoroughly chilled cake.
- For the characteristic square appearance, use three 8-inch square pans rather than round pans.
- Chill the cake twice: after the crumb coat and after the final buttercream coat.
- Always perform a test drip before adding ganache to the visible sides.
- The exact ganache consistency depends partly on the chocolate used.
- Fresh orange zest provides stronger natural citrus aroma than orange juice alone.
- Avoid grating the bitter white pith beneath the orange peel.
- Store the finished cake covered in the refrigerator. For foods requiring refrigeration, FDA consumer guidance uses 40°F/4°C or below as the refrigerator benchmark.
- Prep Time: 1 hour 30 minutes
- Time: 1 hour 30 minutes
- Cook Time: 38 minutes
- Category: Dessert
- Method: Baking
- Cuisine: American
A Celebration Cake Worth the Extra Steps
The magic of this Chocolate Orange Cookie Crunch Drip Cake is not one secret ingredient.
It comes from contrast.
Dark, moist cake meets bright orange zest. Smooth buttercream meets crisp cookies. Soft cake meets firm chocolate pieces. Matte frosting meets glossy ganache.
And the dramatic appearance is built during the quieter stages: cooling the layers fully, keeping the crunch crisp, making a firm crumb coat, chilling twice, testing the ganache, and adding heavy decorations only after the cake is stable.
Take those steps seriously and the result is much more than a pile of chocolate.
It is the kind of cake people notice across the room—and the exposed first slice gives them an even better reason to come closer.