
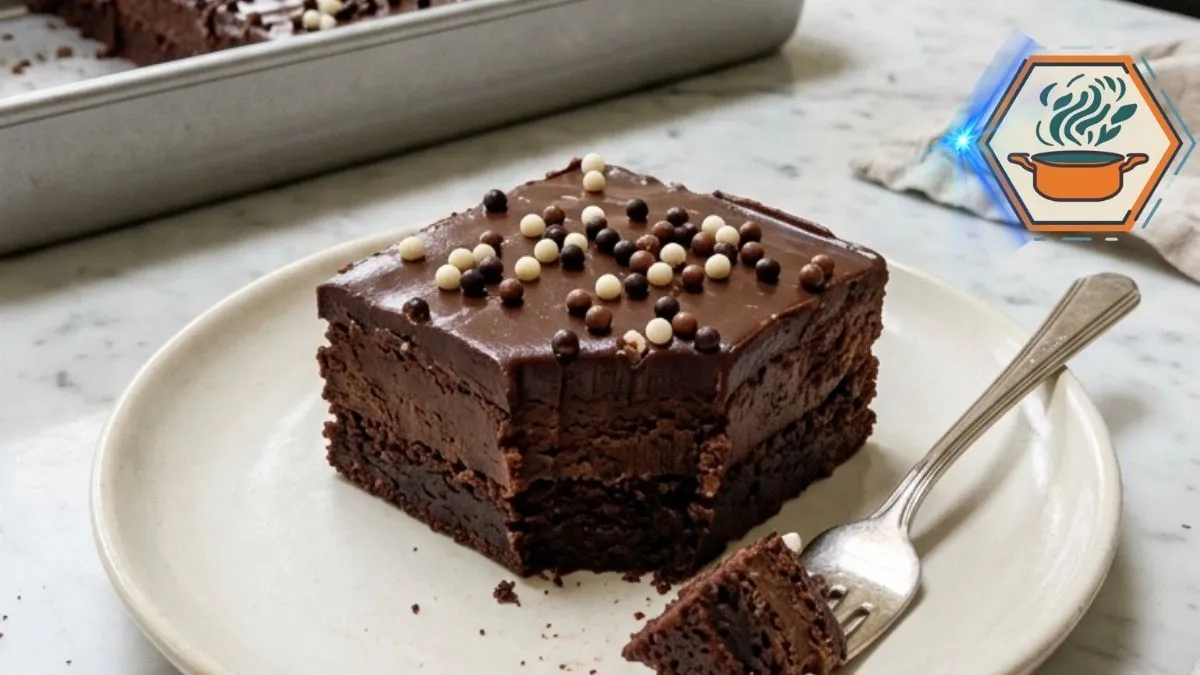
The first thing you notice about Chocolate Fudge Crunch Tray Bars is not just the chocolate. It is the contrast. A fork moves through a glossy chocolate top, catches a few crisp pearls, then sinks into a thick fudgy center and a dark, moist base. Each square looks generous enough to feel like a real dessert rather than a thin snack bar.
That contrast is also what makes this recipe worth making at home. Instead of relying on one chocolate layer, we build three distinct textures. A soft baked base supports a dense fudge filling. A smooth ganache-style coating covers the top. Chocolate pearls provide the final crunch. If you want to learn more about the basic science behind that glossy final layer, King Arthur Baking’s chocolate ganache guide explains how chocolate-to-cream ratios change ganache consistency.
There is one important detail before we begin. Do not taste the raw batter. Flour is a raw agricultural product, and raw flour or eggs may carry harmful bacteria. The FDA’s flour safety guidance recommends cooking foods made with flour and raw eggs rather than tasting uncooked batter.
This recipe also fixes a common problem with heavily topped chocolate bars. If the baked layer is too cakey, it cannot match the dense appearance of the finished dessert. If it is badly underbaked, however, the center may remain raw rather than pleasantly fudgy. The goal is a baked, moist base with a soft crumb, followed by a separate chocolate fudge layer.
Affiliate disclosure: As an Amazon Associate I earn from qualifying purchases. This article may contain affiliate links to kitchen tools I find useful for preparing this recipe.
JUMP TO
Why You’ll Love These Chocolate Tray Bars
Picture a tray of these bars sitting in the center of a kitchen table. From above, you see a dark chocolate surface dotted irregularly with tiny white, milk, and dark chocolate pearls. Cut into the tray and the layers become visible.
That is where this dessert earns its place at parties and family gatherings.
The recipe gives you:
- A rich chocolate base that stays moist
- A thick and creamy fudge center
- A smooth, glossy chocolate topping
- Crisp chocolate pearls for real texture
- Large bakery-style squares
- A 9×13-inch format that is easy to portion
- Make-ahead convenience because the finished bars need chilling
- Clean layers when the correct cooling order is followed
- Deep chocolate flavor without a complicated decorating technique
For the closest result to the pictured bars, do not skip the fudge layer or replace the pearls with regular chocolate chips. Chips add more chocolate, but they do not provide quite the same crisp finish.
Ingredients You’ll Need
Chocolate base
Use 1¾ cups (210 g) all-purpose flour, ¾ cup (64 g) unsweetened cocoa powder, 1½ teaspoons baking powder, ½ teaspoon fine salt, 1 cup (226 g) unsalted butter melted and cooled slightly, 1¾ cups (350 g) granulated sugar, 4 large eggs at room temperature, 2 teaspoons vanilla extract, ½ cup (120 ml) whole milk, and 6 ounces (170 g) semisweet chocolate, melted and cooled slightly.
Fudgy chocolate center
You will need 8 ounces (226 g) semisweet chocolate, finely chopped, ¾ cup (180 ml) heavy cream, 2 tablespoons (28 g) unsalted butter, ¼ cup (30 g) powdered sugar, and a small pinch of fine salt.
Glossy chocolate topping
Prepare 8 ounces (226 g) finely chopped semisweet chocolate, ¾ cup (180 ml) heavy cream, and 1 tablespoon (14 g) unsalted butter.
Crunchy finish
Have ¾ cup crisp chocolate pearls ready. A mixture of dark, milk, and white pearls gives the bars the closest visual match. You can also add 1 ounce (28 g) finely chopped chocolate between the pearls.
If you bake frequently, a sturdy 9×13-inch metal baking pan is useful far beyond this recipe. Affiliate disclosure: replace this link with your Amazon Associates link before publication.
The Small Details That Make This Recipe Work
A tray bar can look simple while being surprisingly sensitive to small changes.
First, use a metal 9×13-inch pan rather than a smaller pan. A different pan size changes the depth of the batter and therefore the baking time. Glass also transfers heat differently, so the timing may need adjustment.
Line the pan with parchment with enough paper extending over two opposite sides to create handles. King Arthur Baking likewise recommends a parchment sling for easier removal of brownies from a pan.
Second, use real semisweet baking chocolate for the fudge and ganache when possible. Chop it finely. Small pieces melt more readily when the hot cream reaches them.
Third, measure the flour carefully. Better still, weigh it. Too much flour can turn a dense chocolate bar into a dry, cakey one.
Finally, cooling is part of the recipe. The three layers cannot simply be piled together while warm. The baked base must cool before the fudge goes on. The fudge must firm before you add the ganache.
Those waiting periods create the defined layers you want.
How to Make Chocolate Fudge Crunch Tray Bars
Step 1: Prepare your kitchen. Place an oven rack near the center and preheat the oven to 350°F (175°C). Lightly grease a 9×13-inch metal pan. Line it with parchment, leaving an overhang on two sides, then lightly grease the parchment.
A reliable digital kitchen scale can make flour, cocoa, and chocolate measurements more consistent. Affiliate disclosure: replace this link with your Amazon Associates link before publication.
Step 2: Mix the dry ingredients. Whisk the flour, cocoa powder, baking powder, and salt in a medium bowl. Break up every visible cocoa lump.
Step 3: Build the wet mixture. Pour the melted butter into a large bowl. It should be warm, not scorching hot. Add the granulated sugar and whisk thoroughly until the mixture looks glossy.
Add the eggs one at a time, whisking after each addition. Stir in the vanilla and milk.
This gradual mixing helps create a smooth batter instead of leaving streaks of egg or chocolate.
Step 4: Add the melted chocolate. Check that your melted semisweet chocolate is still fluid but no longer very hot. Slowly stir it into the butter mixture until the color becomes even.
Step 5: Add the flour mixture. Fold the dry ingredients into the chocolate mixture with a flexible spatula.
Stop as soon as you no longer see dry pockets of flour. Aggressive mixing after the flour goes in can work against the dense, tender texture we want.
How to Get the Moist, Fudgy Base Right
Spread the batter into the prepared pan and push it gently into the corners. Smooth the surface so that the thickness is fairly even.
Bake for approximately 26 to 32 minutes.
Do not use the clock as your only test. Ovens vary. Pan color and material can also affect baking.
Start checking around 26 minutes. The edges should look set. The center should no longer look like liquid batter. Insert a toothpick into the center. You are looking for thick, moist crumbs, not wet batter.
A completely spotless toothpick can mean you have gone farther than needed for the dense texture.
King Arthur’s brownie guidance similarly describes brownies as ready when a tester has moist crumbs attached but no raw batter.
Place the pan on a cooling rack and let the base cool completely in the pan.
Do not spread the fudge onto a warm base. Heat can soften the filling and blur the two layers.
Making the Thick Fudge Center
This layer is what turns an ordinary chocolate tray bake into something far richer.
Put the finely chopped semisweet chocolate in a heatproof bowl.
Heat ¾ cup heavy cream in a small saucepan over medium-low heat. Watch closely. You want it steaming and hot, but there is no need to keep it at a hard boil.
Pour the hot cream evenly over the chocolate. Leave it untouched for about 2 minutes.
Then begin stirring from the center. Work slowly outward until the mixture becomes smooth.
Add 2 tablespoons butter, powdered sugar, and a pinch of salt. Stir until glossy.
If you regularly make ganache, a heatproof mixing bowl set is handy for melting and mixing chocolate. Affiliate disclosure: replace this link with your Amazon Associates link before publishing.
Let the fudge mixture cool until it thickens enough to spread without running.
Spread it across the fully cooled chocolate base. Take it all the way to the edges and smooth the surface.
Refrigerate for about 45 minutes, or until the layer feels firm enough to support the next coating.
How to Make the Glossy Chocolate Topping
Now comes the layer people see first.
Place the remaining 8 ounces of finely chopped semisweet chocolate in a clean heatproof bowl.
Heat ¾ cup heavy cream until steaming. Pour it over the chocolate and leave it for 2 minutes.
Add 1 tablespoon butter and stir gently until the mixture is smooth and glossy.
Ganache thickness is closely tied to the ratio of chocolate to cream. More chocolate generally produces a firmer mixture.
Let this topping stand briefly if it seems very fluid. You want it spreadable, but not so hot and thin that it melts the chilled fudge underneath.
Pour it over the center of the chilled fudge layer. Use an offset spatula to guide it toward the corners.
A small offset spatula makes it much easier to spread chocolate without dragging the layer beneath it. Affiliate disclosure: replace this link with your Amazon Associates link before publication.
How to Create the Crunchy Chocolate Finish
Do not wait until the ganache is completely firm.
While the surface is still soft and tacky, scatter the chocolate pearls across it.
Avoid making perfect rows. The irregular placement gives the finished tray its bakery-style appearance. Use a mixture of white, milk, and dark chocolate pearls if you want a finish close to the reference.
Add a little finely chopped chocolate between them if desired.
Press only the loose pearls very gently. They should stick to the surface rather than disappear into the ganache.
Then refrigerate the entire tray for at least 2 hours.
This final chill matters. It firms the fudge and ganache enough for thick, distinct slices.
How to Cut Clean, Thick Squares
Here is the moment when all that waiting pays off.
Lift the chilled slab from the pan with the parchment handles and place it on a cutting board.
Fill a tall container with hot water. Dip a long, sharp knife into the water, then dry it completely.
Make one straight cut.
Wipe the chocolate from the blade. Warm and dry it again before the next cut.
For the large appearance shown in the reference, divide the tray into roughly 15 to 18 bars rather than dozens of small pieces.
You should see a dark baked base, a thick chocolate center, and a smooth topping. The tiny pearls remain scattered across the surface.
For slightly softer eating, allow a refrigerated bar to stand at room temperature for around 10 to 15 minutes before serving.
Common Mistakes to Avoid
A dry base: The most likely cause is too much flour or too much oven time. Weighing flour and checking the tray early can help.
A raw center: Fudgy does not mean raw. The center needs to set. The FDA also advises against consuming uncooked batter containing raw flour.
Fudge sliding off the base: The base was probably still warm, or the fudge itself was too fluid.
Layers blending together: Chill the fudge before pouring on the final ganache.
Grainy ganache: Chop the chocolate finely and give the hot cream time to soften it before stirring.
Pearls sinking: Add them after the ganache has been spread, while the surface is tacky but not extremely hot.
Serving and Storage
These bars are rich, so they work especially well with unsweetened coffee, cold milk, or fresh berries.
Keep leftovers covered in the refrigerator. Because these bars contain cream-based chocolate layers, refrigeration is the practical storage choice. For their best texture, bring individual pieces out shortly before serving rather than leaving the whole tray at room temperature for a long period.
You can also prepare the baked base one day ahead. Cool it fully, cover it, and add the fudge and ganache the following day.
If chocolate baking is your favorite kind of weekend project, browse more ideas and practical kitchen guides on RecipesMind.
Chocolate Fudge Crunch Tray Bars FAQs
Can I make these bars without chocolate pearls?
Yes. The recipe will still work, but you will lose the distinctive crisp topping. Chopped toasted hazelnuts or crisp cereal pieces can give some crunch, although the finished appearance and flavor will change.
Why are my chocolate bars cakey instead of fudgy?
Too much flour, overmixing, or excessive baking can lead to a more cake-like texture. Measure carefully and stop baking once the center is set and a tester shows moist crumbs rather than liquid batter.
Can I use chocolate chips for the ganache?
You can, although the result may differ depending on the chips. King Arthur notes that chocolate chips can replace chopped chocolate in ganache, but flavor and texture can vary.
Should I refrigerate the bars before slicing?
Yes. Chill the finished tray for at least 2 hours. The fudge and ganache need time to firm so the knife can pass through distinct layers.
Can I make Chocolate Fudge Crunch Tray Bars ahead?
Yes. In fact, this is a good make-ahead dessert because the final chilling time is necessary. Prepare the tray the day before serving and keep it covered in the refrigerator.
How do I know when the chocolate base is baked?
Look at both the surface and the center. The edges should be set, and the middle should not contain liquid batter. A tester inserted into the center should pick up moist crumbs.
Print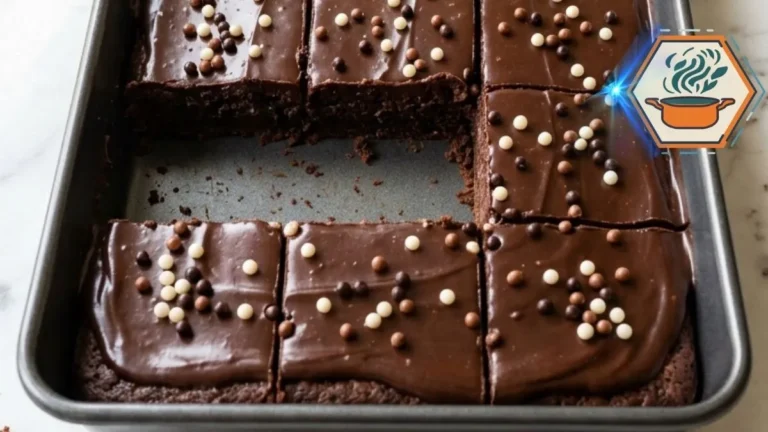
Chocolate Fudge Crunch Tray Bars
Rich Chocolate Fudge Crunch Tray Bars made with a moist chocolate base, a thick fudgy chocolate center, glossy ganache, and crisp chocolate pearls. These generous layered squares are chilled before slicing for clean layers and a dense, decadent texture.
- Total Time: About 4 hours 35 minutes
- Yield: 15–18 bars
Ingredients
Chocolate Bar Base
- 1¾ cups (210 g) all-purpose flour
- ¾ cup (64 g) unsweetened cocoa powder
- 1½ teaspoons baking powder
- ½ teaspoon fine salt
- 1 cup (226 g) unsalted butter, melted and slightly cooled
- 1¾ cups (350 g) granulated sugar
- 4 large eggs, preferably at room temperature
- 2 teaspoons vanilla extract
- ½ cup (120 ml) whole milk
- 6 oz (170 g) semisweet chocolate, melted and slightly cooled
Fudgy Chocolate Center
- 8 oz (226 g) semisweet chocolate, finely chopped
- ¾ cup (180 ml) heavy cream
- 2 tablespoons (28 g) unsalted butter
- ¼ cup (30 g) powdered sugar
- Pinch of fine salt
Chocolate Topping
- 8 oz (226 g) semisweet chocolate, finely chopped
- ¾ cup (180 ml) heavy cream
- 1 tablespoon (14 g) unsalted butter
Crunch Topping
- ¾ cup mixed white, milk, and dark crisp chocolate pearls
- 1 oz (28 g) finely chopped chocolate, optional
Instructions
- Prepare the pan. Preheat the oven to 350°F (175°C). Position a rack in the center. Lightly grease a 9×13-inch metal baking pan. Line it with parchment paper, leaving an overhang on two opposite sides.
- Combine the dry ingredients. In a medium bowl, whisk the flour, cocoa powder, baking powder, and salt until evenly combined. Break up any cocoa lumps.
- Mix butter and sugar. In a large bowl, whisk the melted, slightly cooled butter with the granulated sugar until glossy and evenly combined.
- Add the eggs. Whisk in the eggs one at a time. Mix well after each addition. Add the vanilla extract and whole milk.
- Add melted chocolate. Make sure the melted semisweet chocolate is fluid but not very hot. Stir it gradually into the wet mixture until smooth and evenly chocolate-colored.
- Finish the batter. Fold the dry mixture into the wet ingredients with a spatula. Stop as soon as no visible pockets of dry flour remain. Do not overmix.
- Bake. Spread the batter evenly in the prepared pan. Bake for about 26–32 minutes. Begin checking at 26 minutes. The edges should be set and the center should no longer look liquid. A toothpick inserted near the center should come out with thick, moist crumbs rather than raw batter.
- Cool completely. Set the pan on a wire rack. Leave the chocolate base in the pan until completely cool. Do not add the fudge while the base is warm.
- Prepare the fudge layer. Put 8 oz finely chopped semisweet chocolate in a heatproof bowl. Heat ¾ cup heavy cream until steaming. Pour it evenly over the chocolate and leave undisturbed for 2 minutes.
- Finish the fudge. Stir gently from the center outward until smooth. Add 2 tablespoons butter, powdered sugar, and salt. Stir until glossy. Allow it to cool and thicken until spreadable.
- Add the fudge layer. Spread the fudge evenly over the completely cooled chocolate base. Refrigerate for about 45 minutes, or until firm enough to support the topping.
- Make the chocolate topping. Place the remaining 8 oz chopped chocolate in a clean heatproof bowl. Heat ¾ cup heavy cream until steaming and pour it over the chocolate. Rest for 2 minutes. Add 1 tablespoon butter and stir gently until glossy.
- Cover the fudge. Let the ganache cool briefly if very fluid or hot. Spread it evenly over the chilled fudge layer.
- Add the crunch. Before the ganache fully sets, scatter the mixed chocolate pearls irregularly across the surface. Add the optional finely chopped chocolate. Press loose pearls very lightly so they adhere without sinking.
- Chill. Refrigerate the finished tray for at least 2 hours, until the fudge and ganache are firm enough to slice.
- Slice. Lift the slab out with the parchment. Warm a sharp knife in hot water and dry it completely. Cut into 15 large squares or up to 18 slightly smaller portions. Clean, warm, and dry the knife between cuts for cleaner layers.
Notes
- A 9×13-inch metal pan is recommended. Glass can change the baking behavior and timing.
- Weighing the flour and cocoa gives more consistent results.
- Do not overbake the base. You want baked batter with moist crumbs, not liquid batter and not a completely dry interior.
- Do not taste raw batter containing uncooked flour and eggs.
- The baked layer must be completely cool before adding the fudge.
- The fudge should be chilled before adding the final ganache. This keeps the layers visually distinct.
- Finely chopped chocolate melts more consistently under hot cream.
- Add the chocolate pearls while the ganache remains tacky so they adhere without disappearing into it.
- For the visual style of this recipe, use mixed white, milk, and dark crisp chocolate pearls rather than ordinary chocolate chips.
- Let refrigerated bars sit at room temperature for about 10–15 minutes before serving if you prefer a softer fudge texture.
- Actual baking time varies with the oven, pan material, and pan color.
- Prep Time: 35 minutes
- Chilling/Cooling Time: About 3 hours 30 minutes
- Cook Time: 26–32 minutes
- Category: Dessert
- Method: Baking
- Cuisine: American
The Final Bite
The best part of Chocolate Fudge Crunch Tray Bars is the change in texture from one layer to the next.
The first bite gives you the delicate snap of chocolate pearls. Then comes smooth ganache and a dense fudge center. Finally, the fork reaches the soft chocolate base underneath.
It looks impressive, but the method is manageable when you respect the cooling stages. Bake the base until set but moist. Cool it completely. Give the fudge time to firm. Add the ganache only after that layer is cold. Finish with the pearls while the chocolate is still tacky.
Those small details turn a basic chocolate tray bake into the thick, glossy, bakery-style squares this recipe is meant to deliver.