
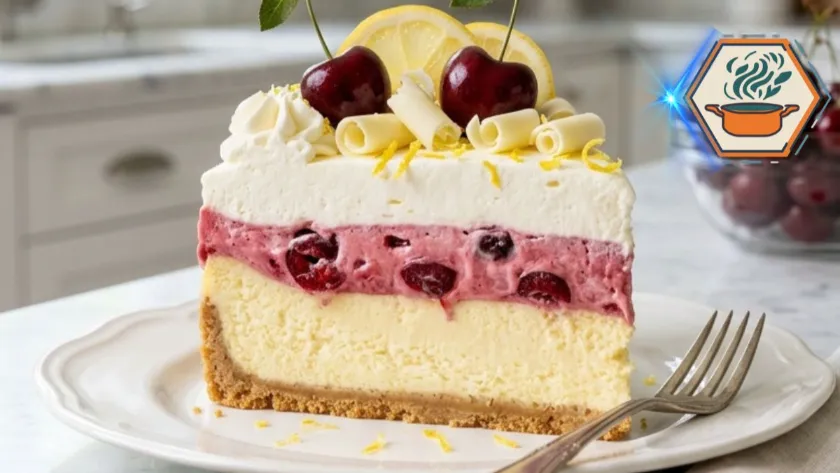
There are desserts that disappear from the table within minutes, and then there are desserts that people remember long after the last slice is gone. Cherry Lemon Dream Cheesecake Lush belongs to the second category. The first time I served this creamy layered dessert at a family gathering, everyone assumed it had come from a professional bakery. They were surprised to learn it was homemade, required no baking, and could be prepared the day before.
That is exactly what makes Cherry Lemon Dream Cheesecake Lush so special. It combines a buttery vanilla cookie crust, a silky lemon cheesecake filling, a rich cherry cream layer, and a cloud of fresh whipped cream. Every bite delivers the perfect balance of bright citrus, sweet cherries, creamy cheesecake, and a delicate crunch from the crust.
Unlike many no-bake desserts that can become overly sweet or soft after chilling, this version focuses on texture as much as flavor. Small preparation details make a huge difference, from choosing the right cookies for the crust to whipping the cream correctly. Those are the secrets that transform a simple recipe into a dessert worthy of any celebration.
Whether you’re preparing dessert for Easter, Mother’s Day, a birthday, a summer barbecue, or simply treating your family on the weekend, this recipe is designed to produce consistent, beautiful results every time.
If you enjoy creamy desserts with irresistible textures, you may also like our guide to Milk Bar Pie, another crowd-pleasing dessert that combines rich flavor with a crisp crust.
Print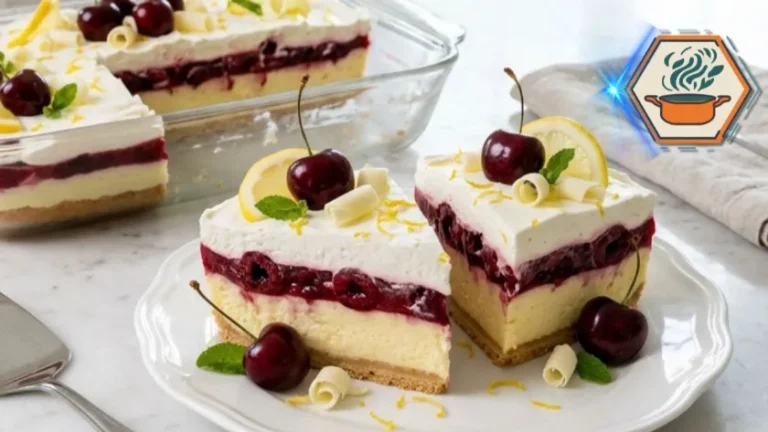
Cherry Lemon Dream Cheesecake Lush
This Cherry Lemon Dream Cheesecake Lush is an easy no-bake layered dessert featuring a buttery vanilla cookie crust, creamy lemon cheesecake filling, fluffy cherry cream, homemade whipped cream, fresh cherries, and white chocolate curls. Perfect for Easter, Mother’s Day, summer parties, holidays, birthdays, and family gatherings.
- Total Time: 6 hours 25 minutes
- Yield: 12 squares
Ingredients
Vanilla Cookie Crust
- 2½ cups (300 g) finely crushed vanilla cookies
- ½ cup (113 g) unsalted butter, melted
- 1 tablespoon granulated sugar
- ¼ teaspoon fine sea salt
- ½ teaspoon pure vanilla extract (optional)
Lemon Cheesecake Layer
- 8 oz (226 g) full-fat cream cheese, softened
- 1 cup (120 g) powdered sugar
- ½ cup (160 g) lemon curd
- 1 tablespoon fresh lemon zest
- 1 tablespoon fresh lemon juice
- 1 teaspoon vanilla extract
Cherry Cream Layer
- 1½ cups (315 g) cherry pie filling
- 1 cup (120 g) whipped topping
- ½ teaspoon almond extract (optional)
Homemade Whipped Cream
- 2 cups (480 ml) cold heavy whipping cream
- 2 tablespoons powdered sugar
- 1 teaspoon vanilla extract
- 1 tablespoon instant vanilla pudding mix (optional, for stability)
Garnish
- Fresh cherries
- Thin lemon slices
- White chocolate curls
- Fresh lemon zest
Instructions
Prepare the Crust
Crush the vanilla cookies into fine crumbs using a food processor.
Mix with melted butter, sugar, salt and vanilla until every crumb is coated.
Firmly press into a greased 9×13-inch baking dish using the bottom of a measuring cup.
Refrigerate for 20 minutes.
Prepare the Cheesecake Filling
Beat softened cream cheese for 3 minutes until completely smooth.
Gradually mix in powdered sugar.
Add lemon curd, lemon juice, lemon zest and vanilla.
Beat until thick and creamy.
Spread evenly over the chilled crust.
Return to the refrigerator for 15 minutes.
Prepare the Cherry Layer
Fold whipped topping into cherry pie filling using a rubber spatula.
Do not overmix.
Spread carefully over the cheesecake layer.
Prepare the Whipped Cream
Whip the cold heavy cream until soft peaks form.
Add powdered sugar, vanilla and optional pudding mix.
Continue whipping until medium-stiff peaks form.
Spread evenly over the cherry layer.
Decorate
Top with
- fresh cherries
- white chocolate curls
- lemon slices
- extra lemon zest
Chill
Cover loosely.
Refrigerate at least 6 hours.
For the cleanest slices, chill overnight.
Serve cold.
Notes
- Always use full-fat cream cheese.
- Room-temperature cream cheese prevents lumps.
- Chill overnight for the cleanest layers.
- Fresh lemon zest creates brighter flavor than bottled juice alone.
- Press the crust firmly to prevent crumbling.
- Do not overwhip the whipped cream.
- Wipe the knife clean between slices for bakery-quality presentation.
- Store covered in the refrigerator for up to 4 days.
- Not recommended for freezing because whipped cream may separate after thawing.
- Prep Time: 25 minutes
- Cook Time: 0 minutes
- Category: Dessert
- Method: No-bake
- Cuisine: American
- Diet: Vegetarian
JUMP TO
Why You’ll Love This Cherry Lemon Dream Cheesecake Lush
There are countless layered cheesecake desserts online, but very few offer the perfect balance between sweetness and freshness.
This recipe stands out because it delivers:
- Rich yet refreshing flavor
- Stable, clean layers
- Bakery-quality appearance
- No oven required
- Easy preparation
- Perfect make-ahead dessert
- Beautiful presentation for parties
- Beginner-friendly instructions
The fresh lemon cuts through the sweetness of the cherries while the cheesecake filling creates a smooth, luxurious center that feels light instead of heavy.
After several hours in the refrigerator, every layer firms beautifully, making each slice clean and visually impressive.
Ingredients You’ll Need
Using quality ingredients makes a noticeable difference. Every component contributes to the final texture.
For the Vanilla Cookie Crust
- 2½ cups crushed vanilla cookies (about 300 g)
- ½ cup unsalted butter, melted (113 g)
- 1 tablespoon granulated sugar
- ¼ teaspoon fine salt
- ½ teaspoon pure vanilla extract (optional)
Why Add Sugar and Salt?
Many recipes skip these ingredients, but professional bakers rarely do.
A small amount of sugar helps the crust caramelize slightly as it chills, while the salt balances the sweetness throughout the dessert.
Adding vanilla gives the crust a richer bakery aroma.
Which Cookies Work Best?
Several vanilla cookies produce excellent results.
Great choices include:
- Golden Oreos with the filling removed
- Vanilla wafers
- Graham crackers
- Butter cookies
- Shortbread cookies
Golden Oreos produce the richest crust, while vanilla wafers create a lighter texture similar to classic bakery cheesecakes.
The crumbs should resemble fine sand.
Large chunks make the crust fragile and difficult to slice neatly.
Lemon Cheesecake Filling
You’ll need:
- 8 ounces (226 g) full-fat cream cheese
- 1 cup powdered sugar (120 g)
- ½ cup lemon curd
- 1 tablespoon fresh lemon zest
- 1 teaspoon vanilla extract
- 1 tablespoon fresh lemon juice
Why Full-Fat Cream Cheese Matters
Reduced-fat cream cheese contains more moisture.
That extra water prevents the filling from setting firmly.
Full-fat cream cheese creates a smooth, creamy texture while maintaining stable layers after chilling.
Always allow the cream cheese to soften for about one hour before mixing.
Cold cream cheese creates tiny lumps that are difficult to remove.
Cherry Cream Layer
Ingredients:
- 1½ cups cherry pie filling
- 1 cup whipped topping
- ½ teaspoon almond extract (optional)
Almond extract pairs naturally with cherries.
Only a few drops add wonderful depth without overpowering the lemon flavor.
If you’re not a fan of almond flavor, simply leave it out.
Fresh Whipped Cream Layer
Instead of relying entirely on frozen whipped topping, homemade whipped cream gives the dessert a fresher taste and better texture.
You’ll need:
- 2 cups cold heavy whipping cream
- 2 tablespoons powdered sugar
- 1 teaspoon vanilla extract
For even better stability, add:
- 1 tablespoon instant vanilla pudding mix
Professional bakers often use this simple trick.
The pudding mix helps whipped cream stay fluffy for longer, especially during warm weather or outdoor gatherings.
Decoration
The decoration is simple but elegant.
Use:
- Fresh cherries
- Thin lemon slices
- White chocolate curls
- Extra lemon zest
Adding white chocolate curls gives the dessert the same upscale appearance found in bakery display cases.
Kitchen Equipment
No special equipment is necessary.
You’ll need:
- 9×13-inch baking dish
- Electric hand mixer or stand mixer
- Rubber spatula
- Large mixing bowls
- Offset spatula
- Measuring cups
- Digital kitchen scale
- Fine grater for lemon zest
A digital scale provides the most accurate measurements, especially for the cookie crust.
Step-by-Step Instructions
Step 1 – Prepare the Cookie Crust
Place the vanilla cookies into a food processor.
Pulse until they become very fine crumbs.
If you don’t own a processor, place the cookies inside a sealed zip-top bag and crush them with a rolling pin.
Transfer the crumbs into a large bowl.
Add:
- Melted butter
- Sugar
- Salt
- Vanilla extract
Mix thoroughly.
Every crumb should be lightly coated with butter.
When squeezed in your hand, the mixture should hold together without falling apart.
If the crumbs still feel dry, add one additional tablespoon of melted butter.
Step 2 – Press the Crust Correctly
Pour the crumb mixture into your baking dish.
Use the bottom of a measuring cup to press the crust firmly and evenly.
Do not simply flatten it with your hands.
Firm pressure creates a compact base that stays together after slicing.
Pay special attention to the corners.
Many crusts crack because the edges are not compressed enough.
Once finished, refrigerate the crust for at least 20 minutes.
This step allows the butter to solidify before adding the filling.
Skipping this stage often causes the crust to separate while serving.
Step 3 – Prepare the Cheesecake Layer
Place softened cream cheese into a large bowl.
Beat for about three minutes.
The texture should become completely smooth before adding any other ingredients.
Now gradually add powdered sugar.
Mix slowly at first.
Once incorporated, increase the mixer speed.
Next, add:
- Lemon curd
- Lemon zest
- Lemon juice
- Vanilla extract
Continue mixing for another minute.
Avoid overmixing.
Too much mixing incorporates excess air, making the filling softer than desired.
The finished mixture should look glossy, smooth, and thick enough to hold soft peaks.
Step 4 – Spread the Cheesecake Filling
Using an offset spatula, carefully spread the cheesecake mixture over the chilled crust.
Work slowly from the center outward.
Avoid dragging crumbs into the filling.
An offset spatula creates perfectly level layers with minimal effort.
If necessary, chill the dessert for another 15 minutes before adding the cherry layer.
This extra chilling time keeps the layers beautifully separated.
Step 5 – Make the Cherry Cream Layer
In a separate bowl, gently fold the cherry pie filling into the whipped topping.
Do not stir aggressively.
Folding keeps the mixture light and fluffy while preserving visible cherry pieces.
Those whole cherries create the beautiful cross-section that makes this dessert so eye-catching.
Spread the cherry mixture gently across the cheesecake layer.
Again, avoid pressing too firmly.
Light pressure keeps the layers distinct.
Expert Tips for Bakery-Style Results
Professional-looking desserts rarely happen by accident. Small details make all the difference.
For the brightest citrus flavor, zest the lemons before cutting them. The fragrant oils in the peel bring far more flavor than juice alone.
Choose heavy whipping cream with at least 36% milk fat. Lower-fat creams whip more slowly and lose volume faster.
Use fresh lemons whenever possible. Bottled lemon juice lacks the fresh aroma that makes this dessert taste vibrant.
If you’re serving this dessert at a party, prepare it the night before. An overnight chill allows every layer to firm up completely while giving the flavors time to blend together.
Finally, wipe your knife clean after every slice. A warm, clean knife produces neat bakery-style squares with perfectly defined layers, making every serving look just as beautiful as the first.