
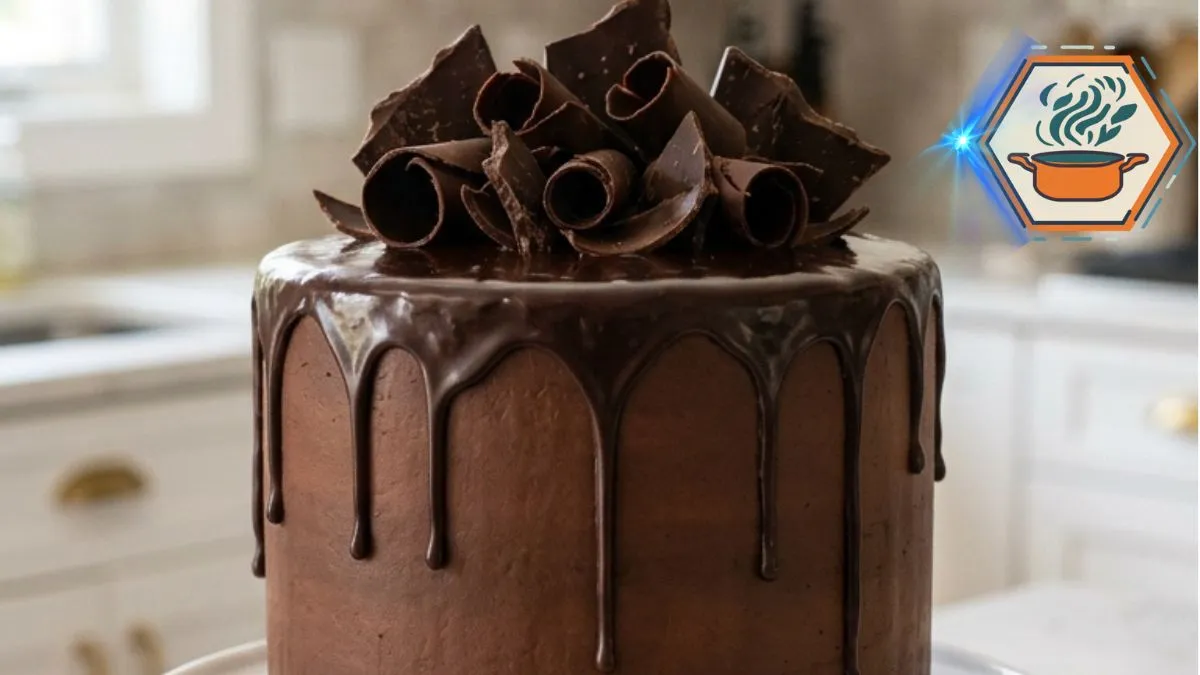
There is something special about cutting into a homemade Triple Chocolate Ganache Cake. From the outside, it looks beautifully simple. Then the first slice comes away and reveals three dark chocolate cake layers, two generous bands of creamy chocolate buttercream, and a glossy ganache coating. That first cut is the moment this cake was made for.
The secret is not an elaborate decoration. It is getting the small details right. Cocoa needs enough moisture. The cake layers need time to cool. The buttercream needs the right texture. Most importantly, the ganache must cool before it touches the cake. Even food safety matters during preparation: the FDA’s guidance on handling flour safely reminds home bakers that flour is a raw food and that uncooked batter should not be tasted.
This recipe walks through those details instead of assuming you already know them. The result is a tall, moist chocolate cake that looks like the one you would proudly place in the middle of a family table: dark layers, visible chocolate filling, a soft ganache finish, natural drips, and simple chocolate curls.
Affiliate disclosure: As an Amazon Associate I earn from qualifying purchases. This article may contain affiliate links to kitchen tools I find useful for preparing this recipe.
jump to
Why This Triple Chocolate Ganache Cake Works
The name comes from three distinct chocolate elements.
First comes the cocoa chocolate cake. Unsweetened cocoa powder gives the crumb a deep chocolate flavor without making the batter excessively heavy.
Next is the chocolate buttercream. It provides a softer, sweeter chocolate layer between the darker cake layers.
Finally, semisweet chocolate and heavy cream become a smooth chocolate ganache. It covers the top and creates those relaxed drips down the sides.
Coffee also plays an important role. Hot coffee intensifies the cocoa character, but the finished cake should not taste like a cup of coffee. If you avoid coffee, hot water can be substituted. The chocolate flavor will simply be slightly less intense.
For another dessert where finishing technique makes a major difference, see our guide to mastering caramelized sugar.
Ingredients You’ll Need
For three 8-inch chocolate cake layers
- 2 cups (about 250 g) all-purpose flour
- ¾ cup (about 65–75 g) unsweetened cocoa powder
- 1¾ cups (350 g) granulated sugar
- 2 teaspoons baking soda
- 1 teaspoon baking powder
- ½ teaspoon fine salt
- 2 large eggs, preferably at room temperature
- 1 cup (240 ml) buttermilk, room temperature
- ½ cup (120 ml) neutral vegetable oil
- 2 teaspoons vanilla extract
- 1 cup (240 ml) hot freshly brewed coffee
Do not substitute Dutch-process cocoa automatically. Natural and Dutch-process cocoa have different acidity, and that can matter when a recipe uses baking soda.
For the chocolate buttercream
- 1 cup (226 g) unsalted butter, softened
- 3½ cups (about 420 g) powdered sugar
- ½ cup (about 45 g) unsweetened cocoa powder
- ⅓ cup (80 ml) heavy cream, plus a little more if needed
- 1 teaspoon vanilla extract
- Pinch of fine salt
For the chocolate ganache
- 8 oz (227 g) semisweet chocolate, finely chopped
- ¾ cup (180 ml) heavy cream
For finishing
- 2 oz (57 g) plain dark chocolate
Equipment That Makes the Recipe Easier
Three matching 8-inch pans are particularly useful. Equal pan sizes help the layers bake at roughly the same rate.
Useful tools include:
- Three 8-inch round cake pans
- Parchment paper
- Large mixing bowls
- Whisk
- Electric hand mixer or stand mixer
- Rubber spatula
- Wire cooling racks
- Offset spatula
- Serrated knife
- Kitchen scale, if available
For readers building a baking kit, here are four practical Amazon searches.
Shop 8-inch round cake pans on Amazon
Shop offset cake spatulas on Amazon
Shop digital kitchen scales on Amazon
Shop wire cooling racks on Amazon
A scale is especially useful for dividing the batter evenly between three pans.
How to Make Moist Chocolate Cake Layers
Preheat the oven to 350°F (175°C). Position a rack near the center of the oven.
Grease three 8-inch round pans. Line each bottom with parchment paper, then lightly grease the parchment.
This extra step matters. A moist chocolate cake is more delicate than a dry sponge. Parchment reduces the chance of leaving part of your cake attached to the pan.
In a large bowl, whisk together the flour, cocoa powder, sugar, baking soda, baking powder, and salt. Break apart any visible lumps of cocoa.
In another bowl, whisk the eggs, buttermilk, vegetable oil, and vanilla.
Add the wet mixture to the dry ingredients. Mix only until they begin to combine.
Now slowly pour in the hot coffee while whisking gently.
Do not worry when the batter becomes quite thin. That is expected. Resist the temptation to add extra flour.
Divide the batter evenly among the three prepared pans.
Bake for approximately 24–29 minutes.
Start checking at 24 minutes because ovens and cake pans vary. A toothpick inserted near the center should emerge with a few moist crumbs rather than wet batter.
Avoid baking until the cake looks dry. Carryover heat continues working after the pans leave the oven.
Let the cakes sit in their pans for about 10–15 minutes. Carefully turn them onto wire racks, remove the parchment, and leave them until completely cool.
Never frost warm cake.
How to Keep the Chocolate Cake Moist
Oil is one reason this cake has such a soft texture. Unlike butter, vegetable oil remains fluid when cool.
Buttermilk contributes moisture and acidity. The combination also works with the leavening ingredients to create a tender crumb.
There are several other details worth remembering:
- Measure flour carefully. Too much flour can produce a dry cake.
- Do not aggressively mix after adding flour.
- Watch the cake closely near the end of baking.
- Cool the layers before frosting.
- Keep exposed cake covered once cooled.
If you frequently bake at home, our banana bread preparation guide covers more useful principles for maintaining moisture in baked goods.
And one safety note is worth repeating: don’t taste the uncooked cake batter. The FDA notes that processing grain into flour does not necessarily eliminate harmful bacteria; baking is an important safety step.
Make the Fluffy Chocolate Buttercream
The butter should be soft but not melted.
Beat it for 2–3 minutes until creamy.
Sift the powdered sugar and cocoa if either contains lumps. Add them gradually rather than dumping everything into the bowl at once.
Begin mixing on low speed.
Add the heavy cream, vanilla, and salt. Increase the mixer speed and beat until the buttercream becomes fluffy and smooth.
Check its consistency.
It should spread without tearing the cake but remain firm enough to support another cake layer.
If it feels too stiff, add heavy cream one teaspoon at a time.
If it becomes too soft, add a small amount of powdered sugar or chill it briefly.
Level and Stack the Three Layers
Once the cakes are completely cool, inspect their tops.
If they have large domes, use a long serrated knife to trim them gently. Do not remove more cake than necessary.
Place the first layer on your serving plate or cake board.
Spread an even layer of chocolate buttercream across it. Keep the filling level, particularly near the edges.
Place the second cake layer on top and repeat.
Add the third layer.
Check the cake from several angles. Correct any leaning now. It becomes harder after coating the exterior.
Spread a thin crumb coat over the top and sides.
A crumb coat traps loose crumbs and gives the final chocolate finish a cleaner appearance. It does not need to look perfect.
Refrigerate the cake for about 20–30 minutes, or until the coating feels firm.
This cold surface is one of the most important details for creating controlled ganache drips.
How to Make Silky Chocolate Ganache
Finely chop the semisweet chocolate and place it in a heat-safe bowl.
Heat the heavy cream until steaming and just beginning to simmer around the edges. It does not need a vigorous boil.
Pour the hot cream over the chopped chocolate.
Leave it untouched for about 2–3 minutes.
Then stir slowly from the center outward until the mixture becomes dark, glossy, and smooth.
Now comes the step many short recipes miss:
Do not immediately pour hot ganache over your buttercream cake.
Hot ganache can soften the buttercream and run straight down the sides.
Let the ganache cool until it is thick but still pourable.
Test a small drip before covering the whole cake. Place a little ganache near the back edge of the chilled cake and watch it move.
If it races to the bottom, wait longer.
If it barely moves, the ganache has become too cool. Warm it very gently.
Once the consistency is right, spread ganache across the top with an offset spatula. Encourage only a few drips over the edge.
The goal is not a perfectly uniform drip pattern. Slight differences make this cake look homemade and inviting.
Create the Chocolate Curls and Shards
The decoration should stay simple.
Use the remaining dark chocolate to make irregular curls, rolls, or shards.
For curls, run a vegetable peeler carefully along the edge of a room-temperature chocolate bar.
For shards, spread melted chocolate thinly over parchment, let it set, and break it into irregular pieces.
Arrange several pieces near the top of the cake rather than covering the entire surface.
That keeps the visual focus on the chocolate itself.
For another dessert that depends heavily on chocolate presentation, you may also enjoy our strawberry-filled chocolate cake guide.
The Most Common Mistakes to Avoid
Using warm cake layers: Buttercream melts against warm cake. Give the layers enough cooling time.
Overbaking: A few additional minutes can change a moist chocolate crumb into a dry one.
Adding extra flour because the batter looks thin: This batter is supposed to be fluid after the coffee is incorporated.
Pouring hot ganache over buttercream: Let both components reach the right condition first: cold cake, cooled ganache.
Making every ganache drip identical: Natural variation often looks more appetizing.
Skipping the crumb coat: Loose dark crumbs can easily mix into the exterior frosting.
Cutting immediately after assembly: Brief chilling makes a tall layered cake easier to slice cleanly.
How to Get Clean, Beautiful Slices
The dramatic interior is part of the appeal of this Triple Chocolate Ganache Cake.
Chill the finished cake long enough for the layers to become stable, but don’t serve it ice-cold if you want the softest texture.
Use a large sharp knife.
Dip the blade in hot water, then wipe it completely dry. Make one clean cut.
Wipe the blade between slices.
This simple method keeps chocolate buttercream from smearing across the exposed cake layers.
Storage and Make-Ahead Tips
The cake layers can be prepared ahead. Once completely cool, wrap them well so their surfaces do not dry out.
The buttercream can also be prepared before assembly. If chilled, allow it to soften and beat it again before spreading.
The finished cake should be kept covered, particularly because the ganache and buttercream contain cream.
For the best eating texture, allow a refrigerated slice to lose some of its chill before serving. Butter-based frosting becomes noticeably firmer in the refrigerator.
Do not leave ingredients containing eggs or other perishable foods sitting out unnecessarily during preparation. USDA guidance recommends refrigerating eggs and not keeping them out of refrigeration for more than two hours.
What to Serve With Chocolate Ganache Cake
This cake is already rich, so simple pairings work particularly well.
Try:
- Fresh strawberries
- Raspberries
- Unsweetened coffee
- Espresso
- Cold milk
- Lightly whipped cream
- A small scoop of vanilla ice cream
Fresh berries provide a welcome tart contrast against the chocolate and buttercream.
FAQs About Triple Chocolate Ganache Cake
What is chocolate ganache made from?
Classic chocolate ganache is primarily a mixture of chocolate and cream. The ratio changes depending on whether you want a thin glaze, drip coating, filling, or firmer frosting.
Why does this chocolate cake use coffee?
Coffee brings out the darker notes of cocoa. With the amount used here, it supports the chocolate flavor rather than turning the cake into a coffee-flavored dessert.
Can I replace coffee with water?
Yes. Use the same amount of hot water. The cake will still work, although its chocolate character may taste slightly less intense.
Why is my chocolate ganache too runny?
It may still be too warm. Let it cool and test it again. A cold cake also helps slow the ganache as it reaches the edge.
Why did my ganache become too thick?
It probably cooled too much. Warm it gently in very short intervals and stir between each one. Avoid overheating it.
Can I make this cake without three pans?
Yes, but don’t put all the batter into one standard 8-inch pan. Bake in batches if necessary. Keep the remaining batter ready while the first layers bake, and understand that results may differ slightly from baking all three layers together.
How do I stop a three-layer cake from leaning?
Use level cake layers and an even amount of filling. Stack each layer directly over the previous one. Chill the assembled cake before adding the ganache.
Should ganache go on a warm or cold cake?
For this design, use a chilled, buttercream-coated cake and ganache that has cooled until thick yet pourable. That combination gives you much better control over the drips.
Print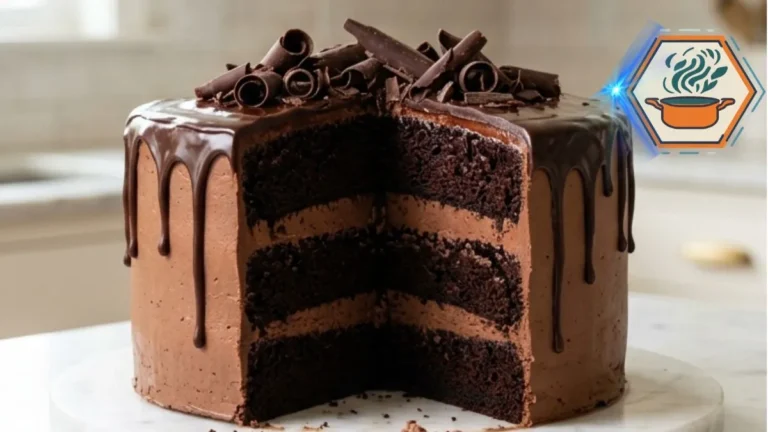
Triple Chocolate Ganache Cake
A rich three-layer chocolate cake with a moist cocoa crumb, fluffy chocolate buttercream, and silky semisweet chocolate ganache. Hot coffee deepens the cocoa flavor, while simple dark chocolate curls and shards give the finished cake an inviting homemade look.
- Total Time: About 2 hours 15 minutes
- Yield: 12 slices
Ingredients
For the Chocolate Cake
- 2 cups (250 g) all-purpose flour
- ¾ cup (65–75 g) unsweetened natural cocoa powder
- 1¾ cups (350 g) granulated sugar
- 2 teaspoons baking soda
- 1 teaspoon baking powder
- ½ teaspoon fine salt
- 2 large eggs, room temperature
- 1 cup (240 ml) buttermilk, room temperature
- ½ cup (120 ml) neutral vegetable oil
- 2 teaspoons vanilla extract
- 1 cup (240 ml) hot brewed coffee
For the Chocolate Buttercream
- 1 cup (226 g) unsalted butter, softened
- 3½ cups (420 g) powdered sugar
- ½ cup (about 45 g) unsweetened cocoa powder
- ⅓ cup (80 ml) heavy cream, plus more if needed
- 1 teaspoon vanilla extract
- 1 pinch fine salt
For the Chocolate Ganache
- 8 oz (227 g) semisweet chocolate, finely chopped
- ¾ cup (180 ml) heavy cream
For Decorating
- 2 oz (57 g) plain dark chocolate, for curls and shards
Instructions
1. Prepare the oven and pans.
Preheat the oven to 350°F (175°C). Grease three 8-inch round cake pans. Line the bottoms with parchment paper and lightly grease the parchment.
2. Combine the dry ingredients.
In a large bowl, whisk the flour, cocoa powder, granulated sugar, baking soda, baking powder, and salt. Break up any cocoa lumps.
3. Mix the wet ingredients.
In a separate bowl, whisk the eggs, buttermilk, vegetable oil, and vanilla until combined.
4. Make the batter.
Pour the wet mixture into the dry ingredients. Mix gently until mostly combined. Slowly add the hot coffee while whisking. The finished batter will be relatively thin. This is normal.
5. Divide the batter.
Divide evenly between the three pans. A kitchen scale gives the most even layers.
6. Bake.
Bake for 24–29 minutes. Begin checking at 24 minutes. A toothpick inserted into the center should come out without wet batter; a few moist crumbs are fine.
7. Cool completely.
Cool the cakes in their pans for 10–15 minutes. Turn them onto wire racks, remove the parchment, and cool completely before frosting.
8. Make the chocolate buttercream.
Beat the softened butter for 2–3 minutes until creamy. Gradually add the powdered sugar and cocoa on low speed. Add the heavy cream, vanilla, and salt. Beat until light and fluffy. If necessary, adjust with heavy cream one teaspoon at a time.
9. Level and fill the cake.
Trim large domes from the cooled cakes with a serrated knife if needed. Place the first layer on a cake board or serving plate. Spread with buttercream. Add the second layer, more buttercream, then the final cake layer.
10. Apply the crumb coat.
Cover the top and sides with a thin layer of chocolate buttercream. Refrigerate for 20–30 minutes, until firm and cold.
11. Prepare the ganache.
Place the finely chopped semisweet chocolate in a heat-safe bowl. Heat the cream until steaming and beginning to simmer around the edges. Pour it over the chocolate. Leave untouched for 2–3 minutes, then slowly stir until smooth.
12. Cool the ganache before pouring.
Let the ganache cool until thick but still pourable. Test one drip on the back of the chilled cake. If it runs immediately to the bottom, the ganache is still too warm.
13. Finish the cake.
Spread ganache across the top. Gently encourage a few irregular drips over the edge. Allow the ganache to settle.
14. Decorate.
Make curls from the dark chocolate with a vegetable peeler, or make thin chocolate shards. Arrange them loosely over the top.
15. Slice.
For cleaner slices, briefly chill the assembled cake. Use a sharp knife warmed with hot water and wiped completely dry before each cut.
Notes
- Do not add extra flour because the batter looks thin. The coffee intentionally creates a fluid chocolate batter.
- Use natural unsweetened cocoa powder unless you have tested the recipe with Dutch-process cocoa.
- Coffee intensifies the cocoa flavor. It should not make the finished cake strongly coffee-flavored.
- Hot water can replace the coffee in the same quantity.
- All cake layers must be completely cool before buttercream is added.
- The crumb-coated cake should be cold before the ganache goes on.
- Never pour piping-hot ganache over buttercream.
- Test one ganache drip before coating the entire cake.
- Avoid overbaking. Start checking at 24 minutes.
- For three layers of similar thickness, weigh the batter before dividing it between the pans.
- Prep Time: 45 minutes
- Additional Time: 60 minutes cooling/chilling
- Cook Time: 24–29 minutes
- Category: Dessert
- Method: Baking
- Cuisine: American
A Cake That’s About the Inside
A beautiful chocolate cake does not need complicated piping or a perfect bakery finish.
This one is memorable because of what appears after that first slice: three moist dark layers, creamy chocolate filling, and a smooth ganache shell.
Pay particular attention to temperature. Cool the cakes completely. Chill the crumb coat. Give the ganache time to thicken. Those quiet waiting periods make a major difference.
Then keep the decoration relaxed. Add a few chocolate curls and irregular shards and leave the rest alone.
The result is a Triple Chocolate Ganache Cake that looks homemade in the best possible way—and delivers the deep chocolate experience its appearance promises.