
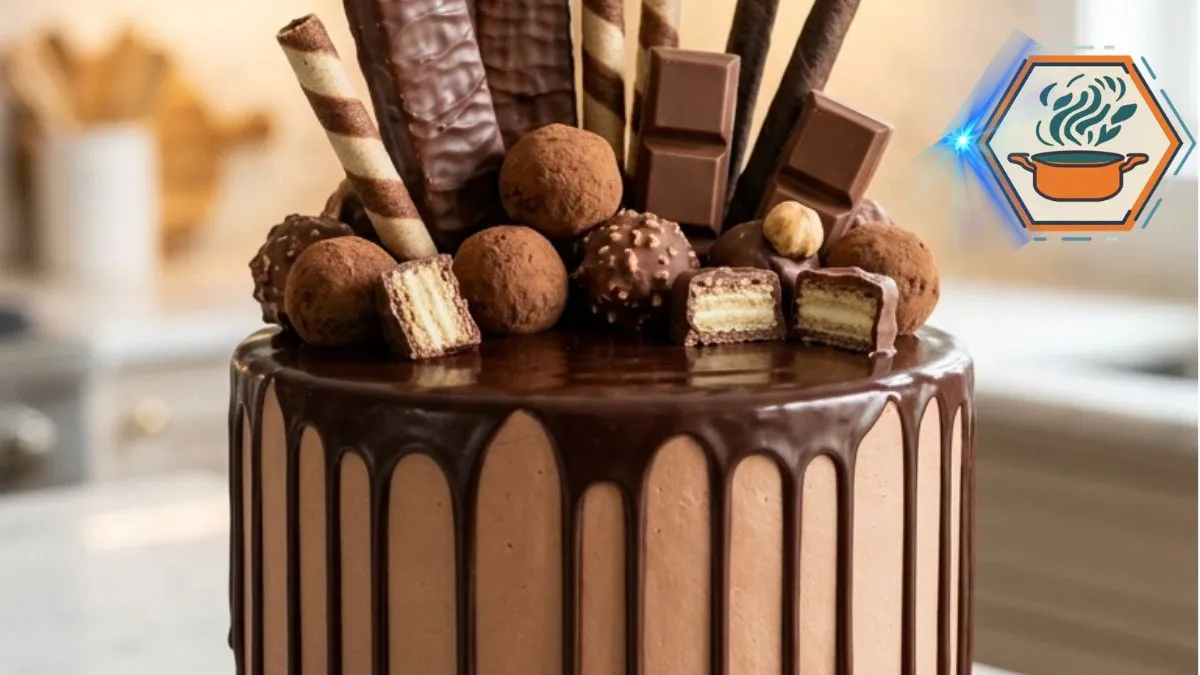
The first thing people notice about a Chocolate Cream Treasure Tower Cake is its height. Then come the dark chocolate drips. Look a little closer and the top reveals a small treasure chest of chocolate: wafer bars, cocoa truffles, striped bites, crisp rolls, and pieces of milk chocolate. It is the kind of cake that can become the center of the table before anyone has tasted a slice.
Yet a dramatic cake still needs to taste good. Under all those decorations, this version has three soft chocolate layers, milk-chocolate cream, and a silky semisweet ganache. Hot coffee gives the cocoa more depth without turning the cake into a coffee dessert. King Arthur Baking also notes that coffee can deepen chocolate flavor, while water gives a purer cocoa profile. You can read its guide to liquid in chocolate cake for more on the science behind that choice.
The ganache deserves just as much attention. Chocolate-to-cream ratios affect whether ganache pours, spreads, or sets firmly. Temperature changes its texture too. That matters here because we want slow, distinct drips rather than chocolate running all the way to the plate. King Arthur Baking’s ganache guide provides useful background on controlling consistency.
Affiliate disclosure: As an Amazon Associate I earn from qualifying purchases. This article may contain affiliate links to kitchen tools I find useful for preparing this recipe.v
jump to
Why This Chocolate Cream Treasure Tower Cake Works
A tall decorated cake can easily become style over substance. This recipe is built to avoid that.
The cake layers use oil rather than relying only on butter. Oil stays liquid when chilled, which helps the crumb remain soft after the assembled cake spends time in the refrigerator.
Buttermilk brings moisture and acidity. Cocoa gives the cake its deep chocolate base, while the hot coffee adds another layer of roasted flavor.
The frosting has a different character. Butter provides structure, while melted semisweet chocolate gives it body and a smoother chocolate finish.
Then there is the ganache.
The darker ganache creates contrast against the lighter milk-chocolate frosting. This is what gives the finished cake the dramatic appearance shown in our inspiration.
If you enjoy learning how small changes affect cakes, our guide to the difference between butter cakes is a useful next read.
Ingredients for Chocolate Cream Treasure Tower Cake
For the best consistency, weigh the main baking ingredients when possible.
For three 8-inch chocolate cake layers
- 2 1/2 cups (300 g) all-purpose flour
- 2 cups (400 g) granulated sugar
- 3/4 cup (64 g) unsweetened cocoa powder
- 2 teaspoons baking soda
- 1 teaspoon baking powder
- 1/2 teaspoon fine salt
- 3 large eggs, at room temperature
- 1 cup (240 ml) buttermilk, at room temperature
- 3/4 cup (180 ml) neutral vegetable oil
- 2 teaspoons vanilla extract
- 1 cup (240 ml) freshly brewed hot coffee
Use natural unsweetened cocoa unless your specific cocoa is known to work with this leavening combination. Do not substitute sweetened drinking chocolate.
For the chocolate cream frosting
- 1 1/2 cups (340 g) unsalted butter, softened
- 5 cups (600 g) powdered sugar, sifted
- 3/4 cup (about 130 g) semisweet chocolate, melted and cooled
- 1/3 cup (80 ml) heavy cream
- 2 teaspoons vanilla extract
- 1/4 teaspoon fine salt
Your butter should be soft enough to indent with a finger but should not look oily or partially melted.
For the ganache drip
- 10 oz (283 g) semisweet chocolate, finely chopped
- 3/4 cup (180 ml) heavy cream
Finely chopping the chocolate helps the hot cream melt it evenly.
For the treasure toppings
- Chocolate wafer cookies
- Vanilla wafer cookies
- Milk chocolate
- White chocolate
- 1 cup chocolate-hazelnut spread
- 1/2 cup finely crushed toasted hazelnuts
- Small cocoa truffles
- Chocolate wafer rolls
These decorations can be homemade rather than branded candy. That keeps the visual style while allowing you to control the sizes and arrangement.
Equipment You Will Need
Three matching 8-inch pans make the layers much easier to bake evenly.
A digital kitchen scale is also useful. You can weigh the finished batter and divide it into three equal portions instead of guessing.
Useful tools include:
- Three 8-inch round cake pans
- Parchment paper
- Digital kitchen scale
- Stand mixer or hand mixer
- Cooling racks
- Offset spatula
- Cake scraper
- Cake turntable
- Piping bag
- Small saucepan
- Heatproof bowl
For readers building their baking kit, a set of 8-inch round cake pans on Amazon is the most useful place to start.
A digital kitchen scale on Amazon also makes dividing batter and measuring chocolate much more accurate.
How to Make the Chocolate Cake Layers
Set an oven rack in the center position. Preheat the oven to 350°F (175°C) for at least 20 minutes.
Grease three 8-inch round pans. Place a parchment circle in the bottom of each pan, then lightly grease the parchment.
In a large bowl, whisk together the flour, sugar, cocoa powder, baking soda, baking powder, and salt. Break up every visible cocoa lump.
In another bowl, whisk the eggs, buttermilk, vegetable oil, and vanilla until smooth.
Pour the wet mixture into the dry ingredients.
Mix on low speed only until most of the flour disappears.
Now slowly add the hot coffee.
The batter will become quite thin. That is expected. Do not add extra flour to thicken it.
Scrape the bottom and sides of the bowl once, then mix briefly until uniform.
Divide the batter equally among the three pans. A scale gives the most even result.
Bake for approximately 25 to 30 minutes.
Do not judge a chocolate cake by color. Begin checking at 25 minutes. A toothpick inserted near the center should come out clean or with a few moist crumbs rather than wet batter. Proper doneness matters because overbaking can produce a dry cake while underbaking can leave a gummy center.
Cool the cakes in their pans for about 10 to 15 minutes. Carefully turn them onto cooling racks, remove the parchment, and let them cool completely.
Never frost warm layers.
How to Make the Milk-Chocolate Cream
Beat the softened butter for about 3 minutes until smooth and noticeably lighter.
Add the sifted powdered sugar gradually. Start the mixer on low speed so the sugar stays in the bowl.
Melt the semisweet chocolate gently. Let it cool until it is fluid but no longer warm enough to soften the butter.
Pour it into the frosting.
Add vanilla, salt, and most of the heavy cream. Beat for another 2 to 3 minutes.
If the frosting feels stiff, add the remaining cream one teaspoon at a time.
You want a frosting that forms soft ridges but still holds its position on a spatula.
How to Build a Straight, Tall Cake
If the cakes developed domes, trim them with a long serrated knife. Flat layers are much easier to stack.
Place the first layer on a cake board.
Spread about 3/4 to 1 cup frosting over it. Keep the filling level, especially around the edges.
Add the second layer and repeat.
Place the final layer upside down. Its flat bottom becomes the top of your cake.
Check the tower from eye level.
If it leans, correct it now rather than trying to hide the problem under frosting.
Apply a very thin crumb coat over the top and sides. This first coat traps loose chocolate crumbs.
Refrigerate for 20 to 30 minutes.
Add the final frosting layer. Smooth the sides with a cake scraper while slowly turning the cake.
A cake turntable and scraper set on Amazon can make this stage much easier, particularly when you want the tall, clean sides seen in the finished cake.
Chill the frosted cake again for at least 20 minutes.
How to Get Thick Chocolate Ganache Drips
This is one of the most important details in the whole recipe.
Place the finely chopped semisweet chocolate in a heatproof bowl.
Heat the cream until steaming and just beginning to show tiny bubbles around the edge. Do not aggressively boil it.
Pour it over the chocolate.
Wait 2 to 3 minutes.
Start stirring gently from the center and gradually move outward until the mixture becomes dark, glossy, and smooth.
Ganache becomes thicker as it cools. That is exactly what we need.
Do not immediately pour hot ganache over the cake.
Let it cool until it runs slowly from a spoon.
Test one drip on the back of the chilled cake. If it races to the bottom, the ganache is too warm or thin. Wait a few minutes and test again.
If it barely moves, gently warm it for a few seconds.
Once the test drip looks right, create separate drips around the edge. Then add enough ganache to cover the top.
For better control, a small offset spatula set on Amazon is handy for guiding ganache toward the rim without flooding the sides.
Make the Homemade Chocolate Treasure Toppings
Now comes the part that gives this cake its personality.
Cut wafer cookies into different lengths. Dip some completely in melted milk chocolate. Leave others partially coated.
For striped pieces, coat vanilla wafers with white chocolate. Once set, drizzle or pipe diagonal lines of milk chocolate across them.
Make small truffles by chilling the chocolate-hazelnut spread until firm enough to handle. Scoop small portions and roll them quickly into balls. Coat them with crushed toasted hazelnuts, cocoa, or fine chocolate crumbs.
Keep these pieces relatively small. Very heavy decorations can sink into soft frosting.
You can find more ideas for getting texture into homemade desserts in our guide to the secret to crunchy cookies.
How to Recreate the Treasure Tower Look
The arrangement should look abundant, but it should not be random.
Start with the tallest wafer bars toward the back of the cake.
Add medium-height chocolate rolls beside them. Place striped vanilla-and-chocolate pieces between the darker decorations to create contrast.
Then fill the lower area with truffles, shorter wafer pieces, and chocolate squares.
Keep the front section lower and cleaner.
This small decision is important. It lets people see the smooth frosting and long ganache drips rather than hiding the entire cake under candy.
Push only light wafer decorations slightly into the frosting.
Keep heavier truffles close to the surface. If a tall decoration feels unstable, do not force it deep into the cake.
Chilling the cake before decorating gives the frosting much more resistance.
Storage and Make-Ahead Tips
You do not have to complete the entire Chocolate Cream Treasure Tower Cake in one day.
The cake layers can be baked a day ahead. Once completely cool, wrap each layer well and keep it at cool room temperature overnight, or refrigerate it if your kitchen is warm.
The fully assembled cake should be refrigerated because of the cream-rich components.
For the best texture, take it from the refrigerator before serving and allow the butter-based frosting to soften somewhat at a cool room temperature. Avoid leaving a decorated cake for long periods in a hot room.
For clean slices, use a long sharp knife. Wipe the blade between cuts.
If you enjoy dramatic celebration desserts, you may also like our Mother’s Day cake ideas.
Common Mistakes to Avoid
Adding flour because the batter looks thin: The batter is supposed to be fluid after the coffee goes in.
Using warm cake layers: Warm cake melts buttercream and makes a tall stack unstable.
Pouring hot ganache onto buttercream: It can melt the frosting and produce uncontrolled drips.
Skipping the test drip: One test on the back can save the appearance of the whole cake.
Making every decoration the same height: Different heights create the overflowing treasure effect.
Overloading the front: Keep some negative space so the ganache remains visible.
Stacking domed cakes: Trim the layers first. A three-layer tower magnifies even a small lean.
Adding heavy decorations to soft frosting: Chill the cake before decorating and place heavier items close to the top surface.
Frequently Asked Questions
Can I make Chocolate Cream Treasure Tower Cake without coffee?
Yes. Replace the coffee with the same amount of hot water. The cake will still work. Coffee mainly adds depth to the cocoa flavor rather than making the finished cake taste strongly of coffee. King Arthur Baking specifically identifies both coffee and water as useful options in chocolate cakes.
Why is my chocolate cake batter so thin?
The cup of hot coffee adds substantial liquid. A thin batter is normal for this style of chocolate cake. Similar chocolate cakes also use fluid batters successfully, so resist the urge to compensate with extra flour.
How do I stop ganache from running down the entire cake?
Cool both components. The frosted cake should be chilled and the ganache should have cooled enough to flow slowly. Ganache thickens as its temperature falls.
Can I make the cake the day before?
Yes. In fact, separating baking and decorating into two days can make this tall cake easier to manage. Bake and cool the layers first. Assemble and decorate them the following day.
Why does my tower cake lean?
Uneven cake layers and uneven filling are the most common practical causes. Level each layer before assembly and spread the filling at a consistent thickness. Check the cake from eye level after adding every layer.
How can I make the cake look like the reference design?
Focus on four visual features: a tall cylindrical shape, smooth light-chocolate frosting, long dark ganache drips, and a dense vertical chocolate arrangement concentrated toward the back. Use different heights and textures rather than covering the whole top uniformly.
Print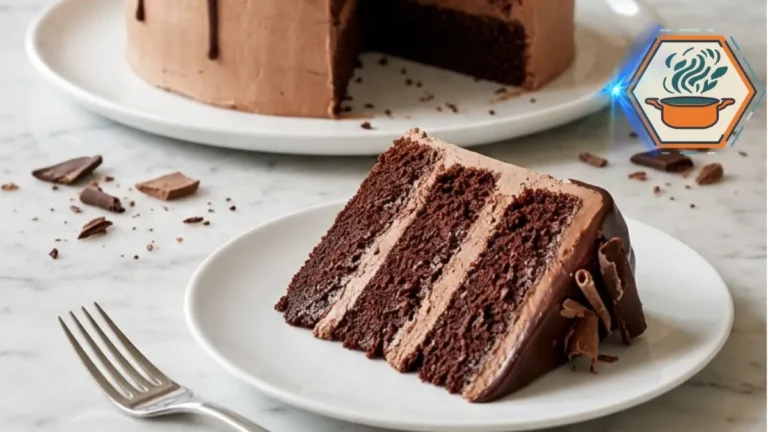
Chocolate Cream Treasure Tower Cake
A tall, moist chocolate layer cake filled and covered with creamy chocolate frosting, finished with glossy semisweet chocolate ganache drips and an overflowing arrangement of homemade chocolate wafers, striped vanilla-chocolate bites, cocoa truffles, chocolate rolls, and hazelnut treats.
- Total Time: 3 hours 30 minutes
- Yield: 1 tall 8-inch cake, about 16 slices
Ingredients
Chocolate Cake
- 2 1/2 cups (300 g) all-purpose flour
- 2 cups (400 g) granulated sugar
- 3/4 cup (64 g) unsweetened cocoa powder
- 2 teaspoons baking soda
- 1 teaspoon baking powder
- 1/2 teaspoon fine salt
- 3 large eggs, room temperature
- 1 cup (240 ml) buttermilk, room temperature
- 3/4 cup (180 ml) neutral vegetable oil
- 2 teaspoons vanilla extract
- 1 cup (240 ml) hot freshly brewed coffee
Chocolate Cream Frosting
- 1 1/2 cups (340 g) unsalted butter, softened
- 5 cups (600 g) powdered sugar, sifted
- 3/4 cup (130 g) semisweet chocolate, melted and cooled
- 1/3 cup (80 ml) heavy cream
- 2 teaspoons vanilla extract
- 1/4 teaspoon fine salt
Chocolate Ganache
- 10 oz (283 g) semisweet chocolate, finely chopped
- 3/4 cup (180 ml) heavy cream
Homemade Chocolate Decorations
To make this section reproducible, I recommend standardizing the original open-ended quantities:
- 8 chocolate wafer cookies
- 6 vanilla wafer cookies
- 6 oz (170 g) milk chocolate, divided
- 3 oz (85 g) white chocolate
- 1 cup (300 g) chocolate-hazelnut spread
- 1/2 cup (60 g) toasted hazelnuts, finely crushed
- 8 small cocoa truffles
- 6 chocolate wafer rolls
Instructions
- Prepare the oven and pans. Preheat the oven to 350°F (175°C). Grease three 8-inch round cake pans. Line the bottoms with parchment circles and lightly grease the parchment.
- Combine the dry ingredients. In a large mixing bowl, whisk together the flour, sugar, cocoa powder, baking soda, baking powder, and salt. Break apart any visible cocoa lumps.
- Add the wet ingredients. Add the eggs, buttermilk, oil, and vanilla. Mix on low speed until the flour is almost incorporated.
- Add the coffee. Slowly pour in the hot coffee while mixing on low. Scrape the bottom and sides of the bowl. Mix briefly until smooth. The batter will be thin; this is normal.
- Divide the batter. Weigh the batter, if possible, and divide it equally among the three prepared pans.
- Bake. Bake on the center rack for 25–30 minutes. Begin checking at 25 minutes. A toothpick inserted near the center should come out clean or with a few moist crumbs.
- Cool completely. Let the cakes cool in their pans for 10–15 minutes. Turn them onto wire racks, remove the parchment, and cool completely before frosting.
- Make the chocolate cream. Beat the softened butter for about 3 minutes until creamy and lighter in color. Gradually beat in the powdered sugar. Add the melted and cooled semisweet chocolate, vanilla, salt, and most of the heavy cream. Beat for another 2–3 minutes. Add additional cream a teaspoon at a time if needed.
- Level and fill. Trim any domed tops with a serrated knife. Place the first cake layer on a cake board and spread about 3/4 to 1 cup of frosting evenly over it. Repeat with the second layer. Add the third layer upside down for a flatter top.
- Crumb coat. Cover the entire cake with a thin layer of frosting. Refrigerate for 20–30 minutes.
- Apply the final frosting. Cover the chilled cake with the remaining chocolate cream. Smooth the top and sides with a cake scraper. Refrigerate for another 20–30 minutes.
- Prepare the ganache. Place the finely chopped semisweet chocolate in a heatproof bowl. Heat the cream until steaming with small bubbles appearing around the edge. Pour it over the chocolate and leave undisturbed for 2–3 minutes. Stir gently from the center outward until glossy and smooth.
- Cool and test the ganache. Allow the ganache to cool until it falls slowly from a spoon. Test one drip on the back of the chilled cake. If it runs rapidly to the bottom, allow the ganache to cool longer.
- Create the drip finish. Spoon controlled amounts around the upper edge to form drips of different lengths. Spread a thin layer of remaining ganache across the top.
- Prepare the decorations. Dip chocolate wafers in melted milk chocolate. Coat some vanilla wafers with white chocolate and add diagonal milk-chocolate stripes. Chill the chocolate-hazelnut spread until firm enough to shape, roll portions into small balls, and coat with toasted hazelnuts or cocoa.
- Decorate the tower. Position the tallest wafer bars and chocolate rolls toward the back. Add medium-height striped wafers and chocolate pieces. Place truffles and shorter pieces near the surface. Keep the front lower so the frosting and ganache drips remain clearly visible.
- Chill before slicing. Refrigerate the decorated cake for at least 30 minutes to firm the structure. Before serving, allow it to lose some of its refrigerator chill so the buttercream becomes creamier. Slice with a sharp knife, wiping the blade between cuts.
Notes
- Do not add extra flour because the batter looks thin. The fluid consistency is intentional.
- Use room-temperature eggs and buttermilk for more even mixing.
- The melted chocolate for the frosting should be cooled before it touches the buttercream.
- Never frost warm cake layers.
- Chill the crumb-coated cake before applying the final frosting.
- The cake should be cold before the ganache is added.
- Always perform one test drip on the back of the cake.
- If the ganache runs too quickly, let it cool longer.
- If it barely moves, warm it very gently.
- Keep heavy decorations close to the cake surface.
- Add tall, lightweight wafer pieces before heavier truffles.
- The toppings should be concentrated toward the back to reproduce the tall overflowing appearance while leaving the front ganache visible.
- Store the finished cake covered in the refrigerator
- Prep Time: 1 hour 30 minutes
- Additional/Chill Time: 1 hour 30 minutes
- Cook Time: 30 minutes
- Category: Dessert
- Method: Baking
- Cuisine: American
A Chocolate Cake Made for the Center of the Table
The charm of the Chocolate Cream Treasure Tower Cake comes from contrast. Soft cake meets creamy frosting. Smooth sides meet glossy ganache. Dark chocolate pieces sit beside pale striped wafers. Tall decorations rise from a cleaner foreground.
But its dramatic appearance does not require complicated pastry techniques.
Bake three even layers. Cool them fully. Build a straight tower. Chill the frosting before adding ganache. Test the first drip. Finally, arrange the chocolate decorations from tallest at the back to shortest at the front.
Those small details turn an ambitious-looking chocolate cake into a recipe that a home baker can approach one stage at a time.
And once the first clean slice comes out, the decoration is no longer the whole story. Inside are three moist chocolate layers separated by soft chocolate cream—the part everyone was waiting to discover.