
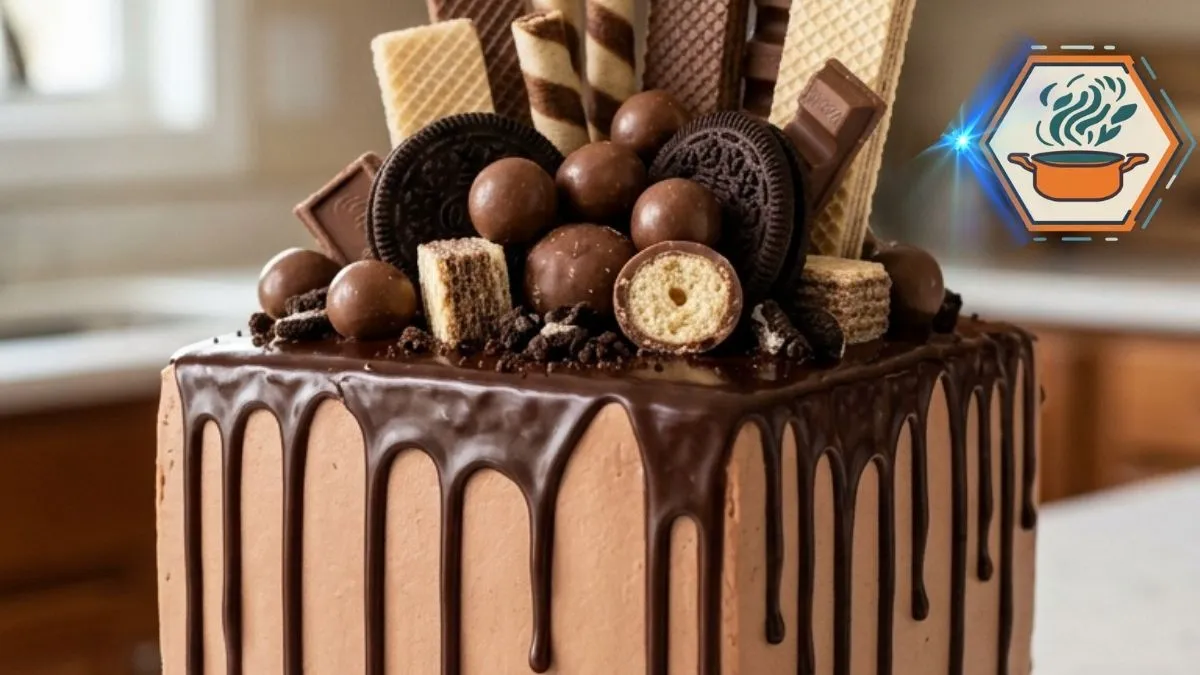
There is a moment when a celebration cake stops being dessert and becomes the centerpiece of the room. This Chocolate Crunch Tower Celebration Cake is designed for exactly that moment. Tall chocolate layers sit beneath smooth chocolate buttercream, glossy ganache drips, cookies, crisp wafers, chocolate balls, wafer rolls, and chunky pieces of chocolate. Before the first slice is served, everyone is already looking at the top and deciding which chocolate they want.
The dramatic appearance may suggest a professional bakery project, but the method is quite manageable when it is broken into stages. The most important part is not adding more decorations. It is building a cake strong enough to support them. Properly cooled layers, stable buttercream, correctly cooled ganache, and careful chilling make the difference. King Arthur Baking’s guidance for chocolate layer cakes also uses three 8-inch pans at 350°F and stresses cooling before frosting.
The ganache needs the same attention. Chocolate and cream can produce anything from a thin glaze to a thick filling depending on their ratio and temperature. King Arthur Baking’s ganache guide notes that increasing the proportion of chocolate produces a thicker ganache. For this cake, you want ganache that flows slowly rather than racing down the sides.
The result is a celebration cake with several textures in every slice: moist chocolate cake, creamy frosting, silky ganache, crisp cookie crumbs, and crunchy wafers.
Affiliate disclosure: As an Amazon Associate I earn from qualifying purchases. This article may contain affiliate links to kitchen tools I find useful for preparing this recipe.
JUMP TO
Why This Chocolate Crunch Cake Works
The beauty of this cake comes from contrast.
The cake itself is soft and deeply chocolatey. The buttercream is smooth and creamy. The filling introduces crisp pieces between the layers. Ganache gives the outside a glossy finish. Finally, the chocolate crown creates the height and irregular shape that makes the cake look abundant.
There is also an important structural detail. The original idea calls for plenty of crunchy filling, but simply piling large wafer pieces between soft cake layers can make a tall cake unstable.
For better results:
- Crush filling cookies and wafers into small pieces.
- Keep large wafers for the top.
- Spread buttercream before adding the crunch.
- Leave about ½ inch around the outer edge free of crumbs.
- Do not make the filling excessively thick.
- Chill the stacked cake before the final coating.
- Add the most delicate wafers shortly before serving.
These small changes make the finished cake much easier to slice.
Ingredients You’ll Need
This recipe makes one tall three-layer 8-inch cake, about 12 to 16 servings depending on slice size.
For the chocolate cake
- 2¼ cups (270 g) all-purpose flour
- ¾ cup (64 g) unsweetened cocoa powder
- 1¾ cups (350 g) granulated sugar
- 2 teaspoons baking powder
- 1½ teaspoons baking soda
- ½ teaspoon fine salt
- 3 large eggs, preferably at room temperature
- 1 cup (240 ml) whole milk, room temperature
- ½ cup (120 ml) neutral vegetable oil
- 2 teaspoons vanilla extract
- 1 cup (240 ml) hot brewed coffee or hot water
Coffee is optional in terms of coffee flavor. You can use hot water instead. Coffee, however, pairs particularly well with cocoa. Chocolate cake formulas from King Arthur Baking also use brewed coffee or water alongside cocoa.
For the chocolate buttercream
- 1½ cups (340 g) unsalted butter, softened
- 5 cups (600 g) powdered sugar, sifted if lumpy
- ¾ cup (64 g) unsweetened cocoa powder
- 2 teaspoons vanilla extract
- ¼ teaspoon fine salt
- 5–6 tablespoons heavy cream
That small amount of salt is worth adding even though it was missing from the original version. It keeps a large quantity of chocolate frosting from tasting flat or excessively sweet.
For the chocolate ganache
- 8 oz (225 g) semisweet chocolate, finely chopped
- ¾ cup (180 ml) heavy cream
Use real semisweet chocolate rather than a chocolate-flavored coating. Finely chopping it also helps the hot cream melt it evenly.
For the crunchy filling
- 1 cup crushed chocolate sandwich cookies
- ¾ cup chopped chocolate wafer pieces
- ½ cup chocolate-covered crispy bites
For the chocolate crown
Use a mixture rather than one type of candy:
- Chocolate wafer bars
- Vanilla wafer bars
- Striped wafer rolls
- Chocolate sandwich cookies
- Chocolate-covered malt-style balls
- Chocolate-covered crispy balls
- Broken chocolate pieces
- Extra cookie and wafer crumbs
The different heights are what create the tower effect seen in the finished cake.
Useful Cake Tools
You do not need professional pastry equipment, but a few tools make a tall cake much easier to assemble.
For three even layers, a set of 8-inch round cake pans on Amazon is useful. Using matching pans helps the layers bake at a similar rate.
A cake turntable on Amazon makes smoothing the tall sides much easier.
For the buttercream, a long offset cake spatula on Amazon gives better control than a regular table knife.
Finally, a wire cooling rack on Amazon allows air to circulate around the layers as they cool.
Affiliate note: Replace these Amazon search links with your approved Amazon Associates links before publication.
How to Make the Chocolate Cake Layers
Preheat the oven to 350°F (175°C). Place the oven rack near the center.
Grease three 8-inch round cake pans. Put a parchment-paper circle in the bottom of each pan, then lightly grease the parchment.
Do not skip the parchment. A tall celebration cake needs intact layers.
In a large bowl, whisk together the flour, cocoa powder, sugar, baking powder, baking soda, and salt. Break up every visible cocoa lump.
In another bowl, whisk the eggs, milk, oil, and vanilla.
Pour the wet mixture into the dry ingredients and mix only until mostly combined.
Now slowly add the hot coffee while whisking at low speed or stirring by hand.
The batter will look surprisingly thin. That is normal. Do not add extra flour to thicken it.
Divide the batter evenly among the three pans. A kitchen scale is particularly useful here. Equal quantities produce layers that finish baking at roughly the same time.
Bake for approximately 25–30 minutes.
Start checking at 24–25 minutes because ovens vary. The center should spring back gently, and a toothpick should come out clean or with a few moist crumbs rather than wet batter.
King Arthur’s tested three-layer 8-inch chocolate cake gives a similar baking range, around 24–26 minutes for its formula, which illustrates why checking before the 30-minute mark matters.
Let the cakes rest in their pans for about 10 minutes. Carefully turn them onto cooling racks and remove the parchment.
Cool completely.
Never frost warm cake.
The Small Step That Can Make the Cake Even More Moist
If you are baking the layers a day ahead or simply prefer an especially moist celebration cake, brush each cooled layer with a small amount of simple syrup.
Mix equal parts sugar and water, heat until the sugar dissolves, then cool completely.
You only need a light brushing. Do not soak the cake.
Simple syrup is optional, but it is a recognized technique for adding moisture to layer cakes. King Arthur Baking suggests about 2 tablespoons per layer in one of its layer-cake recipes.
For another cake where fruit brings moisture and flavor, see our strawberry filled chocolate cake.
Make a Stable Chocolate Buttercream
Beat the softened butter for about 3 minutes until creamy and lighter in texture.
Add powdered sugar gradually rather than dumping it in at once.
Add cocoa powder in several additions. Mix on low initially so cocoa does not fly across the kitchen.
Add vanilla and salt.
Then add heavy cream one tablespoon at a time.
Beat for another 2–3 minutes.
The final buttercream should hold a soft peak. It must spread easily without becoming runny.
If it is too stiff, add cream one teaspoon at a time.
If it becomes too soft, chill it for 10–15 minutes before assembling the cake.
This matters because the buttercream is not only decoration. It supports two cake layers plus a heavy chocolate crown.
Build the Crunch Filling Without Losing the Crunch
Here is one of the details that can make or break this recipe.
Do not pulverize every cookie and wafer into dust.
Aim for mixed textures. Some pieces should be crumb-sized. Others can be roughly ¼ inch.
Mix the crushed sandwich cookies, chopped wafers, and crispy chocolate bites shortly before assembling.
Avoid mixing them directly into buttercream far in advance. Moisture slowly softens wafers.
That crunch is supposed to contrast with the cake.
How to Stack the Cake Without a Collapse
Put a small dab of buttercream on the cake board or serving plate.
Place the first layer on top.
Spread roughly ¾ cup buttercream over it. Keep the surface level.
Scatter a light layer of crunch over the buttercream. Leave the outer ½-inch border clear.
Add the second cake layer.
Repeat.
Finish with the third cake layer, preferably placed upside down so its flat bottom becomes the top of the cake.
Look at the cake from every side. If it is leaning, correct it now.
Apply a thin crumb coat of buttercream over the entire cake. This traps loose crumbs beneath the final frosting.
Refrigerate for about 20–30 minutes, until the coating feels firm.
Then apply the remaining buttercream and smooth the sides.
For more practical cake ideas and baking guides, browse RecipesMind.
How to Get Those Glossy Chocolate Drips
Place the finely chopped semisweet chocolate in a heatproof bowl.
Heat the heavy cream until steaming and just beginning to simmer around the edges. It does not need a vigorous boil.
Pour it over the chocolate.
Leave it untouched for about 2–3 minutes.
Then stir gently from the center outward until smooth and glossy.
Now comes the step people often rush: wait.
Hot ganache can melt buttercream and run all the way to the bottom. Ganache that has cooled too much will barely drip.
Allow it to cool until slightly thickened but still pourable.
Test one drip on the back of the chilled cake. If it stops partway down the side, the consistency is right.
Create individual drips around the edge first. Then spread ganache across the center.
This gives much more control than pouring everything onto the cake at once.
Creating the Chocolate Crunch Tower
This is where the cake gets its signature appearance.
The goal is not symmetry.
Start with the tallest decorations near the center and slightly toward the back. Insert striped wafer rolls and tall wafer bars at different angles.
Next, add medium-height pieces.
Use:
- Vanilla wafer bars
- Chocolate wafer bars
- Sandwich cookies
- Broken chocolate bars
Then fill the lower spaces with round chocolate bites and smaller chunks.
Place a few pieces horizontally. Others should lean.
Finish by scattering crushed cookies and wafer crumbs over exposed ganache.
The cake should look abundant without looking mechanically arranged.
Most importantly, do not push every decoration deeply into the cake. The buttercream and ganache should hold lighter pieces. Excessive pressure can damage the top layer.
The Secret to Keeping the Wafers Crispy
Timing.
Wafers absorb moisture from frosting, ganache, and humid air. If you fully decorate the cake the night before serving, some of that crisp texture can disappear.
Bake and frost the cake ahead if necessary.
But whenever possible, add the wafer rolls, wafer bars, cookies, and crunchy pieces close to serving time.
This gives you the visual drama and the texture the recipe promises.
Make-Ahead and Storage Tips
You can bake the cake layers one day before assembly.
Once completely cool, wrap each layer tightly and keep it at room temperature overnight in a cool room, or freeze well wrapped for longer storage.
Buttercream can also be prepared ahead and refrigerated. Bring it back toward room temperature and beat it again before use.
Once assembled, refrigerate the cake because it contains cream-based ganache and because chilling helps such a tall cake remain firm.
For the best eating texture, take it out about 30–60 minutes before serving, depending on room temperature. The buttercream should soften slightly.
Keep leftovers covered in the refrigerator.
How to Cut a Tall Chocolate Crunch Cake
Remove tall decorations from the exact area you plan to cut.
Use a long, sharp knife.
Dip it in hot water, wipe it dry, and make the first cut. Clean the blade between slices.
For a cake this rich, narrow slices are usually enough.
Every serving should reveal the contrast that makes the cake special: dark cake, creamy chocolate filling, crunchy cookie-and-wafer pieces, and smooth frosting.
Common Mistakes to Avoid
Even an impressive cake becomes much easier when you know where problems usually begin.
- Decorating warm layers: Buttercream can melt and the layers may slide.
- Adding too much filling: A thick bed of loose crumbs makes layers unstable.
- Using hot ganache: It can melt the buttercream.
- Using cold, thick ganache: It will not form attractive drips.
- Skipping the crumb coat: Loose chocolate crumbs can appear in the final frosting.
- Overbaking: Check the cakes before the maximum baking time.
- Overmixing after adding flour: Mix only as much as necessary.
- Decorating with wafers too early: They gradually lose crispness.
- Making every decoration the same height: The crown loses its dramatic tower appearance.
- Tasting raw batter: Flour is a raw agricultural product, and raw flour and eggs can carry harmful bacteria. The FDA advises against eating raw batter.
Easy Variations
Once you understand the structure, you can change the flavor while keeping the recognizable tower design.
For a cookies-and-cream version, use more sandwich cookies and vanilla wafers.
For a dark chocolate version, use dark cocoa in the cake and bittersweet chocolate decorations.
For a birthday version, add chocolate-coated candies and a small amount of sprinkles between the chocolates.
You can also add a thin fruit layer, but avoid loose or watery fillings. A concentrated fruit component works better in a tall cake. Our guide to what strawberry puree is made of explains the basics of strawberry puree if you want to introduce a berry contrast.
Whatever variation you choose, keep the tall wafer-and-chocolate crown. That is the visual identity of this cake.
Frequently Asked Questions
Can I make Chocolate Crunch Tower Celebration Cake the day before?
Yes. Bake, fill, frost, and add the ganache the day before. For the crispest finish, reserve delicate wafer rolls and crunchy decorations until shortly before serving.
Can I use water instead of coffee?
Yes. Use the same amount of hot water. Coffee contributes depth to the chocolate profile, but the cake will still work without it.
Why is my chocolate cake batter so thin?
The hot liquid makes this batter thinner than many butter-based cake batters. That is expected. Do not compensate with additional flour.
Why did my ganache melt the frosting?
It was probably still too warm. Chill the frosted cake first and let the ganache cool until it is fluid but no longer hot. Test a single drip before covering the top.
How do I stop a tall layer cake from sliding?
Cool every layer completely, avoid excessive filling, keep loose crunch away from the edges, crumb-coat the cake, and chill it before applying the final buttercream.
Can I use chocolate chips for the ganache?
They can work, but finely chopped baking chocolate generally melts more predictably. Some chips are formulated to retain their shape during baking.
How long does this cake stay fresh?
It is at its best during the first few days, but the crunchy toppings are the limiting factor. Wafers soften much sooner than the cake itself.
Print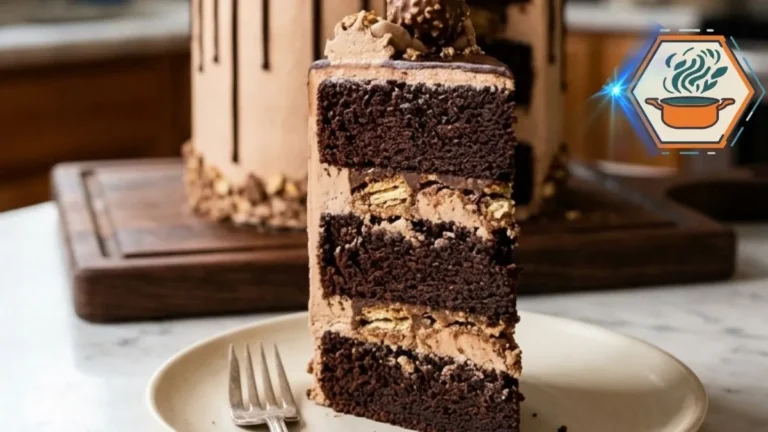
Chocolate Crunch Tower Celebration Cake
A tall, moist chocolate layer cake filled with chocolate buttercream and cookie-wafer crunch, finished with glossy semisweet chocolate ganache and a dramatic crown of crisp wafers, sandwich cookies, chocolate rolls, and chocolate-covered bites. Perfect for birthdays and special celebrations.
- Total Time: 3 hours
- Yield: 1 tall 8-inch three-layer cake / approximately 16 servings
Ingredients
For the Chocolate Cake
- 2 ¼ cups (270 g) all-purpose flour
- ¾ cup (64 g) unsweetened cocoa powder
- 1 ¾ cups (350 g) granulated sugar
- 2 teaspoons baking powder
- 1 ½ teaspoons baking soda
- ½ teaspoon fine salt
- 3 large eggs, room temperature
- 1 cup (240 ml) whole milk, room temperature
- ½ cup (120 ml) neutral vegetable oil
- 2 teaspoons vanilla extract
- 1 cup (240 ml) hot brewed coffee or hot water
For the Chocolate Buttercream
- 1 ½ cups (340 g) unsalted butter, softened
- 5 cups (600 g) powdered sugar
- ¾ cup (64 g) unsweetened cocoa powder
- 2 teaspoons vanilla extract
- ¼ teaspoon fine salt
- 5–6 tablespoons (75–90 ml) heavy cream
For the Chocolate Ganache
- 8 oz (225 g) semisweet chocolate, finely chopped
- ¾ cup (180 ml) heavy cream
For the Crunch Filling
- 1 cup crushed chocolate sandwich cookies
- ¾ cup roughly chopped chocolate wafer pieces
- ½ cup chocolate-covered crispy bites
For the Chocolate Crown
- Chocolate wafer bars
- Vanilla wafer bars
- Striped chocolate wafer rolls
- Chocolate sandwich cookies
- Chocolate-covered malt-style balls
- Chocolate-covered crispy bites
- Assorted chocolate pieces
- Extra crushed cookies and wafer crumbs
For the decorative ingredients, I recommend listing them “as needed” rather than inventing fixed weights. The exact amount depends on the size of the wafers and chocolates used.
Instructions
- Prepare the pans. Preheat the oven to 350°F (175°C). Grease three 8-inch round cake pans. Line the bottoms with parchment circles and lightly grease the parchment.
- Combine the dry ingredients. In a large mixing bowl, whisk the flour, cocoa powder, sugar, baking powder, baking soda, and salt until evenly combined and free of large cocoa lumps.
- Add the wet ingredients. Add the eggs, whole milk, vegetable oil, and vanilla. Mix on low speed until mostly combined.
- Add the hot liquid. Slowly pour in the hot coffee or hot water while mixing on low. The finished batter will be thin. This is expected.
- Divide the batter. Divide evenly between the three prepared pans. For the most even layers, weigh the filled pans or batter portions.
- Bake. Bake for approximately 25–30 minutes. Begin checking around 25 minutes. A toothpick inserted near the center should come out clean or with a few moist crumbs, but no wet batter.
- Cool completely. Leave the cakes in their pans for about 10 minutes. Turn them onto wire racks, remove the parchment, and allow them to cool completely before frosting.
- Prepare the buttercream. Beat the softened butter for about 3 minutes until creamy. Gradually beat in the powdered sugar and cocoa powder. Add vanilla and salt. Add heavy cream one tablespoon at a time until the frosting is smooth, fluffy, and firm enough to hold a layer cake.
- Prepare the crunch. Combine the crushed sandwich cookies, chopped chocolate wafers, and crispy chocolate bites shortly before assembling. Keep some larger pieces for texture rather than reducing everything to fine crumbs.
- Fill the first layer. Place one completely cooled cake layer on a cake board or serving plate. Spread about ¾ cup chocolate buttercream evenly across the surface.
- Add crunch. Scatter a light layer of the cookie-wafer mixture over the buttercream. Leave roughly ½ inch around the edge clear so loose pieces do not interfere with the cake’s stability.
- Repeat. Add the second cake layer and repeat with buttercream and crunch. Place the third cake layer on top. Position it bottom-side up for a flatter surface.
- Crumb coat. Spread a thin layer of buttercream over the entire cake to trap crumbs. Refrigerate for 20–30 minutes, or until firm.
- Final coat. Cover the chilled cake with the remaining chocolate buttercream. Smooth the top and sides. Return it to the refrigerator while preparing the ganache.
- Prepare the ganache. Put the finely chopped semisweet chocolate in a heatproof bowl. Heat the cream until steaming and just beginning to simmer around the edges. Pour it over the chocolate and leave undisturbed for 2–3 minutes. Stir gently until completely smooth.
- Cool the ganache. Allow it to cool until slightly thickened but still pourable. Do not pour very hot ganache onto buttercream.
- Test the drip. Make one test drip down the chilled cake. It should travel slowly and stop before reaching the bottom. If it runs too quickly, allow the ganache to cool longer.
- Decorate with ganache. Create drips around the perimeter, then spread the remaining ganache across the top.
- Build the chocolate tower. Position the tallest wafer rolls and bars near the center and back. Add cookies and medium pieces around them. Fill gaps with chocolate-covered balls, crispy bites, and broken chocolate pieces.
- Finish. Scatter cookie and wafer crumbs across the ganache. Add the most delicate wafer decorations as close to serving time as possible for maximum crunch.
Notes
- Do not frost warm cake. The layers must be completely cool.
- Room-temperature eggs and milk combine more readily with the other ingredients.
- Hot coffee deepens the chocolate character, but hot water works if you prefer not to use coffee.
- The batter is supposed to be thin after adding the hot liquid.
- Do not overload the filling with loose cookie pieces. Too much crunch can cause the layers to slide.
- Keep about ½ inch around the perimeter of each filling layer clear.
- Chill after the crumb coat. This makes the tall cake considerably easier to finish.
- Test the ganache on one section before creating all the drips.
- Add delicate wafers near serving time because moisture from frosting and ganache gradually softens them.
- For cleaner slices, remove tall decorations from the cutting area and use a sharp knife warmed in hot water and wiped dry.
- Food-safety note: never taste the uncooked cake batter. The FDA states that flour is a raw food and that both raw flour and raw eggs can contain harmful bacteria.
- Prep Time: 1 hour
- Additional/Chilling Time: 1 hour 30 minutes
- Cook Time: 30 minutes
- Category: Dessert
- Method: Baking
- Cuisine: American-inspired
A Celebration Cake Worth Gathering Around
The Chocolate Crunch Tower Celebration Cake succeeds because it is not just chocolate piled on chocolate. Each part has a job.
The moist layers provide the foundation. Buttercream gives structure and creaminess. The cookie filling adds crunch. Ganache brings that glossy drip finish. Finally, wafers, cookies, rolls, chocolate balls, and broken pieces create the towering crown.
Take your time during cooling and assembly. Chill the cake between important stages. Test the ganache before committing to the drip. And save the crispest decorations for last.
When the finished cake reaches the table, it should look almost too dramatic to cut.
Almost.