
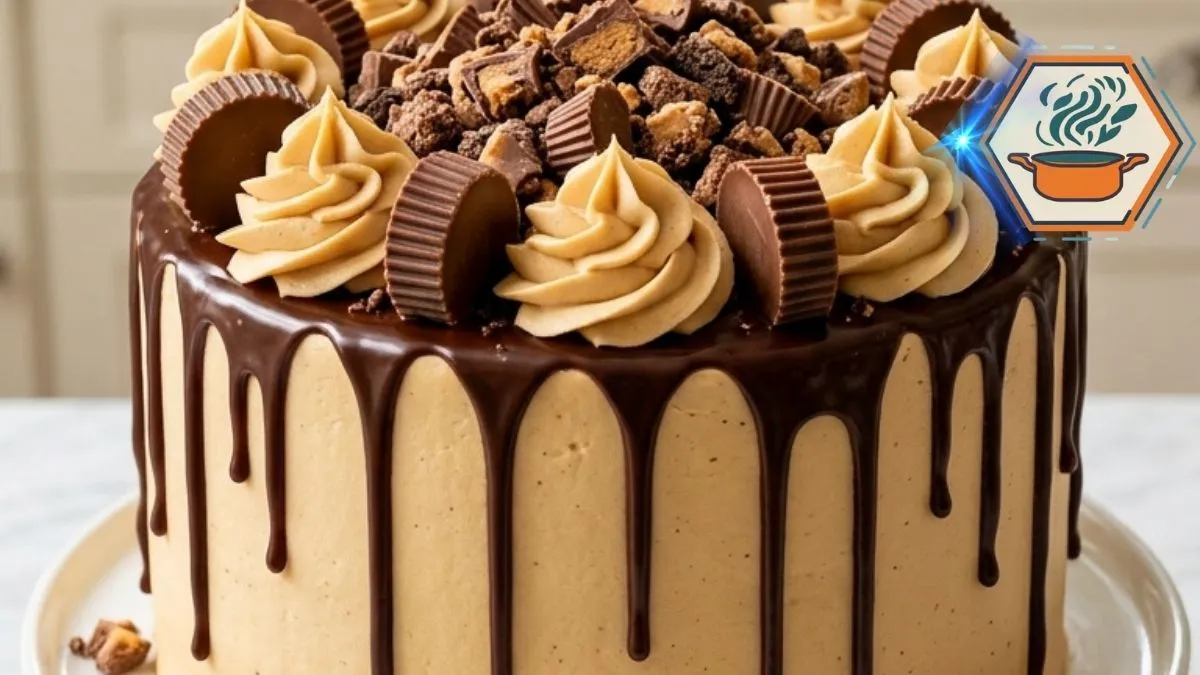
There is a moment when a celebration cake stops being just dessert. It becomes the thing everyone notices when it enters the room. This Peanut Butter Truffle Crunch Cake is made for that moment. Three dark chocolate layers hide beneath silky peanut butter buttercream. Glossy chocolate ganache falls down the sides in uneven drips. Peanut butter swirls, chocolate-peanut butter cups, and chopped candy crown the top.
The first slice makes the cake even more tempting. You get tender chocolate crumb, creamy peanut butter frosting, rich ganache, and little pieces of chocolate-peanut crunch in one forkful. The contrast is what makes this cake special.
Getting that bakery-style result at home is possible, but the small details matter. The cake must cool fully. The frosting needs the right consistency. Most importantly, the ganache cannot be poured onto a warm or freshly frosted cake. For more baking guidance, King Arthur Baking’s cake guide is a useful reference for home bakers.
Food safety matters too. Flour is a raw ingredient, and uncooked cake batter should not be tasted. The FDA’s flour safety guidance explains that flour can carry harmful bacteria and that cooking is what makes foods containing raw flour and eggs safer to eat.
Affiliate disclosure: As an Amazon Associate I earn from qualifying purchases. This article may contain affiliate links to kitchen tools I find useful for preparing this recipe.
JUMP TO
Why This Peanut Butter Truffle Crunch Cake Works
Chocolate and peanut butter already bring two very different flavors to the table. Cocoa is deep and slightly bitter. Peanut butter is creamy, nutty, salty, and rich. Sugar brings them together.
Texture makes the combination even better.
This cake has four main textures:
- Soft, moist chocolate cake
- Smooth peanut butter buttercream
- Silky chocolate ganache
- Crisp chocolate-peanut butter candy
The coffee in the cake batter also has a purpose. It strengthens the perception of the cocoa flavor without making the finished cake taste strongly of coffee. Hot water works if you do not want to use coffee.
The candy topping should be added near serving time when possible. This helps the chopped pieces retain their bite rather than slowly softening against the frosting and ganache.
If you enjoy learning why small ingredient choices change a bake, our guide to the difference between butter cakes offers more useful baking context.
Ingredients You’ll Need
For the chocolate cake
- 2 cups all-purpose flour
- 3/4 cup unsweetened cocoa powder
- 1 3/4 cups granulated sugar
- 2 teaspoons baking powder
- 1 1/2 teaspoons baking soda
- 1/2 teaspoon fine salt
- 2 large eggs, at room temperature
- 1 cup whole milk, at room temperature
- 1/2 cup neutral vegetable oil
- 2 teaspoons pure vanilla extract
- 1 cup hot brewed coffee or hot water
For a stronger chocolate flavor, use good unsweetened cocoa rather than sweetened drinking chocolate.
For the peanut butter buttercream
- 1 1/2 cups unsalted butter, softened
- 1 cup smooth creamy peanut butter
- 4 cups powdered sugar, sifted if lumpy
- 1/3 cup heavy cream, plus a little more if needed
- 1 teaspoon vanilla extract
- 1/4 teaspoon fine salt
Use regular creamy peanut butter for predictable frosting consistency. Natural peanut butter that separates heavily can make the buttercream oily or loose.
For the chocolate ganache
- 8 ounces semi-sweet chocolate, finely chopped
- 3/4 cup heavy cream
For the crunchy decoration
- Chocolate-covered peanut butter cups
- Chopped chocolate-peanut butter candy pieces
- Mini chocolate chunks
For a more noticeable crunch, keep some candy pieces fairly chunky. Very finely crushed candy can disappear into the other textures.
Allergy note: This recipe contains peanuts, dairy, eggs, wheat, and may contain soy depending on the chocolate and candy brands used.
Equipment for a Tall, Even Cake
Three matching 8-inch pans give the cake its tall shape and make the layers easier to stack evenly.
Useful equipment includes:
- Three 8-inch round cake pans
- Parchment paper
- Large mixing bowls
- Electric mixer
- Rubber spatula
- Wire cooling racks
- Offset spatula
- Cake turntable, if available
- Piping bag
- Large open-star piping tip
- Small spoon or squeeze bottle for ganache
For pans, this 8-inch round cake pans can help you find matching pans. Using pans of the same material and size helps the three layers bake at a similar rate.
A good offset spatula also makes frosting tall cakes much easier.
How to Make the Chocolate Cake Layers
Preheat the oven to 350°F (175°C).
Grease three 8-inch round cake pans. Place a circle of parchment paper on the bottom of each pan. Lightly grease the parchment as well.
In a large bowl, whisk together the flour, cocoa powder, sugar, baking powder, baking soda, and salt. Break up any cocoa lumps before adding the wet ingredients.
In another bowl, whisk the eggs, milk, oil, and vanilla.
Pour the wet mixture into the dry ingredients. Mix just until most of the dry streaks disappear.
Now slowly pour in the hot coffee while mixing on low speed.
Do not worry if the finished batter looks thinner than a traditional butter-cake batter. That is expected.
Divide the batter as evenly as possible among the three prepared pans. A kitchen scale is useful here because equal amounts of batter produce more uniform layers.
Bake for 24 to 30 minutes.
Start checking at about 24 minutes rather than automatically leaving all three cakes in for 30 minutes.
Chocolate cake can be harder to judge by color. Look for a matte top, slight separation at the edges, a center that springs back gently, and a tester that comes out clean or with a few moist crumbs. King Arthur Baking recommends using several visual and physical signs rather than relying solely on internal temperature.
Let the cakes sit in their pans for about 10 minutes. Carefully turn them onto wire racks.
This is where patience pays off.
Do not frost warm cake.
Warm layers can melt peanut butter buttercream and create a leaning cake. Allow the layers to cool completely.
A set of wire cooling racks is useful when all three layers need to cool at the same time.
Make the Peanut Butter Buttercream
Place the softened butter in a large mixing bowl. Beat it for 2 to 3 minutes until creamy and lighter in appearance.
Add the peanut butter. Beat again until completely combined.
Add the powdered sugar gradually rather than dumping all four cups into the bowl.
Once incorporated, add the vanilla, salt, and most of the heavy cream.
Beat until the frosting looks smooth and fluffy.
Check the consistency.
The frosting needs to be soft enough to spread but firm enough to hold the weight of three cake layers. If it is very stiff, add heavy cream one tablespoon at a time. If it becomes too loose, add a small amount of powdered sugar.
Save enough buttercream for the decorative swirls on top.
Build the Cake Without Sliding Layers
If your cakes have large domes, trim them with a long serrated knife once completely cool. Flatter layers create a more stable finished cake.
Place the first chocolate layer on a cake board or serving plate.
Spread an even layer of peanut butter buttercream over it. Take the frosting almost to the edge.
Add the second cake layer and repeat.
Place the third layer on top, preferably with its flattest side facing upward.
Check the cake from several angles before continuing. Correct any leaning now.
Spread a thin coat of buttercream over the top and sides. This is the crumb coat. Its job is to trap loose chocolate crumbs.
Chill the cake for about 20 to 30 minutes, or until the crumb coat feels firm.
Then add the final buttercream layer.
Smooth the sides while keeping enough frosting for the large swirls on top.
The finished cake does not need mathematically perfect sides. What matters is an even surface and a stable structure that can support the ganache and candy.
The Secret to Controlled Chocolate Ganache Drips
This is the detail that can change the entire appearance of the cake.
Finely chop 8 ounces of semi-sweet chocolate and place it in a heatproof bowl.
Heat 3/4 cup heavy cream until steaming and hot, but do not aggressively boil it.
Pour the cream over the chocolate. Leave it untouched for about 2 minutes.
Then stir slowly from the center outward until the mixture becomes smooth and glossy.
Now wait.
Hot ganache should not go directly onto the peanut butter frosting.
Allow it to cool until it is fluid but slightly thickened. Meanwhile, chill the frosted cake.
Before pouring anything over the whole cake, perform a test drip on the back.
Place a small amount at the edge.
Watch what happens.
If it races to the bottom, the ganache is too warm or thin. Wait a few more minutes.
If it barely moves, it is too cool. Warm it very briefly.
The ideal drip should travel partway down the chilled side before setting.
Once the test looks right, create drips around the circumference. Then cover the center of the top with ganache and gently smooth it toward the edges.
This controlled method gives you the glossy, irregular chocolate drips that make the cake look dramatic without covering the entire peanut butter exterior.
Create the Truffle Crunch Finish
Once the ganache has settled, it is time to build the top.
Transfer the reserved peanut butter frosting to a piping bag fitted with a large star tip. You can find suitable options through this piping bags and large star tips.
Pipe tall swirls around the outside edge of the cake.
Place halved or whole chocolate-peanut butter cups between the swirls. Keep the arrangement balanced, but it does not need to look rigid.
Roughly chop more peanut butter cups and chocolate-peanut candies.
Pile them generously in the center.
Scatter a few small pieces around the base of the cake too. This ties the decoration together and gives the finished dessert the abundant appearance shown in the inspiration.
The final result should have visible layers of decoration: glossy ganache, golden peanut butter swirls, ridged peanut butter cups, and an irregular mound of chopped chocolate candy.
Common Mistakes and How to Fix Them
Ganache runs all the way down the cake: It was probably too warm. Let it thicken longer and keep the frosted cake cold before applying it.
Buttercream feels greasy: The butter may have been too warm, or the peanut butter may contain too much separated oil. Chill the frosting briefly, then beat it again.
Cake layers slide: The cake or frosting is likely too warm. Chill the assembled cake before applying the final coat.
Cake tastes dry: Start checking before the maximum baking time. Chocolate cakes do not show doneness as clearly as pale cakes, so look for several signs rather than waiting for an extremely dry toothpick.
Candy loses its crunch: Add the chopped candy closer to serving time.
Cake layers break during assembly: Make sure they are completely cool. For even easier handling, chilled cake layers are firmer than room-temperature ones.
Make-Ahead Tips
You do not need to bake, fill, frost, and decorate this entire cake in one afternoon.
Bake the chocolate layers a day ahead. Once fully cool, wrap them well so they do not dry out.
The buttercream can also be prepared ahead and refrigerated. Bring it back toward room temperature and beat it again before frosting.
For the freshest presentation, leave the final ganache drips, piped swirls, and crunchy candy decorations until the day you plan to serve the cake.
If you like big celebration desserts, you may also want to save our strawberry-filled chocolate cake for another occasion. For more baking ideas, visit RecipesMind.
How to Store Peanut Butter Truffle Crunch Cake
Because this cake contains a large amount of dairy-based buttercream and ganache, refrigeration is the cautious storage choice.
Cover the cake well so the refrigerator does not dry the exposed crumb or transfer odors.
For general food safety, USDA guidance recommends refrigerating perishable foods within two hours rather than leaving them at room temperature for extended periods.
Before serving refrigerated cake, allow individual slices some time to lose their refrigerator chill. The buttercream will become softer and the chocolate cake will taste more tender.
Frequently Asked Questions
Can I make Peanut Butter Truffle Crunch Cake without coffee?
Yes. Replace the hot coffee with the same quantity of hot water. Coffee adds depth to the cocoa flavor, but the cake will still work without it.
Why is my chocolate ganache melting the peanut butter frosting?
The ganache is probably too warm, the cake is not cold enough, or both. Chill the frosted cake and let the ganache cool until slightly thick before making a test drip.
Can I use natural peanut butter in the frosting?
A highly separated natural peanut butter can make the buttercream less predictable. A smooth, emulsified creamy peanut butter gives more consistent results for decorating.
How do I get tall frosting swirls?
Use buttercream that is firm enough to hold its shape and a large star tip. Hold the piping bag upright, apply steady pressure, then release the pressure before lifting away.
Can I make this cake with two pans?
You can adapt the recipe, but do not simply overfill two 8-inch pans. Deeper batter takes longer to bake and may bake unevenly. Three 8-inch layers create the tall appearance intended here.
Why did my cake turn out dense?
Common causes include inaccurate flour measurement, overmixing after the flour is hydrated, old leavening agents, or an oven running at the wrong temperature.
Can I eat leftover cake batter?
No. Raw flour and raw eggs can contain harmful bacteria. The FDA advises against eating or tasting uncooked batter.
Print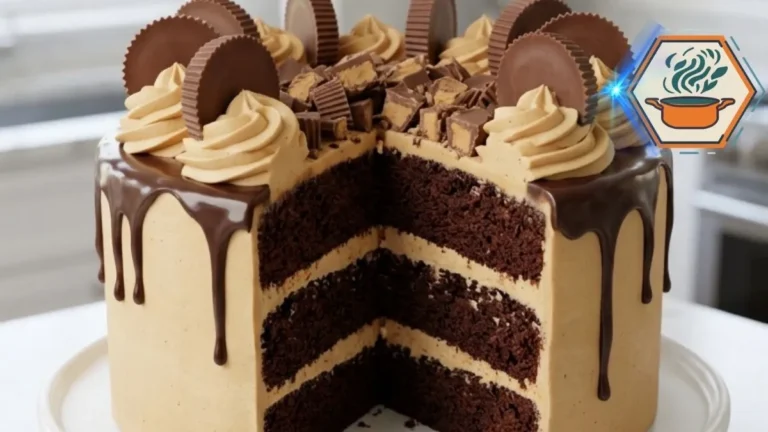
Peanut Butter Truffle Crunch Cake
A tall three-layer chocolate cake filled and covered with creamy peanut butter buttercream, finished with glossy semi-sweet chocolate ganache drips, piped peanut butter swirls, peanut butter cups, and chopped chocolate-peanut butter candy. Rich chocolate, salty peanut butter, and crunchy candy come together in every slice.
- Total Time: 2 hours 20 minutes
- Yield: 1 three-layer 8-inch cake / about 12 slices
Ingredients
Chocolate Cake
- 2 cups (240 g) all-purpose flour
- 3/4 cup (64 g) unsweetened cocoa powder
- 1 3/4 cups (350 g) granulated sugar
- 2 teaspoons baking powder
- 1 1/2 teaspoons baking soda
- 1/2 teaspoon fine salt
- 2 large eggs, room temperature
- 1 cup (240 ml) whole milk, room temperature
- 1/2 cup (120 ml) neutral vegetable oil
- 2 teaspoons pure vanilla extract
- 1 cup (240 ml) hot brewed coffee or hot water
Peanut Butter Buttercream
- 1 1/2 cups (340 g) unsalted butter, softened
- 1 cup (255 g) creamy peanut butter
- 4 cups (480 g) powdered sugar
- 1/3 cup (80 ml) heavy cream, plus 1–2 tablespoons if needed
- 1 teaspoon pure vanilla extract
- 1/4 teaspoon fine salt
Chocolate Ganache
- 8 oz (227 g) semi-sweet chocolate, finely chopped
- 3/4 cup (180 ml) heavy cream
Truffle Crunch Decoration
To make the original recipe reproducible rather than leaving the topping quantities undefined:
- 10 standard chocolate-covered peanut butter cups, divided
- 1 cup (about 150 g) roughly chopped chocolate-peanut butter candy pieces
- 1/3 cup (about 55 g) mini semi-sweet chocolate chunks
Important: the exact candy quantity can be adjusted slightly for appearance, but these quantities are enough to recreate the full, heavily decorated top and crunchy base shown in the reference cake.
Instructions
Preheat the oven to 350°F (175°C).
Grease three 8-inch round cake pans. Line the bottoms with parchment paper and lightly grease the parchment.
2. Mix the dry ingredientsIn a large bowl, whisk together flour, cocoa powder, sugar, baking powder, baking soda, and salt.
Break apart any visible cocoa lumps.
3. Add the wet ingredientsAdd eggs, milk, vegetable oil, and vanilla.
Mix on low speed until combined. Scrape the bottom and sides of the bowl.
4. Add the hot coffeeWith the mixer running on low, slowly pour in the hot coffee.
Mix only until the batter is smooth.
The batter will be relatively thin. This is normal. Do not add extra flour.
5. Divide and bakeDivide the batter evenly between the three prepared pans.
For the most uniform layers, weigh the filled pans or divide the batter by weight.
Bake for 24–30 minutes.
Begin checking at 24 minutes. The cakes are ready when the centers spring back gently and a toothpick inserted near the center comes out clean or with a few moist crumbs.
6. Cool completelyLet the layers cool in their pans for about 10 minutes.
Turn them onto wire racks, remove the parchment, and leave them until completely cool.
Do not frost warm cake.
7. Make the peanut butter buttercreamBeat the softened butter for 2–3 minutes until creamy.
Add the peanut butter and beat until smooth.
Add the powdered sugar gradually on low speed.
Add the heavy cream, vanilla, and salt.
Beat for another 2–3 minutes until light and fluffy.
If necessary, add additional cream 1 tablespoon at a time.
The finished buttercream should spread easily while remaining firm enough to hold a piped swirl.
8. Level and fillIf necessary, level completely cooled cake layers with a serrated knife.
Place the first layer on a cake board or serving plate.
Spread approximately 3/4 cup buttercream over it.
Add the second layer and repeat.
Place the third layer on top.
9. Apply the crumb coatSpread a very thin layer of buttercream over the top and sides.
Refrigerate for 20–30 minutes.
This traps loose chocolate crumbs and gives the final frosting a cleaner finish.
10. Apply the final buttercreamCover the chilled cake with the remaining peanut butter buttercream, reserving approximately 1 1/2 to 2 cups for the large decorative swirls.
Smooth the top and sides.
Refrigerate the frosted cake for another 20 minutes before adding ganache.
11. Make the ganachePlace the finely chopped chocolate in a heatproof bowl.
Heat the cream until steaming and just beginning to simmer around the edges.
Pour it over the chocolate.
Wait 2 minutes without stirring.
Stir slowly until completely smooth and glossy.
12. Cool the ganacheThis step is critical.
Allow the ganache to cool until it remains pourable but is no longer hot.
Test one drip on the back of the chilled cake.
If it immediately runs to the bottom, stop. The ganache is still too warm or thin.
If it barely moves, gently warm the ganache for a few seconds.
13. Create the chocolate dripOnce the consistency is correct, add individual ganache drips around the edge.
Spread the remaining ganache over the top.
Keep the drips irregular in length to reproduce the reference appearance.
14. Pipe the peanut butter swirlsFit a piping bag with a large open-star tip.
Fill it with the reserved peanut butter buttercream.
Pipe 8–10 tall swirls around the outer edge of the cake.
15. Add the peanut butter cupsCut several peanut butter cups in half.
Position them between the buttercream swirls, with their ridged chocolate edges visible.
16. Make the truffle crunch centerRoughly chop the remaining peanut butter cups.
Combine them visually with the chopped chocolate-peanut butter candies and chocolate chunks.
Pile them generously into the center.
Do not crush everything into crumbs. Keeping pieces of different sizes gives the cake its characteristic truffle crunch appearance.
Scatter a small amount around the bottom edge of the cake to match the reference presentation.
Add these crunchy pieces as close to serving as practical for the best texture.
Notes
Peanut butter: Use smooth, conventional creamy peanut butter. Strongly separated natural peanut butter can make the frosting oily or unstable.
Coffee: The cake should not taste like coffee. Coffee mainly deepens the chocolate character. Hot water can be substituted 1:1.
Cake temperature: Never frost warm layers.
Ganache temperature: Do a single test drip before covering the cake.
Crunch: Do not finely grind the candy. Use rough pieces so there is a real textural contrast.
Decoration: Add chopped candy shortly before serving when possible.
Cake stability: If your kitchen is warm, chill the cake between assembly stages.
Serving: For cleaner slices, use a long sharp knife. Wipe the blade between cuts.
Allergens: Contains wheat, milk, eggs, peanuts, and potentially soy depending on the chocolate and candy used.
- Prep Time: 1 hour
- Additional/Chilling Time: 50 minutes
- Cook Time: 30 minutes
- Category: Dessert
- Method: Baking
- Cuisine: American-inspired
A Cake Worth Bringing to the Table Whole
The best part of this Peanut Butter Truffle Crunch Cake may happen before anyone takes a bite.
Set it on the table whole.
The tall peanut butter-covered sides reveal dark chocolate beneath the ganache drips. The top is crowded with soft swirls, peanut butter cups, chocolate pieces, and glossy ganache. Then the knife goes through the first slice and exposes three dark cake layers separated by creamy peanut butter frosting.
It looks extravagant, but every decorative element has a reason to be there.
The chocolate cake brings softness and deep cocoa flavor. Peanut butter adds salt and richness. Ganache gives the cake its glossy finish. Chopped candy provides the final crunch.
And that first slice?
It delivers all four at once.