
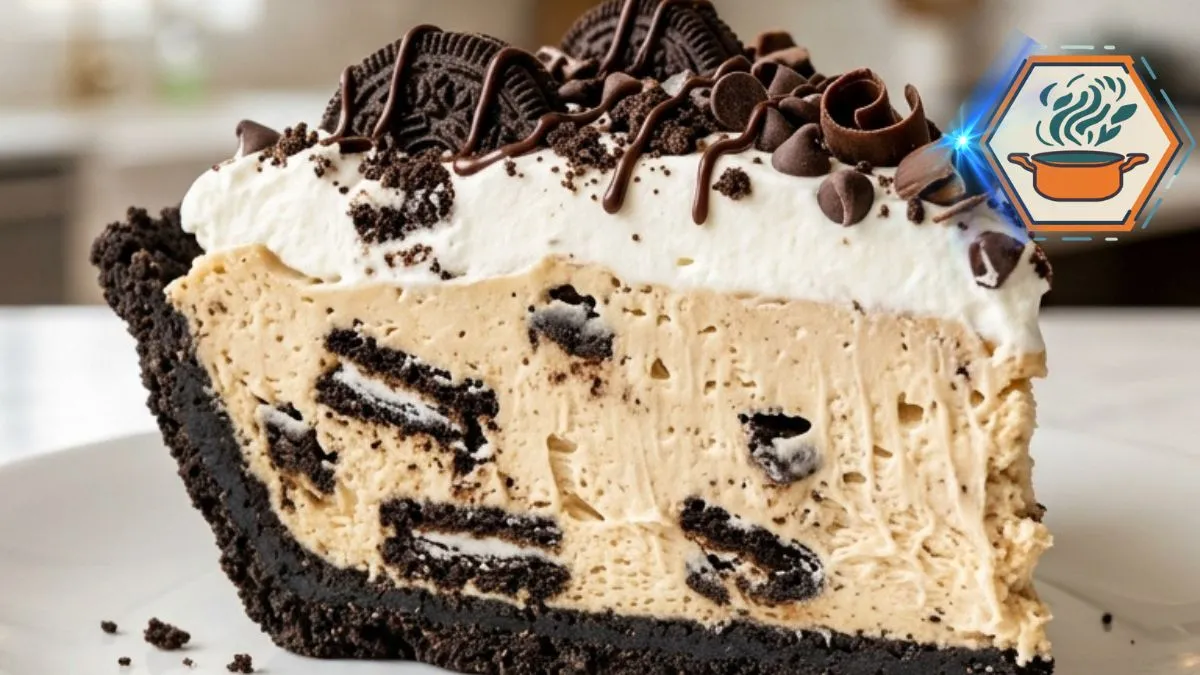
There are desserts you plan days ahead. Then there are desserts you discover in an old cookbook and wonder how they ever disappeared. Rock Bottom Pie belongs firmly in the second group. It combines a dark Oreo crust with a thick, creamy peanut butter filling, chunks of chocolate sandwich cookies, and a cloud of whipped topping. Best of all, the oven can stay off.
The recipe has roots in the retro American cookbook tradition and gained new attention after B. Dylan Hollis shared a version from 1990. His videos are known for bringing forgotten recipes back into modern kitchens. The renewed interest in this pie makes sense. It uses familiar ingredients, takes only minutes to assemble, and delivers the classic chocolate-and-peanut-butter combination. Allrecipes has also covered the return of Rock Bottom Pie, describing the viral version as a simple no-bake dessert built around peanut butter, cream cheese, whipped topping, Oreos, and a chocolate crust.
There is one detail worth improving when making the pie at home. A recipe that simply says “chocolate crumb crust” leaves beginners with questions. How fine should the crumbs be? What holds them together? How do you stop the crust from collapsing when the first slice comes out? This version answers those questions while keeping the character of the retro recipe. Since cream cheese is part of the filling, the finished pie also needs to remain refrigerated. FDA food-safety guidance recommends keeping cheese and cheese dishes refrigerated rather than leaving them at room temperature for more than two hours.
The result is a no-bake peanut butter Oreo pie that looks dramatic but is surprisingly simple to make.
Affiliate disclosure: As an Amazon Associate I earn from qualifying purchases. This article may contain affiliate links to kitchen tools I find useful for preparing this recipe.
JUMP TO
Rock Bottom Pie – No-Bake Peanut Butter Oreo Pie
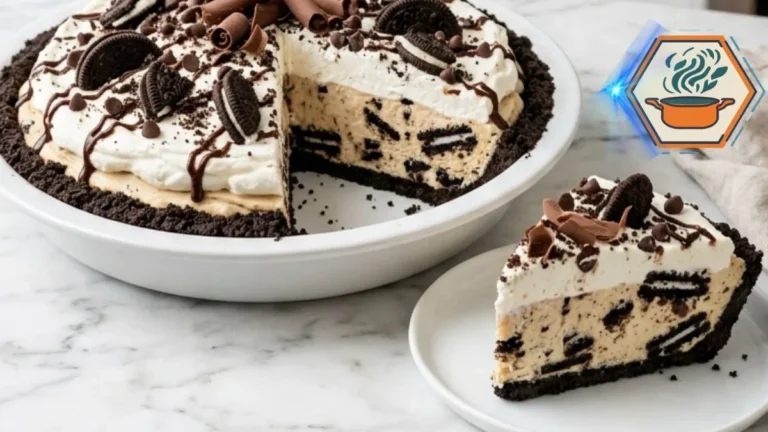
Rock Bottom Pie is a creamy no-bake peanut butter Oreo pie with a dark chocolate cookie crust, fluffy cream cheese filling, crunchy Oreo pieces, whipped topping, and chocolate curls. It is an easy retro American dessert for parties, potlucks, holidays, and summer gatherings.
- Total Time: 3 hours 20 minutes
- Yield: 1 9-inch pie / 8 slices
Ingredients
Oreo Cookie Crust
- 24 Oreo cookies, including the cream filling
- 5 tablespoons (70 g) unsalted butter, melted
Peanut Butter Oreo Filling
- 1 cup (about 250 g) creamy peanut butter
- 8 oz (226 g) full-fat cream cheese, softened
- 1 teaspoon vanilla extract
- 8 oz (226 g) frozen whipped topping, thawed in the refrigerator
- 10 Oreo cookies, roughly crushed
Topping
- 4 Oreo cookies, roughly crushed
- 2 tablespoons chocolate syrup
- 2 tablespoons mini chocolate chips
- Additional whipped topping or whipped cream, optional
- Chocolate curls, optional
Shortcut option: Replace the homemade crust ingredients with one prepared 9-inch chocolate cookie crumb crust.
Instructions
- Make the Oreo crust. Place 24 whole Oreo cookies, including their cream filling, in a food processor. Process until they become fine crumbs.
- Pour in the melted butter. Pulse or stir until every crumb is evenly moistened. The mixture should resemble damp sand and hold together when pressed.
- Transfer the mixture to a 9-inch pie plate. Press it firmly and evenly across the bottom and up the sides. The flat bottom of a measuring cup works well for compacting the crumbs.
- Refrigerate the crust for at least 30 minutes. For a faster option, freeze it for 15 to 20 minutes while preparing the filling.
- Prepare the filling. Place the softened cream cheese, creamy peanut butter, and vanilla in a large mixing bowl.
- Beat on low to medium speed until completely smooth. Stop and scrape the sides and bottom of the bowl when needed.
- Add approximately half of the cold, thawed whipped topping. Beat briefly on low speed until the peanut butter mixture becomes lighter.
- Add the remaining whipped topping. Fold it in gently with a spatula rather than continuing to beat it. Stop as soon as the mixture is evenly combined.
- Roughly crush 10 Oreos. Keep some medium-sized pieces rather than turning all the cookies into crumbs.
- Gently fold the Oreo pieces into the peanut butter filling.
- Spoon the filling into the chilled Oreo crust. Spread it evenly with a spatula and create a few natural swirls on top.
- Add a generous layer or dollops of whipped topping for the white top shown in the finished pie.
- Scatter 4 roughly crushed Oreos over the center. Drizzle lightly with chocolate syrup. Add mini chocolate chips and chocolate curls if desired.
- Cover without pressing the covering against the topping.
- Refrigerate for at least 1 hour. For firmer filling and cleaner slices, chill for 3 to 4 hours. An overnight chill also works well.
- Serve cold. For neat slices, dip a sharp knife in hot water, wipe it completely dry, and clean the blade between cuts.
Notes
- Do not omit the butter if making the crust from scratch. Oreo crumbs alone will not form the same dependable sliceable crust.
- Use the Oreo cream filling when making the crust.
- Regular commercial creamy peanut butter gives the most predictable consistency. Natural peanut butter may separate and can make the filling softer or oily.
- Cream cheese should be softened but not melted.
- Thaw frozen whipped topping in the refrigerator and keep it cold.
- Do not vigorously beat the filling after adding the final portion of whipped topping.
- Roughly crush the Oreos used inside the filling. Visible pieces create the chocolate pockets seen in each slice.
- One hour is the minimum chill. Three to four hours gives a better texture for photography and clean slicing.
- Keep the finished pie refrigerated because it contains cream cheese.
- For the appearance in the reference photo, use a dark, fairly thick Oreo crust, pale beige peanut butter filling with clearly visible Oreo pieces, a generous white whipped layer, broken Oreos, chocolate drizzle, crumbs, and curled chocolate shavings.
- Prep Time: 20 minutes
- Additional/Chill Time: 3 hours
- Cook Time: 0 minutes
- Category: Dessert
- Method: No-bake
- Cuisine: American
What Is Rock Bottom Pie?
Rock Bottom Pie is a chilled American dessert with a chocolate cookie crust and a creamy peanut butter filling.
The version that has circulated online uses a short list of ingredients: peanut butter, cream cheese, whipped topping, Oreo cookies, a chocolate crumb crust, and optional chocolate sauce. A little vanilla can also be added for a rounder flavor.
The filling is different from many traditional peanut butter pies because it does not depend on a large amount of powdered sugar. Instead, whipped topping supplies sweetness and gives the dense peanut butter and cream cheese mixture a lighter texture.
Crushed Oreos are folded directly into the filling. That detail matters.
Rather than getting the same texture in every bite, you find small pieces of cookie scattered through the creamy center. Some become slightly softer as the pie chills. Larger pieces keep more crunch.
It is rich, cold, creamy, chocolatey, and unmistakably nostalgic.
The Retro Story Behind Rock Bottom Pie
Community cookbooks were once a familiar sight in American kitchens. Churches, schools, clubs, and local groups collected recipes from members and printed them in small fundraising cookbooks.
These books were rarely about elaborate restaurant cooking. They recorded the food people actually made for families, parties, potlucks, holidays, and community gatherings.
That is the world where Rock Bottom Pie fits.
The recipe recently attracted a new audience after B. Dylan Hollis featured a 1990 version. Coverage of his preparation describes the recipe as coming from the type of community cookbook often produced by churches or PTAs.
Its return also shows why some retro recipes survive.
They are practical.
There is no pastry dough to roll. There are no eggs to temper. You do not need to bake a custard and wonder whether the center has set.
You mix. You fold. You fill. You chill.
That simplicity makes this dessert particularly useful during summer or whenever the oven is already occupied.
If old-fashioned American desserts are your thing, RecipesMind has plenty of other comforting ideas. Our Jello pudding pie guide is another easy place to start.
Why This Rock Bottom Pie Recipe Works
A short ingredient list does not mean the details are unimportant.
The texture of this pie depends on how the ingredients are handled.
First, the cream cheese needs to be softened. Cold cream cheese is much harder to blend smoothly with peanut butter. The mixture can remain lumpy, and aggressive mixing can make the process unnecessarily difficult.
Second, the whipped topping should not all be beaten vigorously into the filling. Mixing a portion into the peanut butter base first loosens it. The rest can then be folded in gently.
That keeps more air in the mixture.
Third, the Oreos should be roughly crushed rather than pulverized. Fine crumbs disappear into the filling. Uneven chunks create the dark cookie pockets that make each slice look like the one pictured.
Finally, chilling is not optional.
One hour is a useful minimum. Several hours produce a firmer pie and cleaner slices.
Rock Bottom Pie Ingredients
This recipe makes one 9-inch pie and serves about 8 people.
For a Homemade Oreo Crust
- 24 Oreo cookies, including the cream filling
- 5 tablespoons unsalted butter, melted
You can instead use:
- 1 prepared 9-inch chocolate cookie crumb crust
A ready-made crust keeps the recipe closest to the ultra-simple retro version.
The homemade version gives you more control over thickness and creates the deep, dark cookie base shown in our finished pie.
For the Peanut Butter Oreo Filling
- 1 cup creamy peanut butter
- 8 ounces full-fat cream cheese, softened
- 1 teaspoon vanilla extract
- 8 ounces frozen whipped topping, thawed in the refrigerator
- 10 Oreo cookies, roughly crushed
Choose regular creamy peanut butter for the most predictable texture. Natural peanut butter can separate and may produce a softer or oilier filling, depending on the brand.
For the Topping
- 4 Oreo cookies, roughly crushed
- 2 tablespoons chocolate syrup
- 2 tablespoons mini chocolate chips
- Whipped cream or additional whipped topping, as desired
- Chocolate curls, optional
These decorations are optional, but they give the pie the tall café-style appearance shown in the finished version.
How to Make an Oreo Crust That Actually Holds Together
A good crumb crust needs a binder.
If you simply crush Oreos and press them into a pie plate, loose crumbs can fall away when you cut the pie. Melted butter binds those crumbs as it becomes cold.
Start with 24 whole Oreos. Keep the cream filling inside the cookies.
Process them in a food processor until you have fine crumbs. A full-size food processor makes this fast and gives the crumbs a very even texture, but it is optional.
No food processor?
Put the cookies in a strong zip-top bag.. Remove excess air, seal the bag, and crush the cookies with a rolling pin. Keep going until there are no large pieces.
Measure 5 tablespoons of melted unsalted butter.
Pour it into the Oreo crumbs and stir thoroughly. The mixture should resemble damp, dark sand. When squeezed between your fingers, it should hold together.
Transfer the crumbs to a 9-inch pie plate. A glass pie dish makes it easy to check whether the crust is evenly packed along the bottom and sides. If you need one, this 9-inch glass pie plate with lid is a practical option, especially because the finished pie needs several hours in the refrigerator.
Press the crumbs firmly across the bottom first. Then work them up the sides.
The flat bottom of a measuring cup or drinking glass is useful here. Firm, even pressure makes the crust much less likely to crumble later.
Place the crust in the refrigerator for at least 30 minutes before filling it.
For an especially firm no-bake crust, chill it longer.
You can also freeze the crust for about 15 to 20 minutes while preparing the filling.
How to Make Rock Bottom Pie
1. Soften the Cream Cheese
Remove the cream cheese from the refrigerator long enough for it to become soft enough to mix smoothly.
You want softened cream cheese, not warm or melted cream cheese.
Cutting the block into cubes can help it soften more evenly.
2. Prepare the Oreo Pieces
Roughly crush 10 Oreos.
Do not turn them into fine crumbs.
Aim for a mixture of small and medium pieces. Those irregular pieces will create the dark Oreo pockets visible throughout each slice.
Set them aside.
3. Beat the Peanut Butter Base
Place 8 ounces of softened cream cheese in a large mixing bowl.
Add 1 cup creamy peanut butter and 1 teaspoon vanilla.
Beat with an electric mixer on low to medium speed until smooth. A lightweight 7-speed hand mixer works particularly well here because the mixture starts quite thick.
Stop once or twice to scrape the sides and bottom of the bowl with a flexible spatula.
The mixture will be thick. That is normal.
Do not add milk to thin it.
4. Lighten the Filling
Add about half of the thawed whipped topping.
Beat briefly on low speed.
This first portion loosens the thick peanut butter mixture and makes it easier to incorporate the rest.
Once the filling looks lighter and fairly uniform, stop the mixer.
5. Fold in the Remaining Whipped Topping
Add the rest of the whipped topping.
Now switch to a spatula.
Fold gently by cutting through the center of the mixture, sweeping across the bottom, and lifting the mixture over itself.
Turn the bowl as you work.
Stop once there are no large white streaks.
This is one of the most important steps in the recipe.
Overmixing can knock air from the whipped topping and leave you with a denser pie.
6. Add the Oreo Pieces
Fold the roughly crushed Oreos into the filling.
Use only a few strokes.
The goal is to distribute the pieces without crushing them further.
You should still be able to see obvious dark cookie pieces in the pale peanut butter filling.
7. Fill the Chocolate Crust
Spoon the filling into the chilled Oreo crust.
Work carefully near the edges so you do not pull crumbs away from the sides.
Spread the mixture into an even layer.
Use the back of a spoon or an offset spatula to create gentle swirls across the top.
Do not make it perfectly flat.
A slightly rustic surface suits this dessert and gives the topping somewhere to settle.
8. Add the Creamy White Topping
For the visual style shown here, spread or pipe a generous layer of whipped topping over the peanut butter filling.
Leave some of the peanut butter layer visible near the edges if you want the contrast to stand out.
Scatter roughly crushed Oreos across the center.
Add a few mini chocolate chips.
Drizzle thin lines of chocolate syrup over the whipped topping.
Finish with chocolate curls if desired.
The final pie should have three strong visual contrasts:
- A nearly black Oreo crust
- A pale tan peanut butter filling dotted with Oreo chunks
- A bright white whipped topping covered with dark chocolate details
9. Chill Until Firm
Cover the pie without pressing plastic wrap into the decorated surface.
Refrigerate for at least 1 hour.
However, if presentation matters, give it 3 to 4 hours.
An overnight chill is also excellent.
The longer chilling time helps the crust become firm and makes the filling easier to slice.
The Secret to a Light Peanut Butter Filling
Peanut butter and cream cheese are both dense.
If you simply beat every ingredient together for several minutes, you may end up with something closer to a heavy spread than a fluffy pie filling.
The trick is to use the whipped topping in two stages.
Beat the first half into the dense base.
Fold the second half in gently.
Think of the first addition as loosening the filling and the second as adding air.
The same principle matters in many creamy desserts. If you enjoy learning why texture changes in chilled desserts, our guide to crème brûlée and custard explains more about how ingredients and technique affect creamy desserts.
How to Get the Same Look as the Photo
Presentation matters with this pie because the contrast between the layers is part of its appeal.
Start with a thick chocolate cookie crust. It should be visibly dark around the bottom and side of every slice.
Keep the filling pale tan. Do not add chocolate syrup directly to the peanut butter mixture.
Use roughly crushed Oreos in the filling rather than fine crumbs. When the pie is cut, distinct black cookie pieces should appear against the creamy center.
Add a thick, soft layer of whipped topping.
Then decorate the center rather than covering every inch.
For the café-style finish, use:
- Broken Oreo halves and chunks
- Fine Oreo crumbs
- Thin chocolate drizzle
- Mini chocolate chips
- Dark chocolate curls or rolled chocolate shavings
Keep the decoration irregular.
A homemade pie often looks more inviting when every crumb is not perfectly positioned.
How to Make Chocolate Curls
Chocolate curls look fancy but require very little work.
Use a room-temperature chocolate bar and a vegetable peeler.
Pull the peeler along the edge of the chocolate. Depending on the temperature and pressure, you will get small curls or wider ribbons.
If the chocolate breaks into tiny flakes, let it sit at room temperature for a few minutes.
If it becomes too soft, chill it briefly.
Place the curls on the pie shortly before serving so they stay neat.
If you enjoy working with chocolate and caramel decorations, see our guide to mastering caramelized sugar.
How to Cut Rock Bottom Pie Cleanly
The first slice tells you whether you gave the pie enough time to chill.
Use a large, sharp knife.
For cleaner cuts, dip the blade in hot water, wipe it completely dry, and make the first cut.
Clean the knife after each slice.
Repeat the warm-water method when needed.
Do not saw aggressively through the pie. Use a steady downward cut through the filling, then apply a little more pressure to pass through the crust.
A thin pie server makes it easier to remove the first piece.
If your kitchen is warm, keep the pie refrigerated until just before slicing.
What Does Rock Bottom Pie Taste Like?
The first flavor is roasted, salty-sweet peanut butter.
Then comes the slight tang of cream cheese.
The whipped topping softens both flavors and keeps the filling from feeling as dense as straight peanut butter cheesecake.
Oreos bring cocoa flavor and crunch.
The crust adds a stronger chocolate note, while the optional syrup and chocolate curls make the chocolate side of the dessert more noticeable.
Despite its appearance, the filling does not need extra cups of sugar. One published version similarly notes that the recipe differs from many peanut butter pies because the filling does not contain powdered sugar.
That makes the contrast between the sweet cookies, creamy filling, and slightly salty peanut butter especially satisfying.
Make-Ahead Tips
This is a very useful make-ahead dessert.
Prepare the crust first and let it chill.
Make the filling and assemble the pie later the same day, or prepare the entire dessert the night before serving.
If making it ahead, consider waiting to add delicate chocolate curls until serving time.
Cover the pie well so it does not absorb refrigerator odors.
The chilled filling becomes firmer with time, so preparing it several hours early can actually improve the slices.
How to Store Rock Bottom Pie
Because the filling contains cream cheese and thawed whipped topping, keep the pie refrigerated.
Cover leftovers tightly and return them to the refrigerator promptly after serving.
The FDA advises refrigerating cheese dishes and not leaving them at room temperature for more than two hours.
For best quality, eat the pie within about 3 to 4 days.
The Oreo pieces inside the filling will gradually soften. That is not necessarily a bad thing, but the texture is at its best when there is still some contrast between the cookies and cream.
Can You Freeze Rock Bottom Pie?
Yes, this type of pie can be frozen, although the exact texture after thawing may vary with the brands of cream cheese and whipped topping used.
Wrap the pie well to protect it from freezer odors and ice crystals.
You can also freeze individual slices.
Let a frozen slice soften in the refrigerator before eating it. For a firmer, almost ice-cream-like texture, serve it while it is still slightly frozen.
Do not repeatedly thaw and refreeze the pie.
Easy Rock Bottom Pie Variations
The original combination works because peanut butter and chocolate naturally complement each other, but there is room for variation.
For more peanut flavor, scatter chopped peanut butter cups on top.
For extra chocolate, add dark chocolate curls or a light fudge drizzle.
For a crunchier center, keep some Oreo pieces larger.
For a smoother filling, crush the cookies more finely.
You can also use a store-bought chocolate crust when speed matters most.
Avoid changing several ingredients at once on your first attempt. The original proportions give you a useful reference point for how thick the filling should be.
Common Mistakes to Avoid
Using Cold Cream Cheese
Very cold cream cheese does not combine easily with peanut butter.
Let it soften first.
Using Warm Whipped Topping
The topping should be thawed but still cold.
Warm whipped topping loses structure more easily.
Overmixing the Filling
Once the second half of the whipped topping goes into the bowl, fold rather than beat.
This keeps the filling lighter.
Crushing Every Oreo Into Dust
Fine crumbs are right for the crust.
They are not ideal for the filling.
Keep visible pieces for texture and the classic cookies-and-cream appearance.
Skipping the Butter in a Homemade Crust
If you make the cookie crust yourself, Oreo crumbs need enough melted butter to bind together.
Without it, your crust can fall apart as soon as you lift a slice.
Cutting Too Soon
One hour is the minimum chilling period, not necessarily the ideal one.
For neat slices, several hours are better.
Kitchen Note
The small details make the biggest difference in this recipe.
Use softened cream cheese, but keep the whipped topping cold.
Mix the dense ingredients first.
Lighten them with part of the whipped topping.
Then fold gently.
Keep the Oreo pieces irregular.
Press a homemade crust firmly.
Finally, give the finished pie enough refrigerator time.
Those steps create a slice with a firm dark base, creamy peanut butter center, visible Oreo chunks, and light whipped topping instead of a loose filling sitting on crumbly cookies.
Frequently Asked Questions About Rock Bottom Pie
What is Rock Bottom Pie made of?
The viral retro version is primarily made from peanut butter, cream cheese, whipped topping, Oreo cookies, and a chocolate cookie crust. Vanilla and chocolate syrup can also be used. This version adds optional toppings and gives exact instructions for making a stable homemade Oreo crust.
Does Rock Bottom Pie need to be baked?
No. It is a no-bake dessert. A prepared chocolate crust can be used straight from the package. A homemade Oreo-and-butter crust can also be chilled until firm without baking.
How long should Rock Bottom Pie chill?
Chill it for at least 1 hour. For a firmer filling and cleaner slices, 3 to 4 hours is better. Making it the night before is a convenient option for parties.
Why is my peanut butter pie filling too thick?
Peanut butter and cream cheese naturally form a very thick mixture. Make sure the cream cheese is properly softened. Mix in half of the whipped topping first to loosen the base. Then gently fold in the remaining topping.
Why is my Oreo crust falling apart?
A homemade cookie crumb crust needs enough fat to bind the crumbs. For 24 whole Oreos, about 5 tablespoons of melted butter creates a dependable no-bake crust. Press it firmly into the pie plate and chill it before adding the filling.
Can I use a store-bought Oreo crust?
Yes. A prepared 9-inch chocolate cookie crust is the fastest option and is consistent with versions of the retro recipe currently circulating online.
Can I make Rock Bottom Pie the night before?
Yes. In fact, making it ahead gives the filling more time to become firm. Cover the pie and refrigerate it overnight. Add fragile chocolate curls shortly before serving.
Should I use creamy or crunchy peanut butter?
Both can work, but creamy peanut butter gives the filling the smoothest texture and most closely matches the creamy appearance shown here. Regular commercial peanut butter is more predictable than natural peanut butter that separates.
Can I make Rock Bottom Pie without Cool Whip?
A stabilized homemade whipped cream can be used, but it will not behave exactly like commercial whipped topping. The firmness, sweetness, and storage life may change. If you want the most predictable version, use thawed frozen whipped topping.
How do you keep Rock Bottom Pie firm?
Start with softened rather than melted cream cheese, keep the whipped topping cold, avoid overmixing, and chill the finished pie thoroughly. A few hours in the refrigerator gives better slicing results than rushing the minimum chill.
A Retro Dessert Worth Bringing Back
Some vintage recipes are interesting mainly because they are strange.
Rock Bottom Pie is different.
Its ingredients still make sense decades later.
Chocolate and peanut butter provide the main flavor. Cream cheese gives the filling body and a slight tang. Whipped topping makes that rich mixture feel lighter. Oreo pieces create pockets of crunch. A dark cookie crust holds everything together.
And none of it requires an oven.
That makes this Rock Bottom Pie recipe just as useful for a modern summer party as it would have been for a community gathering decades ago.
Make the crust firmly. Keep the filling airy. Leave some Oreo pieces chunky. Give the pie several hours to chill when possible.
Then add a generous white whipped layer, scattered Oreos, chocolate drizzle, mini chips, and a few chocolate curls.
When the knife passes through those layers, you get exactly what this dessert promises: a dark crunchy base, a thick peanut butter center filled with Oreo pieces, and a soft whipped topping in every bite.
It may be called Rock Bottom Pie, but there is nothing disappointing about the first slice.