
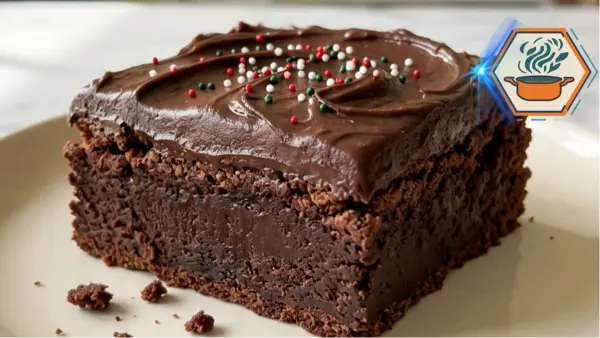
There is always one dessert that seems to disappear first from a holiday table. In my kitchen, it is usually a pan of Fudgy Holiday Chocolate Brownies. They look simple at first. Then you cut into one and find a thick, dark chocolate center beneath a soft layer of glossy ganache.
That contrast is what makes this recipe special. The brownie is dense rather than cakey. The edges have a little chew. The middle stays moist and rich. On top, chocolate ganache creates the soft finish seen in bakery-style brownies. A small scattering of red, white, and green sprinkles gives them their holiday look without covering the chocolate.
Brownie texture depends heavily on ingredient balance and baking technique. Even a few extra minutes in the oven can change a moist brownie into a much drier one. King Arthur Baking’s baking resources are a useful reference for understanding how ingredients and baking methods affect brownies and other baked goods. King Arthur Baking
Food handling matters too. Raw flour and raw eggs should be treated as uncooked ingredients, so resist tasting the brownie batter before baking. The U.S. Food and Drug Administration provides food-safety guidance for home cooks and bakers.
Affiliate disclosure: As an Amazon Associate I earn from qualifying purchases. This article may contain affiliate links to kitchen tools I find useful for preparing this recipe.
JUMP TO
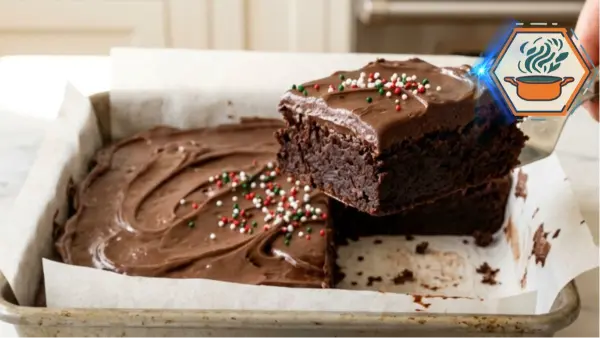
Fudgy Holiday Chocolate Brownies With Chocolate Ganache
Thick and fudgy holiday chocolate brownies made with melted semisweet chocolate, cocoa, and chocolate chips, then topped with soft chocolate ganache and festive red, white, and green sprinkles.
- Total Time: About 2 hours 55 minutes
- Yield: 9 large brownies
Ingredients
Brownies
- 1 cup (227 g) unsalted butter
- 8 oz (226 g) semisweet chocolate, finely chopped
- 1 1/4 cups (250 g) granulated sugar
- 1/2 cup (100 g) packed light brown sugar
- 4 large eggs, preferably at room temperature
- 2 teaspoons vanilla extract
- 1 cup (125 g) all-purpose flour
- 1/2 cup (about 45 g) unsweetened cocoa powder
- 1/2 teaspoon fine salt
- 3/4 cup (about 128 g) semisweet chocolate chips
Chocolate Ganache
- 8 oz (226 g) semisweet chocolate, finely chopped
- 3/4 cup (180 ml) heavy cream
- 1 tablespoon (14 g) unsalted butter
For Finishing
- 1 to 2 tablespoons red, white, and green holiday sprinkles, or as needed
Instructions
- Prepare the oven and pan. Preheat the oven to 350°F (175°C). Position a rack in the center. Line an 8 × 8-inch light-colored metal baking pan with parchment paper, leaving an overhang on two sides. Lightly grease exposed areas.
- Melt the chocolate and butter. Combine 1 cup butter and 8 oz chopped semisweet chocolate in a heatproof bowl over barely simmering water, or use a saucepan over very low heat. Stir until completely smooth. Remove from the heat and cool for about 5 minutes. The mixture should remain warm and fluid.
- Whisk the sugars and eggs. In a large bowl, combine granulated sugar, brown sugar, eggs, and vanilla. Whisk vigorously for 2 to 3 minutes, until glossy, smooth, and slightly thickened. This step helps create the delicate brownie crust.
- Add the melted chocolate. Slowly pour the warm chocolate-butter mixture into the egg mixture while whisking. Continue until smooth and glossy.
- Add the dry ingredients. In another bowl, whisk together flour, cocoa powder, and salt. Sift the cocoa first if it is lumpy.
- Finish the batter. Fold the dry ingredients into the chocolate mixture with a rubber spatula. Stop when only a few flour streaks remain. Fold in the chocolate chips just until evenly distributed. Do not overmix.
- Fill the pan. Transfer the thick batter to the prepared pan. Spread it evenly into the corners and smooth the top without pressing heavily.
- Bake. Bake for 28 to 34 minutes. Begin checking at 28 minutes. The edges should be set and the center should look baked but remain slightly soft. A toothpick inserted in the center should come out with moist chocolate crumbs, not liquid batter.
- Cool completely. Place the pan on a wire rack. Leave the brownies in the pan until completely cool, about 1 1/2 to 2 hours. Do not add ganache to warm brownies.
- Make the ganache. Put 8 oz finely chopped semisweet chocolate in a heatproof bowl. Heat the heavy cream until steaming, with small bubbles around the edges. Do not vigorously boil it. Pour the cream over the chocolate and leave untouched for 2 minutes.
- Finish the ganache. Stir slowly from the center outward until smooth. Add 1 tablespoon butter and stir until glossy. Let the ganache stand until thickened enough to spread without running.
- Decorate. Spread the ganache generously over the completely cooled brownie slab. Make loose spatula swirls rather than a perfectly flat surface. Lightly scatter red, white, and green sprinkles over the top.
- Set and cut. Let the ganache set before lifting the brownies from the pan with the parchment. Cut into 9 thick squares with a sharp knife, wiping the blade clean between cuts.
Notes
- Do not overbake. Moist crumbs on the toothpick are desirable for a fudgy center.
- Use an 8 × 8-inch metal pan for the thick appearance shown in the recipe photos. A larger pan creates thinner brownies and changes the baking time.
- Room-temperature eggs mix more readily into the batter.
- Whisk the eggs and sugars for the full 2 to 3 minutes. This supports the thin, delicate surface crust.
- Once flour is added, fold rather than aggressively whisking.
- The brownies must be completely cool before ganache is added.
- Finely chopped chocolate melts more evenly when making ganache.
- For the same visual style as the reference photo, use only a light scattering of red, white, and green nonpareils/sprinkles. Do not cover the ganache completely.
- For cleaner slices, briefly warm a sharp knife, dry it completely, cut, and wipe the blade after every slice.
- Do not taste raw batter. The FDA notes that raw flour can carry harmful bacteria and that raw eggs may also present a food-safety risk
- Prep Time: 25 minutes
- Time: 2 hours cooling/set time
- Cook Time: 28–34 minutes
- Category: Dessert
- Method: Baking
- Cuisine: American
Why You’ll Love These Fudgy Holiday Chocolate Brownies
Imagine cutting the first square after the ganache has finally set.
The knife moves through a soft chocolate topping. Underneath is a dense brownie with a dark, moist crumb. The edges hold their shape, but the center remains tender.
That is the texture we are after.
These brownies work especially well for Christmas parties, cookie exchanges, winter gatherings, and holiday dessert trays. Yet there is nothing complicated about their appearance.
You do not need elaborate piping.
You do not need several frosting colors.
You do not need specialty molds.
Instead, the decoration comes from three simple elements: thick brownies, swirled chocolate ganache, and a restrained amount of festive sprinkles.
The recipe also uses both melted semisweet chocolate and cocoa powder. This gives the brownies a deeper chocolate character than recipes that depend on cocoa alone.
Chocolate chips add small pockets of chocolate inside the baked brownie.
Then the ganache adds one final chocolate layer.
Ingredients You’ll Need
For the brownies, prepare:
- 1 cup (227 g) unsalted butter
- 8 oz (226 g) semisweet chocolate, finely chopped
- 1 1/4 cups (250 g) granulated sugar
- 1/2 cup (100 g) packed light brown sugar
- 4 large eggs, preferably at room temperature
- 2 teaspoons vanilla extract
- 1 cup (125 g) all-purpose flour
- 1/2 cup (about 43–50 g) unsweetened cocoa powder, depending on the brand
- 1/2 teaspoon fine salt
- 3/4 cup (about 128 g) semisweet chocolate chips
For the chocolate ganache, you need:
- 8 oz (226 g) semisweet chocolate, finely chopped
- 3/4 cup (180 ml) heavy cream
- 1 tablespoon (14 g) unsalted butter
For decorating:
- Red, white, and green holiday sprinkles
You will also need an 8 x 8-inch metal baking pan, parchment paper, mixing bowls, a whisk, rubber spatula, and small saucepan.
A light-colored metal pan is a useful choice because it transfers heat efficiently. Glass and ceramic pans behave differently and may require adjustments to baking time.
Why Each Ingredient Matters
Butter provides richness and helps produce the dense texture we want.
Semisweet chocolate brings cocoa solids, cocoa butter, sugar, and deep chocolate flavor. Using real chocolate alongside cocoa powder helps create a richer result.
Granulated sugar does more than sweeten the brownies. How well the sugar interacts with the eggs and warm chocolate mixture can also influence the delicate surface crust.
Brown sugar contributes moisture and a subtle caramel note.
Eggs bind the batter and provide structure. Four eggs may sound generous, but remember that this is a thick 8-inch brownie.
All-purpose flour gives the brownie enough structure to be cut into squares. Too much flour, however, moves the texture toward cake.
Cocoa powder strengthens the chocolate flavor without adding more liquid.
Salt keeps the sweetness from tasting flat.
Finally, chocolate chips remain as small melted pockets throughout the brownies.
Before You Start
Heat the oven to 350°F (175°C).
Position a rack near the center of the oven.
Line an 8 x 8-inch metal baking pan with parchment paper. Leave several inches hanging over two opposite sides. These become handles for lifting the cooled brownies from the pan.
For this recipe, an 8-inch square metal pan is especially useful because it keeps the brownies thick while helping the edges bake evenly. If you bake brownies often, a sturdy 8-inch square metal baking pan is one of the few tools I would consider worth keeping specifically for brownies, blondies, and small-batch cakes.
Lightly grease any exposed sides of the pan.
Measure every ingredient before melting the chocolate.
This matters because once the wet ingredients are combined, you do not want the chocolate mixture sitting around while you search for flour or cocoa.
If your eggs are refrigerator-cold, place them in a bowl of lukewarm water for about 5 to 10 minutes.
Do not use hot water.
Step 1: Melt the Butter and Chocolate
Place the butter and 8 ounces of chopped semisweet chocolate in a heatproof bowl.
Melt them gently.
You can place the bowl over a saucepan containing a small amount of barely simmering water. The bottom of the bowl should not touch the water.
Stir frequently.
As soon as the mixture becomes smooth, remove it from the heat.
You can also melt the ingredients in a saucepan over very low heat. Keep stirring and watch carefully so the chocolate does not scorch.
Allow the mixture to cool for about 5 minutes.
It should remain fluid and warm, but it should not be extremely hot when added to the eggs.
Step 2: Build the Sugar and Egg Mixture
Place the granulated sugar, brown sugar, eggs, and vanilla in a large bowl.
Whisk vigorously for about 2 to 3 minutes.
The mixture should become smoother, slightly thicker, and glossy.
This step deserves more attention than the original quick recipe suggests.
A well-mixed sugar and egg base can help with the thin brownie crust. The goal is not to whip the eggs into a huge foam like sponge cake. Instead, you want a cohesive, glossy mixture in which much of the sugar has begun to dissolve.
This is one of the small details that can separate dull brownies from brownies with a more attractive surface.
Step 3: Add the Chocolate
Slowly pour the warm melted chocolate and butter into the egg mixture while whisking.
Do this gradually rather than dumping everything in at once.
Whisk until the batter looks dark, glossy, and uniform.
At this stage, the kitchen should smell intensely of chocolate.
Step 4: Add the Dry Ingredients
Whisk the flour, cocoa powder, and salt together separately.
If the cocoa contains hard lumps, sift it first.
Add the dry ingredients to the chocolate mixture.
Now switch from the whisk to a rubber spatula.
Fold gently until only a few faint flour streaks remain.
Add the chocolate chips and finish folding.
Stop as soon as the batter is evenly mixed.
Do not continue stirring simply because the batter feels satisfying to mix. Excessive mixing after the flour is added can make the finished texture tougher.
For more baking ideas, our guide to baking or air frying cookies explains how different cooking methods change baked textures.
Step 5: Fill the Pan
Transfer the batter immediately to the prepared pan.
Because an 8-inch square pan is relatively small, the batter will form a thick layer. That thickness is intentional. It helps produce the tall brownies shown in the finished presentation.
Use the spatula to push batter gently into the corners.
Smooth the surface.
Do not press down hard.
Bake immediately.
How to Get a Better Brownie Crust
A crackly brownie surface is not created by one magic ingredient.
Several details work together.
Whisk the eggs and sugars thoroughly before adding the dry ingredients. Use granulated sugar rather than replacing all of it with brown sugar. Keep the melted chocolate mixture warm enough to remain fluid. And avoid adding excess flour.
Most importantly, do not confuse the surface crust with doneness.
A brownie can develop a beautiful crust and still be raw inside. It can also be badly overbaked underneath an attractive top.
In this recipe, the ganache will eventually cover most of that crust. Still, getting the brownie base right matters because the crust contributes to the final texture.
Step 6: Bake Without Drying the Center
Bake at 350°F (175°C) for approximately 28 to 34 minutes.
Begin checking at about 28 minutes.
The outer edges should look set. The center should no longer look like liquid batter, but it can remain slightly soft.
Insert a toothpick into the center.
For these Fudgy Holiday Chocolate Brownies, you want moist crumbs attached to the toothpick.
You do not want wet raw batter.
You also do not need a perfectly clean toothpick.
That completely clean toothpick is where many good brownies become overbaked brownies.
Remember that residual heat continues to affect the center after the pan leaves the oven.
Place the pan on a cooling rack and leave the brownies inside it.
Cool completely.
This can take 1½ to 2 hours, depending on room temperature.
Do not spread ganache over warm brownies.
Step 7: Make the Chocolate Ganache
Finely chop 8 ounces of semisweet chocolate and place it in a heatproof bowl.
Pour the heavy cream into a small saucepan.
Heat it over medium-low heat until it is steaming and small bubbles begin appearing around the edge.
Do not let it boil vigorously.
Pour the hot cream over the chocolate.
Leave it untouched for 2 minutes.
Then begin stirring gently from the center.
Continue until the ganache becomes smooth and glossy.
Add one tablespoon of butter and stir again.
If tiny pieces of chocolate remain, give them another minute to melt before stirring.
Allow the ganache to sit until it becomes thick enough to spread without running down the sides.
Step 8: Recreate the Holiday Finish
Keep the brownies in one large slab while decorating.
Spoon the ganache onto the completely cooled surface.
Spread it into a generous, even layer.
Do not make the top perfectly flat.
Instead, use the back of a spoon or a small offset spatula to create broad, loose swirls. A compact Ateco offset spatula works especially well here because its narrow blade gives you more control without flattening the soft ganache.
Scatter red, white, and green sprinkles lightly across the ganache.
Less is better here.
Chocolate should remain the dominant visual element. The sprinkles are accents, not a solid coating.
Allow the ganache to set before slicing.
For firmer cuts, you can briefly chill the brownies once the ganache has cooled.
How to Cut Thick, Clean Brownie Squares
Lift the entire brownie slab from the pan using the parchment handles.
Place it on a cutting board.
Use a large sharp knife.
For cleaner slices, warm the knife under hot water and wipe it completely dry.
Make one cut.
Clean the blade.
Repeat.
This takes longer, but it keeps chocolate and ganache from building up on the knife.
For the same thick appearance as the pictured brownies, cut the 8-inch slab into 9 large squares.
For parties, cut it into 16 smaller portions.
Common Mistakes to Avoid
Overbaking: This is the biggest problem. Start checking early rather than relying blindly on the timer.
Using the wrong pan size: A 9 x 13-inch pan will produce much thinner brownies and requires a different baking time.
Adding ganache while the brownies are warm: The topping can melt into a thin, messy layer.
Overmixing after adding flour: Fold only until the dry ingredients disappear.
Boiling the cream hard: Gentle heating is enough for ganache.
Cutting immediately: Warm brownies are soft. Warm ganache is even softer. Give both time to set.
If texture problems interest you, our article on the secret to crunchy cookies looks at another side of baking texture.
Storage and Make-Ahead Tips
Store the finished brownies in an airtight container.
Because these brownies contain a cream-based ganache, refrigeration is the more cautious choice for longer storage. Let chilled brownies sit at room temperature briefly before serving if you prefer a softer, fudgier bite.
You can also bake the brownie layer a day before decorating.
Let it cool completely. Cover it well. Prepare and spread the ganache the following day.
This makes the recipe useful when you are preparing several holiday desserts at once.
Serving Ideas
Serve these brownies as they are for the closest match to the intended presentation.
For a plated dessert, add vanilla ice cream.
Fresh raspberries or strawberries can cut through the chocolate richness.
Coffee also pairs naturally with dark chocolate.
For a holiday dessert tray, place the brownies beside lighter cookies rather than several other heavily frosted chocolate desserts.
If you’re building a larger seasonal baking table, our star-shaped cookies guide offers another festive option.
Frequently Asked Questions
What makes brownies fudgy instead of cakey?
Fudgy brownies generally rely on a high proportion of fat and chocolate relative to flour. Careful baking matters too. Too much flour or too much oven time can create a drier, more cake-like texture.
How do I know when fudgy brownies are done?
Check the center with a toothpick. It should carry moist chocolate crumbs, but not liquid batter. The edges should look set while the center remains slightly soft.
Why don’t my brownies have a shiny crust?
The sugar may not have dissolved sufficiently into the egg mixture, or the mixing method may have been different. Thoroughly whisking the sugar and eggs before adding the flour can help create a delicate glossy surface.
Can I make these brownies without ganache?
Yes. The brownie base can be served alone. However, the ganache is an important part of this particular holiday recipe and gives the brownies the thick chocolate appearance shown in the reference image.
Can I use milk chocolate for the ganache?
You can, but the result will be sweeter. Semisweet chocolate creates a better balance with the already sweet brownie base.
Why did my ganache turn grainy?
The chocolate may have become too hot, or water may have entered the mixture. Chop the chocolate finely and pour hot, steaming cream over it rather than cooking the chocolate directly.
Can I make these brownies ahead of Christmas?
Yes. Bake the brownie base ahead, cool it fully, and keep it well covered. The ganache can be added closer to serving.
Can I double the recipe?
Yes, but do not simply put twice the batter into the same 8-inch pan. Use a suitably larger pan and remember that changing pan dimensions changes baking behavior.
Final Baking Notes
The secret to memorable Fudgy Holiday Chocolate Brownies is not adding more and more ingredients. It is knowing when to stop.
Stop mixing when the flour disappears.
Stop baking while moist crumbs still cling to the toothpick.
Wait until the brownie is completely cool before adding ganache.
Then stop decorating before the sprinkles hide the chocolate.
The result is exactly what a holiday brownie should be: thick, dark, rich, and unmistakably homemade. The center stays soft and fudgy. The ganache adds a creamy chocolate layer. The red, white, and green sprinkles give just enough festive color.
And when that first thick square is lifted from the pan, leaving a few chocolate crumbs behind, do not be surprised if the rest disappear soon after.