
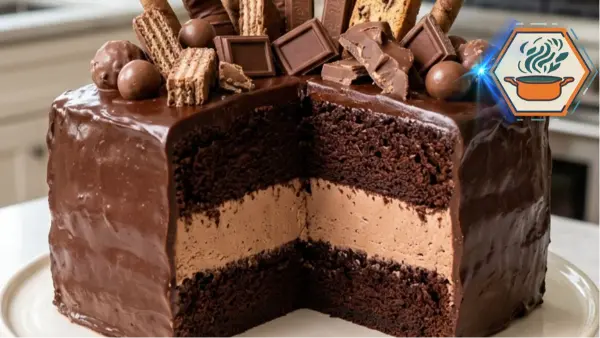
There is a moment when an ordinary chocolate cake turns into a celebration cake. For this Loaded Chocolate Candy Cake, that moment comes when the glossy ganache meets a generous pile of chocolate wafers, crisp rolls, cookie pieces, mini chocolate squares, and round chocolate-covered bites. Cut into it, and the contrast gets even better. You see dark, moist cake around a thick layer of light chocolate cream. It looks dramatic, but every part can be made in a home kitchen.
The goal here is not simply to put candy on a chocolate cake. We want the layers to stay moist but strong enough to hold the filling. The chocolate cream needs enough body to remain between the layers. The ganache should be glossy and thick enough to cling to the cake. Most importantly, the candy should stay where you put it instead of sliding into a pool of warm chocolate.
That balance is what makes this recipe work. Chocolate cakes topped with candy appear in many forms, and chocolate ganache is a common way to combine cake and candy decorations. Food Network, for example, features candy-inspired cakes paired with chocolate ganache. You can also visit RecipesMind for more practical home-cooking ideas.
This version focuses on the tall square appearance shown in our finished cake: two deep chocolate cake layers, a visible chocolate cream center, a smooth ganache coating, and an intentionally loose arrangement of chocolates on top.
JUMP TO
Loaded Chocolate Candy Cake
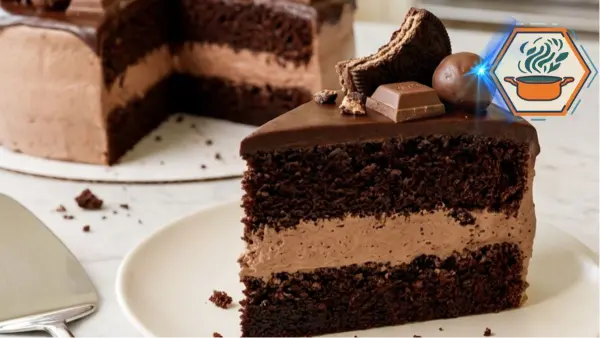
A tall square chocolate layer cake with moist chocolate sponge, fluffy chocolate cream filling, glossy semisweet chocolate ganache, and a generous mix of chocolate wafers, crisp rolls, cookie pieces, mini chocolate squares, and chocolate-covered bites.
- Total Time: About 2 hours 20 minutes
- Yield: 16 slices
Ingredients
Chocolate Cake
- 2 cups (240 g) all-purpose flour
- 2 cups (400 g) granulated sugar
- 3/4 cup (70 g) unsweetened cocoa powder
- 2 teaspoons baking soda
- 1 teaspoon baking powder
- 1 teaspoon fine salt
- 2 large eggs, room temperature
- 1 cup (240 ml) whole milk, room temperature
- 1/2 cup (120 ml) neutral vegetable oil
- 2 teaspoons vanilla extract
- 1 cup (240 ml) hot brewed coffee or hot water
Chocolate Cream Filling
- 8 oz (226 g) full-fat block cream cheese, softened
- 1/2 cup (60 g) powdered sugar
- 1/3 cup (30 g) unsweetened cocoa powder
- 1 teaspoon vanilla extract
- 1 1/2 cups (360 ml) cold heavy whipping cream
Chocolate Ganache
- 12 oz (340 g) semisweet chocolate, finely chopped
- 1 cup (240 ml) heavy cream
- 1 tablespoon (14 g) unsalted butter
Chocolate Toppings
- About 2 to 3 cups assorted chocolate decorations, roughly 300 g total
- Mini chocolate squares
- Chocolate wafer cookies
- Chocolate-covered wafer pieces
- Crisp chocolate rolls
- Chocolate sandwich cookie pieces
- Chocolate-covered cereal or malted bites
- Small pieces of milk chocolate
- Small pieces of dark chocolate
Instructions
- Prepare the pans. Preheat the oven to 350°F (175°C). Lightly grease two 8-inch square cake pans. Line the bottoms with parchment paper and grease the parchment.
- Mix the dry ingredients. In a large bowl, whisk together the flour, granulated sugar, cocoa powder, baking soda, baking powder, and salt. Break up any visible cocoa lumps.
- Add the wet ingredients. Add the eggs, whole milk, vegetable oil, and vanilla. Mix on low speed until combined. Do not overmix.
- Add the hot liquid. Slowly pour in the hot coffee while mixing gently. The batter will become quite thin. This is normal. Do not compensate by adding extra flour.
- Divide the batter. Pour the batter evenly between the two prepared square pans. For equal layers, weigh the filled pans or weigh the batter before dividing it.
- Bake. Bake for 28 to 34 minutes. Begin checking at 28 minutes. A toothpick inserted in the center should come out with several moist crumbs but no wet batter.
- Cool correctly. Let the cakes sit in their pans for 10 to 15 minutes. Carefully turn them onto cooling racks, remove the parchment, and allow them to cool completely.
- Make the chocolate cream. Beat the softened block cream cheese until smooth. Add powdered sugar, cocoa powder, and vanilla. Beat until creamy.
- Whip the filling. Gradually pour in the cold heavy cream while mixing at low speed. Increase to medium-high and whip until thick, fluffy, and firm enough to hold its shape. Do not overwhip.
- Level the cake if necessary. If either cake has a pronounced dome, trim it carefully with a serrated knife. Keeping the layers flat helps prevent sliding.
- Fill the cake. Place one cake layer on a flat serving platter or cake board. Spread the chocolate cream evenly over the top, stopping just short of the outer edge.
- Add the second layer. Set the second cake layer on top and gently align the square corners. Refrigerate for 20 to 30 minutes so the filling can firm.
- Prepare the ganache. Put the finely chopped semisweet chocolate in a heatproof bowl. Heat the heavy cream until steaming with small bubbles beginning to appear around the edge.
- Melt the chocolate. Pour the hot cream over the chopped chocolate. Leave untouched for 2 to 3 minutes.
- Finish the ganache. Stir slowly from the center outward until completely smooth and glossy. Add the butter and stir until incorporated.
- Cool the ganache slightly. Let it stand until it thickens but remains pourable. Very hot ganache is too thin and may run off the cake.
- Cover the cake. Spread ganache across the top and down the sides. Allow a few natural drips and soft spatula marks rather than trying to create a perfectly rigid finish.
- Wait before decorating. Let the ganache become slightly thick and tacky. Do not place heavy chocolates onto very warm ganache.
- Add the toppings. Begin with the tall wafer rolls and larger chocolate pieces. Add mini squares, wafer pieces, cookie fragments, and round chocolate bites around them.
- Keep the decoration natural. Leave patches of glossy ganache visible. Avoid covering every square inch of the surface.
- Chill before slicing. Refrigerate the finished cake for 30 to 45 minutes.
- Slice cleanly. Warm a sharp knife with hot water, wipe it completely dry, and cut the cake. Clean and rewarm the blade between slices for the neatest presentation.
Notes
- Do not add extra flour even though the batter looks thin after adding the coffee.
- Full-fat block cream cheese gives a more stable filling than soft cream cheese spread.
- The heavy whipping cream should be very cold before whipping.
- Both cake layers must be completely cool before filling.
- A 20 to 30-minute chill after filling helps stop the layers from sliding.
- Let the ganache thicken before coating the cake.
- Let it become slightly tacky again before adding the heavy chocolate pieces.
- Use different heights, shapes, and textures for the topping.
- Leave some ganache visible between chocolate clusters.
- For crisp toppings, reserve a few wafer pieces and add them closer to serving.
- Because the filling contains cream cheese and whipped cream, keep the finished cake refrigerated.
- Coffee may be replaced with the same volume of hot water.
- For the closest visual match to the reference cake, use two square layers rather than round cake pans.
- Prep Time: 45 minutes
- Chilling / Resting: About 1 hour
- Cook Time: 32 minutes
- Category: Dessert
- Method: Baking
- Cuisine: American
Why This Loaded Chocolate Candy Cake Works
The best part of this cake is contrast.
The cake itself is dark and tender. The middle is softer, lighter, and creamy. The ganache adds a dense chocolate finish. Finally, the toppings bring crunch.
Coffee is also useful here. It doesn’t need to make the cake taste strongly of coffee. Instead, it pairs naturally with cocoa and gives the batter the extra liquid it needs.
Another important detail is the shape. Two 8-inch square pans produce the clean corners and broad top that suit this loaded style. Round pans can work, but they will not give you the same finished appearance.
And although the decorations look spontaneous, there is some planning behind them. Large pieces create height. Smaller chocolates fill gaps. Leaving patches of ganache uncovered stops the top from becoming a solid wall of candy.
Ingredients You’ll Need
For the Chocolate Cake
- 2 cups (240 g) all-purpose flour
- 2 cups (400 g) granulated sugar
- 3/4 cup (65–75 g) unsweetened cocoa powder
- 2 teaspoons baking soda
- 1 teaspoon baking powder
- 1 teaspoon fine salt
- 2 large eggs, at room temperature
- 1 cup (240 ml) whole milk, at room temperature
- 1/2 cup (120 ml) neutral vegetable oil
- 2 teaspoons vanilla extract
- 1 cup (240 ml) hot brewed coffee or hot water
For the deepest flavor, choose unsweetened cocoa rather than a sweetened drinking-chocolate powder.
For the Chocolate Cream Filling
- 8 oz (226 g) full-fat block cream cheese, softened
- 1/2 cup (60 g) powdered sugar
- 1/3 cup (30 g) unsweetened cocoa powder
- 1 teaspoon vanilla extract
- 1 1/2 cups (360 ml) cold heavy whipping cream
Use block cream cheese, not a soft whipped spread. The firmer texture helps the filling support the upper cake layer.
Keep the heavy cream cold until you need it. Cold cream whips more reliably and gives the filling its airy texture.
For the Chocolate Ganache
- 12 oz (340 g) semisweet chocolate, finely chopped
- 1 cup (240 ml) heavy cream
- 1 tablespoon (14 g) unsalted butter
Finely chopping the chocolate matters. Smaller pieces melt more evenly when the hot cream is added.
For the Loaded Chocolate Topping
Use a mixture rather than one type of candy:
- Mini milk or dark chocolate squares
- Chocolate wafer cookies
- Chocolate-covered wafer fingers
- Crisp chocolate rolls
- Chocolate sandwich cookie pieces
- Chocolate-covered cereal or malted bites
- Broken milk chocolate
- Broken dark chocolate
You don’t need an exact weight. About 2 to 3 cups of mixed decorations is a practical starting point.
The aim is abundance without completely hiding the ganache.
Equipment
You will need:
- Two 8-inch square cake pans for the tall square shape used in this recipe
- Parchment paper
- Large mixing bowl
- Whisk
- Electric hand mixer or stand mixer
- Rubber spatula
- Cooling rack
- Offset spatula
- Heatproof bowl
- Cake board or flat serving plate
- Serrated knife, if the layers need leveling
A digital kitchen scale is also helpful. It makes it much easier to divide the batter evenly between the two pans and reproduce the same cake later.
How to Make the Chocolate Cake
Heat the oven to 350°F (175°C).
Grease two 8-inch square cake pans. Line the bottoms with parchment paper, then lightly grease the parchment.
Do not skip the paper. Chocolate cake can be tender, and parchment makes releasing the square layers much easier.
In a large bowl, whisk together the flour, sugar, cocoa powder, baking soda, baking powder, and salt.
Break up any visible cocoa lumps.
In another bowl, lightly whisk the eggs. Add the milk, vegetable oil, and vanilla.
Pour the wet mixture into the dry ingredients.
Mix only until most of the dry streaks disappear.
Now slowly pour in the hot coffee while mixing on low speed or whisking gently.
At this point, the batter will look surprisingly thin.
That is normal.
Do not add extra flour because the batter looks loose. The added liquid is part of what gives the finished cake its moist crumb.
Divide the batter evenly between the two prepared pans. A scale is the easiest way to create layers of similar thickness.
Bake for 28 to 34 minutes.
Start checking near the 28-minute mark. Insert a toothpick into the center. You want it to emerge with a few moist crumbs rather than liquid batter.
Avoid baking until the cake becomes completely dry around the center. Overbaking is one of the easiest ways to lose the soft texture we’re trying to create.
Let the cakes rest in their pans for about 10 to 15 minutes.
Run a thin knife around the edges if needed. Turn them onto cooling racks, remove the parchment, and let them cool completely.
Never put the cream filling onto warm cake.
Even mild residual heat can soften the filling.
Make the Chocolate Cream Filling
While the cakes cool, prepare the cream.
Beat the softened cream cheese until smooth.
Add the powdered sugar, cocoa powder, and vanilla. Beat again until the mixture looks even and no obvious cream cheese lumps remain.
Scrape the bottom and sides of the bowl.
Now add the cold heavy cream gradually while mixing at low speed.
Once incorporated, increase to medium-high speed and whip until the filling becomes thick and fluffy.
Watch it closely near the end.
You want a filling that holds its shape when lifted with a spatula. It should not run off the cake.
Do not continue beating indefinitely. Heavy cream can become grainy when overwhipped.
If your kitchen is very warm, refrigerate the finished filling for 10 to 15 minutes before assembling the cake.
Build a Stable Layer Cake
Place one completely cooled cake layer on your serving plate or cake board.
If it has a large dome, carefully level it with a serrated knife. You don’t need to remove much. A flat surface simply makes the finished cake more stable.
Spread a generous, even layer of chocolate cream over the cake.
Take the filling close to the edges, but don’t pile a thick mound right against them. The weight of the second layer will push the cream outward.
Carefully position the second cake layer on top.
Look at the cake from every side and gently adjust it until the corners line up.
Refrigerate the assembled cake for about 20 to 30 minutes.
This short chilling period is easy to overlook, but it makes the next stage much easier. The cream firms up, the layers settle, and the cake becomes less likely to shift when ganache is added.
If you’re interested in the small decisions that make cakes taste and look better, our guide to the difference between butter cake styles offers more baking context.
How to Make Glossy Chocolate Ganache
Place the finely chopped semisweet chocolate in a heatproof bowl.
Heat the heavy cream in a small saucepan until it is steaming and small bubbles begin appearing around the edge.
Do not let it boil aggressively.
Pour the hot cream over the chopped chocolate.
Leave it untouched for 2 to 3 minutes.
Then begin stirring slowly from the center.
As the chocolate and cream combine, the mixture will change from streaky to dark and glossy.
Add the butter and stir until smooth.
Now comes a detail that can make or break the appearance of the cake:
Do not immediately pour very hot ganache over it.
Fresh ganache can be too thin. It may race down the sides, expose the cake, soften the filling, and give your candy decorations nothing stable to grip.
Let it cool until it thickens slightly.
You are looking for a consistency that still flows from a spoon but moves slowly.
Cover and Decorate the Cake
Remove the chilled cake from the refrigerator.
Spread ganache over the top first. Push some gently toward the edges, allowing a few natural drips to travel down the sides.
Then use an offset spatula to spread ganache around the exposed sides.
The finished coating does not need to resemble perfectly smooth fondant. The visual style works better with soft spatula marks and natural ganache movement.
Wait again before adding the candy.
The ganache should become slightly tacky.
This is one of the most important details in the whole recipe.
If it is still very fluid, heavy chocolate squares and wafer pieces can sink, tilt, or slide. If it becomes completely hard, the decorations may not stick.
Begin with the tallest pieces.
Insert a few crisp wafer rolls at different angles. Add broken wafer cookies and larger chocolate pieces around them.
Next, place mini chocolate squares in several directions.
Finish with smaller chocolate-covered bites and cookie fragments.
Avoid making a perfect pattern.
The cake should look generously loaded rather than geometrically decorated.
Think in terms of height and texture:
- Tall wafer rolls create vertical movement.
- Flat chocolate squares provide recognizable shapes.
- Broken cookies add rough edges.
- Round chocolate bites fill small spaces.
- Exposed ganache gives the eye somewhere to rest.
That last point matters.
More candy does not automatically create a better-looking cake.
Leave visible chocolate ganache between several clusters.
The Final Chill
Once decorated, refrigerate the cake for 30 to 45 minutes.
This firms the filling and ganache enough to produce cleaner slices.
For the best cut, use a large sharp knife.
Warm the blade under hot water, wipe it completely dry, then make your first cut. Clean and warm the blade again between slices when presentation matters.
You should see three distinct elements inside: dark chocolate cake, a thick lighter chocolate-cream center, and the ganache coating.
That contrast is part of what makes the Loaded Chocolate Candy Cake so striking once sliced.
Mistakes That Can Ruin This Cake
Adding Extra Flour to the Thin Batter
Don’t panic when the batter becomes thin after adding coffee.
Adding more flour can produce a heavy, dry cake.
Filling a Warm Cake
This is one of the biggest risks.
The layers need to be completely cool before assembly. Otherwise, the cream can soften and squeeze out.
Using Warm Ganache Too Soon
Give the ganache time to thicken.
Very hot ganache will be thin and can run straight off the cake.
Decorating Wet Ganache
Wait until it becomes tacky before adding heavier toppings.
Overloading One Side
Large chocolate pieces add real weight. Spread them across the surface rather than creating one extremely heavy cluster.
Skipping the Chill Before Slicing
The cake may taste wonderful immediately, but the filling will be softer.
A short refrigeration period makes the structure far cleaner.
Can You Change the Candy?
Absolutely.
The decoration is one of the easiest parts to personalize.
Try mixing milk, semisweet, and dark chocolate so every bite isn’t equally sweet.
You can also combine smooth chocolate with crisp wafers and cookies. That gives each slice more texture.
For a birthday cake, choose the birthday person’s favorite chocolate bars. For a more polished finish, stay within brown, dark brown, and cream shades.
Check allergen labels carefully when serving guests. Assorted candy and cookies can contain or come into contact with milk, wheat, soy, peanuts, or tree nuts.
How to Store Loaded Chocolate Candy Cake
This particular cake should be refrigerated because its filling contains cream cheese and whipped cream.
USDA food-safety guidance specifically distinguishes ordinary baked cakes from cakes containing cream cheese frosting or cream fillings, which require refrigeration. USDA guidance also states that soft cheeses such as cream cheese should be refrigerated.
Keep the cake covered in the refrigerator so the exposed cake does not dry out or absorb other food odors.
For the nicest texture, you can take the portion you plan to serve from the refrigerator shortly before eating, rather than leaving the entire cake sitting out for a long period.
Some wafer toppings will gradually lose their crispness in the refrigerator. If you are preparing the cake far ahead, consider reserving a few crisp decorations and adding them closer to serving.
Make-Ahead Plan
You don’t have to make everything in one session.
A practical schedule is:
- Day 1: Bake and completely cool the cake layers.
- Day 2: Make the filling, assemble, chill, prepare the ganache, and decorate.
- Serving day: Add any extra crisp toppings and slice.
If you make the cake layers ahead, wrap them well once they are fully cool.
This can make decorating day far less stressful.
Why Coffee Is Added to Chocolate Cake
Hot coffee contributes liquid while pairing well with cocoa’s roasted flavor.
If you don’t want to use coffee, replace it with the same amount of hot water.
The cake will still work.
Don’t remove that cup of liquid altogether. Doing so changes the intended batter balance.
What Does This Cake Taste Like?
The first impression is rich chocolate.
Then the textures separate.
The sponge is soft. The cream filling is cool and airy. Ganache provides a silky, denser layer. The candy topping adds crisp and crunchy bites.
That is why this recipe works better with different kinds of chocolate decorations instead of covering the top with only one candy.
It is not merely a cake with sweets scattered over it. Each layer contributes a different texture.
Serving Ideas
This cake naturally suits:
- Birthdays
- Family celebrations
- Chocolate-themed parties
- Valentine’s Day
- Graduation parties
- Holiday dessert tables
Because it is rich, start with modest portions. An 8-inch square layer cake can provide roughly 12 to 16 servings, depending on how generously you cut it.
Serve it with cold milk, coffee, or unsweetened tea to balance the sweetness.
Loaded Chocolate Candy Cake FAQs
What is a Loaded Chocolate Candy Cake?
It is a chocolate layer cake finished with a generous assortment of chocolate candies, wafers, cookies, or chocolate-covered bites. This recipe also includes chocolate cream filling and semisweet chocolate ganache.
Can I use water instead of coffee?
Yes. Replace the coffee with an equal amount of hot water. Coffee adds another roasted note, but it isn’t required for the cake to bake correctly.
Why is my chocolate cake batter so thin?
The batter is supposed to be relatively fluid because it contains one cup of hot coffee or water. Don’t correct it by adding extra flour.
Can I make this cake in round pans?
Yes. Two 8-inch round pans can be used, although the finished cake will not match the distinctive square presentation of this version.
Why did my ganache run off the cake?
It was probably too warm or too fluid. After combining the chocolate and cream, give the ganache time to cool and thicken before coating the cake.
When should I put the candy on the ganache?
Wait until the ganache is thickened and tacky but not completely firm. That gives larger pieces enough grip while still allowing you to position them.
Does Loaded Chocolate Candy Cake need refrigeration?
Yes. This version contains a cream cheese and whipped-cream filling, so it should be kept refrigerated. USDA guidance calls for refrigeration of cream cheese and cream-filled cakes.
Can I make it the day before?
Yes. In fact, chilling helps the cake settle and makes slicing easier. Keep it covered and refrigerated. For maximum crunch, you can add some wafer decorations closer to serving.
How do I get clean cake slices?
Chill the finished cake first. Use a sharp knife warmed with hot water and wiped dry. Clean the blade between cuts.
What chocolates work best on top?
Use several shapes and textures. Chocolate squares, wafer pieces, crisp rolls, cookie chunks, chocolate-covered cereal bites, and broken dark or milk chocolate create the loaded appearance.
A Cake Made to Be Seen—and Eaten
The fun of this Loaded Chocolate Candy Cake starts before anyone tastes it.
It arrives at the table looking almost excessive. Tall wafer rolls stick out from glossy chocolate. Broken bars sit between cookie pieces and round chocolate bites. Then the first slice reveals what all those decorations were hiding: two deep chocolate layers with a thick band of creamy chocolate filling running through the center.
Yet the most useful lesson is not to add as much chocolate as physically possible.
It is contrast.
Soft cake needs a stable cream. Smooth ganache benefits from crunchy wafers. Dark cake looks richer beside the lighter filling. Large decorations look more dramatic when some glossy ganache remains visible around them.
Give each stage enough time. Cool the cakes fully. Chill the filled layers. Let the ganache thicken. Add the candy only when the surface can hold it.
Do that, and you get the cake we were aiming for from the beginning: tall, square, deeply chocolatey, messy in exactly the right places, and ready for that moment when the first generous slice is lifted onto a plate.