Ingredients
Chilled graham cracker crust• 2 cups (240 g) fine graham cracker crumbs• 3 tablespoons (38 g) packed light brown sugar• 1/2 cup (113 g) unsalted butter, melted and cooled until just warm• 1/8 teaspoon fine saltFluffy cheesecake filling• 32 ounces (907 g; four 8-ounce blocks) full-fat block cream cheese, softened until pliable but not warm• 1 cup (120 g) powdered sugar, sifted if lumpy• 1/4 cup (60 g) full-fat sour cream• 2 teaspoons pure vanilla extract• 1 tablespoon (15 ml) fresh lemon juice• 1 1/2 cups (360 ml) cold heavy whipping cream, at least 36% milk fatHomemade strawberry topping• 1 1/2 pounds (680 g) fresh strawberries, weighed after hulling; leave tiny berries whole and halve larger berries• 1/3 cup (67 g) granulated sugar• 1 tablespoon (15 ml) fresh lemon juice• 1 1/2 tablespoons (12 g) cornstarch• 2 tablespoons (30 ml) cool water
Instructions
1. Prepare ingredients and pan. Allow approximately 1 hour for the cream cheese to become pliable in a cool kitchen; use sooner if ready. Keep heavy cream refrigerated. Do not exceed safe room-temperature limits. Fasten the ring onto a 9-inch springform base, at least 3 inches deep. A parchment circle on the base is optional; serve on the base rather than sliding the cake off.
2. Press the no-bake crust. Stir crumbs, brown sugar, and salt together, breaking up lumps. Add the just-warm melted butter and stir until all crumbs are evenly moistened. Press into the bottom of the pan and only about 1/2 inch up the sides using a flat-bottomed cup. Refrigerate 30 minutes. Do not bake or freeze.
3. Whip the cold cream. With clean beaters and a clean bowl, whip the heavy cream on medium-high until smooth, stiff peaks stand when the beaters lift, approximately 3–5 minutes. Do not continue until grainy. Refrigerate the whipped cream while preparing the cream cheese mixture.
4. Make the filling. In a separate large bowl, beat softened cream cheese and powdered sugar until smooth, approximately 2–3 minutes, scraping the bowl. Beat in sour cream, vanilla, and lemon juice just until blended. Fold in the cold whipped cream in 3 additions with a silicone spatula, turning the bowl and lifting from the bottom. Stop when evenly combined and fluffy; do not beat at high speed after adding whipped cream.
5. Fill and chill. Spread filling over the cold crust without large gaps, smoothing the top and leaving about 1/2 inch headroom. Keep the ring attached. Cover without touching the filling and refrigerate at 40°F or below for 12 hours, preferably overnight. The filling must be set before topping. Do not use the freezer to force a set.
6. Cook the topping during that chill. Combine strawberries, granulated sugar, and lemon juice in a small nonreactive saucepan. Mash a few berries lightly to help release juice, leaving most whole or halved. Warm over medium-low heat, stirring, until juicy and gently simmering, about 5–7 minutes. Stir cornstarch and cool water together in a small cup until smooth; stir the slurry into the fruit. Simmer gently, stirring along the bottom, for 1–2 minutes until thickened and glossy, approximately 10 minutes stovetop time total. Avoid boiling vigorously or crushing all the fruit. Estimated yield: about 2–2 1/4 cups, depending on berry size and evaporation.
7. Cool topping separately. Transfer to a shallow heat-safe dish. Cool promptly, using an ice-water bath if helpful, and refrigerate within 2 hours of cooking. Loosely cover while cooling, then cover once cold. Allow approximately 1–2 hours to become completely refrigerator-cold; this happens during the cheesecake’s 12-hour chill and is not added again to elapsed time. Never put warm topping on the filling.
8. Top the set cheesecake. When the cheesecake has chilled 12 hours and the topping is cold, spoon the topping gently over the cake with the ring still attached. Keep the layer within the pan; if your berries yield more than fits, reserve the excess for serving. Refrigerate another 30 minutes. The fruit layer will remain spoonable, not a solid gelatin slab.
9. Release and serve. Loosen the edge carefully with a thin non-scratching utensil, unlatch the springform ring, and lift it away. Serve from the base. Cut into 12 wedges with a sharp knife, wiping clean between cuts. Keep cake refrigerated until serving and return leftovers promptly to the refrigerator.
Notes
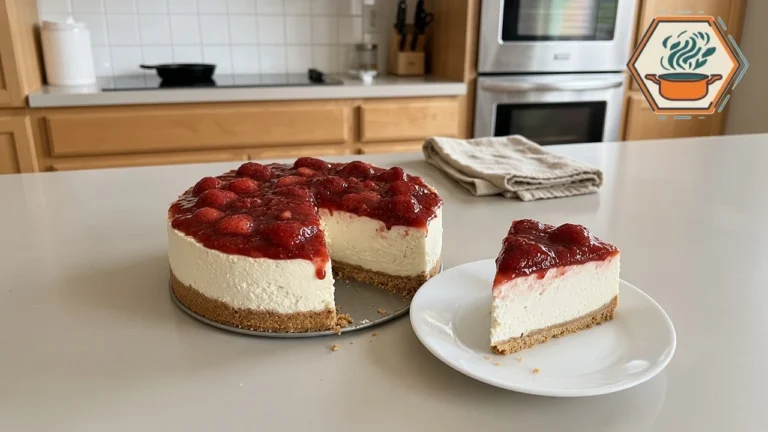
• Development status: Original measured formulation informed by established methods, developed to accompany the supplied reference photo. Not kitchen-tested by RecipesMind. Times, topping yield, cake height, and final texture are estimates, not guarantees; use the stated visual cues and add refrigerator time if needed. Reference-guided images illustrate the intended look, not a documented test batch.
• Time accounting: 45 minutes active prep (including measuring, mixing, and finishing), 10 minutes stovetop cooking, and 14 hours additional softening/chilling = 14 hours 55 minutes in a conservative sequential schedule. Additional time is 1 hour cream-cheese softening + 30 minutes crust chill + 12 hours filling set + 30 minutes final chill. Topping cooling overlaps the 12-hour filling chill. Starting with already pliable cream cheese shortens elapsed time. More chilling may be necessary.
• Cream cheese and cream: Use US full-fat block cream cheese, not whipped spread, reduced-fat cream cheese, or a tub spread. Heavy cream must stay cold and whip to firm peaks. Do not substitute milk, canned spray cream, or extra sour cream for the whipping cream. Those swaps have not been validated for a freestanding cake.
• Pan: One 9-inch pan at least 3 inches deep. Actual whipped volume varies; never mound filling above the pan rim. Reserve a little filling separately in a refrigerated cup if your pan lacks headroom. A 10-inch pan makes a lower cake; this recipe does not give validated timing or yield for other formats.
• Strawberries: Fresh firm berries give the closest whole/halved look. Frozen unsweetened berries may be used without thawing but soften more and may need longer cooking to achieve a thick spoonable sauce. Cook by consistency, cool fully, and keep excess sauce off the cake if too loose. Do not use raw flour or dry cornstarch to patch a runny finished filling.
• Food safety: Use pasteurized dairy. Keep refrigerator at 40°F or below. Limit cumulative time dairy is unrefrigerated to 2 hours, or 1 hour above 90°F; discard cake exceeding those limits. Store covered and use within 3–4 days of preparation, including any make-ahead days. Refrigerate cooked topping promptly in a shallow container. A longer shelf life from a different cheesecake recipe is not adopted here.
• Make ahead: Prepare the cake and topping the day before; store separately and covered in the refrigerator. Add cold topping after the filling sets, then chill another 30 minutes before serving. The fruit will soften the crumb base as it sits. Refrigerator storage is recommended for this untested topped version; freezing is not a shortcut to setting.
• Nutrition and video are intentionally blank. No fabricated calories, test results, reviews, or ratings.
- Prep Time: 45 minutes
- Additional softening/chilling: 14 hours
- Cook Time: 10 minutes
- Category: Dessert
- Method: No-Bake / Refrigerating; stovetop topping
- Cuisine: American