
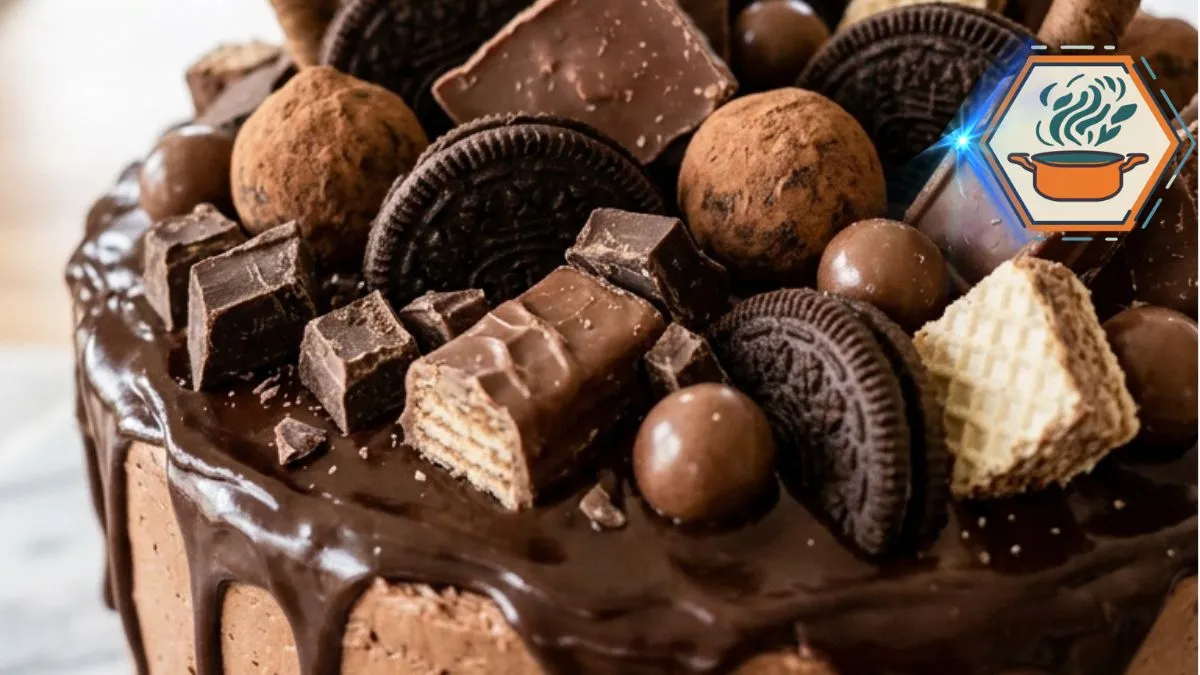
Some cakes arrive at the table looking neat and delicate. A Loaded Chocolate Candy Bar Cake makes a very different entrance. It is tall, dark, messy in the best possible way, and covered from edge to edge with chocolate. Cut into it and three moist chocolate layers appear, separated by thick chocolate buttercream. On top, glossy ganache slowly runs down the sides while cookies, wafers, truffles, and broken chocolate pieces create the dramatic finish.
The secret is not simply adding more chocolate. Each part needs a purpose. The cake must stay moist enough to support three layers without becoming dense. The buttercream needs enough body to hold the stack. The ganache must be thick enough to create controlled drips rather than running to the cake board. Even the temperature of the ingredients matters. For more background on recognizing when a chocolate cake has finished baking, King Arthur Baking’s cake doneness guide explains several useful visual and texture tests.
There is another small ingredient doing important work here: hot coffee. It adds liquid while giving the cocoa a deeper chocolate character. Coffee can bring out more complex chocolate notes without necessarily making the finished cake taste like a cup of coffee. King Arthur Baking also explains the role of coffee in chocolate cake.
The result is a celebration cake that looks extravagant but can still be made in a home kitchen.
Affiliate disclosure: As an Amazon Associate I earn from qualifying purchases. This article may contain affiliate links to kitchen tools I find useful for preparing this recipe.
JUMP TO
Why This Loaded Chocolate Candy Bar Cake Works
The best part of this cake is contrast.
The crumb is soft and moist. The frosting is creamy. Ganache adds a silky layer. Sandwich cookies bring crunch. Wafers add a lighter crisp texture. Truffles are soft inside, while broken pieces of milk and dark chocolate give each slice a firm chocolate bite.
It also looks far more complicated than it really is.
There is no need to pipe dozens of perfect decorations. In fact, a slightly irregular arrangement works better. The chocolate pieces should have different heights and angles. Some should overlap. Others should leave small open areas where the ganache remains visible.
That controlled imperfection is what gives the finished cake the abundant homemade appearance shown in the inspiration photo.
If you enjoy rich chocolate desserts, the cake can also sit naturally alongside RecipesMind’s strawberry-filled chocolate cake guide.
Ingredients You’ll Need
This recipe makes one tall three-layer 8-inch cake, about 12 to 16 servings depending on slice size.
For the chocolate cake
- 2 1/2 cups (300 g) all-purpose flour
- 1 cup (85 g) unsweetened natural cocoa powder
- 2 cups (400 g) granulated sugar
- 2 teaspoons baking soda
- 1 teaspoon baking powder
- 1/2 teaspoon fine salt
- 3 large eggs, at room temperature
- 1 1/4 cups (300 ml) buttermilk, at room temperature
- 3/4 cup (180 ml) neutral vegetable oil
- 2 teaspoons pure vanilla extract
- 1 cup (240 ml) hot freshly brewed coffee
For the chocolate buttercream
- 1 1/2 cups (340 g) unsalted butter, softened
- 3/4 cup (64 g) unsweetened cocoa powder
- 5 cups (600 g) powdered sugar, preferably sifted
- 1/2 cup (120 ml) heavy cream
- 2 teaspoons vanilla extract
- 1/4 teaspoon fine salt
For the chocolate ganache
- 8 oz (227 g) semisweet chocolate, finely chopped
- 3/4 cup (180 ml) heavy cream
For the loaded topping
Use enough toppings to create height without completely hiding the cake.
- Chocolate sandwich cookies
- Chocolate-coated wafer sticks
- Plain wafer cookies
- Chocolate wafer bars, cut or broken
- Homemade or store-bought chocolate truffles
- Milk chocolate pieces
- Dark chocolate pieces
- Small round chocolate candies or chocolate balls
You do not need to use branded candy bars. A mixture of shapes and textures gives a more natural appearance.
Equipment That Makes This Cake Easier
Three matching 8-inch pans are very useful. Matching pans help the layers bake at a similar rate and give the finished cake its tall, straight profile.
A sturdy set of 8-inch aluminum pans is a practical option. Here is an Amazon search for 8-inch round aluminum cake pans
You will also benefit from a stand or hand mixer. The frosting needs several minutes of beating to become smooth and airy. Here is an Amazon search for electric stand mixers.
For smooth sides with a slightly rustic finish, an offset spatula gives you much better control than a regular spoon. You can replace this Amazon search for offset cake spatulas
Finally, a rotating cake stand makes frosting the sides much easier, especially on a tall three-layer cake. Here is an Amazon search for rotating cake decorating turntables.
Prepare the Pans Before Mixing
Heat the oven to 350°F (175°C).
Grease three 8-inch round cake pans lightly. Cut three parchment circles and place one in the bottom of each pan. Grease the parchment lightly as well.
Do not skip the parchment.
These layers are very moist. Parchment greatly reduces the chance of losing part of a cake when turning it out.
Place an oven rack near the center of the oven.
For the most consistent layers, weigh the empty mixing bowl before starting. Once the batter is finished, weigh it again and subtract the bowl’s weight. Divide the remaining batter weight by three.
That gives each pan almost exactly the same amount.
How to Make the Moist Chocolate Cake Layers
In a large bowl, whisk together the flour, cocoa powder, sugar, baking soda, baking powder, and salt.
Break up every visible lump of cocoa.
In another bowl or large measuring jug, whisk the eggs, buttermilk, vegetable oil, and vanilla until combined.
Pour the wet mixture into the dry ingredients.
Mix on low speed just until most of the flour disappears.
Now add the hot coffee slowly.
The batter will become quite thin. That is normal. Do not add extra flour because the batter looks loose.
Mix only until smooth.
Overmixing after the flour becomes wet can give the cake a firmer texture than intended.
Divide the batter evenly among the prepared pans.
Bake for approximately 25 to 30 minutes.
Start checking around 24 to 25 minutes because ovens vary.
A finished chocolate layer should look matte rather than wet or glossy. The center should spring back after a gentle touch. A toothpick inserted near the center should come out clean or with a few moist crumbs rather than liquid batter. These are among the practical signs recommended for checking chocolate cake doneness.
Let the cakes rest in their pans for about 10 to 15 minutes.
Run a thin knife around the edges if needed. Turn the cakes onto wire racks, remove the parchment, and let them cool completely.
Never frost warm cake.
Even slight warmth can soften buttercream and make a tall stack slide.
The Cooling Trick for Cleaner Layers
Once completely cool, wrap each cake layer and chill it for about 30 to 60 minutes before assembly.
Cold cake is firmer. It produces fewer loose crumbs while frosting.
If a layer has a noticeable dome, trim it with a long serrated knife. Keep the knife parallel to your work surface.
Do not remove more cake than necessary.
The goal is three stable layers with relatively flat surfaces.
Make the Creamy Chocolate Buttercream
Beat the softened butter for about 3 minutes until smooth and lighter in appearance.
Add the cocoa powder and mix on low.
Gradually add the powdered sugar, about one cup at a time. Keep the mixer on low at first so the sugar stays in the bowl.
Add vanilla, salt, and most of the heavy cream.
Beat for another 3 to 4 minutes on medium speed.
Check the texture.
The buttercream should form soft peaks but still hold its shape. If it feels too stiff, add heavy cream one tablespoon at a time. If it becomes too soft, add a small amount of powdered sugar.
Avoid pouring in all the extra liquid at once.
A tall cake needs frosting that can carry the weight of the layers above it.
Stack the Cake Without Sliding
Put a small spoonful of buttercream in the center of your cake board or serving plate. Place the first cake layer on top.
Spread roughly 3/4 to 1 cup of frosting over it.
Keep the filling level.
Add the second layer and repeat.
Place the third cake layer on top, preferably upside down. The flat bottom of the cake becomes the top surface and gives you a cleaner edge.
Apply a very thin layer of buttercream over the whole cake. This is the crumb coat.
Refrigerate for 20 to 30 minutes.
The crumb coat traps loose crumbs so they do not appear in the final frosting.
Now cover the chilled cake with the remaining buttercream.
For the same visual character as the reference cake, do not polish the sides until they look artificial. Smooth them enough to create straight walls while leaving a few gentle spatula marks.
How to Make a Thick Chocolate Ganache Drip
Finely chop the semisweet chocolate and put it into a heatproof bowl.
Heat the heavy cream until steaming and just beginning to simmer around the edges. Do not boil it aggressively.
Pour it over the chocolate.
Leave it untouched for 2 to 3 minutes.
Then stir slowly from the center outward until glossy and smooth.
Ganache thickens as it cools, so temperature and waiting time have a major effect on how it flows. Chocolate-to-cream ratio also changes its final consistency.
This matters greatly for the appearance of our Loaded Chocolate Candy Bar Cake.
If the ganache is too hot, it may melt the buttercream and run all the way to the bottom.
If it is too cold, it may sit on top in thick lumps.
Test one drip on the back of the chilled cake first.
It should travel slowly down the side and stop before reaching the cake board.
If it runs too quickly, wait a few more minutes.
Once the consistency is right, spoon small amounts around the upper edge to form irregular drips. Then spread the remaining ganache across the top.
Chill briefly until the ganache is stable but still slightly tacky.
How to Get the Loaded Look in the Photo
This is where the cake gets its personality.
Do not simply empty candy onto the center.
Start with the largest pieces.
Push several broken chocolate bars gently into the ganache at different angles. Add tall chocolate wafer sticks toward the back. Place sandwich cookies partly upright rather than laying every cookie flat.
Then fill selected spaces with:
- Chocolate truffles
- Broken wafer pieces
- Small chocolate balls
- Milk chocolate squares
- Dark chocolate chunks
- Halved sandwich cookies
Keep the tallest decorations toward the rear and center.
Place shorter pieces toward the front.
Leave a few visible areas of ganache between decorations.
The reference look works because the cake feels abundant without becoming perfectly symmetrical. Broken chocolate pieces are particularly useful because their uneven edges make the decoration feel natural.
You can also vary the chocolate shades. Dark chocolate, milk chocolate, cocoa-colored cookies, and pale wafers prevent the top from becoming one flat brown mass.
How to Cut a Tall Chocolate Cake Cleanly
The first slice is always the dramatic moment.
Use a long, sharp knife.
Dip the blade in hot water, wipe it completely dry, then make one firm downward cut. Clean the blade before the next cut.
This creates much cleaner layers of cake and buttercream.
Remove large decorations from the exact cutting path first. Trying to force a knife through a hard chocolate square can crush the softer cake beneath it.
For smaller portions, cut thin slices. This cake is rich, and a little goes a long way.
Storage and Make-Ahead Instructions
The chocolate layers can be baked ahead.
Once completely cool, wrap each layer tightly. Keep them at room temperature for a short period if assembling the next day, or freeze them for longer storage.
The buttercream can also be prepared ahead and refrigerated. Bring it back toward cool room temperature and beat it again before frosting.
For the best final appearance, add crisp wafers and cookies closer to serving time. Moisture from frosting, ganache, and refrigeration can gradually soften crisp decorations.
Once assembled, store the cake covered in the refrigerator if your room is warm or if it will sit for an extended period.
Before serving, allow a refrigerated cake roughly 30 to 60 minutes to lose some of its chill. Butter-based frosting becomes firmer when cold and tastes creamier as it softens.
Common Mistakes to Avoid
Adding flour because the batter seems thin: The coffee makes this batter loose. That is expected.
Using warm cake layers: Warm cake can melt the frosting and make the stack unstable.
Skipping the crumb coat: Dark chocolate crumbs are very visible in buttercream.
Pouring hot ganache directly onto buttercream: Give the ganache time to cool and test one drip first.
Making every ganache drip identical: Different drip lengths create the relaxed finish seen in the reference cake.
Adding every topping you have: More is not always better. Leave small spaces so people can still see the ganache.
Decorating too early with wafers: Crisp toppings can absorb moisture over time.
Using only whole candy bars: Break some pieces. Different heights and shapes make the top much more attractive.
What Makes This Cake So Moist?
Three ingredients play major roles: buttermilk, vegetable oil, and hot coffee.
Oil remains fluid at room temperature, which gives this cake a soft texture. Buttermilk adds liquid and acidity. Coffee supplies additional moisture while supporting the chocolate flavor.
The combination produces a tender cake that can still carry thick frosting and a heavy topping.
If you want to learn more about keeping baked desserts soft rather than dry, RecipesMind’s guide on how to keep madeleines moist covers another useful example of moisture management in baking.
Frequently Asked Questions
Can I make this chocolate candy bar cake without coffee?
Yes. Replace the coffee with the same quantity of hot water. The cake will still work. Coffee mainly adds another layer to the chocolate flavor. King Arthur notes that water can give cocoa-based cake a purer chocolate profile, while coffee can bring more complex chocolate notes.
Can I make it with two cake pans?
Yes, but do not force all the batter into two shallow 8-inch pans unless they have enough capacity. Overfilled pans can overflow.
A safer choice is to bake in batches or use pans deep enough for the batter. The baking time will also change with thicker layers.
What cocoa powder should I use?
Natural unsweetened cocoa is the safest choice for this formula because the recipe contains baking soda and acidic buttermilk. Dutch-process cocoa has different acidity and can change flavor, color, and how a cake formula behaves.
Why did my chocolate ganache run down the whole cake?
It was probably too warm or too fluid when applied.
Wait until it thickens, then test one drip before decorating the entire cake. Ganache becomes thicker as it cools.
Why did my ganache turn grainy?
Ganache is an emulsion, and excessive heat or an unsuitable liquid-to-chocolate balance can cause it to split or become rough. Gentle heating and the right ratio matter.
Can I make the cake one day ahead?
Yes. In fact, making the layers ahead can make assembly easier. Cool them completely, wrap them well, and assemble the cake later.
Add wafers and other toppings that need to remain crisp nearer to serving.
How do I stop a three-layer cake from sliding?
Use cool cake layers and buttercream with enough body. Keep the filling even rather than excessively thick. Chill the crumb-coated cake before applying the final frosting.
Also make certain the ganache has cooled before it touches the buttercream.
What candy works best on top?
Use a mixture rather than one type.
Chocolate sandwich cookies, wafer sticks, chocolate-covered wafers, truffles, milk chocolate, dark chocolate, and small round chocolates create the varied appearance shown in the finished cake.
Can I freeze Loaded Chocolate Candy Bar Cake?
The undecorated chocolate layers freeze very well when tightly wrapped. Freezing the fully decorated cake is less desirable because cookies and wafers can lose their crisp texture after thawing.
How many people does this cake serve?
A tall 8-inch three-layer cake can generally provide about 12 to 16 dessert portions. Smaller party-style slices can stretch further because the cake is tall and very rich.
Print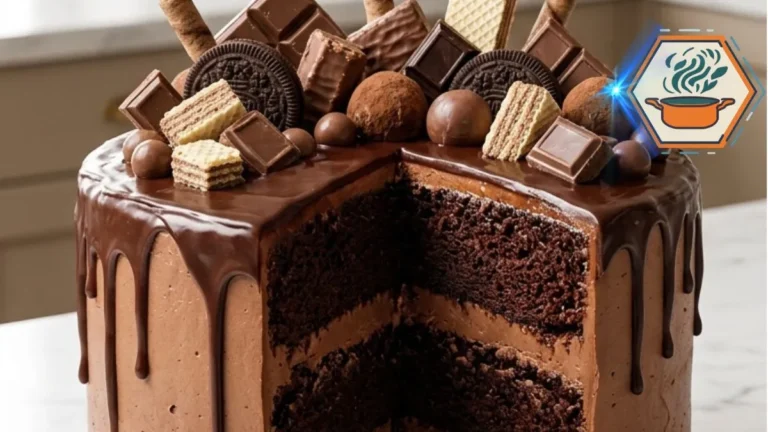
Loaded Chocolate Candy Bar Cake
A tall, moist three-layer chocolate cake filled with creamy chocolate buttercream, finished with glossy semisweet chocolate ganache, and piled with cookies, wafers, truffles, and broken chocolate pieces.
- Total Time: About 3 hours
- Yield: 1 three-layer 8-inch cake, 16 servings
Ingredients
For the Chocolate Cake
- 2 1/2 cups (300 g) all-purpose flour
- 1 cup (85 g) unsweetened natural cocoa powder
- 2 cups (400 g) granulated sugar
- 2 teaspoons baking soda
- 1 teaspoon baking powder
- 1/2 teaspoon fine salt
- 3 large eggs, room temperature
- 1 1/4 cups (300 ml) buttermilk, room temperature
- 3/4 cup (180 ml) neutral vegetable oil
- 2 teaspoons vanilla extract
- 1 cup (240 ml) hot brewed coffee
For the Chocolate Buttercream
- 1 1/2 cups (340 g) unsalted butter, softened
- 3/4 cup (64 g) unsweetened cocoa powder
- 5 cups (600 g) powdered sugar, sifted if lumpy
- 1/2 cup (120 ml) heavy cream, plus a little more if needed
- 2 teaspoons vanilla extract
- 1/4 teaspoon fine salt
For the Ganache
- 8 oz (227 g) semisweet chocolate, finely chopped
- 3/4 cup (180 ml) heavy cream
For the Loaded Chocolate Topping
- 6–8 chocolate sandwich cookies
- 4–6 chocolate-coated wafer pieces
- 3–4 plain wafer cookies
- 6–8 chocolate truffles
- 3–4 oz mixed milk and dark chocolate, broken into irregular pieces
- 1/2 cup small chocolate balls or round chocolate candies
The topping amounts are intentionally flexible. This is important because the decoration in the reference image looks abundant but not mathematically arranged.
Instructions
- Preheat the oven to 350°F (175°C). Grease three 8-inch round cake pans. Line the bottoms with parchment paper and lightly grease the parchment.
- In a large bowl, whisk the flour, cocoa powder, granulated sugar, baking soda, baking powder, and salt. Break apart any cocoa lumps.
- In a second bowl, whisk the eggs, buttermilk, vegetable oil, and vanilla.
- Add the wet mixture to the dry ingredients. Mix on low just until combined.
- Slowly pour in the hot coffee while mixing on low. The batter will be thin. This is normal. Do not add extra flour.
- Divide the batter evenly between the three prepared pans.
- Bake for 25–30 minutes. Begin checking at 25 minutes. The cakes are ready when the centers spring back lightly and a toothpick comes out clean or with a few moist crumbs.
- Cool in the pans for 10–15 minutes. Turn the cakes onto wire racks, remove the parchment, and cool completely.
- For easier assembly, wrap and chill the cooled layers for about 30–60 minutes. Trim any large domes with a serrated knife.
- Make the buttercream. Beat the softened butter for about 3 minutes. Add the cocoa powder, then gradually beat in the powdered sugar.
- Add the heavy cream, vanilla, and salt. Beat for another 3–4 minutes until light and creamy. Add a tablespoon of cream if the frosting is too stiff.
- Put the first cake layer on a cake board or serving plate. Spread about 3/4 to 1 cup of buttercream over it. Repeat with the second layer, then add the third.
- Cover the cake with a thin crumb coat. Refrigerate for 20–30 minutes.
- Apply the remaining buttercream. Smooth the sides while leaving subtle spatula marks for the slightly rustic appearance shown in the reference cake.
- Make the ganache. Put the finely chopped semisweet chocolate in a heatproof bowl. Heat the cream until steaming and beginning to simmer around the edges.
- Pour the cream over the chocolate. Leave untouched for 2–3 minutes, then stir gently until smooth and glossy.
- Let the ganache cool until it becomes thick enough to create a slow drip. Test one drip on the back of the cold cake before decorating the entire edge.
- Spoon ganache around the top edge, creating drips of different lengths. Spread the remaining ganache across the top.
- Arrange the largest broken chocolate pieces first. Add cookies and tall wafer pieces at different angles.
- Fill some of the gaps with truffles, chocolate balls, smaller wafer pieces, and chocolate chunks. Leave a few open areas where the ganache remains visible.
- Chill briefly to set the cake. For the creamiest texture, remove it from the refrigerator about 30–60 minutes before serving.
Notes
- Do not add extra flour when you see the thin cake batter.
- Use natural unsweetened cocoa powder for this specific formula.
- All cake layers must be completely cool before frosting.
- Chilled layers are easier to stack and create fewer crumbs.
- Do not put hot ganache directly onto buttercream.
- Always make one test drip before adding ganache around the whole cake.
- Add wafers and cookies relatively close to serving time if you want maximum crunch.
- For the reference-photo appearance, use broken chocolate in different sizes rather than perfectly arranged whole bars.
- Leave small gaps between toppings. The ganache should remain visible.
- Remove hard chocolate decorations from the cutting path before slicing.
- Because brands and decoration quantities vary, nutrition information is an estimate.
- Prep Time: 1 hour
- Additional Cooling/Chilling Time:: 1 hour 30 minutes
- Cook Time: 25–30 minutes
- Category: Dessert
- Method: Baking
- Cuisine: American-inspired
A Cake Made for the First Slice
There is a moment with this cake when all the work suddenly makes sense.
From the outside, guests see chocolate everywhere: glossy drips, cookies, wafers, truffles, broken bars, and little chocolate spheres. Then the first wedge comes away.
Three dark, moist layers appear.
Between them are thick bands of creamy chocolate frosting. Above them sits the ganache. Crunchy pieces contrast with the tender crumb. Every forkful can be slightly different from the one before it.
That is what a Loaded Chocolate Candy Bar Cake should be.
It should not look like a perfectly organized candy shelf. It should look generous, dramatic, homemade, and almost impossible for a chocolate lover to ignore.