
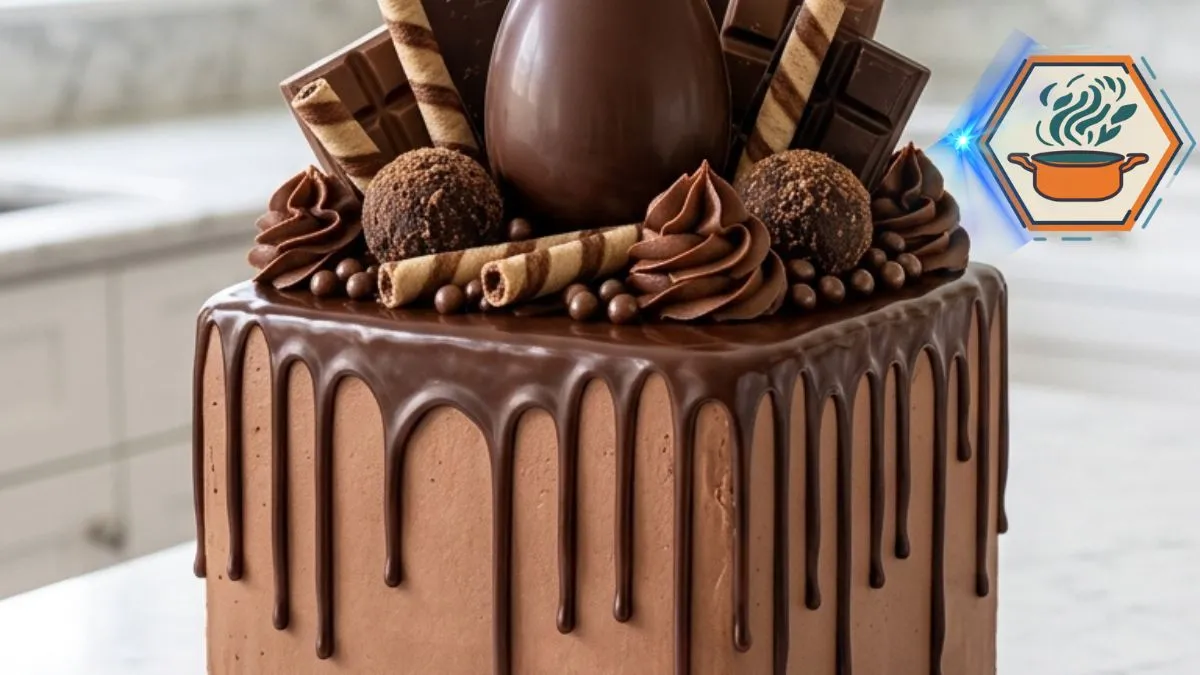
The first thing you notice about a Chocolate Wafer Truffle Drip Cake is not one single decoration. It is the abundance. Tall chocolate layers rise beneath smooth milk-chocolate frosting. Dark ganache falls down the sides in glossy, uneven drips. Wafer rolls stand above the cake, while truffles, chocolate bars, piped swirls, pearls, and sprinkles fill every open space.
Yet a cake like this should do more than look impressive. It needs to taste good once the first slice is cut. The chocolate sponge should stay soft. The frosting needs enough structure to support the decorations. The ganache must be fluid enough to drip, but not so warm that it runs to the bottom. Basic food-safety practices matter too. The U.S. Food and Drug Administration’s egg-safety guidance recommends proper refrigeration and thorough cooking when working with eggs.
That balance is the purpose of this recipe. Instead of simply piling chocolates onto a cake, we will build it in stages. The result is a tall, dramatic chocolate centerpiece with the same visual character: a square silhouette, milk-chocolate exterior, dark drip, central chocolate egg, upright chocolate pieces, striped wafer rolls, crunchy truffles, and rich chocolate swirls. If you enjoy learning the small details that change a homemade dessert, RecipesMind also has a useful guide to mastering caramelizing sugar, where temperature and timing are just as important.
Affiliate disclosure: As an Amazon Associate I earn from qualifying purchases. This article may contain affiliate links to kitchen tools I find useful for preparing this recipe.
JUMP TO
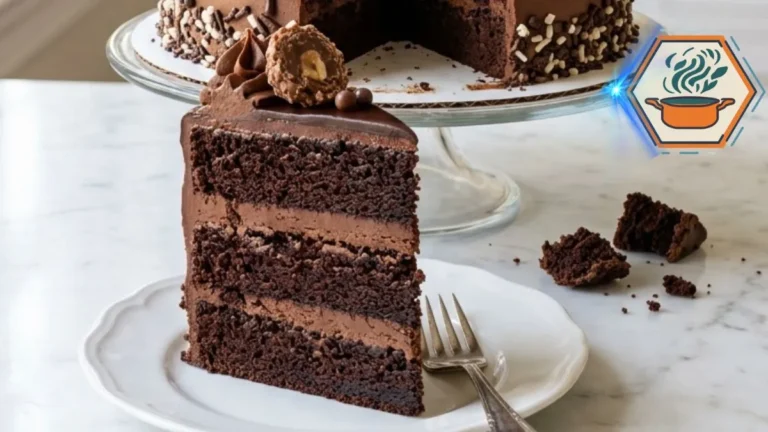
Chocolate Wafer Truffle Drip Cake
A tall square chocolate cake with soft chocolate layers, creamy chocolate buttercream, glossy dark chocolate ganache drips, crisp wafer rolls, crunchy truffles, chocolate bars, and a centerpiece chocolate egg. A dramatic celebration cake with rich chocolate flavor and contrasting creamy and crunchy textures.
- Total Time: 3 hours 30 minutes
- Yield: 12 servings
Ingredients
Chocolate Cake
- 2 ¼ cups (270 g) all-purpose flour
- 1 ¾ cups (350 g) granulated sugar
- ¾ cup (70 g) unsweetened cocoa powder
- 2 teaspoons baking powder
- 1 teaspoon baking soda
- ½ teaspoon fine salt
- 3 large eggs, room temperature
- 1 cup (240 ml) whole milk, room temperature
- ½ cup (120 ml) neutral vegetable oil
- 2 teaspoons vanilla extract
- ¾ cup (180 ml) hot water or hot coffee
Chocolate Buttercream
- 1 ½ cups (340 g) unsalted butter, softened
- ¾ cup (70 g) unsweetened cocoa powder
- 4 cups (480 g) powdered sugar, sifted
- ⅓ to ½ cup (80–120 ml) heavy cream
- 2 teaspoons vanilla extract
- ¼ teaspoon fine salt
Dark Chocolate Ganache
- 8 oz (225 g) dark or semisweet chocolate, finely chopped
- ½ cup (120 ml) heavy cream
- 1–2 tablespoons warm heavy cream, only if needed to adjust consistency
Decoration
- 8–10 striped vanilla-chocolate wafer rolls
- 6–8 crunchy chocolate truffles
- 6 oz (170 g) milk and dark chocolate bars, broken into large pieces
- 1 medium hollow milk-chocolate egg
- ½ cup mini chocolate pearls
- ½ cup chocolate sprinkles
- Reserved chocolate buttercream for piping
- Extra chocolate crumbs and wafer pieces, optional
Instructions
- Preheat the oven to 350°F (175°C). Lightly grease two 8-inch square cake pans and line the bottoms with parchment paper.
- Whisk the flour, granulated sugar, cocoa powder, baking powder, baking soda, and salt in a large bowl. Break up any cocoa lumps.
- Add the eggs, milk, vegetable oil, and vanilla. Mix on low speed until combined.
- Slowly pour in the hot water or coffee while mixing. The batter will be thin. This is normal.
- Divide the batter evenly between the two prepared pans. For equally sized layers, weigh the batter in each pan.
- Bake for 25–32 minutes, or until the centers spring back lightly and a tester comes out with a few moist crumbs but no wet batter.
- Cool in the pans for 10–15 minutes. Turn onto wire racks, remove the parchment, and cool completely. Chill the layers for 30–60 minutes before decorating for easier handling.
- For the buttercream, beat the softened butter for 3–4 minutes until creamy. Gradually beat in the cocoa powder and powdered sugar.
- Add the vanilla and salt. Add heavy cream a little at a time until the frosting is smooth, fluffy, and firm enough to hold its shape.
- Level the cooled cakes if necessary. Place the first layer on a cake board and spread an even layer of chocolate buttercream over it.
- Add the second layer. Apply a thin crumb coat to the entire cake. Refrigerate for 20–30 minutes.
- Apply the final chocolate buttercream coat. Smooth the four sides and top with an offset spatula and cake scraper. Chill again for at least 20 minutes before adding ganache.
- Put the chopped dark chocolate in a heatproof bowl. Heat ½ cup heavy cream until steaming but not vigorously boiling.
- Pour the cream over the chocolate. Leave untouched for 2–3 minutes, then stir gently until smooth and glossy.
- Allow the ganache to cool until thick but still pourable. Test one drip on the chilled cake. If it runs straight to the bottom, wait longer. If it barely moves, warm it very gently or mix in a teaspoon of warm cream.
- Spoon ganache around the upper edge, alternating short and longer drips. Spread a thin layer of ganache over the top.
- Allow the ganache to settle. Position the hollow chocolate egg near the center. Insert the tallest chocolate bar pieces behind and around it.
- Add striped wafer rolls at different heights and angles. Arrange the crunchy chocolate truffles around the center.
- Pipe generous chocolate buttercream swirls into the open spaces. Add chocolate pearls and shorter wafer pieces.
- Press chocolate sprinkles irregularly around the bottom edge. Finish with small chocolate pieces, pearls, wafer crumbs, and chocolate crumbs.
- Chill briefly to set the decorations. For cleaner slices, use a sharp knife warmed in hot water and wiped completely dry between cuts.
Notes
- Do not add extra flour because the batter looks thin. A fluid batter is expected.
- Measure flour carefully. Too much flour can make the cake dry.
- Coffee is optional. Hot water works well too.
- The cake layers must be completely cool before frosting.
- Chill the buttercream-coated cake before applying ganache.
- Always perform a test drip before decorating the whole cake.
- Different chocolates produce slightly different ganache consistencies.
- Add extra cream to ganache only in very small amounts.
- Place the tallest and heaviest decorations first.
- Add crisp wafer rolls relatively close to serving time if you want maximum crunch.
- Remove large decorations from the cutting area before slicing.
- Keep the finished cake refrigerated when storing it.
- Prep Time: 1 hour 30 minutes
- Additional/Chilling Time: 1 hour 30 minutes
- Cook Time: 30 minutes
- Category: Dessert
- Method: Baking
- Cuisine: American-inspired
What Makes This Chocolate Wafer Truffle Drip Cake Special?
This cake combines several textures in every serving.
The sponge is tender and deeply chocolatey. The buttercream is smooth and creamy. Dark chocolate ganache adds a richer finish. Crisp wafer rolls provide crunch, while chocolate truffles and broken chocolate pieces turn the top into a full celebration display.
The square shape also changes its appearance. Straight sides and sharp upper edges give the dark drips a striking background.
Most importantly, the decorations are not placed randomly.
The tallest pieces sit toward the center and back. Medium decorations fill the middle level. Frosting swirls, truffles, pearls, and smaller pieces fill the lower spaces.
This creates the overflowing look without making the cake appear messy.
Ingredients
For the Chocolate Cake
- 2 ¼ cups (270 g) all-purpose flour
- 1 ¾ cups (350 g) granulated sugar
- ¾ cup (65–75 g) unsweetened cocoa powder
- 2 teaspoons baking powder
- 1 teaspoon baking soda
- ½ teaspoon fine salt
- 3 large eggs, at room temperature
- 1 cup (240 ml) whole milk, at room temperature
- ½ cup (120 ml) neutral vegetable oil
- 2 teaspoons vanilla extract
- ¾ cup (180 ml) hot water or hot coffee
Hot coffee is optional. It can deepen the perceived chocolate flavor without making the finished cake taste strongly of coffee.
For the Chocolate Buttercream
- 1 ½ cups (340 g) unsalted butter, softened
- ¾ cup (65–75 g) unsweetened cocoa powder
- 4 cups (480 g) powdered sugar, sifted
- ⅓ to ½ cup (80–120 ml) heavy cream
- 2 teaspoons vanilla extract
- ¼ teaspoon fine salt
Do not pour all the cream into the frosting immediately. Start with about ⅓ cup. Add more only when needed.
The finished buttercream needs to be soft enough to spread but firm enough to hold the cake’s straight sides and piped swirls.
For the Dark Chocolate Drip
- 8 oz (225 g) good-quality dark or semisweet chocolate, finely chopped
- ½ cup (120 ml) heavy cream
Keep a tablespoon or two of additional warm cream nearby in case the ganache becomes too thick.
This slightly firmer starting ratio gives you more control over the drip than an overly loose ganache. Chocolate brands differ in cocoa solids and fat content, so the final consistency should always be judged by a test drip rather than the clock alone.
For the Decoration
To reproduce the abundant chocolate style, prepare:
- 8–10 striped vanilla-chocolate wafer rolls
- 6–8 crunchy chocolate truffles
- 6 oz (170 g) milk and dark chocolate bars
- 1 medium hollow chocolate egg
- ½ cup chocolate pearls or small chocolate balls
- ½ cup chocolate sprinkles
- Reserved chocolate buttercream for piping
- A few extra wafer pieces and chocolate crumbs
You do not need to use every piece. Having extra decorations makes it easier to build a balanced top.
Equipment You Will Need
For the most reliable result, prepare:
- Two 8-inch square cake pans for evenly sized layers
- Parchment paper
- Large mixing bowls
- Whisk
- Electric hand mixer or stand mixer
- A digital kitchen scale for accurate flour, cocoa, and batter measurements
- Cooling racks
- A small offset spatula for spreading and refining the chocolate buttercream
- Cake scraper
- Piping bag
- Large star piping tip
- Small spoon or squeeze bottle
- Cake board or flat serving plate
A digital scale is particularly useful for flour and cocoa. Too much flour is one of the easiest ways to turn a moist chocolate cake into a dry one.
How to Make the Chocolate Cake
1. Prepare the Pans
Heat the oven to 350°F (175°C).
Grease two 8-inch square pans lightly. Line the bottoms with parchment paper. Add parchment strips to the sides if your pans tend to stick.
Do not rely only on grease for a tall chocolate cake. Parchment makes releasing the delicate layers much safer.
2. Combine the Dry Ingredients
In a large bowl, whisk together:
- Flour
- Sugar
- Cocoa powder
- Baking powder
- Baking soda
- Salt
Break up every visible cocoa lump.
This small step matters because dry pockets of cocoa can remain in a thin chocolate batter.
3. Add the Wet Ingredients
Add the eggs, milk, vegetable oil, and vanilla.
Mix on low speed until the dry ingredients are moistened. Increase to medium-low briefly and mix until combined.
Avoid prolonged beating.
Now add the hot water or coffee gradually.
The batter will become noticeably thin. That is expected. Do not add extra flour.
The liquid helps create a soft crumb rather than a dense brownie-like cake.
Because raw batter contains uncooked flour and eggs, avoid tasting it before baking. FDA food-safety guidance specifically advises against eating raw cake batter containing raw eggs.
4. Divide and Bake
Divide the batter evenly between the prepared pans.
For the most even layers, weigh the filled pans rather than judging them by eye.
Bake for 25–32 minutes.
Start checking around 25 minutes. Oven temperatures and pan materials differ.
The cakes are ready when:
- The centers spring back lightly when touched.
- A skewer inserted near the center comes out with a few moist crumbs rather than wet batter.
- The center no longer looks liquid.
Do not keep baking until the skewer is completely dry. That can mean the cake has already lost too much moisture.
5. Cool Completely
Leave the cakes in their pans for about 10–15 minutes.
Carefully turn them onto cooling racks and remove the parchment.
Allow them to cool completely.
For easier frosting, wrap the cooled layers and refrigerate them for 30–60 minutes. Cold cake is firmer and creates fewer crumbs.
Never put buttercream onto a warm layer. The butter can soften and cause the entire cake to shift.
Make the Chocolate Buttercream
Beat the softened butter for 3–4 minutes until creamy and slightly lighter.
Add the cocoa powder gradually.
Add the powdered sugar one cup at a time, mixing on low speed first so it does not fly out of the bowl.
Pour in the vanilla and salt.
Add the heavy cream a tablespoon or two at a time until the frosting becomes smooth.
Then beat for another 2–3 minutes.
You are looking for a buttercream that forms a soft peak but does not collapse.
If it is too stiff, add a small amount of cream.
If it becomes too soft, add a little sifted powdered sugar or chill it for 10–15 minutes.
Assemble a Tall, Straight Cake
If the cakes have domed tops, level them with a long serrated knife.
Place the first layer on the serving board.
Spread an even layer of chocolate buttercream over it. Keep the filling level, particularly near the corners.
Place the second cake layer on top.
Check the cake from every side. Correct any leaning now.
Apply a thin crumb coat over the top and sides. This first layer traps loose crumbs.
Chill for about 20–30 minutes.
Then add the final buttercream coat.
Use an offset spatula and scraper to create smooth vertical sides. Work carefully around the corners.
The frosting does not need to look machine-perfect. The final chocolate decorations add movement and hide tiny imperfections.
The Secret to Controlled Chocolate Drips
The drip is one of the most important parts of this cake.
Place the finely chopped dark chocolate in a heatproof bowl.
Heat the heavy cream until steaming and just approaching a simmer. Do not let it boil aggressively.
Pour the hot cream over the chocolate.
Leave it untouched for 2–3 minutes.
Then stir slowly from the center outward until the mixture becomes dark, smooth, and glossy.
Now comes the step that should never be skipped:
Let the ganache cool before putting it on the cake.
Warm ganache can melt buttercream. Thin ganache can race down the sides.
The frosted cake should also be chilled before you start.
Test a small amount of ganache against an edge of the cake or on a cold test surface. If it runs immediately to the bottom, wait several more minutes.
If it barely moves, gently warm the ganache or stir in a tiny amount of warm cream.
The goal is a slow drip.
Create some short drips and some longer ones. Uniform drips can look artificial.
Once the perimeter is finished, spread a thin layer of ganache across the top.
How to Decorate the Cake Like the Reference Style
Give the ganache a few minutes to settle before adding the heavier decorations.
Start with the tallest pieces.
Place the large chocolate egg near the center. It becomes the main focal point.
Next, insert several chocolate bar pieces vertically behind and beside the egg. Vary their heights.
Add the striped wafer rolls. Keep some nearly vertical and others slightly angled.
Do not make everything symmetrical.
Place the crunchy truffles around the center at a lower height.
Now pipe generous chocolate buttercream swirls into the remaining spaces.
Use a large star tip and pipe upward so each swirl has visible ridges and a defined peak.
Add shorter wafer pieces horizontally near the front. Scatter chocolate pearls around the swirls.
Press chocolate sprinkles around the bottom edge of the cake. Keep the coverage irregular rather than creating a perfectly straight border.
Finish with a few crumbs, tiny chocolate pieces, and pearls around the base.
The finished cake should look full from every direction.
How to Keep the Decorations From Falling
Large chocolate bars and a hollow chocolate egg can become surprisingly heavy.
Insert them only into a well-chilled cake.
For chocolate slabs, push a clean lower edge gently into the buttercream. Do not balance them loosely on top.
Avoid making every decoration excessively tall. The goal is visual height without creating an unstable structure.
If the cake needs to travel, add the tallest chocolate pieces after transportation whenever possible.
Common Mistakes to Avoid
Ganache Runs to the Bottom
It is probably too warm or too thin.
Let it cool and test again.
Ganache Will Not Drip
It has become too cool or thick.
Warm it very gently or stir in a teaspoon of warm cream.
Cake Layers Slide
Possible causes include:
- Warm cake layers
- Buttercream that is too soft
- Too much filling
- A cake that was not chilled before the ganache stage
Chill the assembled cake before continuing.
Cake Is Dry
Common causes are too much flour, excessive baking time, or inaccurate oven temperature.
Measure flour carefully and begin checking the cake before the maximum baking time.
Frosting Is Grainy
Sift the powdered sugar and cocoa. Also make sure the butter is properly softened before mixing.
Make-Ahead Instructions
You do not need to complete this cake in one afternoon.
The chocolate layers can be baked a day ahead. Cool them fully, wrap them tightly, and refrigerate.
Buttercream can also be prepared in advance and refrigerated in a covered container. Allow it to soften, then beat it briefly before using.
For the crispest presentation, add wafer rolls close to serving time. Long exposure to refrigerator humidity can gradually soften crisp wafer decorations.
Storage and Serving
Because the finished cake contains buttercream and ganache made with dairy, keep it refrigerated for longer storage.
For the best texture, remove individual slices from the refrigerator before serving and allow them a little time to lose their refrigerator chill.
For food safety, the FDA recommends keeping refrigerators at 40°F (4°C) or below and refrigerating perishable foods promptly.
Do not leave the decorated cake sitting for many hours in a hot room.
How to Get Clean Slices
A heavily decorated cake needs a little planning before cutting.
Remove tall wafer rolls and loose chocolate pieces from the section you want to slice.
Use a long, sharp knife.
Dip the blade in hot water, then wipe it completely dry.
Cut through the cake with a firm downward motion.
Clean and warm the blade again between slices.
This gives you clearer layers and prevents thick buttercream and ganache from dragging through the crumb.
More Chocolate Flavor Without Making the Cake Heavy
Chocolate desserts can become sweet very quickly when cake, frosting, truffles, wafers, and chocolate bars are combined.
Using dark or semisweet chocolate for the ganache helps create contrast.
Salt is important too. The small amount in the cake and buttercream does not make the dessert salty. It keeps the flavor from tasting flat.
Vanilla plays a similar supporting role.
For another dessert where texture and caramelized sugar are central to the finished result, read our guide on what crème brûlée is made of.
Frequently Asked Questions
Can I Make a Chocolate Wafer Truffle Drip Cake the Day Before?
Yes. Assemble and frost the cake one day ahead and keep it refrigerated. For the best crunch, consider adding the wafer rolls and some crisp decorations closer to serving.
Why Does My Chocolate Ganache Run Down the Whole Cake?
The ganache is usually too warm or too fluid. Let it cool until it thickens slightly, then test one drip before covering the entire cake.
Should a Cake Be Cold Before Adding Ganache Drips?
Yes. A chilled buttercream surface makes the drip much easier to control. Warm buttercream can soften when the ganache touches it.
Can I Use Chocolate Chips for the Ganache?
You can, but chopped chocolate bars often melt more predictably. Chocolate chips are formulated to retain their shape during baking, and different brands can produce different ganache textures.
Can I Use Three Cake Layers Instead of Two?
Yes. Three thinner square layers can create an even taller presentation. Increase the frosting as needed and make sure the assembled cake remains stable.
What Kind of Truffles Work Best?
Round crunchy chocolate truffles work particularly well because they add both texture and height. Avoid truffles with very soft centers if the cake will remain at room temperature for an extended period.
How Do I Keep Wafer Rolls Crispy?
Add them late in the decorating process and keep them away from wet ganache where possible. Humidity and prolonged refrigeration can soften wafers.
Can I Make This Cake Without Coffee?
Absolutely. Use hot water instead. Coffee is only an optional way to deepen the chocolate notes.
Why Is My Chocolate Cake Batter So Thin?
That is normal for this recipe. Hot water, milk, oil, and eggs produce a relatively fluid batter. Do not compensate by adding extra flour.
How Do I Make the Cake Look Full Without Making It Messy?
Work from largest to smallest. Place the chocolate egg and tall bars first. Add wafer rolls next, followed by truffles and buttercream swirls. Finish with pearls, sprinkles, and crumbs.
Final Baking Notes
A Chocolate Wafer Truffle Drip Cake looks complicated because many elements appear in the final presentation. In practice, it becomes manageable when you treat it as a series of small jobs.
Bake and cool the chocolate layers first.
Make a buttercream strong enough to support the cake.
Chill the frosted surface.
Prepare the dark chocolate ganache and test its consistency before making a single visible drip.
Then decorate from the tallest pieces down to the smallest details.
That order is what creates the dramatic appearance while keeping the cake stable.
When the knife finally passes through the glossy ganache, soft chocolate sponge, and creamy frosting, the decoration has done its job. The cake looked like a celebration before it was cut. More importantly, it still delivers the rich chocolate flavor and contrasting textures promised by its appearance.