
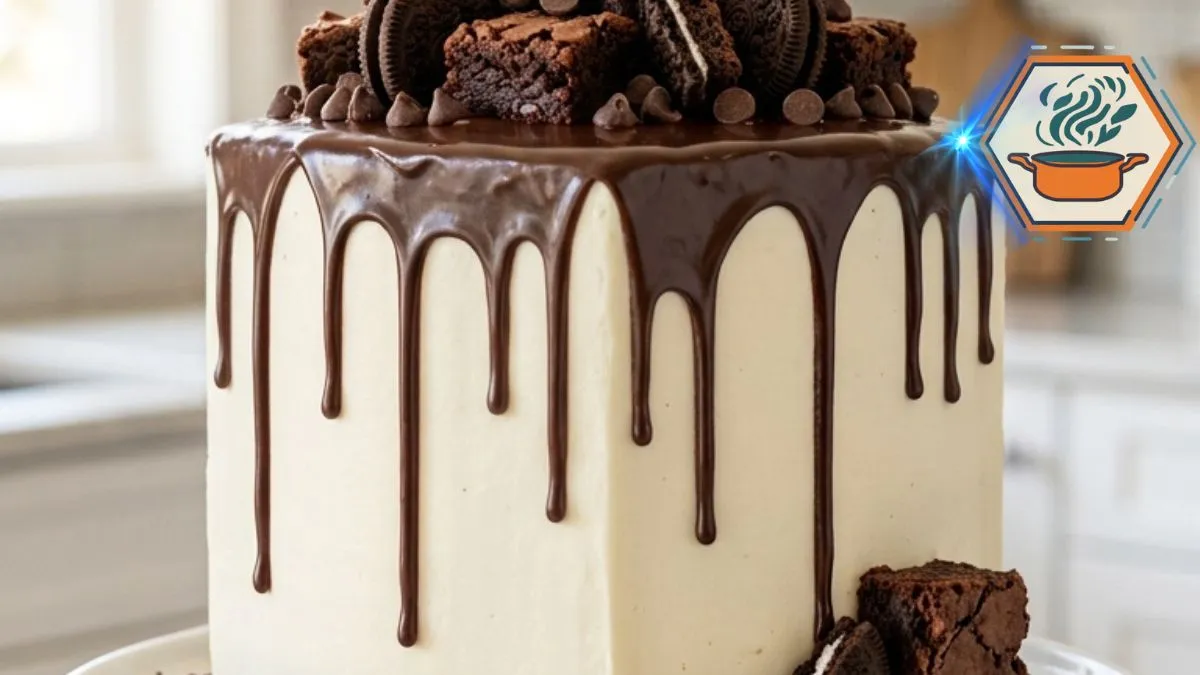
There is a moment when a homemade cake stops looking like an ordinary dessert and starts looking like the centerpiece of the table. This Chocolate Brownie Cookie Drip Cake is made for that moment. It combines a soft chocolate cake, smooth vanilla cream cheese frosting, glossy chocolate ganache, fudgy brownie chunks, chocolate sandwich cookies, and scattered chocolate chips.
The finished cake is tall, square, and covered in a clean ivory-white frosting. Dark chocolate ganache runs from the top edge in uneven drips. Brownies and cookies form a generous pile on top rather than a perfectly arranged pattern. That contrast is what gives the cake its dramatic bakery-style appearance.
The technique matters just as much as the ingredients. A drip cake works best when the cake is cold before the ganache is applied. The ganache also needs time to cool and thicken. Testing one drip before covering the entire cake can save the finish. These small details turn a good chocolate cake into one that is much easier to reproduce at home.
Affiliate disclosure: As an Amazon Associate I earn from qualifying purchases. This article may contain affiliate links to kitchen tools I find useful for preparing this recipe.
JUMP TO
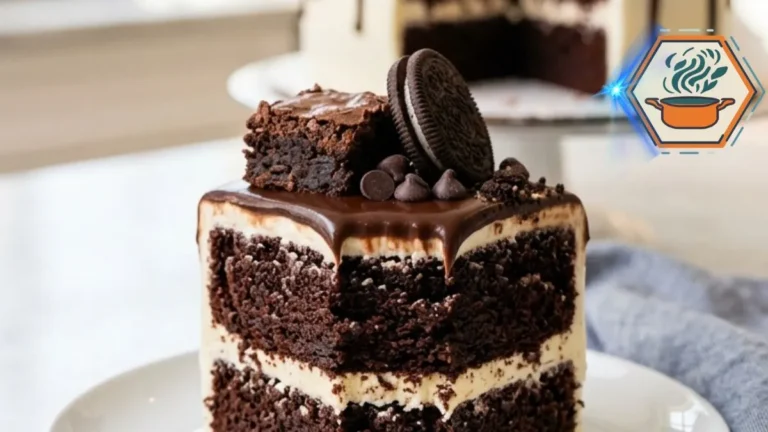
Chocolate Brownie Cookie Drip Cake
A tall chocolate celebration cake with moist chocolate layers, vanilla cream cheese frosting, glossy chocolate ganache drips, fudgy brownie chunks, chocolate sandwich cookies, and chocolate chips.
- Total Time: Approximately 2 hours 45 minutes
- Yield: 1 eight-inch square layer cake, about 16 servings
Ingredients
Chocolate Cake
- 2 cups (240 g) all-purpose flour
- 1 3/4 cups (350 g) granulated sugar
- 3/4 cup (64 g) unsweetened cocoa powder
- 2 teaspoons baking powder
- 1 teaspoon baking soda
- 1/2 teaspoon fine salt
- 3 large eggs, room temperature
- 1 cup (240 ml) whole milk, room temperature
- 1/2 cup (120 ml) vegetable oil
- 2 teaspoons vanilla extract
- 3/4 cup (180 ml) hot water
Vanilla Cream Cheese Frosting
- 1 1/2 cups (340 g) unsalted butter, softened
- 8 oz (226 g) full-fat block cream cheese, softened but still slightly cool
- 4 cups (480 g) powdered sugar
- 2 teaspoons vanilla extract
- 1/4 teaspoon fine salt
- 2–3 tablespoons heavy cream, only as needed
Chocolate Ganache
- 6 oz (170 g) semi-sweet chocolate, finely chopped
- 1/2 cup (120 ml) heavy cream
Decoration
- 6–8 chocolate sandwich cookies
- 8–10 small brownie pieces
- 1/2 cup semi-sweet chocolate chips
- 1/2 cup crushed chocolate sandwich cookies
- Extra brownie pieces and broken cookies for the base, optional
Instructions
- Preheat the oven to 350°F (175°C). Grease two 8-inch square cake pans and line the bottoms with parchment paper.
- Whisk flour, sugar, cocoa powder, baking powder, baking soda, and salt in a large bowl. Break up any cocoa lumps.
- In a second bowl, whisk eggs, milk, vegetable oil, and vanilla. Add the wet ingredients to the dry mixture and mix just until combined.
- Slowly stir in the hot water. The batter will be thin. This is normal.
- Divide the batter evenly between the two prepared pans. Bake for 25–30 minutes, or until a toothpick inserted near the center comes out without wet batter. A few moist crumbs are fine.
- Cool in the pans for 10–15 minutes. Transfer to wire racks and cool completely. For easier assembly, chill the cooled layers for 30–60 minutes.
- Level any domed cake tops with a serrated knife so the layers stack evenly.
- For the frosting, beat softened butter for 2–3 minutes until creamy. Add cream cheese and mix briefly until smooth.
- Gradually mix in powdered sugar. Add vanilla and salt. Add heavy cream one teaspoon at a time only if needed. The frosting should remain firm enough to coat a tall cake.
- Place the first cake layer on a cake board or serving plate. Spread an even layer of frosting over it. Add the second layer.
- Cover the cake with a thin crumb coat. Refrigerate for 20–30 minutes.
- Apply the remaining vanilla frosting. Smooth the four sides with a cake scraper and refine the square corners. Chill for at least 30 minutes before adding ganache.
- Put the chopped semi-sweet chocolate in a heatproof bowl. Heat 1/2 cup heavy cream until steaming. Pour it over the chocolate and leave for 2 minutes.
- Stir slowly until glossy and smooth. Allow the ganache to cool until fluid but no longer hot.
- Make one test drip on the back of the chilled cake. If it runs to the bottom, wait longer. If it barely moves, gently warm the ganache.
- Create irregular drips around the top edge. Spread a thin layer of remaining ganache over the top.
- Arrange brownie chunks and whole and broken chocolate sandwich cookies at different heights across the top. Scatter chocolate chips through the gaps.
- Press crushed cookies around the bottom edge. Add one or two brownie pieces and a broken cookie near the base to reproduce the decorated reference style.
- Chill for about 30 minutes before slicing.
Notes
- Cool the cake layers completely before frosting.
- For straight layers, weigh the batter when dividing it between the pans.
- Do not add extra flour because the chocolate batter appears thin.
- Level domed layers before stacking.
- Use full-fat block cream cheese, not whipped cream cheese spread.
- Add heavy cream to the frosting only when necessary.
- A cold cake is important before applying the chocolate drip.
- Always make one test drip before decorating the entire perimeter.
- Brownies with a fudgy interior and crackly top give the closest visual result.
- Arrange the toppings at different heights instead of creating a symmetrical pattern.
- Refrigerate leftovers because the frosting contains cream cheese.
- For the closest match to the reference image, keep the cake square, the outer frosting ivory-white, the ganache dark and glossy, and the decorations concentrated on top with cookie crumbs and brownie pieces around the base.
- Prep Time: 45 minutes
- Additional/Chilling Time: 1 hour 30 minutes
- Cook Time: 25–30 minutes
- Category: Dessert
- Method: Baking
- Cuisine: American-inspired
Why This Chocolate Brownie Cookie Drip Cake Works
Imagine carrying this cake into a birthday party.
At first, people notice the height and the smooth white sides. Then they see the dark chocolate dripping down the edges. Finally, their eyes reach the top: thick brownie squares, whole and broken chocolate sandwich cookies, chocolate chips, and crumbs.
Then comes the first slice.
That is where the cake needs to deliver more than good looks.
The chocolate layers should be tender and moist but strong enough to support the frosting and decorations. The frosting needs enough structure to create straight sides. The ganache should be fluid enough to drip but thick enough to stop before reaching the cake board.
The toppings add several textures:
- Soft chocolate cake
- Creamy vanilla frosting
- Fudgy brownie bites
- Crisp sandwich cookies
- Smooth chocolate ganache
- Small bursts of chocolate from the chips
If you enjoy learning why small baking choices make a difference, our guide to the secret to crunchy cookies is another useful read.
Ingredients
For the Chocolate Cake Layers
- 2 cups all-purpose flour
- 1 3/4 cups granulated sugar
- 3/4 cup unsweetened cocoa powder
- 2 teaspoons baking powder
- 1 teaspoon baking soda
- 1/2 teaspoon fine salt
- 3 large eggs, at room temperature
- 1 cup whole milk, at room temperature
- 1/2 cup neutral vegetable oil
- 2 teaspoons vanilla extract
- 3/4 cup hot water
Use hot water, but it does not need to be aggressively boiling when it reaches the batter. The final batter will look thinner than a brownie batter. That is expected.
For the Vanilla Cream Cheese Frosting
- 1 1/2 cups unsalted butter, softened
- 8 ounces full-fat block cream cheese, softened but still slightly cool
- 4 cups powdered sugar, sifted if lumpy
- 2 teaspoons vanilla extract
- 1/4 teaspoon fine salt
- 2 to 3 tablespoons heavy cream, only as needed
The original ingredient list did not include salt in the frosting. Adding a small amount helps balance the powdered sugar and chocolate toppings.
Do not automatically add all the heavy cream. A tall square cake needs a fairly firm frosting. Start without it and add cream a teaspoon at a time only if the frosting is too stiff to spread.
For the Chocolate Ganache Drip
- 6 ounces semi-sweet chocolate, finely chopped
- 1/2 cup heavy cream
Finely chopping the chocolate helps it melt evenly when the hot cream is poured over it.
For Decorating
- 6 to 8 chocolate sandwich cookies
- 8 to 10 small brownie chunks
- 1/2 cup semi-sweet chocolate chips
- 1/2 cup crushed chocolate sandwich cookies
- Extra brownie pieces for the base, optional
For the closest appearance to the reference cake, use brownies with dark, fudgy centers and thin crackly tops. Cut them into rough squares and triangles rather than making every piece identical.
Equipment You Will Need
The correct tools make this cake much easier to finish.
You will need:
- Two 8-inch square cake pans
- Parchment paper
- Large mixing bowls
- Whisk
- Electric hand mixer or stand mixer
- Digital kitchen scale, if available
- Cooling rack
- Long serrated knife
- Offset spatula
- Straight cake scraper
- Cake board or flat serving plate
- Piping bag or squeeze bottle for the ganache
A turntable is useful for smoothing the frosting, although the cake can still be made without one. For the clean, straight white sides shown on this cake, a straight metal cake scraper ([see cake scrapers on Amazon — paid link]) is one of the most useful decorating tools.
How to Make the Chocolate Cake
Preheat the oven to 350°F (175°C).
Grease two 8-inch square cake pans. Line the bottoms with parchment paper. For easier removal, you can also leave parchment extending slightly over two opposite sides.
In a large bowl, whisk together the flour, granulated sugar, cocoa powder, baking powder, baking soda, and salt.
Break up any visible cocoa lumps.
In another bowl, whisk the eggs, milk, vegetable oil, and vanilla until blended.
Pour the wet mixture into the dry ingredients. Mix just until most dry patches disappear.
Gradually pour in the hot water while mixing on low speed or whisking gently.
The batter will become quite fluid. Do not add extra flour to thicken it.
Divide the batter evenly between the prepared pans. A digital scale is especially useful here because equal quantities produce layers that bake and stack more evenly.
Bake for approximately 25 to 30 minutes.
Start checking around 25 minutes. Insert a toothpick into the center. It should come out with a few moist crumbs rather than liquid batter.
Avoid baking until the toothpick is completely dry. Too much oven time can remove the moist texture we want.
Allow the cakes to rest in their pans for about 10 to 15 minutes. Carefully transfer them to cooling racks.
They must cool completely before frosting.
Warm cake and cream cheese frosting are a bad combination. The frosting can soften, slide, or pull crumbs away from the cake.
For easier decorating, wrap the fully cooled layers and refrigerate them for 30 to 60 minutes.
Level the Cake Before Stacking
This detail is easy to skip, but it matters when you want the clean square shape shown in the photo.
If either cake has developed a dome, use a long serrated knife to remove it.
Work slowly.
The layers should sit flat against each other. A tilted first layer becomes a much more noticeable lean once frosting, ganache, brownies, and cookies are added.
Save the trimmed chocolate cake. It makes an excellent snack or can be crumbled over ice cream.
Make the Vanilla Cream Cheese Frosting
Place the softened butter in a mixing bowl.
Beat for 2 to 3 minutes until creamy and lighter in texture.
Add the cream cheese and beat briefly until smooth. Avoid beating cream cheese frosting for an unnecessarily long time because it can become softer as you work with it.
Add the powdered sugar gradually on low speed.
Once incorporated, add the vanilla and salt.
Beat until smooth.
Check the texture before adding heavy cream.
For this Chocolate Brownie Cookie Drip Cake, the frosting should spread without tearing the cake but still hold its shape on a spatula.
If it is too stiff, add heavy cream one teaspoon at a time.
If it becomes too soft, chill it briefly before decorating.
How to Assemble the Cake
Place a small dab of frosting in the center of your cake board. Set the first chocolate layer on top.
Spread a generous, even layer of vanilla frosting over it.
Keep the filling level, especially near the corners.
Place the second cake layer on top. For a particularly flat upper surface, place the second layer with its flatter bottom side facing upward.
Check the cake from every side before continuing.
Apply a very thin layer of frosting over the top and sides. This is the crumb coat.
The crumb coat traps loose chocolate crumbs so they do not spoil the clean white outer frosting.
Refrigerate the cake for about 20 to 30 minutes, or until the coating feels firm.
Now apply the final frosting.
Add enough frosting to the sides that you can scrape it smooth without exposing the chocolate cake beneath it. Use a straight scraper to work each side.
Square cakes need a little extra attention at the corners. Smooth one side at a time and pull excess frosting outward at the corner rather than rounding it off.
Clean your scraper regularly.
Once the sides look smooth, refine the top edge with an offset spatula.
Chill the frosted cake for at least 30 minutes before adding ganache.
How to Make the Chocolate Ganache Drip
Place the finely chopped semi-sweet chocolate in a heatproof bowl.
Heat the heavy cream until it is steaming and hot but not furiously boiling.
Pour it over the chocolate.
Leave it untouched for about 2 minutes.
Then stir slowly from the center outward until the mixture becomes dark, glossy, and smooth.
Now comes one of the most important parts of the recipe.
Do not immediately pour hot ganache over the cake.
Let it cool until it is still fluid but no longer hot. The exact time depends on your kitchen, chocolate, bowl, and room temperature.
This is why a test drip is more reliable than depending only on a timer.
Place a small amount of ganache at the back edge of the chilled cake.
Watch it.
If it races to the bottom, the ganache is too warm or thin. Wait a few more minutes.
If it barely moves, it has become too thick. Warm it very gently.
The ideal drip travels partway down the cold white frosting and stops naturally.
Create the Drip Pattern
Once your test looks right, add ganache around the top perimeter. You can use a small spoon, but a small squeeze bottle for chocolate drips ([see squeeze bottles on Amazon — paid link]) gives you more control over the amount of ganache released at each point.
Do not make every drip identical.
The cake in the reference style looks attractive because some drips are short while others extend much farther down the white frosting.
Add a little more ganache in selected areas to create longer drips.
Once the perimeter is finished, spread a thin layer of ganache across the top.
Work carefully around the corners. Square cakes naturally create focal points at each corner, so avoid pouring a large amount there at once.
Refrigerate for around 10 to 15 minutes so the chocolate begins to set.
How to Decorate It Like the Reference Cake
This stage creates the signature look.
Start with the largest brownie pieces.
Place several chunks upright near the center and toward the back of the cake. Their height creates the dramatic silhouette.
Next, insert whole chocolate sandwich cookies between the brownies.
Break a few cookies in half. Place some flat and some at an angle.
Add smaller brownie chunks toward the front.
Scatter semi-sweet chocolate chips through the gaps.
The goal is abundance without perfect symmetry.
You want the top to look generous and slightly spontaneous, not as though every cookie was measured with a ruler.
Press crushed chocolate sandwich cookies around the bottom edge of the cake. Keep the crumb border irregular.
Place one or two brownie chunks and a broken cookie near the base to echo the decoration on top.
That final detail helps reproduce the visual character of the reference cake.
If you like experimenting with cookie decorations, you may also enjoy our guide to jazzing up sugar cookies.
The Details That Make This Recipe More Reliable
A beautiful drip cake depends on several small decisions.
Keep these points in mind:
- Measure flour correctly. Too much flour can produce dry layers.
- Use room-temperature eggs and milk for easier mixing.
- Do not add extra flour because the batter looks thin.
- Divide the batter evenly between both pans.
- Do not frost warm cake.
- Level domed layers before stacking.
- Apply a crumb coat before the final white frosting.
- Chill the finished frosting before adding ganache.
- Test one chocolate drip before decorating the entire cake.
- Add heavy cream to the frosting only when needed.
- Keep the brownie and cookie decorations irregular.
- Use full-fat block cream cheese rather than a very soft spreadable product.
These steps take a little more time, but they also make the finished cake far more predictable.
Common Mistakes to Avoid
Ganache Running to the Bottom
The cake may be too warm, or the ganache may still be too hot.
Stop after the first test drip and let the ganache cool longer.
Ganache Refusing to Drip
The ganache has probably cooled too much.
Warm it very gently and test again.
Chocolate Crumbs in the White Frosting
This usually happens when the crumb coat was skipped or not chilled long enough.
A thin first coating creates a cleaner surface for the final frosting.
Cake Layers Sliding
The layers may still be warm, the frosting may be too soft, or too much filling may have been added between them.
Chilling the layers before assembly makes tall cakes easier to handle.
Rounded Square Corners
Use more frosting than you think you need around the corners. A scraper can then remove the excess while creating a sharper edge.
Dry Chocolate Cake
Measure flour carefully and start checking the cake before the maximum baking time. Chocolate cakes can move from moist to dry surprisingly quickly.
For more baking ideas and practical kitchen guides, visit RecipesMind.
Serving the Cake
After decorating, chill the cake for about 30 minutes so everything becomes stable.
However, a cream-cheese-frosted chocolate cake is usually more pleasant to eat when the cake and frosting are not refrigerator-hard.
Take it from the refrigerator shortly before serving, allowing enough time for the cake to lose some of its chill without leaving the cream cheese frosting out for an extended period.
Use a long, sharp knife to cut it.
Wipe the blade between cuts if you want clean slices.
This is a rich celebration cake. Smaller portions usually work well because each slice includes cake, frosting, ganache, brownie, and cookies.
Storage and Make-Ahead Tips
Because the frosting contains cream cheese, keep the finished cake refrigerated.
Store it covered to protect it from refrigerator odors and prevent exposed cake from drying out.
For the best decorating schedule, bake the chocolate layers first and decorate later.
A practical schedule is:
- Day 1: Bake and completely cool the cake layers.
- Day 2: Prepare the frosting, stack, crumb coat, frost, chill, add ganache, and decorate.
- Serving day: Add any final cookie pieces if you want them at their crispest.
If making the cake ahead, wait to add some of the exposed cookie pieces until closer to serving. Cookies can gradually soften when they sit against moist frosting.
Frequently Asked Questions
What is a Chocolate Brownie Cookie Drip Cake?
It is a chocolate celebration cake decorated with vanilla frosting, chocolate ganache drips, brownie pieces, chocolate sandwich cookies, and chocolate chips. This version uses chocolate cake layers rather than literal brownie slabs so the finished cake remains easier to stack and slice.
How do you stop chocolate ganache from running down the whole cake?
Chill the frosted cake first and allow the ganache to cool before applying it. Make one test drip at the back. If it runs too far, wait before continuing.
Can I make this drip cake the day before?
Yes. The assembled cake can be made ahead and refrigerated. For the best cookie texture, reserve a few decorative cookie pieces to add closer to serving.
Why does my cream cheese frosting become runny?
Very warm ingredients, excess liquid, or prolonged mixing can make it too soft. Use block cream cheese and add heavy cream only when the frosting truly needs it.
Can I use round cake pans?
Yes, but the finished cake will not match the square appearance shown here. For the same visual style, use two 8-inch square pans.
Can I use milk chocolate for the drip?
You can, although changing the chocolate can also change the ganache texture and sweetness. Semi-sweet chocolate gives this cake a strong contrast against the pale frosting.
How do I get smooth white sides?
Start with chilled, level cake layers. Apply a crumb coat and chill it. Add a thicker final layer of frosting, then smooth each side with a clean cake scraper.
Why should I chill a cake before adding a chocolate drip?
Cold frosting helps the ganache begin setting as it travels down the side. That gives you greater control over the length of each drip.
Final Baking Notes
The most memorable part of this Chocolate Brownie Cookie Drip Cake is not one ingredient. It is the contrast between all of them.
Dark cake sits beneath pale vanilla frosting. Glossy chocolate falls over clean square edges. Crisp cookies meet soft brownie chunks. Tiny chocolate chips fill the spaces between the larger decorations.
Yet the dramatic appearance comes from simple techniques.
Cool the layers completely. Level them. Build the crumb coat. Chill the cake. Make a smooth ganache. Test the first drip. Then decorate with a loose hand.
When the cake finally reaches the table, do not worry if one brownie leans farther than another or one chocolate drip is longer than its neighbor.
Those small differences are part of the look.
And once the first square slice is removed, the decoration becomes only half the story. Inside is the part everyone has been waiting for: moist chocolate cake, creamy vanilla frosting, dark ganache, crunchy cookies, and fudgy brownie bites in the same forkful.